Mbed Blog
mbed Christmas Stockings!
 Simon Ford.
3
replies
Simon Ford.
3
replies
Since launch, the mbed manufacturing elves have been putting in their overtime and it looks to be paying off; Digikey, Future and Farnell have caught up on their backlog and are all now showing mbed in stock!
So if you are a discerning geek, or know someone who is, perhaps this year an mbed is the perfect late christmas gift. Get one on order today and start inventing your own gadgets. Maybe even next years hit xmas gadget?!
And while we're talking christmas, here are a couple of festive mbed projects to inspire you:
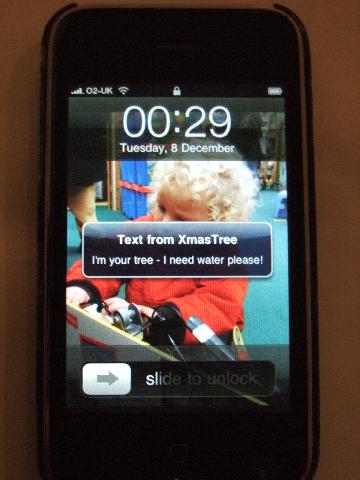
If you are working on a festive project, make sure you write it up and we'll share it with everyone.
Merry Christmas!
Come and work with us!
mbed may only be 2 months old, but things are going really well so we're planning for the future; that means we're looking for people to join the team!
We've setup a jobs page which lists more details on the roles we're looking for, but here is the summary:
- A ninja microcontroller coder to work with us on libraries, middleware, toolchains, etc; this is a Full Time role, starting as a Contractor with a view to employment
- Undergraduates or recent graduates to work on peripheral hardware, libraries and projects using mbed to pro-actively support our users; this would be as 3-12 month full-time internships
An important note: We're based in Cambridge, UK, so please only apply if you are from the area, or willing to commute or move here!
For the full details, and the links to apply, take a look at the mbed jobs page.
Please pass this on if you know someone you'd recommend who could be interested.
Thanks,
Simon
mbed Baseboards!
It has been really great to see the response that the mbed Microcontroller form-factor has been getting. We spent a lot of time researching, testing and trialing prototypes to end up with what we have now, and it is good to know the effort was worthwhile. On our wall are all the different mbed prototypes, and it is funny to look at e.g. the one that is 2-eurocards big, and see how our thinking changed over time as we tried things out in the field. I'll perhaps write them up at some point...
But we do still sometimes get asked why mbed doesn't have a screen? Or a certain connector? Or a flavour-of-the-month peripheral chip? There are obviously lots of factors why we haven't gone that route, and here is a good example of one of those reasons.
Baseboards!
Check out this mbed-compatible baseboards that Embedded Artists have just announced:
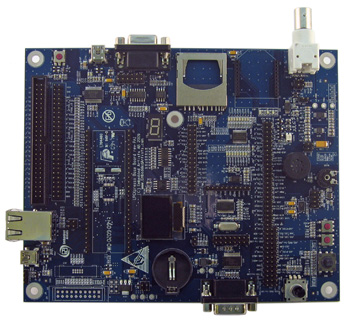
Looking at the specs, it's got OLED screen, SPI SD card socket and Flash, I2C port expander, accelerometer and light sensor, joystick, push button and rotary switches, XBee, Ethernet and CAN sockets. Sounds like a great mix of peripherals.
We've used Embedded Artists stuff before and always been very pleased with the quality, so whilst we haven't got hold of one yet so can't fully comment, if you want to try it out yourself it looks like you can pre-order the Embedded Artists baseboard and get it some time in January.
Great job EA!
6HYG6FBYQWXY
Site update 1.2 pt 2: Homepages, Profiles and Activity
This is part two of the series of posts about site update 1.2.
To continue our aim of improving the community features of mbed, we have added several new features and improved some existing ones.
User homepages
Previously every user had a very basic home area. Hopefully now your home page does a better job of bringing together everything a user is up to. The mechanisms for updating settings and your profile have been updated, too.
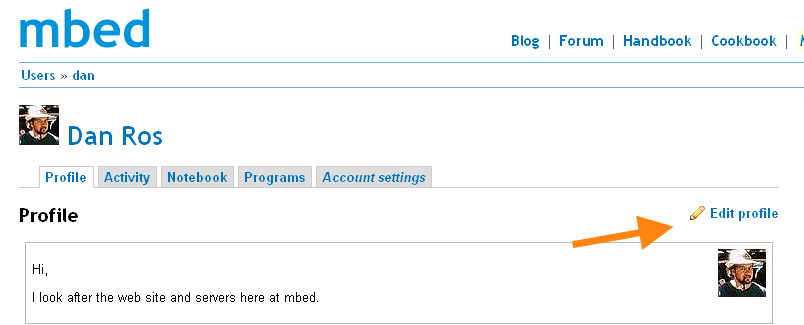
User profiles
You can now upload a profile picture and write a description about yourself where you can link to your blog, etc.. To edit your profile, just go to the My Home link in the main menu, and then click Edit profile at the top right.
User activity feed
There is now a feed of (almost) all activity on mbed. Each user gets their own feed, and there is also one for everyone put together. An RSS feed of each person's feed and the aggregated feed for everyone is in the works and should be a part of the upcoming 1.2.1 release.
Site update 1.2 part 1: Notebooks
Some of you may have noticed that a site update was pushed out to the mbed servers last night, which we're calling mbed 1.2.
Over the next couple of blog posts, I'm going to take a closer look at some the new features and perhaps some of our ideas for the future.
In this post, I'll tell you a bit about notebooks.
Notebooks
We've given you all a notebook. A notebook is simply a place to make notes. Each page of notes can be anything from a quick reminder of a pinout to a detailed how-to on a subject complete with illustrations.
Why notebooks?
We created notebooks to allow mbed developers to share information. You can search inside other people's notebooks and link to notebooks. You can tag and describe your notebook pages to aid in searching.
How do I use my notebook?
A Notebook is made up of pages. Adding a notebook page is easy.
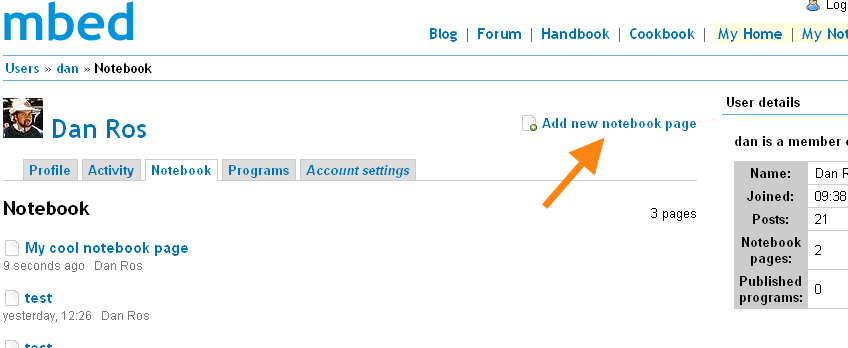
Go to your new My Home (more on that later) and then the Notebook. Clicking Add new notebook page will open a pane where you can make a start on your page.
How do I tell people about my notebook pages?
We have added a couple of new buttons to the standard editor window used in posts. On the far right hand side of the editor toolbar, you'll see buttons for inserting a link to your Published Programs and Notebook Pages. I'll explain some suggested work-flows for making the most of these buttons in a later post.

Can I get feedback on notebook pages?
Each notebook page has space for comments and discussion below it. If someone leaves a comment on one of your pages, you'll get an email letting you know.
Can notebook pages be private?
All notebook pages are public. However, you do have the option of setting a notebook page to be Unlisted. Unlisted pages don't show up in your user activity feed (more on that later!) and don't show up in search results. They also won't appear in the list of your notebook pages when someone visits your Home area.
Please note that even if your page is marked as unlisted, anyone can still view it if they know the URL.
What about the cookbook?
What about the cookbook, you may ask. The cookbook has served us well up till now, but a single "flat" wiki would become increasingly difficult to manage as our small mbed community grew. Plus, there are technical issues involved which make the cookbook non-optimal.
The cookbook isn't going away just yet! Notebooks are missing a key feature - that being the ability to create group pages to allow collaboration on building an information reference.
So, use notebooks if you can, and we'll be working on ways to integrate more of the cookbook features. When the cookbook replacement is ready, cookbook pages will be copied into any new group documentation feature. So you can continue using the Cookbook with confidence, and we'll be engaging the mbed community in designing the eventual replacement.
That's it for this quick introduction to Notebooks.
As ever, the Notebooks feature will evolve and improve over time in response to user feedback. We already have some early feedback which may be the subject of a small further update to come soon.
My next blog post will talk about User Activity and your Home area.
Dan
Chris is on TV!
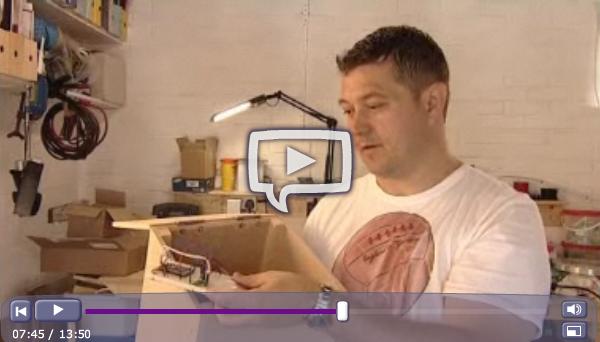
If anyone was watching sky channel 880 last night at around 10.15, you'd have seen Chris in his garage with a big wooden box and an mbed.
But why? Well, a team from "Teachers TV" asked to come to film him doing some of his activities as a "STEM Ambassador"; someone who goes out and helps with Science, Technology, Engineering, Maths in schools. The result is a 15 min video which shows some experiments going on during a visit to a local school.
It should be no surprise that it was based around using mbed, but it was a great reminder of what triggered mbed in the first place. It was many moons ago that we were trying to do the same thing in the schools with "traditional" kit, and getting very frustrated (as were the kids); it got in the way of their ideas. It was the classic scratch your own itch scenario, with us thinking "it could be so much better!".
Interestingly, the best decision I think we ever made in tackling this problem was not to go and build something specifically for taught education. We decided to try and make something that solved the problems we were seeing, but where it was a generic problem that was applicable to anyone trying to prototype something. The position we took was particularly inspired by the books "Deschooling Society" (Ivan Illich, 1971) which was a great reminder that people should always be learning (i.e. not just in taught environments), and "The Paradox of Choice" (Barry Schwartz, 2004), explaining how a lot of complexity can be attributed to choice paralysis/overload. My own interpretation of this is that it is common to pass on decisions to users in the form of "options", where infact you are actually passing on complexity and hard decisions. Finally, we wanted to ensure we could make it commercially viable so it could support continuous investment in itself.
As and example of how these school visits impacted our thinking, I can remember one day going in to a school and seeing their electronics lesson (I wish I had a photo!); they were soldering leaded components to copper tape stuck on to cardboard. I couldn't even do that; you need three hands! Worse still, as you apply the heat, the glue on the copper tape melts and peels of the card! I'm sure there were good reasons, but at some level you have to ask yourself why industry doesn't do it like that?!
It was things like this that focused us on wanting to make industry-style tools more accessible; using C/C++ rather than dreaming up some graphical flowchart programming to "make it easy", or using 0.1" pitch rather than a simple (but ultimately restrictive) "modular system".
The great thing about this video was it reminded us we'd been able to come full circle, and apply mbed back to what originally inspired us. What started as a little skunk-works project is now a real product, and we're hoping to continually improve on it to help more people experiment with microcontrollers. Whilst taught education is certainly not our primary focus, we hope mbed will find a home with some people who want to apply it to let students explore these sorts of things.
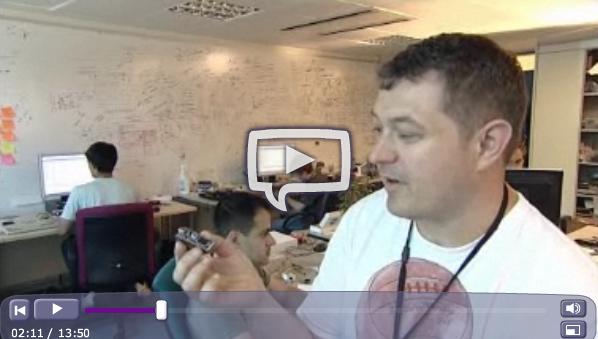
And don't worry if you missed it! It is now published on Teachers TV, so go check it out! You even get to see the mbed HQ white board in the background at one point :)
Tutorial: Getting mbed in and out of breadboard!
Someone recently commented that once an mbed was in breadboard, it was a little tricky to get out. I've also seen a few cases in workshops where examples wern't working for people, and it was simply due to the mbed not being pushed in to the breadboard properly (usually because it is stiff, and the user didn't want to damage anything - better to be careful!).
So here are a couple of videos with some simple recommendations. Firstly, getting your mbed in to the breadboard:
Secondly, getting it back out:
For removal, the emphasis is on working it out slowly with light pressure to avoid bending pins, and ensuring you only press the shaft of the screwdriver against the edge of the mbed and the tip against the breadboard by pulling up. If you push down, you'll scrape the underside of the mbed with the screwdriver tip which will not be good news!
So use these simple approaches, take your time, and treat the hardware with care, and you'll be fine!
Library Update: Real-Time Clock
We thought it was about time to get time() working...
The mbed Microcontroller has a Real-Time Clock (RTC) on it, which is a built in hardware clock that can keep track of the time and date. We've now done the plumbing to make use of it sane, and you can now just use standard C functions to read, set and format the time. Ideal for data logging and other time related functions!
The basic function to read the time is named time(). This returns the time in seconds since January 1st 1970, often known as the UNIX timestamp. This is a fairly universal way to define time, and can be transformed in to other string forms using C functions. The function time() actually takes a pointer as an argument, but in most case you'll just want to pass NULL. Here is a most basic example to get the current time:
#include "mbed.h"

int main() {
    while(1) {
        time_t seconds = time(NULL);
        printf("Seconds since January 1, 1970: %d\n", seconds);
        wait(1);
    }
}
Of course, that isn't much use until the time has been set somehow, as the RTC won't have been setup. Here is the minimal way to set the time, in this case providing the UNIX timestamp:
#include "mbed.h"

int main() {
    set_time(1256729737);  // Set RTC time to Wed, 28 Oct 2009 11:35:37
}
A natural thing to want to do is display the time and/or date in a human readable way, either on a screen, in a file, or over a terminal. For that, C provides a number of functions to help do this. This example shows these functions in use:
#include "mbed.h"

int main() {
    while(1) {
        time_t seconds = time(NULL);

        printf("Time as seconds since January 1, 1970 = %d\n", seconds);

        printf("Time as a basic string = %s", ctime(&seconds));

        char buffer[32];
        strftime(buffer, 32, "%I:%M %p\n", localtime(&seconds));
        printf("Time as a custom formatted string = %s", buffer);

        wait(1);
    }
}
The results of this are shown below:
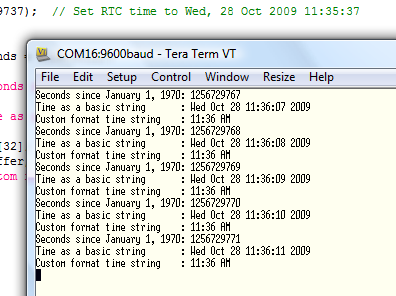
For all the string formatting options, see the list of format specifiers in the strftime function api documentation.
While we were testing, Rolf said he thought it'd be nice to be able to set the time from the terminal, so here is the final example for this post that does just that:
// Example to setup the Real-Time Clock from a terminal, sford

#include "mbed.h"

int main() {

    // get the current time from the terminal
    struct tm t;
    printf("Enter current date and time:\n");
    printf("YYYY MM DD HH MM SS[enter]\n");
    scanf("%d %d %d %d %d %d", &t.tm_year, &t.tm_mon, &t.tm_mday
                             , &t.tm_hour, &t.tm_min, &t.tm_sec);

    // adjust for tm structure required values
    t.tm_year = t.tm_year - 1900;
    t.tm_mon = t.tm_mon - 1;

    // set the time
    set_time(mktime(&t));

    // display the time
    while(1) {
        time_t seconds = time(NULL);
        printf("Time as a basic string = %s", ctime(&seconds));
        wait(1);
    }
}
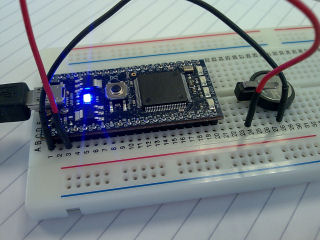
Hopefully this gives you a good insight in to how to use the RTC from software, but of course one of the nice features of the RTC is that it is designed to support a battery backup. This means just like your PC or various equipment around the house, the mbed can keep time even when the power is disconnected.
It obviously needs some source of power to keep the clock running, but it is very tiny and this is where the VB pin comes in. By connecting a 3V battery to this pin, the clock can be kept running for a long time with only a single coin cell (watch battery). Wire a 3v coin cell battery between VB and GND, and when you disconnect the main power (e.g. USB cable) the clock will continue to run:
For full details of the time related functions, see the time API page:
To update to this new library version, as ever just start a new project or select the existing mbed library in an existing one and hit "Update". Please feedback any problems/questions to the forum.
Have Fun!
mbed @ ARM Techcon
Just to let you know, we'll be at ARM Techcon in Santa Clara this week:
If you are in the area, please come along and find us if you get the chance; it'd be great to chat, especially if you already got hold of an mbed or know what your plans are when yours comes through!
NXP should be doing a demo session on Thursday too (~1pm), so if mbed is new to you it may be a great way of getting an intro.
See you there,
Simon
Firmware Update: Improved Serial and FileSystem Access
Phil has been working hard on some firmware updates that improve two particular areas we had requests: support for usb serial on x64 windows platforms and access to the USB filesystem from both the mbed and the PC interchangeably. There were a few other improvements we wrapped up too, so here are the details:
Whilst Linux and Mac support for the USB serial port has been pretty clean for a while, Windows has always been a little more tricky; it required the mbed to be configured with an .ini file, and didn't work on x64 or win 2k machines. We've now given this an overhaul, and the results are much better. Firstly, the new firmware means there is no longer any configuration needed, so the mbed works on Windows, Mac and Linux exactly the same!
As ever, Windows still needs a driver for serial, but now no changes are needed. Plug it in without any driver and you get just the disk drive, so you can work away fine. Run the serial installer and the serial port appears - magic :)
At the same time, we added support for more Windows platforms in to the installer. The list is now Windows 2K, Windows XP, Windows Vista and Windows 7, including x64 versions. Phew!
The firmware also updates the LocalFileSystem to allow both the PC and the mbed to access the USB Disk files (just not at the same time). Whereas previously, as soon as the mbed opened a file on the local disk, it would "grab" the disk from the PC and not give it back until the program exited, it now releases the disk whenever there are no open filehandles. This should make it much more flexible and usable.
Some final updates for completeness:
- Improved programming and semihosting performance
- Fixed a bootcode problem that was causing a virus false-positives on some systems
- Updated MBED.HTM to a link new format - you can now use it to launch the mbed website whenever you start
Updating your Firmware
To update your firmware, simply go to:
Updating the firmware simply involves saving the new firmware on to your mbed, and then power-cycling the board (disconnect and reconnect the USB cable).
For the new serial driver, run the installer found at:
Hope these updates are useful. Any problems, please tell us in the forums!
You need to log in to post a reply