Renesas
Renesas Electronics Corporation (TSE: 6723), the world's number one supplier of microcontrollers, is a premier supplier of advanced semiconductor solutions including microcontrollers, SoC solutions and a broad range of analog and power devices.
GR PEACH rev_B version information
Platform information (プラットフォーム情報)
- GR-PEACH
- 8MB FLASH
- 1xUSB Host/Device Interface, 1xEthernet
- 2xSPI, 3xI2C, 8xUART, 7x12-bits ADC
Pin arrangement (ピン配置)
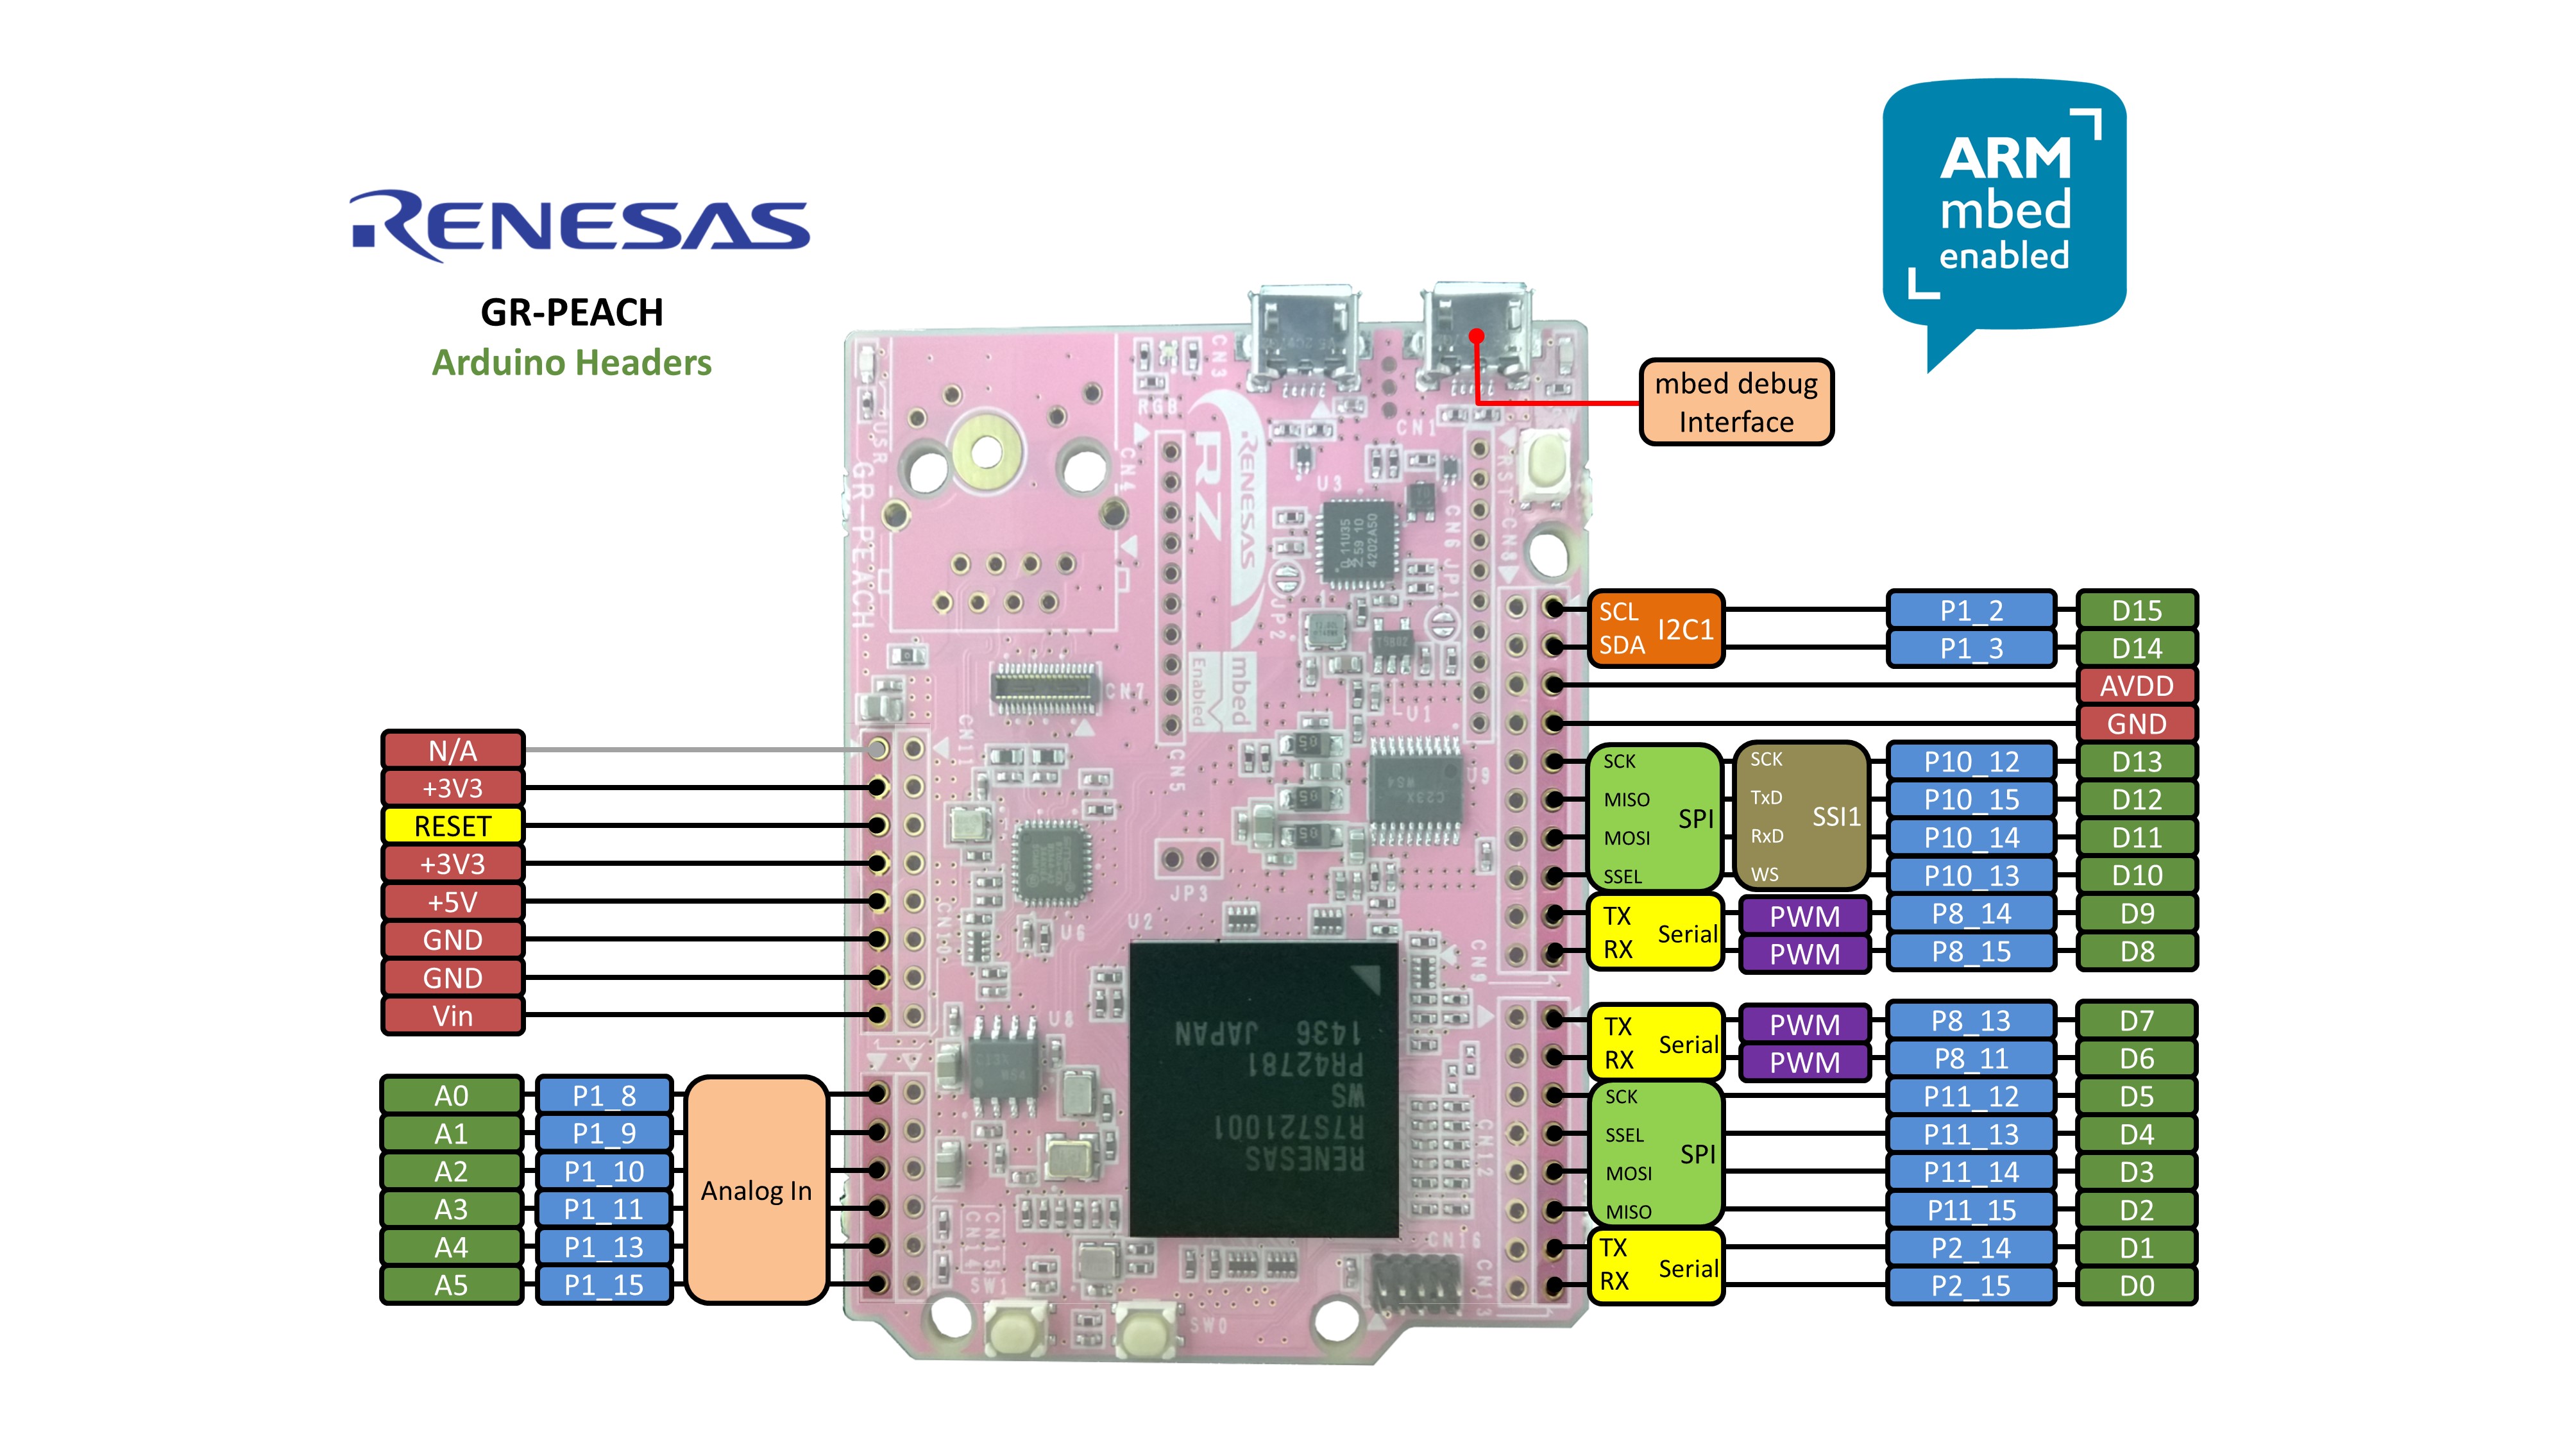
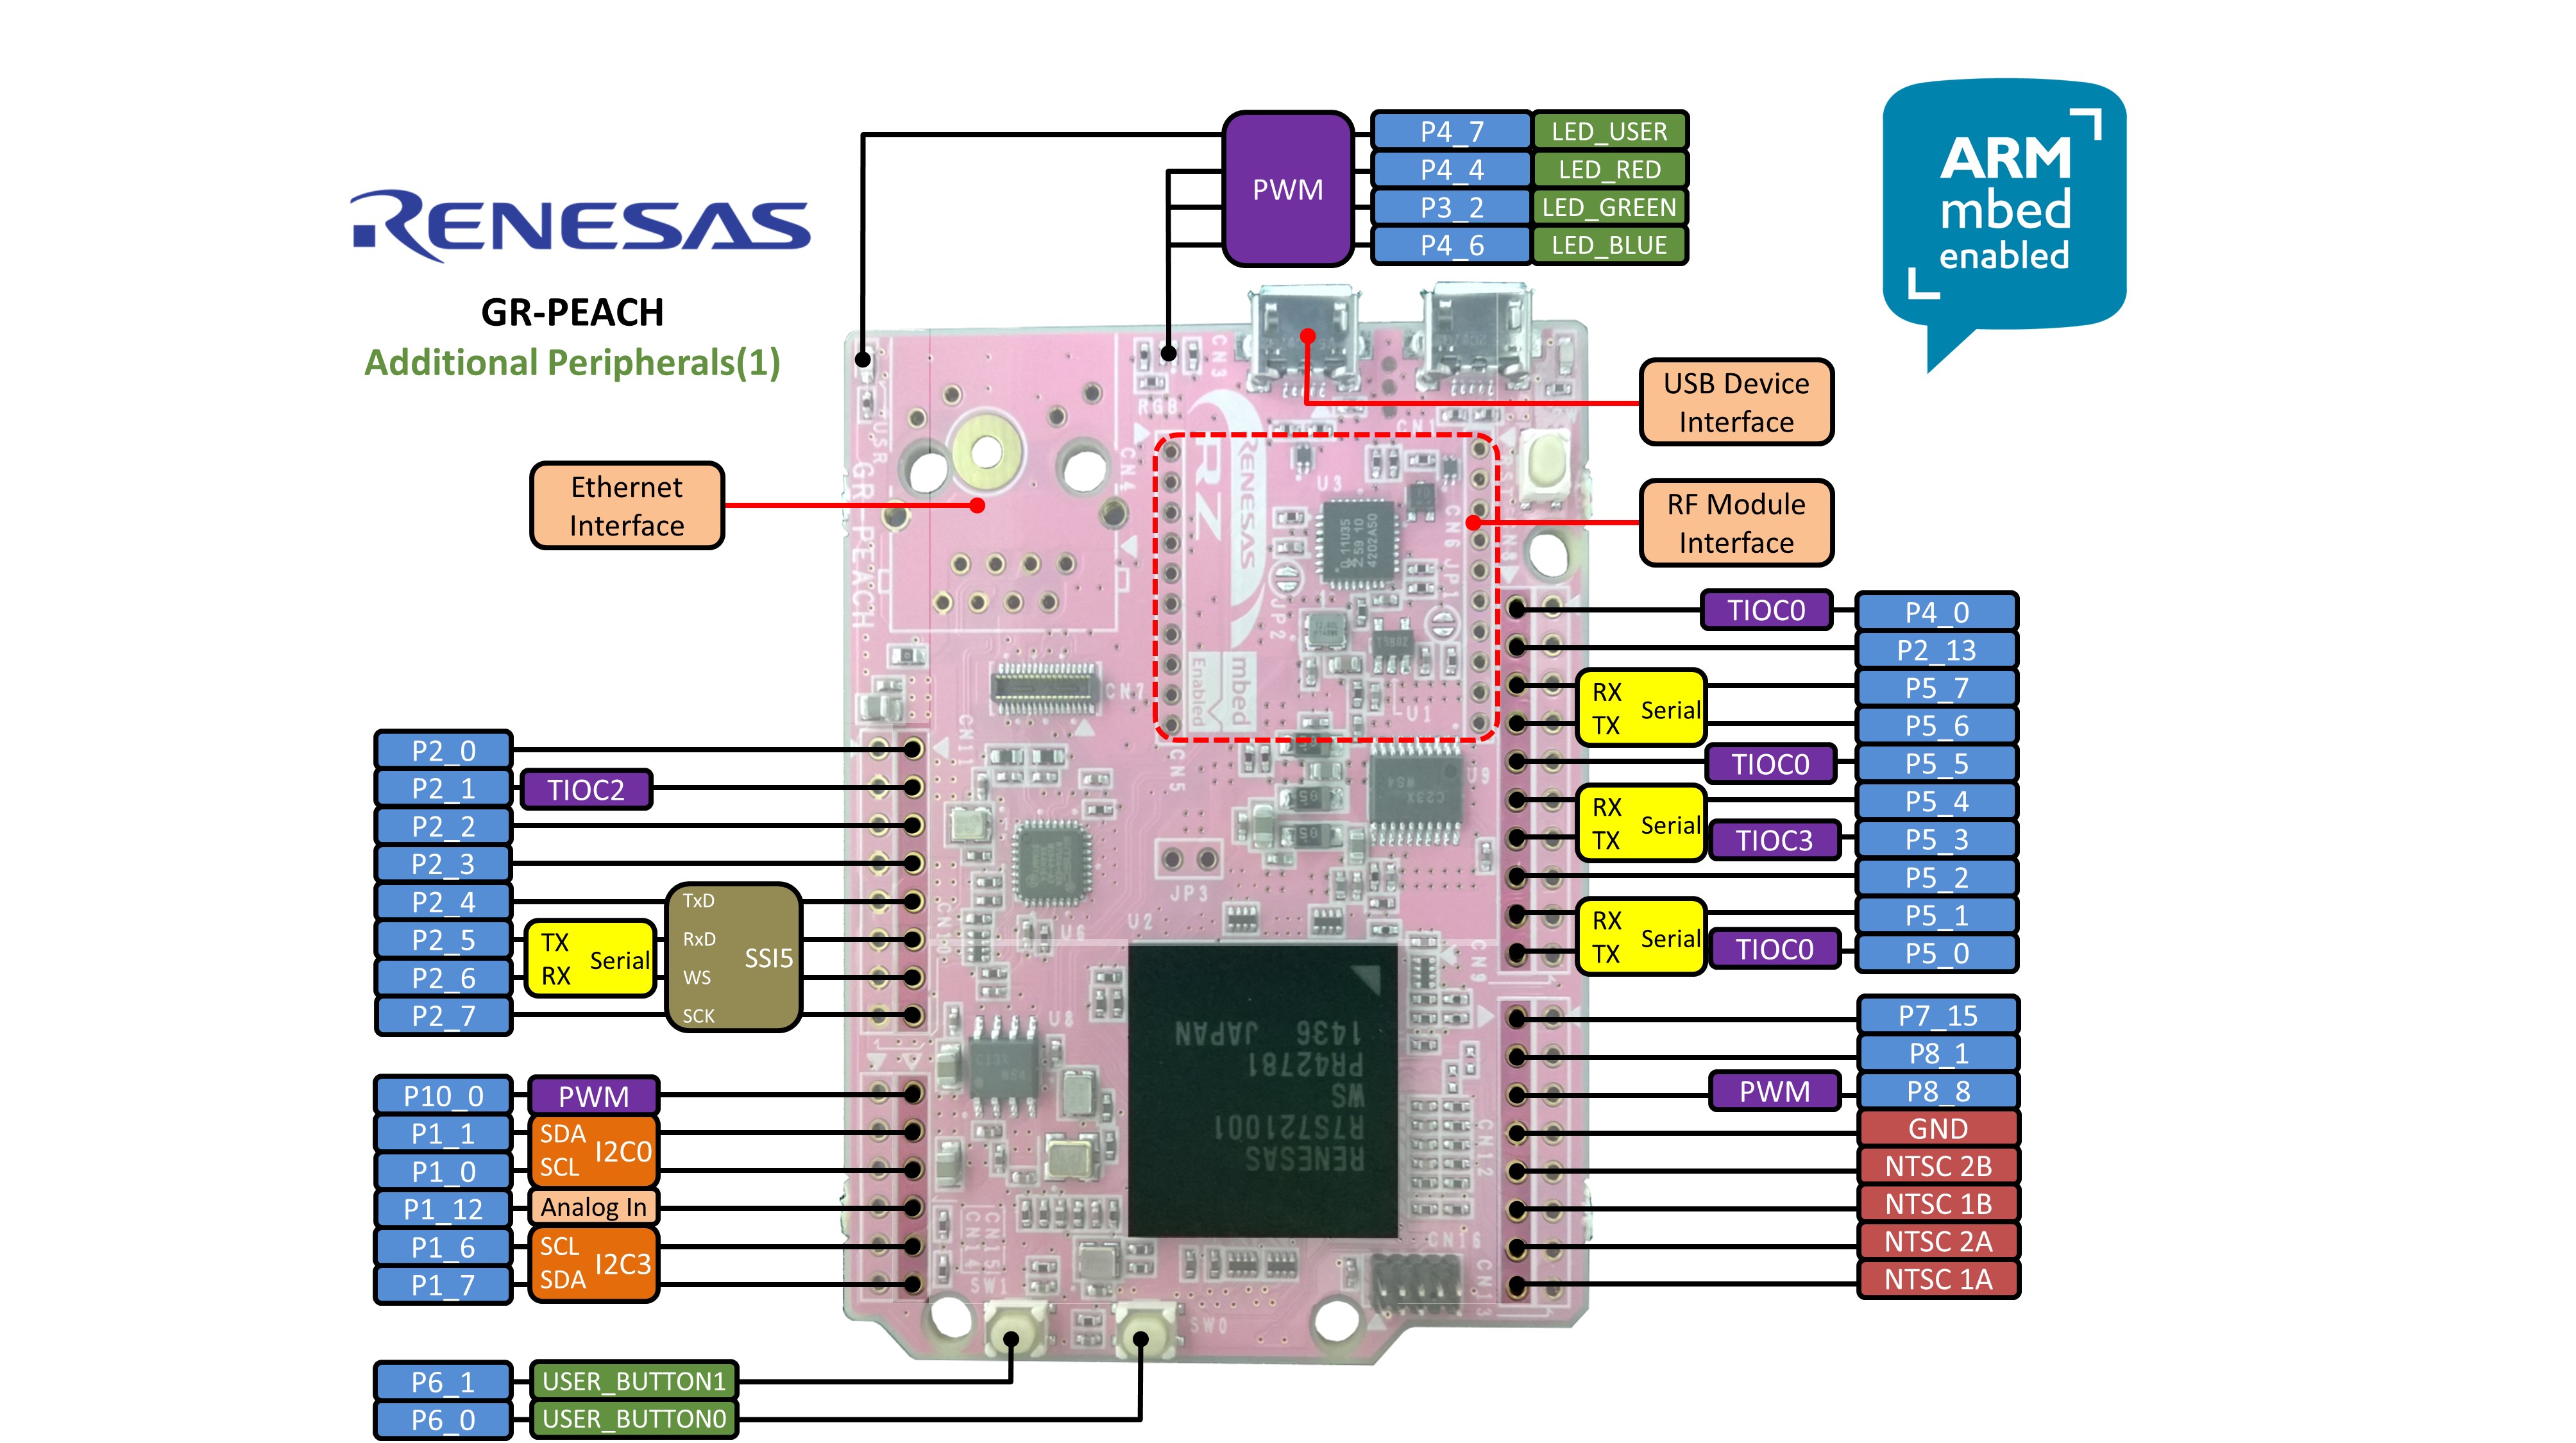
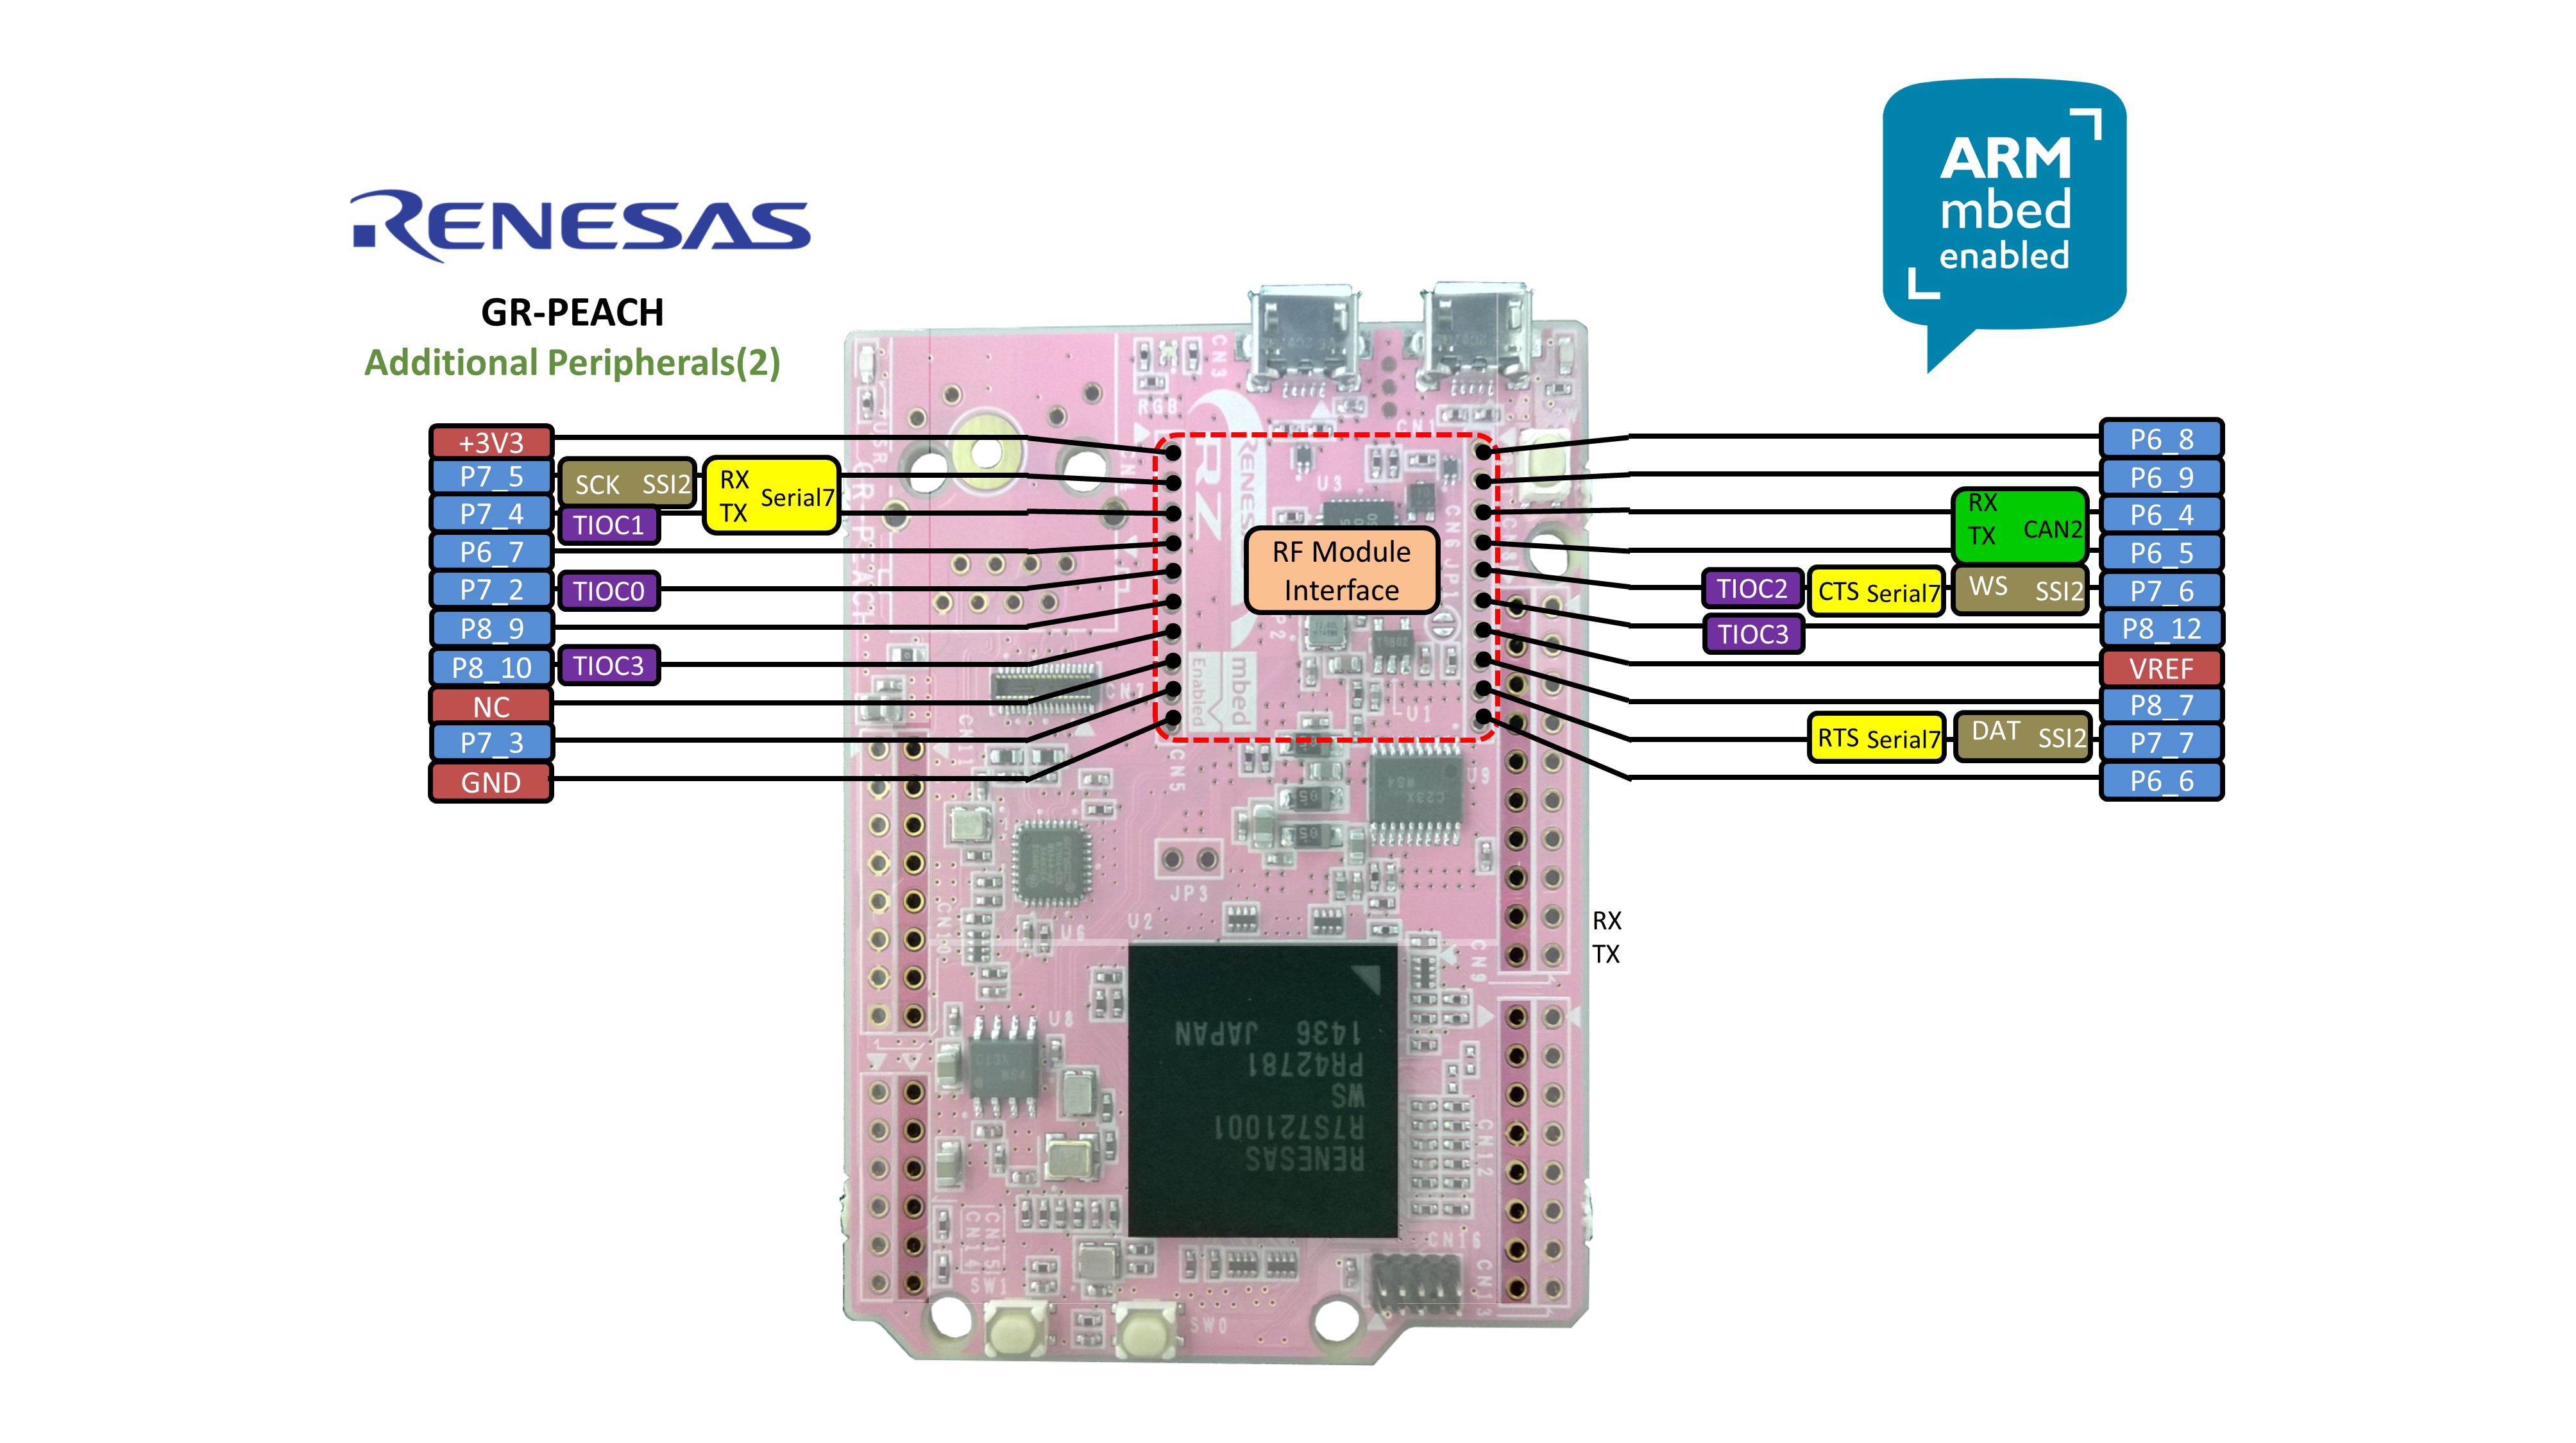
Schematics (回路図)
- GR-PEACH board schematics (Link to CORE CORPORATION)
Jumper settings (ジャンパ設定)
| JP# | description 概要 | default |
|---|---|---|
| JP1 | RST button directly connect to RZ/A1H RSTボタンをRZ/A1Hに直結 | open |
| JP2 | Update Mbed CMSIS-DAP firmware CMSIS-DAPファームウエアのアップデート | open |
| JP3 | VBUS supply to USB Host/Function USBホストにVBUSを供給 | open |
| JP4 | short diode not to drop voltage ダイオードによる電圧低下を防ぐためのショート | open |
| JP5 | short diode not to drop voltage ダイオードによる電圧低下を防ぐためのショート | open |
| JP6 | short diode not to drop voltage ダイオードによる電圧低下を防ぐためのショート | open |
Supported function map
Mbed Libraries
Note: "Done" means that you can import it on the Mbed on-line compiler.
| Function | Support | merged to mbed-src | registered to mbed library | Note |
|---|---|---|---|---|
| AnalogIn | ✓ | Done | Done | - |
| AnalogOut | - | - | - | RZ-A1H does not have this function. |
| DigitalIn | ✓ | Done | Done | Pull up and Pull down settings aren't supported because RZ/A1H doesn't have pull up/down for pins(signals). [Affected APIs] DigitalIn(PinName pin) DigitalIn(PinName pin, PinMode mode) void mode(PinMode pull) |
| DigitalOut | ✓ | Done | Done | Pull up and Pull down settings aren't supported because RZ/A1H doesn't have pull up/down for pins(signals). [Affected APIs] DigitalOut(PinName pin) DigitalOut(PinName pin, int value) |
| DigitalInOut | ✓ | Done | Done | Pull up and Pull down settings aren't supported because RZ/A1H doesn't have pull up/down for pins(signals). [Affected APIs] DigitalInOut(PinName pin) DigitalInOut(PinName pin, PinDirection direction, PinMode mode, int value) void mode(PinMode pull) |
| BusIn | ✓ | Done | Done | Pull up and Pull down settings aren't supported because RZ/A1H doesn't have pull up/down for pins(signals). [Affected APIs] BusIn(...) void mode(PinMode pull) |
| BusOut | ✓ | Done | Done | Pull up and Pull down settings aren't supported because RZ/A1H doesn't have pull up/down for pins(signals). [Affected APIs] BusOut(...) |
| BusInOut | ✓ | Done | Done | Pull up and Pull down settings aren't supported because RZ/A1H doesn't have pull up/down for pins(signals). [Affected APIs] BusInOut(...) void mode(PinMode pull) |
| PortIn | - | - | - | Please use BusIn instead |
| PortOut | - | - | - | Please use BusOut instead |
| PortInOut | - | - | - | Please use BusInOut instead |
| PwmOut | ✓ | Done | Done | The maximum period is 491us When you set a number greater than 491us, 491us is set. [Affected APIs] void period(float seconds) :max:4.91e-4 void period_ms(int ms) :ms<=0:1us , ms>=1:491us void period_us(int us) :max:491 The combination of the following pins are exclusively use. ・P4_6 or P4_7 ・P8_8 or P8_9 ・P8_10 or P8_11 ・P8_12 or P8_13 ・P8_14 or P8_15 [Affected APIs] PwmOut(PinName pin) The period of the following pins can be set to the same value. ・channel 1: P8_8,P8_9,P8_10,P8_11,P8_12,P8_13,P8_14,P8_15 ・channel 2: P10_0,P3_2,P4_4,P4_6,P4_7 [Affected APIs] PwmOut(PinName pin) void period(float seconds) void period_ms(int ms) void period_us(int us) |
| InterruptIn | ✓ | Done | Done | Pull up and Pull down settings aren't supported because RZ/A1H doesn't have pull up/down for pins(signals). [Affected APIs] void mode(PinMode pull) The combination of the following pins are exclusively use. ・IRQ0:P1_0,P2_14,P4_8,P5_8,P6_8,P7_9,P8_2 or P9_1 ・IRQ1:P1_1,P2_15,P4_9,P6_9,P7_8,P8_3 or P11_15 ・IRQ2:P1_2,P1_8,P3_0,P4_10,P5_9,P6_3,P6_10 or P7_10 ・IRQ3:P1_3,P1_9,P4_11,P6_4,P6_11,P7_11 or P11_12 ・IRQ4:P1_4,P1_10,P3_3,P4_12,P6_1,P6_12 or P7_12 ・IRQ5:P1_5,P1_11,P2_0,P4_13,P6_0,P6_13,P7_13 or P8_7 ・IRQ6:P1_6,P2_12,P3_1,P3_9,P4_14,P5_6,P6_14 or P7_14 ・IRQ7:P1_7,P2_13,P4_15,P6_2 or P6_15 [Affected APIs] InterruptIn(PinName pin) |
| Timer | ✓ | Done | Done | - |
| TimeOut | ✓ | Done | Done | - |
| Ticker | ✓ | Done | Done | - |
| wait | ✓ | Done | Done | - |
| time | ✓ | Done | Done | - |
| Serial | ✓ | Done | Done | 5-bits format and 6-bits format are not supported. Because RZ/A1H does not support such a function. In the flow control, flow types using only either of CTS or RTS is not supported. Because RZ/A1H does not support. |
| SPI | ✓ | Done | Done | - |
| SPISlave | ✓ | Done | Done | - |
| I2C | ✓ | Done | Done | - |
| I2CSlave | ✓ | Done | Done | - |
| CAN | - | - | - | - |
Mbed official Libraries
Note: "Available" means that you can import it on the Mbed on-line compiler.
| Function | Support | Availability | Note |
|---|---|---|---|
| Mbed RTOS | ✓ | Available | - |
| LocalFileSystem | - | - | No plan to support. |
| SDFileSystem | ✓ | Available | - |
| USBDevice | ✓ | Available | - |
| USBHost | ✓ | Available | - |
| Ethernet | ✓ | Available | - |
| EthernetInterface | ✓ | Available | - |
Other Libraries
Note: "Available" means that you can import it on the Mbed on-line compiler.
| Function | Support | Availability | Note |
|---|---|---|---|
| CMSIS-DSP(NEON) | ✓ | Available | - |
Getting Started
Preparation (準備)
Install the USB serial communication driver (USBシリアルドライバのインストール)
For Windows(R) user:
Windows(R)ユーザのみ必要な手順です。
- Connect GR-PEACH and PC.
PCにGR-PEACHを接続します。 - After the mount GR-PEACH as "MBED" volume label, install this driver.
GR-EPACHが「MBED」ドライブとしてマウントされたのちに、USBシリアルドライバをインストールします。
Add compiler for GR-PEACH (コンパイラにGR-PEACHを追加する)
- The root folder of GR-PEACH mass storage drive includes "mbed.htm" .
GR-PEACHをPCに接続し、ドライブに「mbed.htm」があることを確認します。
- This file jumps to the site of GR-PEACH when double clicked.
「mbed.htm」をダブルクリックします。
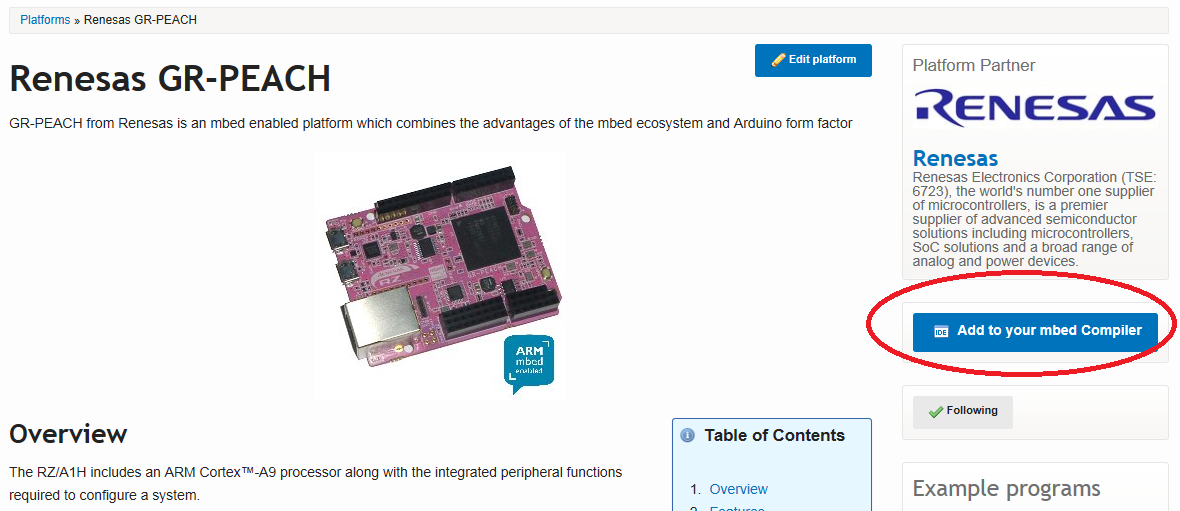
- You can use Mbed compiler for GR-PEACH after click at "Add to your compiler" button.
「Add to your compiler」ボタンを押してGR-EPACHをコンパイラに登録します
Build and Run (ビルドと実行)
Let's blink LED (LEDをチカチカさせよう)
- Then launch the development environment from Compiler button.
Compilerボタンをクリックして開発環境画面に行きます。 - Import mbed_blinky.
mbed_blinkyを「import」ボタンを押してインポートします。
Import programmbed_blinky
The example program for mbed pin-compatible platforms
- Click "Import Program" button.
「Import Program」ボタンを押します。 - Delete "mbed" library.
「mbed」ライブラリを削除します。
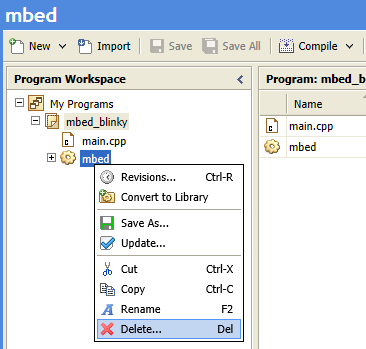
- Use mbed-src library instead of Mbed library, please do either of the following work.
以下のいずれかの手法でmbed-srcを使用してください。
- Overwrite mbed-src\taregets\hal\TARGET_RENESAS\TARGET_RZ_A1H\PinNames.h by PinNames.h below
mbed-srcの mbed-src\taregets\hal\TARGET_RENESAS\TARGET_RZ_A1H\PinNames.h を以下のもので書き換える
PinNames.h for GR-PEACH rev.BImport librarymbed-src
mbed library sources
- Import mbed-src_GR-PEACH_rev_b library below.
rev.B用のライブラリを使用する
Import librarymbed-src_GR-PEACH_rev_b
mbed library sources for GR-PEACH rev.B.
- Overwrite mbed-src\taregets\hal\TARGET_RENESAS\TARGET_RZ_A1H\PinNames.h by PinNames.h below
- Create binary file to click the "Compile" button.
「Complie」ボタンを押して*.binファイルを作成します
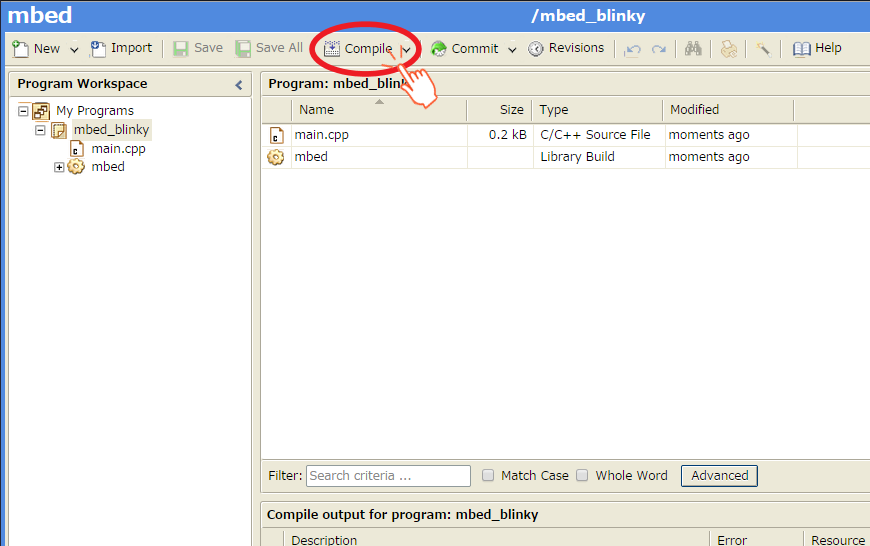
- When compile is finished, binary file is downloaded using browser function.
Copy this file to Mbed drive.
For Window user: drag and drop.
For Mac user : Refer here
コンパイルが終了するとbinファイルがダウンロードされます。
これをMbedドライブにコピーしてください。
Windowsはドラッグ&ドロップを行ってください。
Macはこちらを参照ください。 - When GR-PEACH's reset button is pushed or reconnect USB cable, the program runs.
GR-PEACHのリセットボタンを押すか、USBケーブルの再接続を行うと、プログラムが実行されます。
Blink LED smoothly (滑らかにLEDを点滅させよう)
Edit main.cpp of mbed_blinky.
mbed_blinkyのmain.cppを以下のように修正してください。
LED PWM
#include "mbed.h"

PwmOut led(LED_RED);

int main() {
    float crt = 1.0, delta = 0.04;

    led.period_ms(2); // 500Hz
    while (true) {
        led.write(crt);
        wait_ms(50);
        crt = crt + delta;
        if (crt > 1.0) {
            crt = 1.0;
            delta = -delta;
        }
        else if (crt < 0) {
            crt = 0;
            delta = -delta;
        }
    }
}
Use A/D converter (A/Dコンバータを使ってみよう)
Follow the procedure of "Let's blink LED". The program to import is below.
「LEDをチカチカさせよう」と同じ手順です。以下のプログラムをインポートしてください。
Import programAnalogIn-HelloWorld
Hello world program for mbed SDK AnalogIn API
Use Serial Peripheral Interface(SPI) (SPIを使ってみよう)
- Follow the procedure of "Let's blink LED". The program to import is below.
「LEDをチカチカさせよう」と同じ手順です。以下のプログラムをインポートしてください。
Import programSPI_HelloWorld_Mbed
SPI Hello World
- Before compile, edit main.cpp as below.
コンパイルする前に、main.cppを以下のように変更してください。
A part of main.cpp to delete
SPI spi(p5, p6, p7); // mosi, miso, sclk
DigitalOut cs(p8);
A part of main.cpp to add
SPI spi(D11, D12, D13);   // mosi, miso, sclk
DigitalOut cs(D10);
Use I2C (I2Cを使ってみよう)
- Follow the procedure of "Let's blink LED". The program to import is below.
「LEDをチカチカさせよう」と同じ手順です。以下のプログラムをインポートしてください。
Import programI2C_HelloWorld_Mbed
Hello World for I2C
- Before compile, edit main.cpp as below.
コンパイルする前に、main.cppを以下のように変更してください。
A part of main.cpp to delete
I2C i2c(p28, p27);
A part of main.cpp to add
I2C i2c(I2C_SDA, I2C_SCL);
Use microSD (microSDを使おう)
- Follow the procedure of "Let's blink LED". The program to import is below.
During importing, the dialog appears.**DO NOT CHECK the "Update all libraries to the latest version".**
「LEDをチカチカさせよう」と同じ手順です。以下のプログラムをインポートしてください。
インポート中に以下の表示がされますが、**"Update all libraries to the latest version"はチェックしないでください.**Import programSDFileSystem_HelloWorld
SD File System Hello World
- Before compile, edit main.cpp as below.
コンパイルする前に、main.cppを以下のように変更してください。
A part of main.cpp to delete
SDFileSystem sd(p5, p6, p7, p8, "sd"); // the pinout on the Mbed Cool Components workshop board
A part of main.cpp to add
SDFileSystem sd(P8_5, P8_6, P8_3, P8_4, "sd");
Use Ethernet (microSDを使おう)
- Follow the procedure of "Let's blink LED". The program to import is below.
「LEDをチカチカさせよう」と同じ手順です。以下のプログラムをインポートしてください。
Import programTCPSocket_HelloWorld
TCP Socket Hello World with Ethernet
- To specify MAC address, add fllowing function to main.cpp.
MACアドレスを設定する場合、以下をmain.cppに追加してください
Specify MAC address
// set mac address
void mbed_mac_address(char *mac) {
    mac[0] = 0x00;
    mac[1] = 0x02;
    mac[2] = 0xF7;
    mac[3] = 0xF0;
    mac[4] = 0x00;
    mac[5] = 0x00;
}
Use GR-PEACH as USB Device (USBデバイスとしてGR-PEACHを使おう)
- Follow the procedure of "Let's blink LED". The program to import is below.
「LEDをチカチカさせよう」と同じ手順です。以下のプログラムをインポートしてください。
If you want to use a function other a mouse, please see USBDevice page.Import programUSBMouse_HelloWorld
USBMouse Hello World
マウス以外の機能を使いたい場合、こちらのページを参照ください。
Use USB Host (USBホスト機能を使おう)
- To supply VBUS, please close JP3.
JP3をショートしてVBUSに電圧を供給します - Follow the procedure of "Let's blink LED". The program to import is below.
「LEDをチカチカさせよう」と同じ手順です。以下のプログラムをインポートしてください。
If you want to use a function other a mouse, please see USBHost page.Import programUSBHostMouse_HelloWorld
USBHostMouse Hello World
マウス以外の機能を使いたい場合、こちらのページを参照ください。
CMSIS-DAP firmware Update (CMSIS-DAPファームウエアのアップデート)
0. Preparation (準備)
Download a firmware from the following URI.
ファームウエアを以下からダウンロードしてください。
- Latest version (最新版)
grpeach_8mb_20150601.bin- support drag-and-drop writing on OS X Yosemite.
OS X Yosemiteでドラッグ&ドロップできるようになりました。 - support the binary files of size larger than 512 kilobytes.
512KB以上のサイズのバイナリに対応しました。
- support drag-and-drop writing on OS X Yosemite.
- Original version (配布時のバージョン)
grpeach_8mb_20141127.bin- This firmware is written in the original GR-PEACH rev.B.
配布時に書き込まれているバージョンです
- This firmware is written in the original GR-PEACH rev.B.
- Connect GR-PEACH to PC (GR-PEACHをPCに接続)
Please make a short-circuit at JP2 when you connect USB cable between GR-PEACH and PC.
JP2をショートした状態でGR-PEACHをPCにUSBケーブルで接続してください。
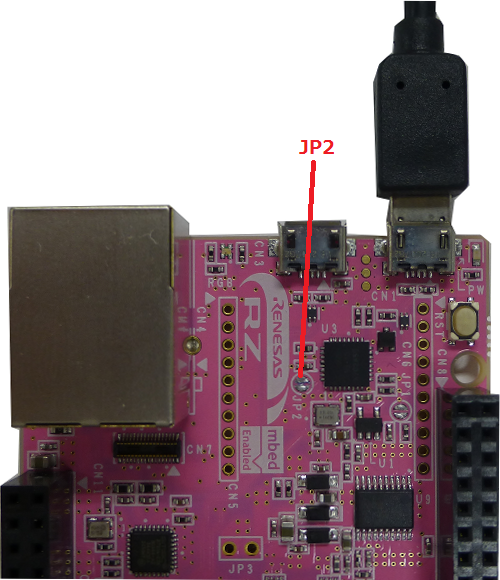
- After the connection, it will appear as a disk called "CRP DISABLED".
If "mbed" appears, the short-circuit of JP2 doesn't succeed.
In this case, please re-try the previous item.
When GR-PEACH connected as "CRP DISABLED", JP2 can be opened during firmware updating.
「CRP DISABLED」ドライブが表示されているか確認してください。
「Mbed」ドライブが表示されているときはショートに失敗しています。
この場合は再度接続を行ってください。
「CRP DISABLED」ドライブが表示された場合はこの時点でJP2をオープンにしても問題ありません。 - Open the "CRP DISABLED" disk folder and delete the Firmware.bin. (Please check the following Note.)
「CRP DISABLED」ディスクを開き、Firmware.binを削除します(Macは以下Noteを参照ください)。 - Copy the downloaded file to this drive. (Please check the following Note.)
ダウンロードしたファイルをこのドライブにコピーします(Macは以下Noteを参照ください)。
Note
For Mac user: please check the following URL instead of step 3 and 4.
Macをお使いの場合、ステップ3,4の替わりに以下のURLの方法を用いてください。
: Refer here
5. Disconnect between GR-PEACH and PC after copy is finished.
コピーが完了したあとで、GR-PEACHとPCの接続を解除します。
6. Reconnect GR-PEACH and PC.
GR-PEACHとPCを再接続します。
7. When USB disk appears as "mbed", firmware update is finished.
「Mbed」ドライブが表示された場合、ファームウエアの書き換えは完了です。
Known issues
defects (問題)
| No | module | description | status | preliminary | release date |
|---|
issues (課題)
| No | module | description | status | release date |
|---|---|---|---|---|
| 1 | USBHost | support USBHost library (isochronous) USBHostのisochronous転送のサポート | done USBHostrev.29 | - |
| 2 | - | Method of running programs on internal RAM 内蔵RAM上のプログラム実行方法 | done | - |
fixes (解決した問題)
| No | dexcription | fixed date | mbed-library (mbed) | Mbed library sources | Mbed official libraries |
|---|---|---|---|---|---|
| 1 | I2C When a slave is busy, read will be an error. | 2015/5/27 | rev.100 | mbed-src rev.541 | - |
| 2 | I2C Low level I2C commands does not work.(start(),stop(),etc) | 2015/5/27 | rev.100 | mbed-src rev.541 | - |
| 3 | CMSIS-DAP By yosemite correspondence, issue that fail to write binary files of size larger than 512 kilobytes, has occurred. | 2015/6/1 | - | - | - |


