Writing a Library
mbed OS 2 and mbed OS 5
This is the handbook for mbed OS 2. If you’re working with mbed OS 5, please see the Mbed OS 5 documentation and API References. For the latest information about libraries, please see our licensing libraries section.
This page discusses the steps in writing and publishing an mbed Library. It covers:
- What is a library
- How to code a library
- How to publish a library
What is a Library?
A library is a collection of code, usually focused on enabling a specific component, peripheral or functionality.
The main point of a library is to package something useful up so you and others don't need to keep re-inventing the wheel when you want to use some device or functionality. You can think of it as a building block for a program. Importantly, it is not a program in itself. i.e. it doesn't have a main() function, but will be a useful and reusable component in a program.
For reference, here are some existing examples:
- Servo Library is a library for controlling a R/C servo, containing Servo.h and Servo.cpp files
- Servo Hello World is a program that uses this library to control a servo, containing main.cpp and the Servo library
You'll see the Servo library is a reusable component including the API documentation to make it easy to use, and the Servo Hello World pulls in this library, only having to worry about what it is going to do with the servo.
How to code a library
A good library has a clear purpose, nice clean interface, and doesn't include the code doing other things - that is what the user's program is for.
Most libraries actually start as some code that turns out to be useful, is then re-factored in to a useful class or set of functions that can be reused in multiple places in a program, and then finally separated out so any program can include and use it. Lets work through an example to see how this might work...
Step 1 - Refactoring
To start with, here is some code I might have ended up with after some programming:
main.cpp
#include "mbed.h"

DigitalOut pin(LED2);

int main() {
    // do something...

    // flash 5 times
    for(int i=0; i<10; i++) {
        pin = !pin;
        wait(0.2);
    }

    // do something else

    // flash 2 times
    for(int i=0; i<4; i++) {
        pin = !pin;
        wait(0.2);
    }

    // do another thing
}
The program might do what I want, but it is obvious that some of the code is doing very similar things, perhaps as the result of copy-paste of bits I found useful. In this case, it is good practice to re-factor the code so we create a function that can do the flashing for us; define the code in one place, use it in many places.
So our code might become:
main.cpp
#include "mbed.h"

DigitalOut pin(LED2);

void flash(int n) {
    for(int i=0; i<n*2; i++) {
        pin = !pin;
        wait(0.2);
    }
}

int main() {
    // do something...

    // flash 5 times
    flash(5);

    // do something else

    // flash 2 times
    flash(2);

    // do another thing
}
So we haven't changed the functionality, but the code is now more structured. A quick look at some of the advantages:
- If my flash logic had a bug or I wanted to change it, i'd only have to fix it in one place
- My comments "flash n times" are now pretty redundant! The code speaks for itself
Step 2 - Making it a Class
In the example we're using, although we have factored the flashing logic in to a function, what it is flashing is fixed (a global pin). We might decide that this is so useful, we want to create something that we can use on any output.
There are a number of ways we can do this:
- Create a class for the functionality that contains it's own DigitalOut object, so we can create multiple versions on different pins
- Make a function that we also pass what pin object to flash
- Create a new class inherited from DigitalOut that adds the flash functionality
I'm going to choose 1. It may not actually be the most appropriate for this example, but is by far the most common approach so we'll ignore that :)
So we are going to create a class called Flasher that when created sets up a DigitalOut pin, and provides the method to flash it:
main.cpp
#include "mbed.h"

class Flasher {
public:
    Flasher(PinName pin) : _pin(pin) {  // _pin(pin) means pass pin to the DigitalOut constructor
        _pin = 0;                                        // default the output to 0
    }

    void flash(int n) {
        for(int i=0; i<n*2; i++) {
            _pin = !_pin;
            wait(0.2);
        }
    }

private:
    DigitalOut _pin;
};

Flasher led(LED2);
Flasher out(p6);

int main() {
    led.flash(5);
    led.flash(2);
    out.flash(10);
}
In this code, we can now create a Flasher tied to a particular pin, and tell it to flash. But of course now, we can easily create different flashers on different pins too.
This is obviously quite a bit more complex, but the important thing is that the extra effort put in to turning this useful code in to a class results in the simplicity of how you can use it.
Step 3 - Separating the code into files
With the effort put in to making this code reusable, we may want to make it easier to include in to other programs. To do this, we can put the code in its own files which can simply be included by other programs.
In C, we do this by creating header files which can be included by other code so we know what is available (the declaration), and source files that contain the implementation that generates the code (the definition).
As a convention, if we had a class Flasher, we'd create the header and source files of the same name to contain it; Flasher.h and Flasher.cpp:
Flasher.h
#ifndef MBED_FLASHER_H
#define MBED_FLASHER_H

#include "mbed.h"

class Flasher {
public:
    Flasher(PinName pin);
    void flash(int n);

private:
    DigitalOut _pin;
};

#endif
Flasher.cpp
#include "Flasher.h"
#include "mbed.h"

Flasher::Flasher(PinName pin) : _pin(pin) {
    _pin = 0;
}

void Flasher::flash(int n) {
    for(int i=0; i<n*2; i++) {
        _pin = !_pin;
        wait(0.2);
    }
}
Again, you'll need to know a little about C/C++ and the pre-processor to know what is going on; important things are the #define guards around the header (so if it gets included more than once, it only appears once), and the split between the .h and .cpp and the resulting syntax of how to define the methods.
So now we have that, our main.cpp file looks like:
main.cpp
#include "mbed.h"
#include "Flasher.h"

Flasher led(LED2);

int main() {
    led.flash(5);
    led.flash(2);
}
The program is now using the functionality, without getting caught up on how it is implemented. Simple!
How to publish your library
So, now you have some great code, how do you let others use it?! Well, the mbed Compiler has built in support for libraries, and lets you package up your own and publish them for anyone to use. Here is how you do it.
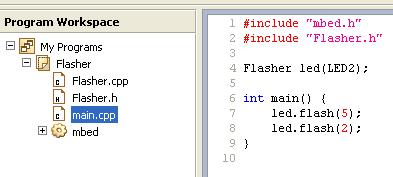
From the previous sections, we've now got a program that looks something like:

Using the same convention that a class called Flasher should have a header file Flasher.h, we suggest you make your library have the same name i.e. "Flasher".
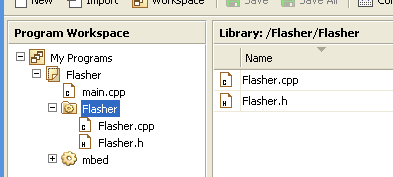
To create a library, right-click on your program, select "New Library..." and enter "Flasher"; it'll add a folder to your program, but you'll notice a little cog on it indicating it is actually a library in edit mode. You can now drag your files that will be part of the library in to it, and you'll end up with:

Your program should still build fine, but now there is a little bit more structure.
The next step is to publish it. To do this, just right-click the library and choose "Publish Library...". You'll be asked to enter a description, some tags and any message specific to that particular version (e.g. first revision, bug fixes). Once done, hit OK and you'll get a message:

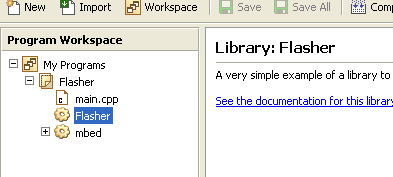
Your library is now live! You can go to the URL and see it on the mbed.org website, and tell all your friends! You'll also see your project has been updated:

It now just contains a reference to the published library, just like anyone else will get when they choose to import your library.
How to make updates to a library (or edit someone else's library)
So, now lets say you wanted to edit the library some more. Perhaps you wanted to add some Doxygen documentation so users of your library get nice documentation of your library so they know how to use it. We'll that's nice and easy. Just right-click the library and choose "Edit Library...". You'll be back to a editable library folder:

Make your changes, then re-publish it as before, and your updates are pushed live! Go to the URL and you'll be able to look through the history. Anyone using your library will be able to see a newer version exists, and choose to update in a single click. Magic :)
Note that you can also edit a library that someone else wrote. Just import it, click edit library and go nuts. The only difference is when you come to publish it, it'll publish under your libraries area rather than theirs.
Documenting your library
The mbed site will also automatically generate API documentation for your library if you mark it up. See: