Working with Mercurial
Mbed Studio supports the most common Mercurial actions for programs hosted on os.mbed.com, including branching and synching with the remote repository.
Mbed Studio's Mercurial flow:
- Set a remote repository.
- Branch.
- Track files.
- Edit files.
- Commit.
- Push.
Tip: Mbed Studio includes its own version of Mercurial; you do not need to manually install it.
Credentials
Note: Mbed Studio supports Mercurial repositories from os.mbed.com only.
For Mercurial, on any operating system, your credentials are taken from the Mbed account with which you logged into Mbed Studio. You can work with all public repositories, as well as any private repository to which you have access through os.mbed.com.
Interface and features reference
Source control in Mbed Studio is handled in two views: The Source Control view, for handling the current work, and the History view to see previous commits. They always show the active program.
The image highlights:
- The actions menu. With the Toggle to List View
 and Toggle to Tree view
  buttons, you can display your changes as a list or as a tree view. Note the ... button for more actions.
 - The buttons available on each file when you hover over a file name: Track (+), Untrack (-), Discard Changes, Open File.
- One tracked file - a Modified (M) file, which had already been committed to Mercurial once and has changed since. One untracked file - a Added (A) file, which has not been committed yet.
- The selected branch, which doubles as a button to create or select other branches.
 The Source Control view for Mercurial.
| Features | Comments | |
|---|---|---|
| Local changes | Track and Track all files | Use the Track option to monitor the files for changes. A tracked file with changes is automatically added to a commit. You can move files back to the **UNTRACKED** list only if you've never committed them (these files are marked with "A", for "Added"). Once you commit files, they remain tracked. |
| Discard all changes | Revert all changed files to their state as of the last time they were pushed (or their starting state if they have never been pushed). | |
| Refresh | Update the list of local changes. | |
| Commits | Commit | Put all tracked files into a single record of local changes. The commit is the record you can push to the remote repository. |
| Add signed-off-by | Tag your commit and add comments, a signature, the date and your email. For some projects, this is a requirement for all contributions submitted as pull requests | |
| Branch management | Branch | Create a new local branch or checkout an existing branch. The default branch for a newly set repository is "default". |
| Pull | Apply the latest changes from the default remote repository to your local repository (pull and merge). | |
| Push | Send new local commits to the remote. | |
| Push to... | Push all branches to a specific remote, rather than the default remote. | |
| Merge heads | Merge two or more heads of a branch into a single head. | |
Configuring a program for source control and collaboration
If you import a Mercurial program from os.mbed.com, it automatically points to the remote repository you imported it from. For programs which are not yet configured for source control, you need to manually set the remote repository. In that case, you can only work with newly created remote repositories (without any commits). You cannot create a remote repository from within Mbed Studio; you need to create the repository directly through os.mbed.com.
When the active program is not yet configured for source control, you can initialise it and set a remote repository:
-
Go to the Source Control view.
-
Click the Set Remote URL button.
The Set Remote URL dialog box opens.
-
Enter a URL for your remote repository.
Note: The URL should not contain a branch name.
-
Click Set Remote Repository.
Setting a remote repository through the UI is only possible once for each new program. If you want to change your program's set repository, use the Mercurial command line tool, available in the terminal.
 Setting a Mercurial repository.
Creating or switching branches
Mercurial uses branches to isolate your work from other people's work or from code that needs to remain stable. Mbed Studio allows creating branches, as well as synching the remote and local branches.
You can see which branch you are working on from the status bar (when first setting a repository, you are on the "default" branch by default).
To create a new branch or switch to a different branch:
-
Click the current branch in the status bar.
 Current branch in the status bar.
The available branches are listed at the top of the window.
-
Create or switch:
-
To create a new branch: Select Create new branch... and enter a name to create a new branch.
The name of the new branch should not contain spaces.
The branch is created locally; it will be published to the remote repository the first time you push from it.
-
To switch to a different branch, search for and select an existing branch in the list.
 Create a new branch, or select one from the list.
 -
Managing local files
This section describes the different options to manage your local files and explains how to update the remote.
File statuses
Statuses are displayed to the right of each file to indicate changes.
- A: Added - a new file in either the TRACKED or UNTRACKED list.
- M: Modified - an existing file in the TRACKED list.
- D: Deleted file.
- C: Merge Conflict - you will need to resolve it before you can push.
Viewing changes
To view the changes you have made to a file, double-click its name to open the file. The changes open in a new tab, comparing what was available in the file before the changes (in red) and what has changed (in green).
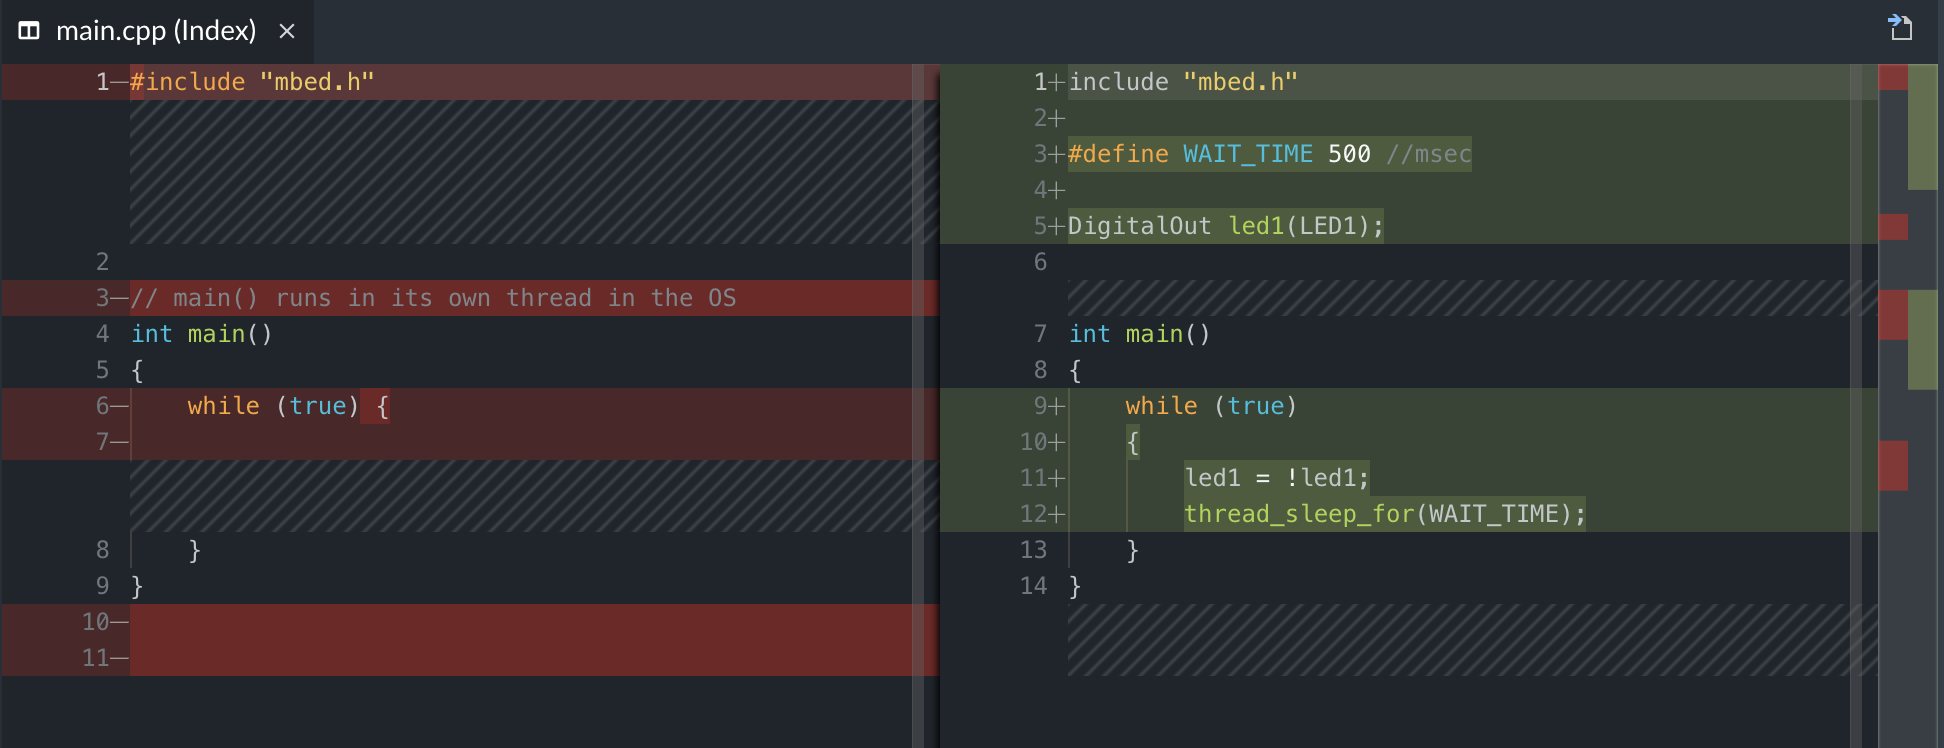 Double-click a file to view its side-by-side comparison.
You can open the file for editing by clicking the Open File icon at the top-right corner of the screen. Go back to the changes by clicking the Open Changes icon.
When in the editor, if there are changes to a file, the Open Changes icon is also available when you open the file.
Tracking, committing and pushing changes
To track and commit changes:
-
In the Source Control view, all new files are listed under UNTRACKED.
Files that have already been committed once are automatically shown in the TRACKED list when you modify them.
-
Hover your mouse over the file you want to commit and click + to track your changes. The file is listed under TRACKED.
 Tracking a single file.
 -
In the Commit message box, enter a commit message for the tracked changes.
-
Click Commit or Commit (Signed Off).
The changes are committed and the commit can be seen in the History view.
-
To push the commit to the remote branch, click ... > Push.
Ignoring files
You can completely exclude files from the Source Control view to keep your file list tidy and navigable. For example, by default Mbed Studio doesn't list any Mbed OS files.
Use .hgignore to list the files you want to exclude. The .hgignore file exists by default in all Mbed OS programs, and is visible and editable in Mbed Studio.
For more information about how .hgignore files work and how to use them, see the Mercurial documentation.
Synchronizing
If the remote repository has been changed since you last pulled, you must synchronize your local copy before you can push any of your own changes to the remote.
Resolving merge conflicts
Synchronizing remote and local changes can lead to merge conflicts when a single file has been edited in both locations.
By default, when Mercurial sees a conflict between two branches being merged, it will add merge conflict markers <<<<<<< ======= ||||||| >>>>>>> into your code and mark the file as conflicted and let you resolve it.
 Mercurial merge conflict in Mbed Studio.
The top half of a conflict is the branch you are merging into, and the bottom half is from the commit that you are trying to merge in.
So, for example, if you were pulling (pull and merge):
- The top half shows your local changes and your base version (after the ||||||| markers).
- The bottom half (after the ======= markers) shows the remote changes which you were trying to merge in.
In order to resolve a conflict, you have to decide which part you want to keep or merge the contents yourself, and then remove all the merge conflict markers. Once you are happy with the corrections on a given file, click + on the file entry in the MERGE CHANGES list to resolve the conflict and move the file to the TRACKED list.
For more information about merge conflicts with Mercurial, see the Tutorial - Merging conflicting Changes.
Mercurial command line tool
If you need features not available through the UI, like filtering or searching the commit log, use the Mercurial command line tool in the Mbed Studio terminal.