Working with Git
Mbed Studio supports the most common Git actions for your programs, including branching, stashing and synching with the remote repository.
Mbed Studio's flow matches the Git flow with the "stage" step:
- Set a remote repository.
- Branch.
- Edit files.
- Stage changes.
- Commit.
- Push.
Tip: Mbed Studio includes its own version of Git; you do not need to manually install it.
Setting credentials for Git hosting services
Working with Git-based hosting services requires authentication against those services.
Git on macOS and Linux
You cannot directly input Git hosting service credentials into Mbed Studio. Instead, if you are using GitHub to work with a private repository (or to push changes to a public repository), use one of these methods to set your credentials:
- We recommend you set up Secure Shell (SSH) keys, as explained in the GitHub documentation.
- You can also use HTTPs with a token, as explained in the GitHub documentation.
- Alternatively, you can connect your Mbed account and your GitHub account from this page: https://os.mbed.com/account/connected/. Log into your Mbed account and click the Connect button on the page to allow Mbed Studio to access your GitHub account.
If you are using another hosting service such as GitLab or Bitbucket, please check the documentation for these services.
Git on Windows
Mbed Studio running on Windows can use an SSH key or a token, as described for macOS and Linux. If those don't exist on your system or if your Mbed account and your Git hosting service account are not connected, then you will be prompted to log into your Git hosting service account or provide a personal token.
Interface and features reference
Source control in Mbed Studio is handled in two views: The Source Control view, for handling the current work, and the History view to see previous commits. They always show the active program.
The image highlights:
- The actions menu. With the Toggle to List View
 and Toggle to Tree view
  buttons, you can display your changes as a list or as a tree view. Note the ... button for more actions.
 - The buttons available on each file when you hover over a file name: Discard Changes, Open File, Stage Changes (+), Unstage Changes (-).
- Five changed files and one staged file.
- The last (head) commit.
- The selected branch, which doubles as a button to create or select other branches.
 The Source Control view for Git.
| Features | Comments | |
|---|---|---|
| Local changes | Discard all changes | Revert all changed files to their state as of the last time they were pushed (or their starting state if they have never been pushed). |
| Stage and Stage all changes | Use the Stage option for files you want to add to your next commit. Staging files manually breaks your work into logical units, each in its own commit, rather than having to commit all files together. | |
| Unstage and Unstage all changes | Return a staged file, or all staged files, to the CHANGES list. | |
| Refresh | Update the list of local changes. | |
| Commits | Commit | Put all staged files into a single record of local changes. The commit is the record you can push to the remote repository. |
| Add signed-off-by | Tag your commit and add comments, a signature, the date and your email. For some projects, this is a requirement for all contributions submitted as pull requests. | |
| Commit (amend) | Change your last commit (head commit) by amending the message and the content of the commit, or only the content. This option combines your staged changes with the head commit. | |
| Amend (button) | Rollback commits and reset your current head commit to a prior state. The changes done between the original head commit and the current head are staged. | |
| Branch management | Branch | Create a new local branch or checkout an existing branch. The default branch for a newly set repository is Master. |
| Fetch | Fetch changes from the remote, but do not merge them into the current local branch. | |
| Merge | Incorporate changes from another branch into the current branch. For example, add the latest changes from the remote repository to your local copy. | |
| Pull | Apply the latest changes from the default remote repository to your local repository (fetch and merge). We recommend pulling only with a clean working copy; if you have any uncommitted local changes, use fetch and merge. | |
| Pull from... | Pull from a specific remote, rather than the current one. | |
| Push | Send new local commits to the remote. | |
| Push to... | Push to a specific remote, rather than the current one. | |
| Stash | Stash | Set aside your changed files. This allows: a) Switching branches without committing local changes; apply the stash when you are ready to go back to the branch. b) Applying work from one branch to another; apply the stash in the new branch. |
| Apply latest stash | Add the latest stashed changes to the branch, without clearing the stash. | |
| Apply stash | Add a specified stash to the branch, without clearing the stash. | |
| Drop stash | Discard all changes in the stash. | |
| Pop latest stash | Apply the latest stash and clear the stash. | |
| Pop stash | Apply a specified stash and clear the stash. | |
Configuring a program for source control and collaboration
If you import a program from Git, it automatically points to the remote repository you imported it from. For programs which are not yet configured for source control, you need to manually set the remote repository. In that case, you can only work with newly created remote repositories (without any commits). You cannot create a remote repository from within Mbed Studio; you need to create the repository directly through your Git tool or website.
When the active program is not yet configured for source control, you can initialise it and set a remote repository:
-
Go to the Source Control view.
-
Click the Set Remote URL button.
The Set Remote URL dialog box opens.
-
Enter a URL for your remote repository. The format can be either SSH (if you have set up an SSH key) or HTTPS. For example, for GitHub:
- SSH:
git@github.com:user-name/repo-name - HTTPS:
https://github.com/user-name/repo-name
Note: The URL should not contain a branch name.
- SSH:
-
Click Set Remote Repository.
Setting a remote repository through the UI is only possible once for each program. If you want to change your program's set repository, use the Git command line tool, available in the terminal.
 Setting a Git repository.
Creating or switching branches
Git uses branches to isolate your work from other people's work or from code that needs to remain stable. Mbed Studio allows creating branches, as well as synching the remote and local branches.
You can see which branch you are working on from the status bar (when first setting a repository, you are on the master branch by default).
To create a new branch or switch to a different branch:
-
Click the current branch in the status bar.
 Current branch in the status bar.
The available branches are listed at the top of the window.
-
Create or switch:
- To create a new branch: Select Create new branch... and enter a name to create a new branch.
The name of the new branch should not contain spaces.
The branch is created locally; it will be published to the remote repository the first time you push from it.
- To switch to a different branch, search for and select an existing branch in the list.
 Create a new branch, or select one from the list.
Managing local files
This section describes the different options to manage your local files and explains how to update the remote.
File statuses
Statuses are displayed to the right of each file to indicate changes.
- U: Untracked - a new file in the CHANGES list (not yet staged).
- A: Added - a new file in the STAGED CHANGES list.
- M: Modified - an existing file in either the CHANGES or STAGED CHANGES list.
- D: Deleted file.
- C: Merge Conflict - you will need to resolve it before you can push.
Viewing changes
To view the changes you have made to a file, double-click its name to open the file. The changes open in a new tab, comparing what was available in the file before the changes (in red) and what has changed (in green).
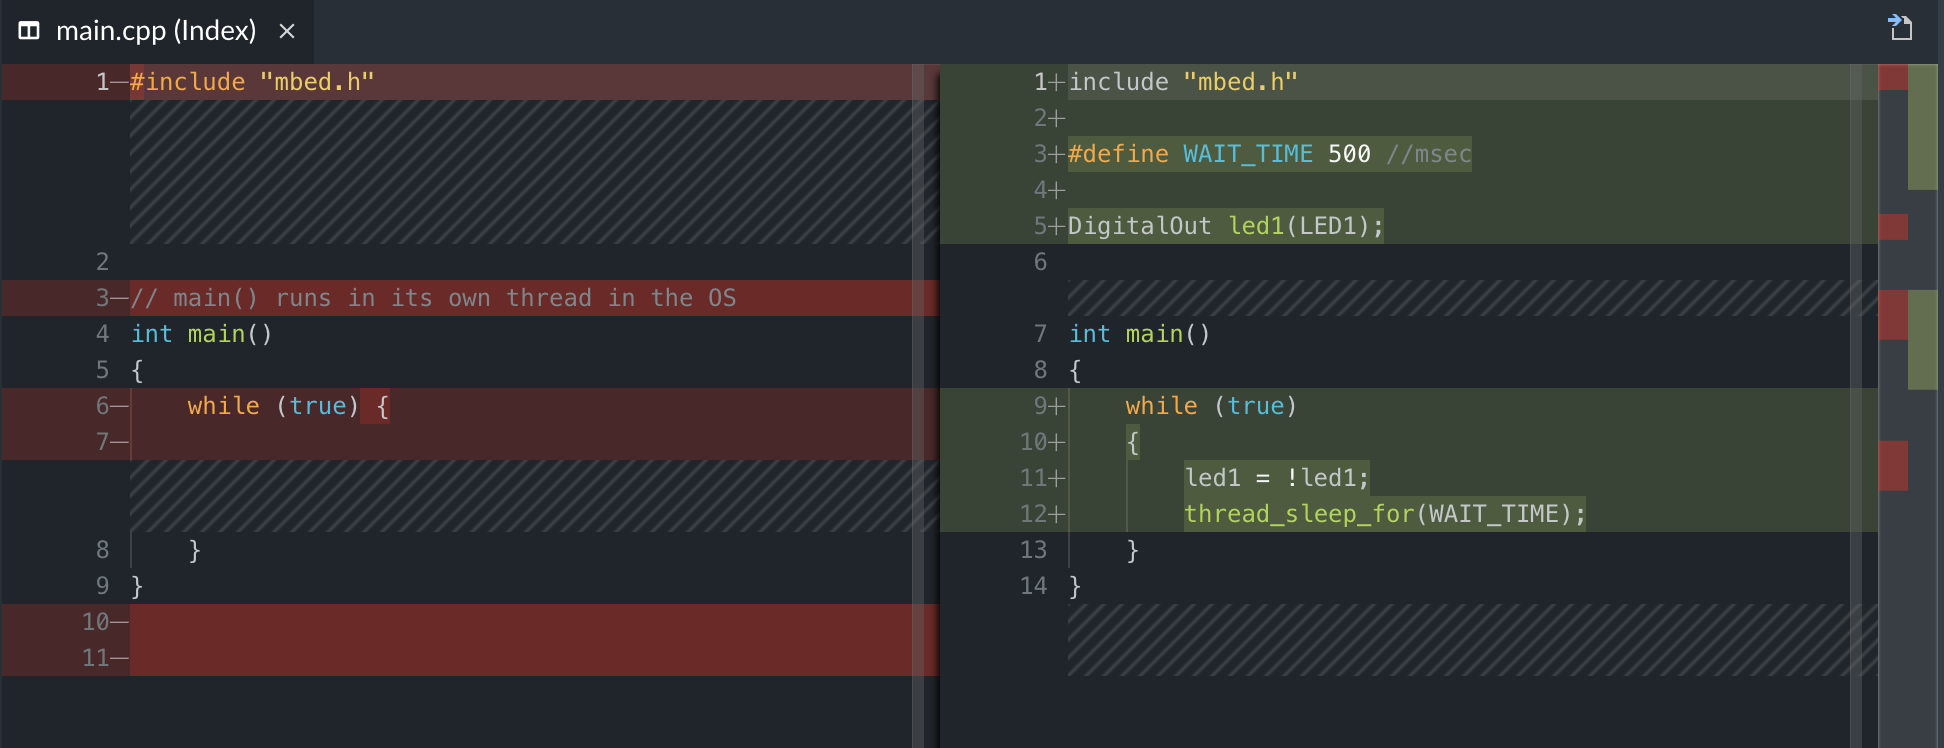 Double-click a file to view its side-by-side comparison.
You can open the file for editing by clicking the Open File icon at the top-right corner of the screen. Go back to the changes by clicking the Open Changes icon. Note that you can open several files at once for editing: hold Shift or else Cmd (macOS) or Ctrl (Windows and Linux) and select the files, then right-click and select Open File.
When in the editor, if there are changes to a file, the Open Changes icon is also available when you open the file.
Staging, committing and pushing changes
Use staging to manually control which of your edited files are added into each commit. This breaks your work into logical units, each in its own commit, rather than having to commit all files together.
You can always remove a file from the STAGED CHANGES list, and later add it to a different commit.
To stage and commit changes:
-
In the Source Control view, all new and modified files are listed under CHANGES.
-
Hover your mouse over the file you want to commit and click + to stage your changes. The file is listed under STAGED CHANGES. To stage several files at once, hold Shift or else Cmd (macOS) or Ctrl (Windows and Linux) and click the files you want to stage, then click +.
 Staging a single file.
 -
In the Commit message box, enter a commit message for the staged changes.
-
Click Commit or Commit (Signed Off).
The changes are committed and the commit can be seen at the bottom of the Source Control view, as well as the History view.
-
To push the commit to the remote branch, click ... > Push.
Note: To stage or unstage one or several files, you can also select the file or files, right-click and select Stage Changes or Unstage Changes.
Amending local commits
Before pushing to the remote to share your work with others, you can rewrite local commits by:
- Adding, updating, or removing files in your last commit and changing the commit message.
- Changing multiple commits at once.
Note: If you've already pushed your changes to the remote and notice that something is not quite right, you can still fix your commits and force push the changes. However, you must be absolutely certain that nobody has pushed commits to the remote before doing a force push as this will overwrite their commits.
Changing the last commit
With the Commit (amend) option, you can amend your most recent commit and change the content of the commit by adding, updating, or removing files. You can also optionally change the commit message.
To change your last commit:
-
Stage the files that you want to include in your last commit.
To remove a file from your last commit, first delete it from the Explorer view (it will appear as deleted D in the CHANGES list), then stage the deleted file.
-
Click ... > Commit (amend).
-
Add a commit message in the message box that opens or just press Enter to reuse the last commit message and only update the content of the commit.
Changing multiple commits
With the Amend button, you can rollback several commits to reset your head commit to a prior state. The changes done between the original head commit and the current head commit are staged. This way you can add, modify, or remove files and stage new changes.
To change multiple commits:
-
Click the Amend button for each commit that you want to amend.
All the changes you had committed are staged. You can decide which changes should be staged or unstaged and combine commits. Use the Unamend button if you change your mind and prefer to keep a commit untouched. This resets the head commit to the commit you have just "unamended". If there are several commits to "unamend", click Unamend all commits (-).
-
Once you are happy with the changes, in the Commit message box, enter a commit message for the staged changes.
-
Click Commit or Commit (Signed Off).
The changes are committed and the commit can be seen at the bottom of the Source Control view, as well as in the History view. In the History view, you'll notice the amended commits have been replaced by the new commit.
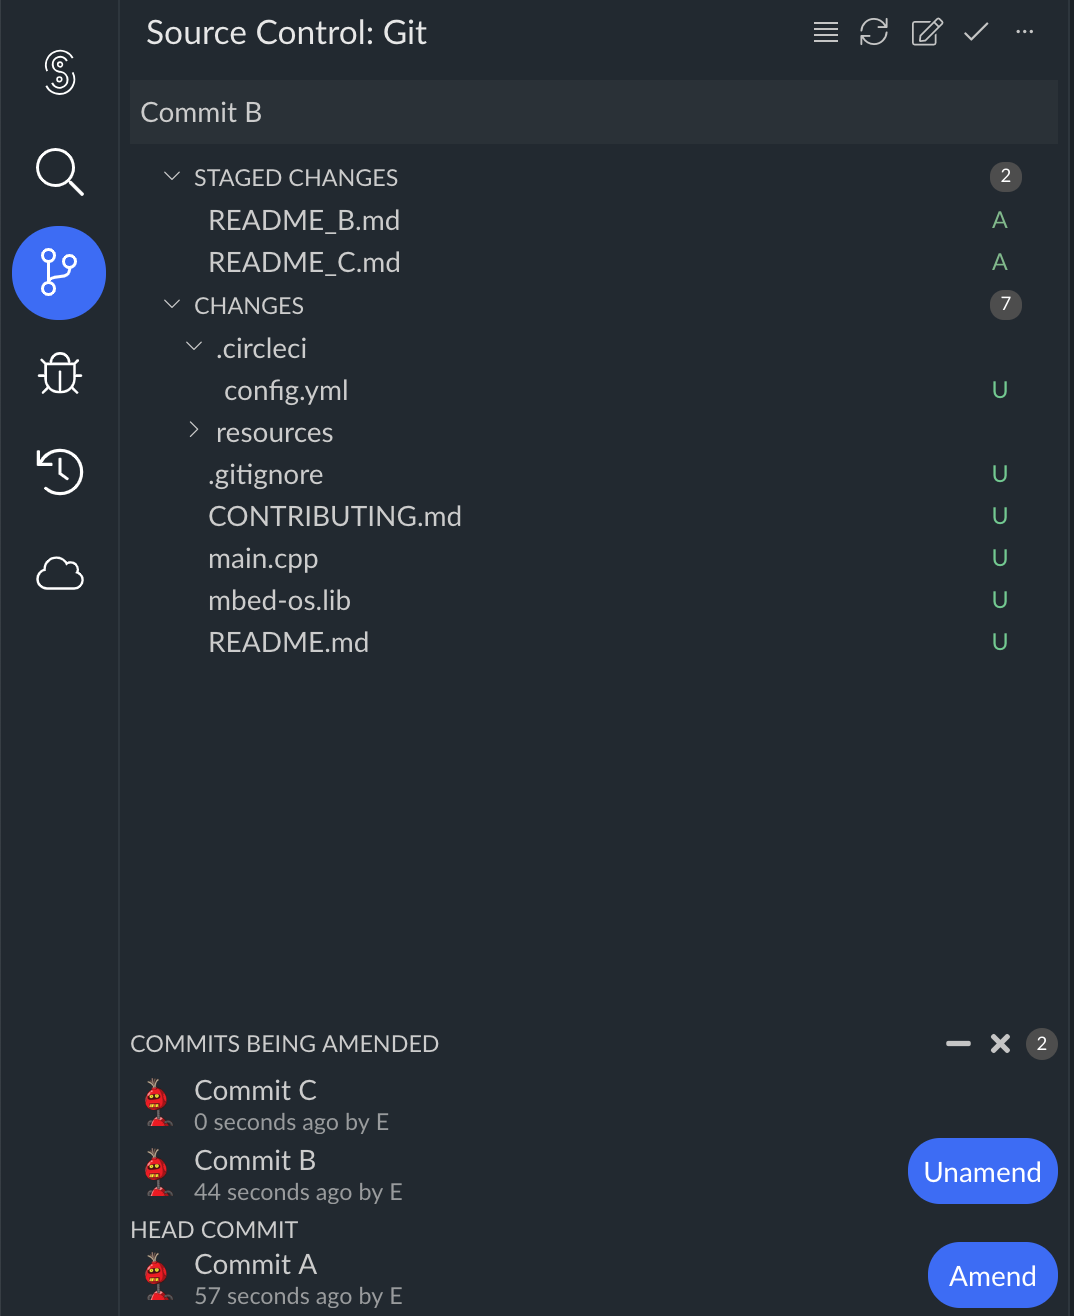 This image shows two commits being amended. The head commit is now commit A. The changes that had been committed with Commit B and Commit C are in the STAGED CHANGES list and can be reused or discarded.
Note: You can clear all the commits in the COMMITS BEING AMENDED list at once with the Clear amending commits (x) button. The files that had been staged while amending the commits remain in the STAGED CHANGES list.
Ignoring files
You can completely exclude files from the Source Control view to keep your file list tidy and navigable. For example, by default Mbed Studio doesn't list any Mbed OS files.
Use .gitignore to list the files you want to exclude. The .gitignore file exists by default in all Mbed OS programs, and is visible and editable in Mbed Studio.
For more information about how .gitignore files work and how to use them, see the Ignoring Files chapter of the Pro Git book.
Synchronizing
If the remote repository has been changed since you last pulled, you must synchronize your local copy before you can push any of your own changes to the remote.
The Synchronize Changes indicators on the left-hand side of the status bar show how many changes have been pushed to the remote repository since your last pull, and how many commits you have on your local copy.
 The Synchronize Changes indicators are also a button that displays the available synchronization options.
Synchronization options
Mbed Studio offers three synchronization options. Each one combines different Git operations to automatically manage the changes.
Click the Synchronize Changes button to display the available options:
- Pull and push commits from and to 'origin/
' : Apply the latest changes from the remote repository to your local repository by doing a pull (fetch and merge), then push your changes to the remote repository. This option may generate merge conflicts (see below). - Fetch, rebase and push commits from and to 'origin/
' : Put aside the local changes, fetch the remote changes to bring the local up to date, reapply your local changes and push to the remote. The rebase option compresses all the changes into a single "patch" to integrate with the remote branch. This option may generate merge conflicts (see below). - Force push commits to 'origin/
' : Overwrite the remote branch with your local branch, regardless of the status of that remote branch.
Resolving merge conflicts
Synchronizing remote and local changes by pulling or rebasing can lead to merge conflicts when a single file has been edited in both locations. Merge conflicts can also happen when you apply or pop a stash, if the stash contains changes that contradict further work on the branch.
By default, when Git sees a conflict between two branches being merged, it will add merge conflict markers <<<<<<< ======= >>>>>>> into your code and mark the file as conflicted and let you resolve it.
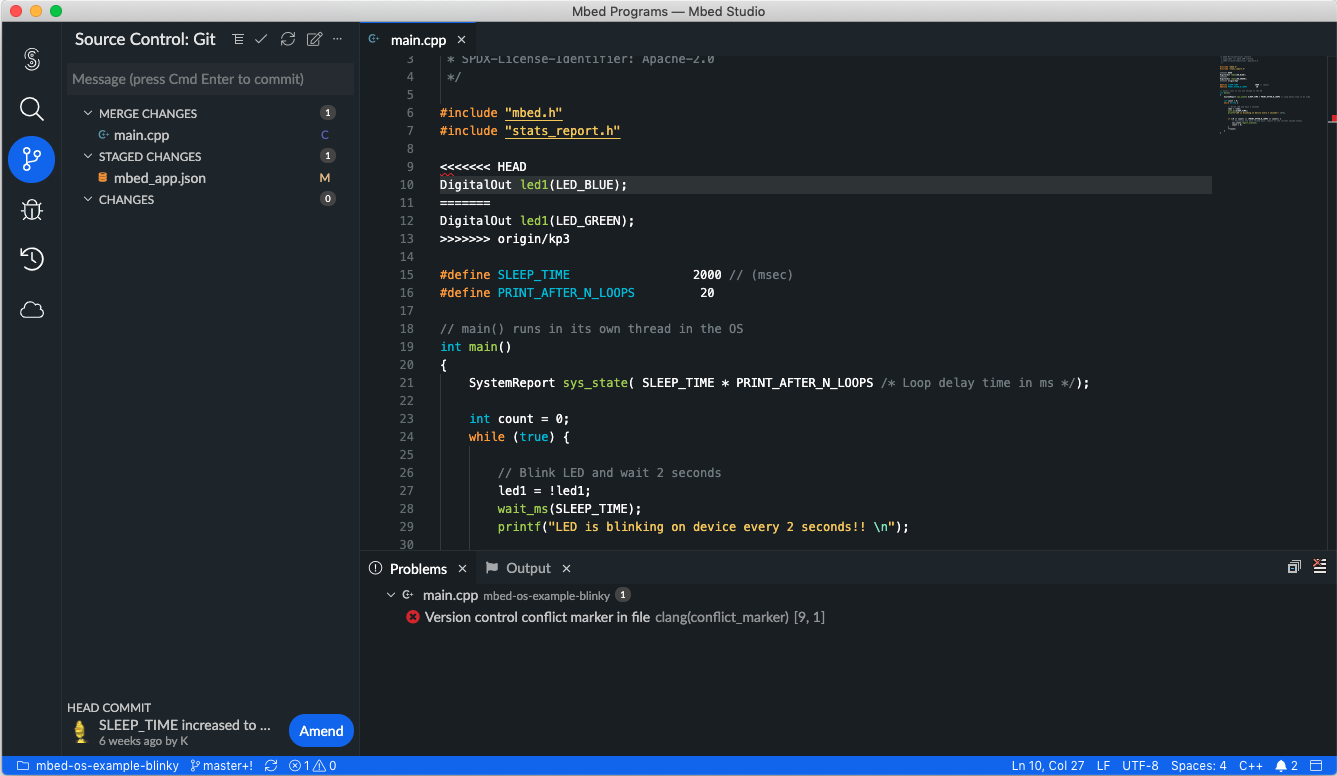 Git merge conflict in Mbed Studio.
The top half of a conflict is the branch you are merging into, and the bottom half is from the commit that you are trying to merge in.
So, for example, if you were pulling (fetch and merge):
- The top half shows your local changes.
- The bottom half shows the remote changes which you were trying to merge in.
In order to resolve a conflict, you have to decide which part you want to keep or merge the contents yourself, and then remove all the merge conflict markers. Once you are happy with the corrections on a given file, click + to stage your changes.
For more information about merge conflicts, see the About merge conflicts page of the GitHub Help.
Git command line tool
If you need features not available through the UI, like cherry picking and deleting branches, use the Git command line tool in the Mbed Studio terminal.