WiflyInterface
Import programWifly_HelloWorld
Hello World with a wifly module (RN 131 C/G - RN-XV)

Information
With this library, you will be able to add a wireless connectivity to your mbed. This library relies on wifly modules from Roving Networks (now Microchip). These modules can be found on sparkfun for instance.
The objective of this library is to provide the same API as the EthernetInterface. So all programs using the EthernetInterface are compatible with the WiflyInterface.
For some applications, it can be useful to dig a little deeper, in which case the Wifly User Manual will be helpful.
Software
The WiflyInterface library provides you with a simple API to connect to the internet.
Import library
Public Member Functions |
|
| WiflyInterface (PinName tx, PinName rx, PinName reset, PinName tcp_status, const char *ssid, const char *phrase, Security sec=NONE) | |
|
Constructor.
|
|
| int | init () |
|
Initialize the interface with DHCP.
|
|
| int | init (const char *ip, const char *mask, const char *gateway) |
|
Initialize the interface with a static IP address.
|
|
| int | connect () |
|
Connect Bring the interface up, start DHCP if needed.
|
|
| int | disconnect () |
|
Disconnect Bring the interface down.
|
|
| char * | getIPAddress () |
|
Get IP address.
|
|
Hardware
A basic hardware configuration (if you don't use a battery to power the module) is:
| RN-131 | +++++ | RN-XV | ||
|---|---|---|---|---|
| wifly pin | Mbed pin | wifly_pin | Mbed pin | |
| 3.3V RIN | GND | |||
| GND | GND | GND | GND | |
| VDD BATT | VOUT | |||
| VDD IN | VOUT | VDD_3V3 | VOUT | |
| RX | TX | UART_RX | TX | |
| TX | RX | UART_TX | RX | |
| GPIO 6 | any DigitalIn | GPIO 6 | any DigitalIn | |
| RESET | any DigitalIn | RESET | any DigitalIn |
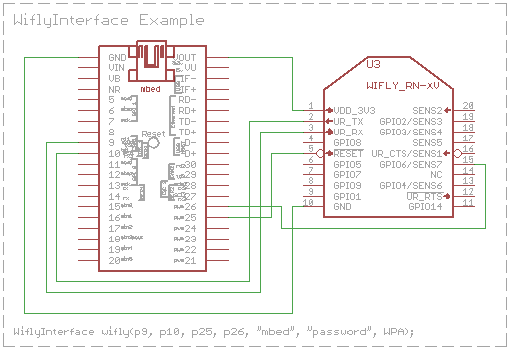
Connections that match "Hello Example" code shown below

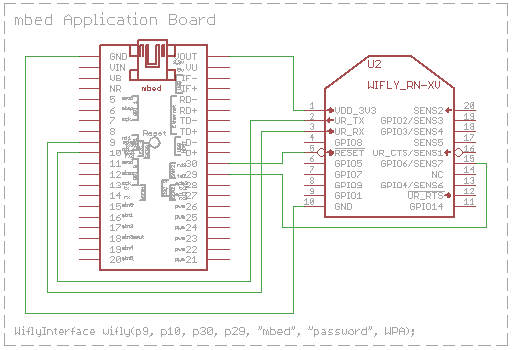
Connections that match mbed Application Board
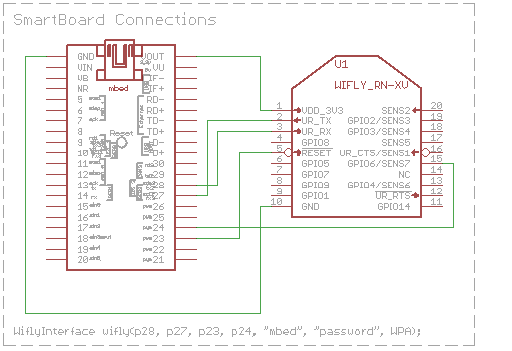
Connections that match SmartBoard
Hello World!
Please be sure to read the Wifly datasheet and API of Wifly class, if you are using it, for maximum ease of use.
#include "mbed.h"
#include "WiflyInterface.h"

Serial pc(USBTX, USBRX);

/* wifly object where:
*     - p9 and p10 are for the serial communication
*     - p25 is for the reset pin
*     - p26 is for the connection status
*     - "mbed" is the ssid of the network
*     - "password" is the password
*     - WPA is the security
*/
//
WiflyInterface wifly(p9, p10, p25, p26, "mbed", "password", WPA);
// mbed Application Board
//WiflyInterface wifly(p9, p10, p30, p29, "mbed", "password", WPA);

int main() {
    wifly.init(); // use DHCP
    while (!wifly.connect()); // join the network
    printf("IP Address is %s\n\r", wifly.getIPAddress());
    wifly.disconnect();
}
Import programWifly_HelloWorld
Hello World with a wifly module (RN 131 C/G - RN-XV)
The previous program tries to connect the network. If the network is joined, it prints the ip address of the wifly module.
More details
In order to test that your hardware has been setted up correctly, you can use this program:
Import programWifly_configure
Configure wifly module
.
Information
If everything is connected correctly, you should get the response "CMD" when you put in three consecutive dollar signs "$$$". The module is now in command mode. To return the module to this factory state, if you want to, you should enter in command mode "factory RESET\r".
Here is a configuration example:

- First I enter in command mode by pressing $$$
- the response is CMD
- set wlan ssid my_network\r
- the response is AOK (AOK has replaced set... local echo activated)
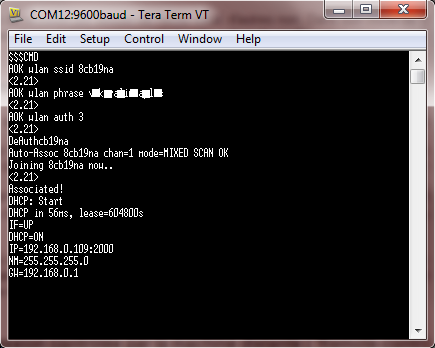
- set wlan phrase my_password\r (I use set wlan phrase because my network use WPA as security. If you have a WEP security, you have to use set wlan key your_password)
- the response is AOK
- join\r
- the response is quite long but Associated! means that you are connected
Links to Wifly Resources
Roving networks was acquired by Microchip, and there are a number of online resources. If you do not already have it, be sure to download the user manual, as there are a lot of commands.
- Microchip's RN171
- RN171 User Manual
- Microchip's RN131 On Sparkfun:
- [https://www.sparkfun.com/search/results?term=rn171|various Wifly RN-171 modules]]
- Note that some versions use an external antenna - see the related products section.
Things to be aware of:
- If sending data using the on board TCP/IP stack, it might be necessary, if you are experiencing problems, to change the flush size/timeout to the maximum, or it sends the data as it receives it.
- Sometimes an unresponsive module will need an external reset (there is also a watchdog), might need to be part of a design to guard from total failure. This is not uncommon when the server is very unreliable (when you are using your own) or there is some disconnection between the module and the router (due to inteference/distance). Your mbed application should also implement a watchdog, which in turn can then reset the Wifly module.
- Need to be aware of times to complete commands such as connecting to a network, as DHCP can take a while among other things. Rather than looking for ASCII confirmation of things like an open TCP connection, it may be easier to configure one of the GPIO pins to do the job.
- If you hang your module, and can't seem to get back in control of it, you may need to perform the hardware reset procedure described in section A.13 (of user manual v1.2r). This can happen if you inadvertently save a bad configuration.
Stuff the WiFly can do
- Communicate over wifi
- Upgrade its firmware over TCP
- Sleep
- Be controlled completely using GPIO pins.
- Operate as a wifi client, or as an access point or ad-hoc mode. (ad-hoc replaced with access point mode - see User manual section 4.8)
- Operate as a standalone server
Programs using this library:
Import programWebsocket_Wifly_HelloWorld
WebSocket Hello World using the wifly interface
Import programHTTPClient_Wifly_HelloWorld
HTTPClient Hello World with the WiflyInterface
Import programNTPClient_Wifly_HelloWorld
NTPClient using the mbed_official WiflyInterface
Import programRPC_Wifly_HelloWorld
RPC hello world using the Wifly Interface
Import programWifly_TCPEchoServer
wifly tcp echo server example
Import programWifly_TCPEchoClient
wifly tcp echo client example
Projects with this module:
- Pachube wireless data logging
- Internet of things
- Web Server - SmartBoard WiFly using a modified WiflyInterface.
Troubleshooting
Occasionally, people have had a challenge getting the Wifly module to work. This section may have a few tips for troubleshooting.
Get the manual
Perhaps the most important tip - get the manual and read it. It is quite detailed, and many questions are answered in the manual. Often, and we all fall into this trap, you go for the quick fix (and it usually works).
Wiring
- Check your wiring carefully. There are only a few signals to connect, but it is not uncommon to mis-wire one.
- Do you have the ground connection?
- Is your power connection to the Wifly module from the VOUT pin of the mbed?
- Review RXD and TXD - be sure they are not swapped.
Power Quality
- This should not be a problem when the Wifly module is powered from the mbed and that from the USB connector. If you have a separate power supply powering the module, you may want to check it, or try another.
Software Config
- Which mbed UART is your module wired to? Check the schematics up above, and take careful note of the pin assignments used in the corresponding WiflyInterface constructor.
- Factory Reset the WiFly module (this is described in section A.13 of the RN171 User Manual)
- If you have a good software connection and the module is responding, you can issue "factory RESET" to the module, followed by "reboot".
- If you cannot get the a response, you can issue a hardware reset of the module. GPIO9 is a pin on the Wifly module. Set it high and then apply power. Then toggle the pin 5 times slowly.
Connecting to an Access Point (AP)
Using the Wifly_configure program (see above), you can issue the commands manually to the Wifly module. This can help solve connection problems.
- Type "scan" and see that the AP of interest is listed. Compare the signal strength of it compared to others. To eliminate "range" as a problem, move the Wifly module closer to the AP during testing.
- Check or reenter your ssid and pass-phrase. Take note that space characters must be replaced with '$'.
- Check the security setting on your AP. Then re-check the command to match that on the Wifly module.
- Check other settings on your AP, does it have MAC filtering turned on and your module MAC address is not in the filter?
- As a nearly last resort, reduce the security setting on your AP to see if you can then connect. Don't forget to increase the security setting after the test.
Remote Configuration by Telnet
If you can't get it to join your network, perhaps you can join its network. The Wifly module supports telnet over the wireless network. If you can connect to it, then you may be able to configure it as needed.
- In addition to the required connections - GND, 3.3V, TX, and RX, also connect GPIO9 (pin 8) to 3.3V.
- Cycle power with GPIO9 is high.
- Modules with firmware v2.38.3 and lower will enter ADHOC mode.
- Modules with firmware v2.45 and higher will enter AP (access point) mode.
- Associate your PC to the “WiFly” ssid.
- Telnet to the Wifly Module.
- For modules with firmware v2.38.3, the IP address and port is 169.254.1.1:2000.
- For modules with firmware v2.45 and higher, the IP address and port is 1.2.3.4:2000.
- You should now see HELLO on your telnet screen.
- Type $$$ and you should see the CMD response on your telnet screen.
- Perform the commands:
- set wlan phrase YOUR_PASS_PHRASE
- set wlan ssid YOUR_SSID
- Optional: set the security mode.
- save
- reboot
- Before you reboot, remove the 3.3v from GPIO9, so the unit can go into normal mode.
- If your terminal locally echos what you type and the module does too, you may see 2 of everything you type. This is normal, and you should do your best to ignore the extra characters.
- With the reboot, your will lose your connection. If your terminal window is connected to the mbed via USB, and the Wifly_configure application is running, you may see the RN-XV reboot and connect to your network.
- Your computer will also lose the AP as the Wifly module goes into normal mode. Connect the PC back to your regular network.
- If you saw the Wifly module connect, you should see its new IP address. Telnet to that new IP.
- You should now see HELLO on your telnet screen.
- Type $$$ and you should see the CMD response on your telnet screen.
- It should respond with the CMD prompt.
- Type “ftp u” and the firmware update is performed.
- An older Wifly module may still try to connect to Roving Networks ftp site. If that is the case, there are detailed instructions in the user manual from the Microchip site on how to change that.
Remote Configuration by Web Page
Similar to the remote configuration by telnet, but in this case with just your browser. This is available in firmware v4.0 and higher.
- In addition to the required connections - GND, 3.3V, TX, and RX, add a push-button to connect GPIO9 (pin 8) to 3.3V.
- Cycle power and after a moment or two press the button to momentarily set GPIO9 is high.
- The module should now launch the configuration web server and access point.
- Associate your PC to the “WiFly” ssid.
- Launch your web browser and open the page "http://config".
- Click on the Network configuration tab.
- Enter your network SSID, or click on the Refresh List button and then select it from the list (if your network is not hidden).
- Enter your pass phrase.
- Click Save Configuration button.
- Click the Exit Web Configuration app. The module reboots to the new configuration.


