Websockets Server
Websocket Tutorial
As explained in this webpage, the Websocket protocol allows full-duplex, bi-directional communications between a server and clients.
For this WebSocket tutorial, we will need to implement a server. We chose the Tornado Websocket server for our Internet of Things project. In this tutorial, we will present an example of how to get the Tornado Server running using websockets.
This tutorial is divided into two parts:
- A Hello World which uses Tornado
- A websocket streaming example which uses Websocket4j.
1 - Hello World (Python)
1.1 - Server side: Tornado

Installation
- Install Python 2.7.9+ (has pip by default)
- Install Tornado with pip
$ pip install tornado
Code
You can find all the documentation you need here, but I will explain the main parts of the following basic Tornado Websocket server program.
The main idea is to define a class inherited from the WebSocketHandler class.
In this class, you can override the following methods:
- open
- on_message
- on_close
It's very simple; when a client and the server have performed the websocket handshake, the open method is called.
When a message is received from a client, the on_message method is called and if the connection is closed, the on_close method is called.
class WSHandler(tornado.websocket.WebSocketHandler):
    def open(self):
    	print 'new connection'
    	self.write_message("Hello World")

    def on_message(self, message):
    	print 'message received %s' % message

    def on_close(self):
      print 'connection closed'
In our case:
- when a connection is opened, the server prints "new connection" and sends to the client "Hello World"
- when a message is received, the server prints this message
- when a connection is closed, the server prints "connection closed"
To complete the server program, we have to have at the beginning of the program an HTTP Server.
application = tornado.web.Application([
    (r'/ws', WSHandler),
])


if __name__ == "__main__":
    http_server = tornado.httpserver.HTTPServer(application)
    http_server.listen(8888)
    tornado.ioloop.IOLoop.instance().start()
An instance of tornado.web.Application is passed to the HTTP Server. When the server receives a request of the form:
var ws = new WebSocket("ws://localhost:8888/ws");, it will instantiate a WSHandler object. Note the "ws" at the end of the url. This is useful for the client side implementation.
Finally, the whole program is:
Websocket-Server-Python
import tornado.httpserver
import tornado.websocket
import tornado.ioloop
import tornado.web
import socket
'''
This is a simple Websocket Echo server that uses the Tornado websocket handler.
Please run `pip install tornado` with python of version 2.7.9 or greater to install tornado.
This program will echo back the reverse of whatever it recieves.
Messages are output to the terminal for debuggin purposes.
'''

class WSHandler(tornado.websocket.WebSocketHandler):
    def open(self):
        print 'new connection'

    def on_message(self, message):
        print 'message received:  %s' % message
        # Reverse Message and send it back
        print 'sending back message: %s' % message[::-1]
        self.write_message(message[::-1])

    def on_close(self):
        print 'connection closed'

    def check_origin(self, origin):
        return True

application = tornado.web.Application([
    (r'/ws', WSHandler),
])


if __name__ == "__main__":
    http_server = tornado.httpserver.HTTPServer(application)
    http_server.listen(8888)
    myIP = socket.gethostbyname(socket.gethostname())
    print '*** Websocket Server Started at %s***' % myIP
    tornado.ioloop.IOLoop.instance().start()
We save this in /Documents/tornado as server.py for now.
1.2 - Client side
You can either use a webpage or an mbed board to test the above python websocket server. The webpage can be found below, the mbed websocket example can be found here: make sure to point the mbed code at the python server on the correct port.
Import programWebsocket_Ethernet_HelloWorld
Hello World program demonstrating HTML5 Websockets connecting via Ethernet
Warning
To follow this tutorial, you have to use a browser which supports websockets.You can test here to see if your browser supports websockets.
If you are not familiar with jQuery, it is advisable to get a basic understanding here.
The main part of the simple Hello World:
        $("#open").click(function(evt) {
          evt.preventDefault();

          var host = $("#host").val();
          var port = $("#port").val();
          var uri = $("#uri").val();

          ws = new WebSocket("ws://" + host + ":" + port + uri);

          ws.onmessage = function(evt) {alert("message received: " + evt.data)};

          ws.onclose = function(evt) { alert("Connection close"); };

          ws.onopen = function(evt) {
            $("#host").css("background", "#00ff00");
            $("#port").css("background", "#00ff00");
            $("#uri").css("background", "#00ff00");
          };
        });
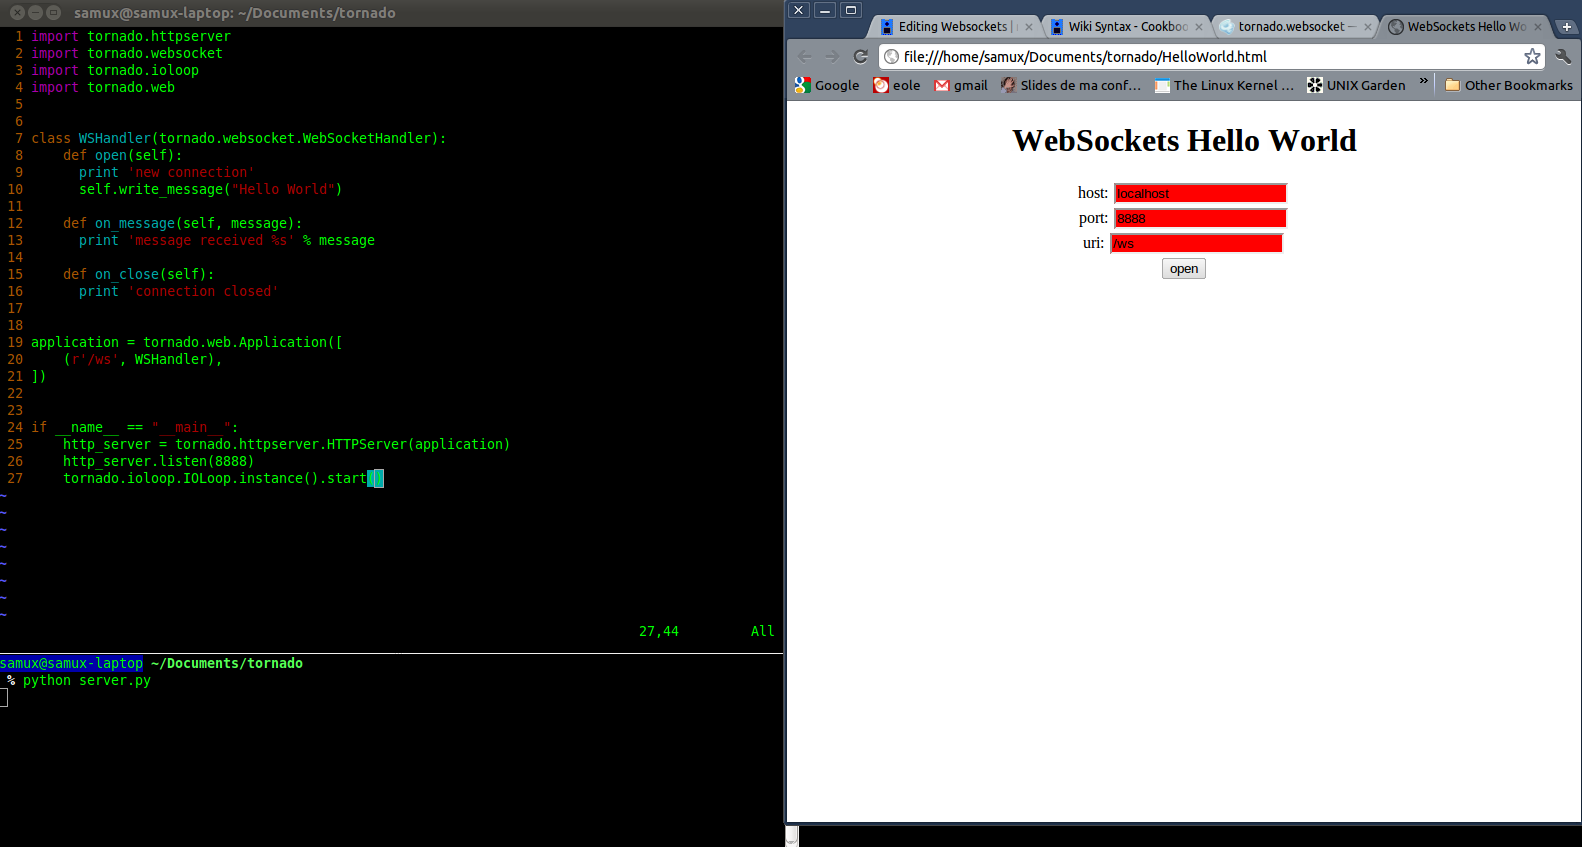
- On this webpage, there are 3 fields: host, port and uri which have a red background at the beginning. You can see this at the bottom of this tutorial.
- When the user has filled these 3 fields, he can try to open a websocket connection by clicking the open button
As for the server, there are three methods: onopen, onmessage and onclose:
- If the connection is opened, we change the background of the 3 previous fields to green
- When we receive a message, we open a pop-up containing the message received
- When the connection is closed, we open a pop-up containing Connection close
Finally, the whole program for the client is:
Websocket-Client-WebBrowser
<!doctype html>
<html>
  <head>
    <title>WebSockets Hello World</title>
    <meta charset="utf-8" />
    <style type="text/css">
      body {
        text-align: center;
        min-width: 500px;
      }
    </style>
    <script src="http://code.jquery.com/jquery.min.js"></script>
    <script>

      // log function
      log = function(data){
        $("div#terminal").prepend("</br>" +data);
        console.log(data);
      };

      $(document).ready(function () {
        $("div#message_details").hide()

        var ws;

        $("#open").click(function(evt) {
          evt.preventDefault();

          var host = $("#host").val();
          var port = $("#port").val();
          var uri = $("#uri").val();

          // create websocket instance
          ws = new WebSocket("ws://" + host + ":" + port + uri);

          // Handle incoming websocket message callback
          ws.onmessage = function(evt) {
            log("Message Received: " + evt.data)
            alert("message received: " + evt.data);
            };

          // Close Websocket callback
          ws.onclose = function(evt) {
            log("***Connection Closed***");
            alert("Connection close");
            $("#host").css("background", "#ff0000");
            $("#port").css("background", "#ff0000");
            $("#uri").css("background",  "#ff0000");
            $("div#message_details").empty();

            };

          // Open Websocket callback
          ws.onopen = function(evt) {
            $("#host").css("background", "#00ff00");
            $("#port").css("background", "#00ff00");
            $("#uri").css("background", "#00ff00");
            $("div#message_details").show();
            log("***Connection Opened***");
          };
        });

        // Send websocket message function
        $("#send").click(function(evt) {
            log("Sending Message: "+$("#message").val());
            ws.send($("#message").val());
        });

      });
    </script>
  </head>

  <body>
    <h1>WebSockets Hello World</h1>
    <div id="connection_details">
      <label for="host">host:</label>
      <input type="text" id="host" value="localhost" style="background:#ff0000;"/><br />
      <label for="port">port:</label>
      <input type="text" id="port" value="8888" style="background:#ff0000;"/><br />
      <label for="uri">uri:</label>
      <input type="text" id="uri" value="/ws" style="background:#ff0000;"/><br />
      <input type="submit" id="open" value="open" />
    </div>
    <div id="message_details">
        </br></br>
        <label for="message">message:</label>
        <input type="text" id="message" value="Hello World!"/><br />
        <input type="submit" id="send" value="send" />
    </div>
    <div id="terminal">

    </div>
  </body>
</html>
We save this as HelloWorld.html in the tornado directory.
1.3 - Demo
We start the server with the command:
$python server.py
And navigate to the Hello world test page.


Et Voilà! There is the pop-up on the client side containing Hello World and the backgrounds are green. On the server side, we see that a new connection has been opened.
2 - Streaming (Java)
2.1 - Server side: Websocket4j
Installation
This server is written in java. To develop in Java, I used Eclipse. Here are the links to download this software:
- JRE installation: here, click the Download button under JRE in Java SE 7 section. After that, you have to chose the program according to your operating system.
- IDE installation: here. take the version of your operating system.
Alternately, if you are running Linux you can just use
$ sudo apt-get install eclipse
Code
For this tutorial, we are going to have a server that broadcasts the message 'message: message 1' every two seconds to every connected client while incrementing the '1'.
The architecture of this server is very simple:
- Tha main function is an infinite loop which accepts websocket connections and does an action after that.
For instance, for us, the action can be:
Let's say that we have an array containing each websocket connection opened.
- Wait for a websocket connection
- Add this client to our array
- If this is the first connection opened:
- Start a thread which will broadcast each 2 secondes a message to clients in our array
The code for this can be:
		int port = 8888;
		boolean first_client = true;
		WebServerSocket socket = new WebServerSocket(port);
		while (true) {
			System.out.println("Streaming server ready. Listen on: " + port + " &&& nb_clients: " + clients.size());
			WebSocket ws = socket.accept();
			if (ws.getRequestUri().equals("/streaming"))
			{
				clients.add(ws);
				if(first_client)
				{
					new WSStreaming().start();
					first_client = false;
				}
			}
			else {
				System.out.println("Unsupported Request-URI");
				try {
					ws.close();
				} catch (IOException e) {}
			}
		}
Note that we will add in our array only clients which try to connect with an uri like: var ws = new WebSocket("ws://localhost:8888/streaming"); in this case.
Now the thread which will broadcast a message is also very simple:
	public static ArrayList<WebSocket> clients = new ArrayList<WebSocket>();

	public void run(){
		long nb = 0;
		while (true) {
			if(clients.size() != 0)
			{
				for(int i = 0; i < clients.size(); i++)
				{
					try{
						clients.get(i).sendMessage("message: " + nb);
					}
					catch(IOException e)
					{
						clients.remove(clients.get(i));
					}
				}
				nb++;
				try {
					sleep(2000);
				} catch (InterruptedException e) {
					e.printStackTrace();
				}
			}
		}
	}
As you can see, in an infinite loop we:
- we send to each client the message message nb.
- If the sending fails, we remove the client of the array.
- Then we wait during 2 secondes
An archive of all the code in the demo section.
2.2 - Client side
<!doctype html>
<html>

  <head>
    <style type="text/css">
      body {
        text-align: center;
        min-width: 500px;
      }
    </style>
    <script src="http://code.jquery.com/jquery.min.js"></script>
    <script>
      function log(m) {
        d = document.getElementById("log");
        d.innerHTML = m + "<br/>" + d.innerHTML;
      }

      $(document).ready(function () {

        var ws = new WebSocket("ws://localhost:8888/streaming");

        ws.onopen = function(evt) { log("socket opened"); };
        ws.onmessage = function(evt) { log("message: " + evt.data); };
        ws.onclose = function(evt) { log("socket closed"); };
      });

    </script>
  </head>

  <body>
    <h1>Websockets Streaming</h1>
    <div id="log"></div>


  </body>
</html>
Here, we save this to a file in our tornado directory as before, calling the file 'Streaming.html'. In this webpage, once the connection has been established, we print socket opened in a div with the id log and then for each received message, we extend this div with the message.
1.3 - Demo
To run the demo:
- Download this archive containing the server sources
- Put and extract this archive in your workspace (/home/samux/workspace for me)
- Start Eclipse
- File > Import > General > Existing Projects into Workspace. Then select the archive file in the select archive file field.
- Finish

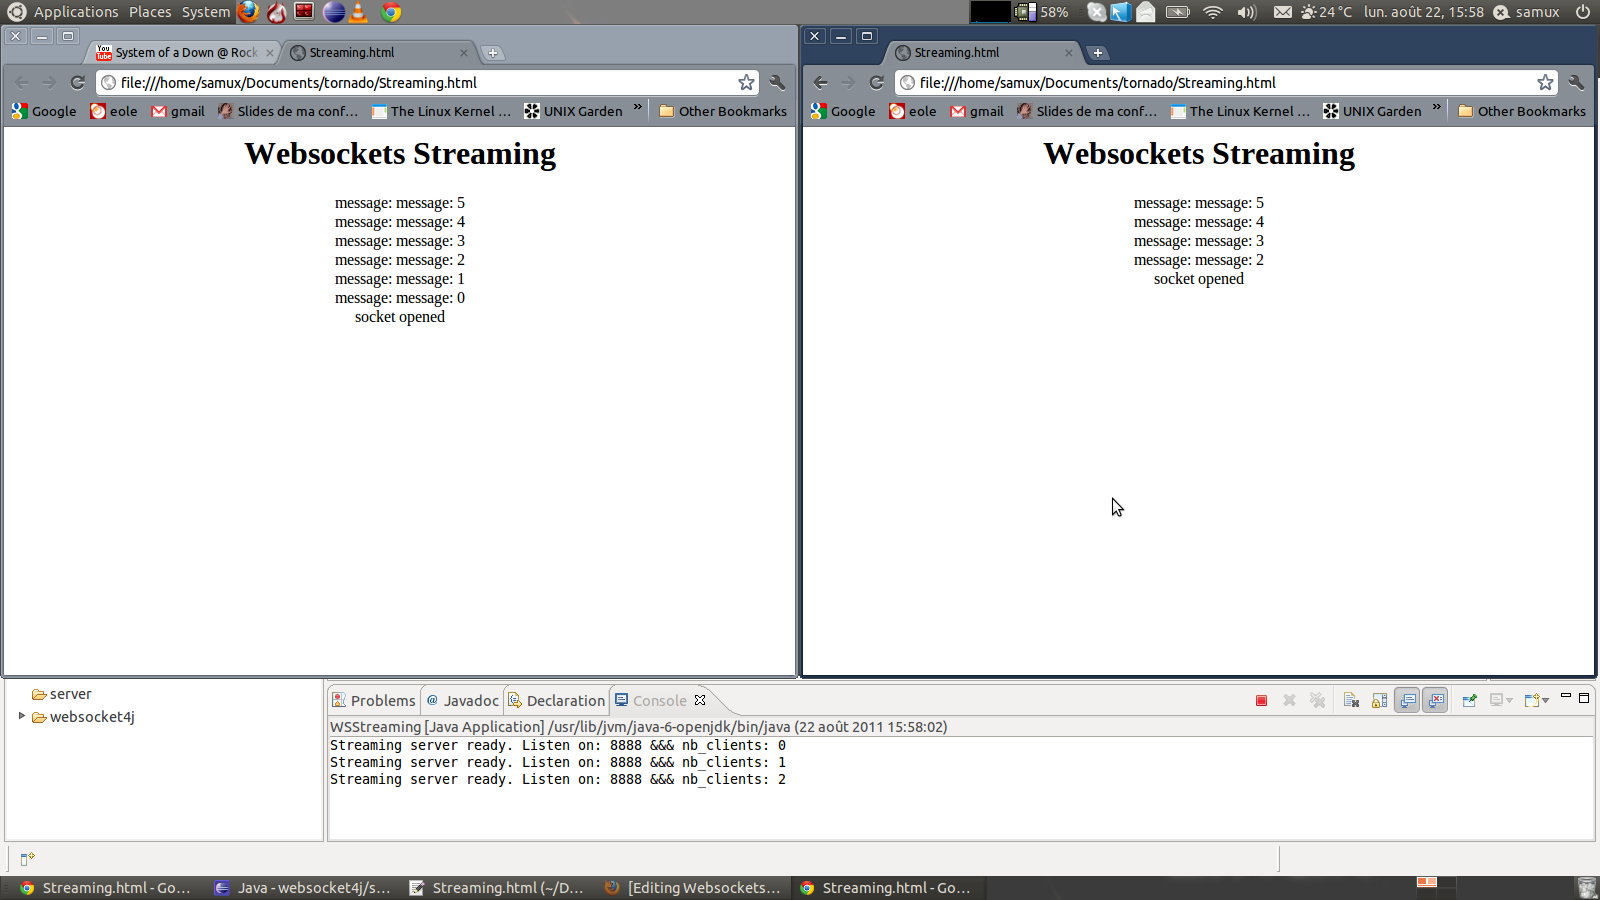
Then on the left-hand side, you should have a directory named websocket4j, as you can see above. You can go in the src directory to see the packages used. The one which we are interested in is websocket4j.mbed_demo. You can open WSStreaming.java and see the code explained above.
Run the server by clicking on the small green icon with the arrow, with the WWStreaming.java file selected:

You should see on the console Streaming server ready. Listen on: 8888 &&& nb_clients: 0.
At this step, the server is started!
You can open the Streaming.html file with Chrome and see the results:

Et Voilà! The client(s) are receiving messages from the server and the server prints that there are two, or however many, clients connected. Note that although we are accessing the page from the same computer we are running the server on, it would be the same result if you were to do so from another computer on the LAN, or any on the Internet if you set up port forwarding correctly on your router.
