PID
A proportional-integral-derivative controller (PID controller) is a generic loop feedback mechanism. It measures a process variable (e.g. temperature), and checks it against a desired set point (e.g. 100 degrees celsius); it then attempts to adjust the process variable by changing a controller output (e.g. PWM signal to an electric heater) which will bring the process variable closer to the desired set point.
The wikipedia article on PID controllers is an excellent place to start in understanding the basic concepts. The controlguru website also contains a wealth of easy to digest information on how to implement and tune a PID controller.
As these resources can already explain the fundamentals and implementation of a PID controller, this page will detail the PID library and then present an example of putting it into practice.
Note
The CMSIS-DSP software library contains high-performance PID functions. These should be a better option when looking for higher raw performance.
Software
The PID software runs a loop at a set interval, and performs the following calculation:

Where
- CO is the controller output
- CObias is an optional, user set bias for the controller output
- Kc is a proportional tuning constant
- e(t) is the error at time t
- Ti is an integral tuning constant
- Td is a derivative tuning constant
- PV is the process variable
- dt is the rate the loop runs at
The controller works in percentages during the calculations and then scales relevant outputs back into real world values.
Initialization
When a PID object is created, the three tuning constants (Kc, Ti, Td) and an interval time are passed as parameters. By default the controller starts in manual mode - whenever the controller is changed to auto mode, the working variables are reset (according to the current limits) which allows for "bumpless" transfer between manual and auto mode. The input and output limits are set as 0.0-3.3 [volts], and the tuning constants are slightly modified to make things easier during calculations. Finally, appropriate variables (such as the controller output and process variable) are initialized to zero before the main loop method is attached to a Ticker which runs at the rate passed in by the user.
Application
In order to set up a PID object for use in a specific application, a typical initialization and loop might look like this.
#include "PID.h"

#define RATE 0.1

//Kc, Ti, Td, interval
PID controller(1.0, 0.0, 0.0, RATE);
AnalogIn pv(p15);
PwmOut   co(p26);

int main(){

  //Analog input from 0.0 to 3.3V
  controller.setInputLimits(0.0, 3.3);
  //Pwm output from 0.0 to 1.0
  controller.setOutputLimits(0.0, 1.0);
  //If there's a bias.
  controller.setBias(0.3);
  controller.setMode(AUTO);
  //We want the process variable to be 1.7V
  controller.setSetPoint(1.7);

  while(1){
    //Update the process variable.
    controller.setProcessValue(pv.read());
    //Set the new output.
    co = controller.getRealOutput();
    //Wait for another loop calculation.
    wait(RATE);
  }

}
Example: Velocity Control
This example will show how to use the PID controller library and a brushed DC motor with a quadrature encoder and H-bridge to perform velocity control.
We can calculate the velocity of the motor by taking two samples of the quadrature encoder's pulse count in a short interval and then dividing the difference between them by the length of the interval to get the number of pulses per second.
We could turn pulses per second into a more familiar unit, such as metres per second, but we want to try and choose a process variable which is as closely related to what we're measuring as possible; and since what we're measuring (pulses per second) is directly proportional to the velocity, it should provide a much better value to work with during our PID calculations.
Our process variable will therefore be the number pulses per second we've read, and our controller output will be the PWM signal's duty cycle to the H-bridge.
Tuning Method
There are many ways to tune the constants in a PID controller, including simple trial and error; the method presented on controlguru involves fitting a simple first order plus dead time dynamic model to process test data that we take - a lot easier than it sounds! This is the method we will follow, but it is not the only way.
Step Test
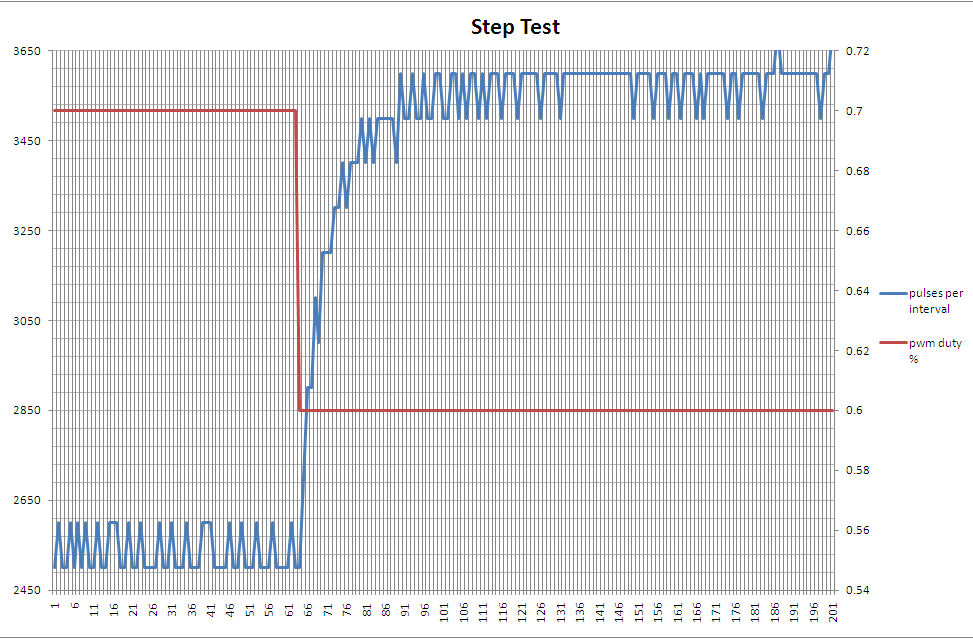
The first we need to do, is observe how our process variable changes with respect to controller output. We'll do this by performing a step test - after setting our controller output to a specific value and observing our process variable, we will then "step" our controller output to a new value and watch what happens to our process variable.
Here are the results.

The number of counts per second were observed while the PWM duty cycle was 70%, and after it was stepped to 60%.
Process Gain
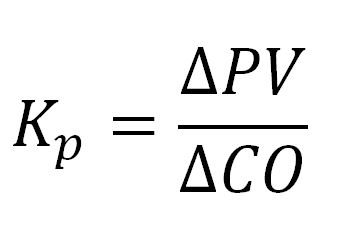
The process gain constant or Kp describes how the process variable changes when the controller output changes. It is calculated in the following way:

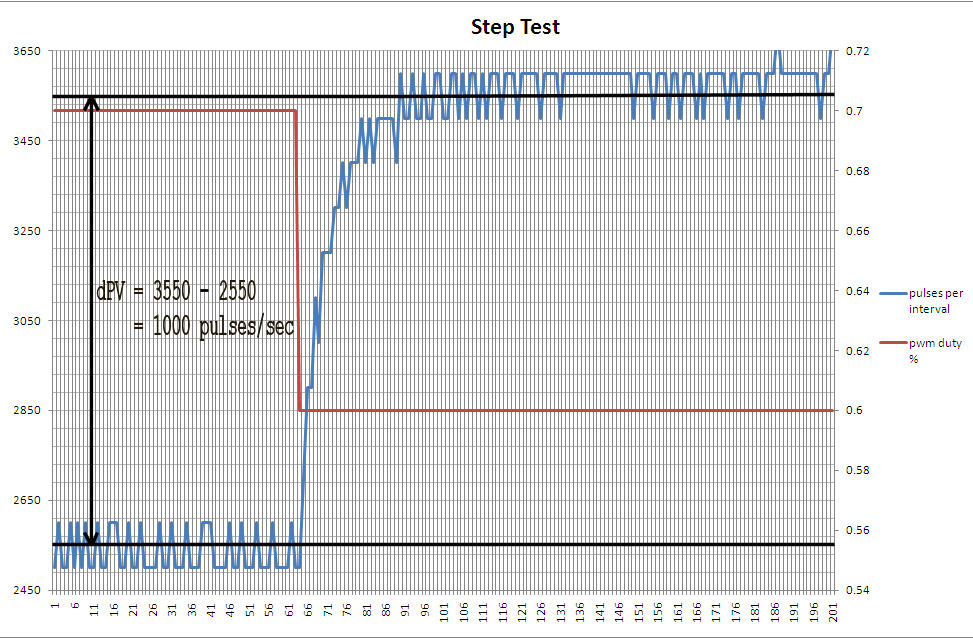
We can use the data from our step test to calculate to Kp.

dPV = 1000, and dCO = -0.1; when talking about the controller output, we will use how far "on" or "off" it is as a percentage in our calculations to make things easier. Therefore dCO = -10%.
Kp = dPV / dCO = 1000 / -10% = -100 counts per second/%
Library
[Not found]