You are viewing an older revision! See the latest version
Interfacing with LabVIEW
Here are some building blocks to interface an mbed with LabVIEW, allowing LabVIEW programs to interact with the real world. This could be used for things like:
- data acquisition in LabVIEW via sensors connected to mbed
- controlling actuators connected to mbed from LabVIEW
- LabVIEW programs with hardware-in-the-loop, where sensors and actuators are interfaced with mbed but calculations and control are in LabVIEW
We've created two ways for you to interface between LabVIEW and mbed.
- LabVIEW RPC This allows you to directly control the mbed using the RPC. For many applications it wouldn't be necessary to write any custom code for the mbed.
- Serial Communication These examples show how data can be transfered between the program running on mbed and your LabVIEW application.
The examples use the mbed USB Serial Port to connect between LabVIEW and mbed.
LabVIEW Setup
To use mbed with LabVIEW, you need to have the NI-VISA drivers installed to give access to the USB serial port.
- http://www.ni.com/trylabview/ - LabVIEW trial version
- http://www.ni.com/visa/ - NI-VISA drivers for the serial port
With LabVIEW and NI-VISA installed, you should be ready to go.
LabVIEW RPC
We've created a set of vi's that expose most of the mbed interface which is accessible using the RPC. The vi's we've created allow you to create and control new objects or control objects that are created in the mbed code.
The LabVIEW vi's
Here are the vi's that allow you to interface with the RPC and some examples of their use.
- LabVIEW vi's: /media/uploads/MichaelW/mbed_lvlibrary.zip
- Examples: /media/uploads/MichaelW/mbed_labview_demos.zip
mbed code
The mbed needs to run code to receive the RPC messages, pass them into the rpc handler and return the result.
Import program
00001 #include "mbed.h"
00002 #include "mbed_rpc.h"
00003
00004 /**
00005  *  This example program has been updated to use the RPC implementation in the new mbed libraries.
00006  *  This example demonstrates using RPC over serial
00007  */
00008
00009 //Use the RPC enabled wrapped class  - see RpcClasses.h for more info
00010 RpcDigitalOut myled(LED4,"myled");
00011
00012 Serial pc(USBTX, USBRX);
00013 int main() {
00014     //The mbed RPC classes are now wrapped to create an RPC enabled version - see RpcClasses.h so don't add to base class
00015
00016     // receive commands, and send back the responses
00017     char buf[256], outbuf[256];
00018     while(1) {
00019         pc.gets(buf, 256);
00020         //Call the static call method on the RPC class
00021         RPC::call(buf, outbuf);
00022         pc.printf("%s\n", outbuf);
00023     }
00024 }
Or here is a bin file which you can download straight on to your mbed: /media/uploads/MichaelW/rpc_serial_lpc1768.bin You can also run your own code with the RPC routines, its not a case of either or.
Using the LabVIEW RPC vi's
The LabVIEW vi's have been created to mirror the mbed api as closely as possible. They therefore take a similar object oriented approach. We create an mbed object and then using this create objects for each of the inputs and outputs. The vi's are contained in two folders:
- The "mbed Interface" folder includes all the vi's for creating and controlling inputs and outputs on mbed.
- The "Transport Mechanisms" folder contains the vi's for creating a connection to an mbed and then closing it.
The vi's
We've provided the vi's as a zipped file which you can extract to any where on your computer. To make it a bit easier to access them we've also created a Library which might make it a bit easier to develop with as you can drag vi's in from it. Just open the file mbed_LVlibrary from within LabVIEW.
Using the API
- First create an mbed interface by using a transport mechanism, so far only "mbedSerial" has been created. Connect a control to set the port the mbed is connected to.
- You can now create objects on mbed such as DigitalOut or AnalogIn. Wire up the input of a DigitalOut to the output from mbedSerial
- To create an object connect controls or constants to the pin number. Pins are passed as a string eg "p21" or "LED1"
- If you have an object created on mbed then you can tie to it by passings its name as a string into the existing object name.
- You can now execute the methods that are defined in the mbed api. For example you can execute a write block on a DigitalOut to set the value of the pin. Wire the write block to the object you want to act on and then add a control to set the value of the pin.
- Finally wire up the mbedSerial_delete method to the mbed wire so that the serial port is closed and is avaliable to other programs.
This is demonstrated in the LED flash example. Note that only the write method is contained within the while loop as the object only needs to be created once at the start.
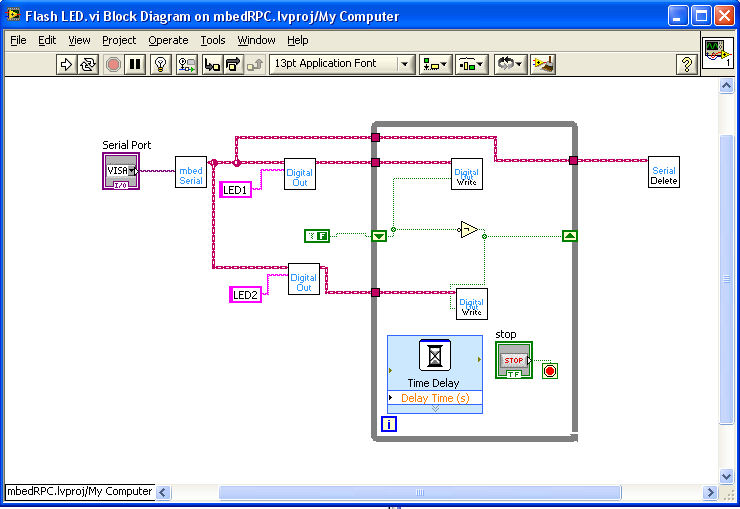
Using this approach you can connect multiple mbeds on different ports and control them from LabVIEW. The vi's have been designed to align as closely as possible with the api so looking in the Handbook should help explain what each method does. As its using the RPC the vi is directly calling the methods in the api.
Coming up
- Further developments will make it easy to interface with mbed over other transport mechanisms such as networks.
- Provide more example code for mbed showing how to integrate your own code with a program that is also controlled over RPC.
Serial Communication
Here are the mbed vi's we've created to communicate between mbed and LabVIEW:
- mbed-ni.zip - mbed read and write VI's, plus Hello World examples
Download these and use them as components in your LabVIEW designs.
The Protocol
To keep things simple, we're assuming the communication between LabVIEW and mbed is a line-based text protocol. That means every "packet" between LabVIEW and mbed is a string followed by a newline character (\n). The mbed-read.vi returns a line read from mbed every time you run it, and the mbed-write.vi writes a string to the mbed every time you run it, so you can use this however you want.
Whilst the line string is the underlying data, there are also some common cases we've added support for such as sending single numbers, or comma separated value (csv) "packets". The inputs and outputs supported are:
- A string (e.g. "hello" is transferred as "hello\n")
- A number (e.g. 1 is transfered as "1.0000\n")
- An array of strings (e.g. ["foo", "bar"] is transferred as "foo,bar\n")
- An array of numbers (e.g. [1, 0.5] is transferred as "1.000,0.5000\n")
These make it easy to work in LabVIEW without having to do lots of packing/unpacking/conversion yourself.
mbed Read Hello World
A simple labview example is included that plots the state of an AnalogIn input, which looks like:
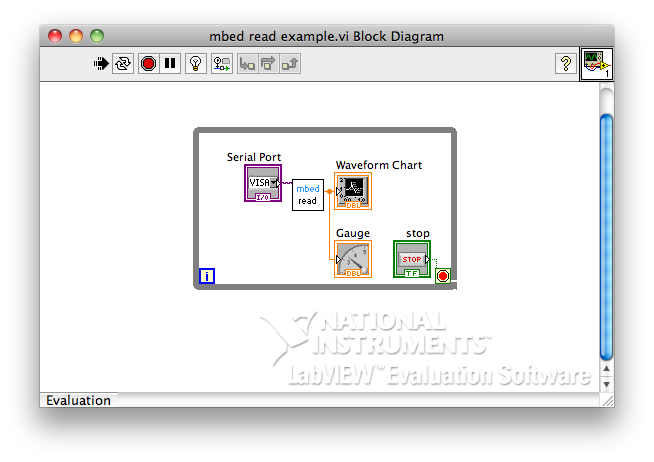
And here is an example program to send some data:
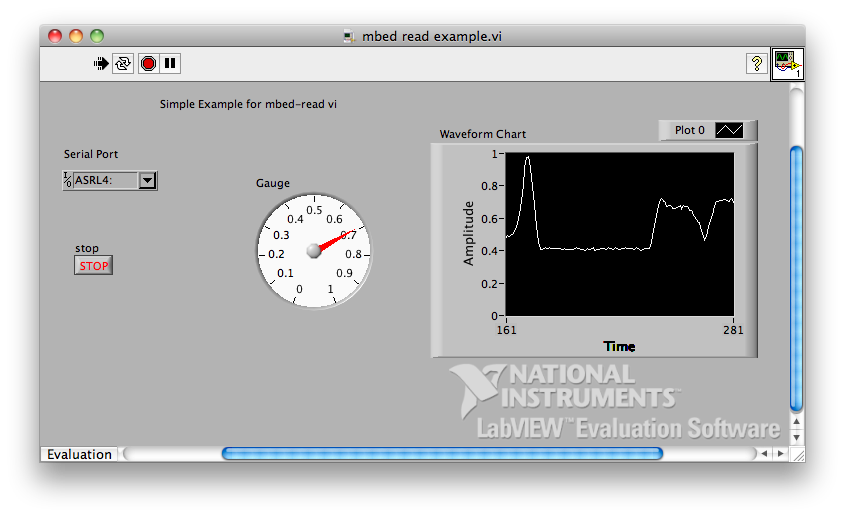
The resulting output once the mbed COM port number has been selected in the VISA control, and when modifying AnalogIn, looks like:
mbed Write Hello World
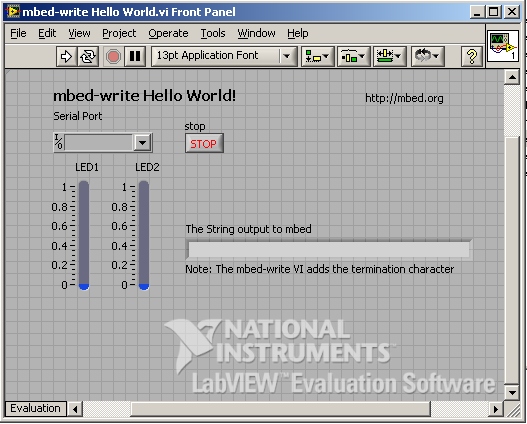
A simple labview example is included that controls the brightness of LED1 and LED2, which looks like:
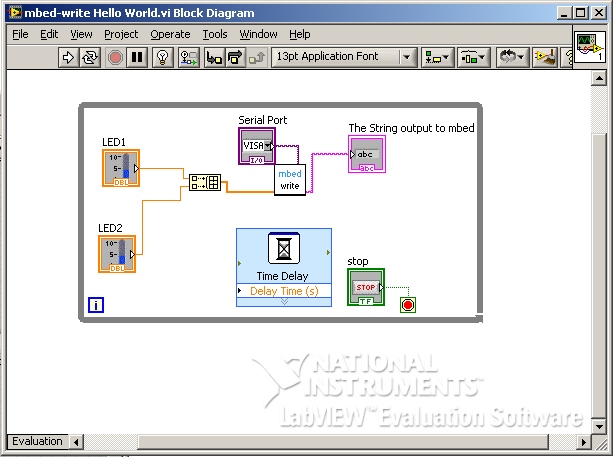
And here is an example program that responds to the commands:
The control panel looks like:
