Big Mouth Billy Bass
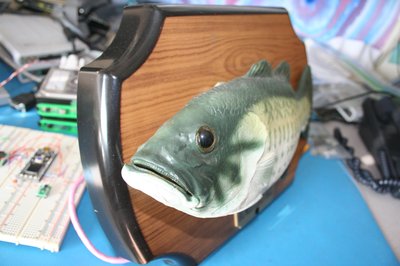
Here it is: the cookbook page for everything you need to know to build your own hotrod Big Mouth Billy Bass (BMBB). Billy was featured on hackaday, gizmodo, break.com, and Design News Gadget Freak, as well as traveling to the Embedded Systems Conferences in Boston and the UK. In this article are the details of how Billy got his brain transplant. Follow these directions and you can have your own all-singing, all-dancing ichtyoid.
 Import the BMBB bass program to your compiler environment
First the parts list. You'll need:
- An mbed!
- A Big Mouth Billy Bass
- An SDcard breakout, like this one from Sparkfun.
- Solderless breadboardlike this one from Sparkfun
- wires/cables/sockets (I used an RJ45 puchdown socket and a cut apart network cable).
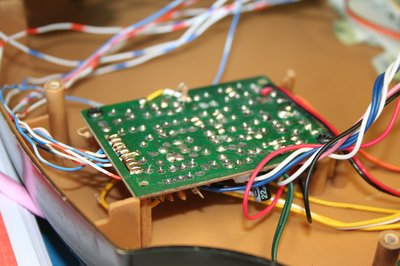
Open up your BMBB by removing the screws from the back panel. Once inside you should see a PCB that looks something like this:

Actually yours won't have all of those long wires attachedon the left side. Instead, over on the edge of the PCB, there will be a smaller PCB attached. This smaller PCB contains Billy's brain, in an epoxy encapsulated IC. It's significantly underpowered as you can tell by the diminutive size. We'll be addressing that next. First, you need to sit down with a scope or voltmeter to figure out what each of those 10 connections is for. Either that or you need to refer to the table below, where I've already done the probing and listed the results. In this table, pin one is the pin closest to the top of the BMBB, and also towards the top of the photo. Pin 10 is at the bottom.
| Control module pin | Function |
|---|---|
| 1 | GND |
| 2 | Light sensor, dark=Vbatt |
| 3 | Push button |
| 4 | Tail motor |
| 5 | Mouth motor |
| 6 | Body motor |
| 7 | NC |
| 8 | ??? |
| 9 | ??? |
| 10 | Audio |
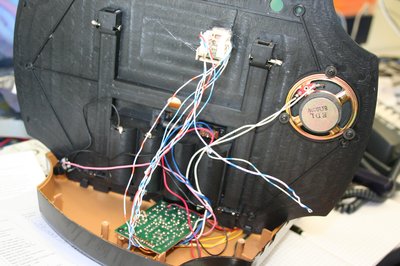
Also inside BMBB are a speaker and three small motors that move the three body parts (body, mouth, tail). The mechanisms for these body parts include return springs such that when the motor is energized the body part moves (mouth opens, body moves away from the plaque, tail moves away from the plaque). When the motor is not energized the spring pulls the body part back to its rest position.
You'll need to remove Billy's little brain by unsoldering the 10 connections between it and the larger PCB, which contains the driver circuitry for the motors, the pushbutton, and the light sensor. You can then add your own wires connected to your mbed to control Billy's movement, and respond to the pushbutton and light sensor. The mbed pin assignments in the table above can be changed to suit your application.
The full set of connections between BMBB and your mbed are as follows:
| Driver PCB signal | Function | To MBED pin |
|---|---|---|
| Control/Driver pin 1 | Ground 1 (GND) | 1 (black end) |
| Control/Driver pin 2 | Light sensor | 15* |
| Control/Driver pin 3 | Push button | 24 |
| Control/Driver pin 4 | Tail motor | 23 |
| Control/Driver pin 5 | Mouth motor | 22 |
| Control/Driver pin 6 | Body motor | 21 |
| Control/Driver pin 10 | Audio | 18* |
| Vbatt, taken from the positive end of the 4 C cells | Power | 2 (VIN) |
The last connection, from Vbatt to the mbed, will allow the mbed to be powered by the BMBB batteries to make a self contained solution. It can be left off, which will require the mbed to be powered by the USB cable. Take note: You'll be so entertained by this new BMBB that you'll probably put together a long play list and use it all the time. Billy will go through batteries pretty quickly, and when they start to get low the voltage will drop, especially when all three motors are energized. If mbed is powered by the batteries then this low voltage can trigger the brownout circuit and reset the part. So if BMBB starts over right in the middle of a body movement it's probably time for new batteries.
The firmware included with this article does not make use of the light sensor. It also does not use the analog section of the BMBB PCB or the BMBB speaker. I was not able to make that work, so I simply attached a 1/8" audio plug to mbed pin 18 and ground and plugged in a set of powered computer speakers.
In my example I wanted the new brain to be outside the BMBB, so soldered the wires to the control points, then ran them to an RJ45 puchdown jack that I mounted to the back of the plaque. I cut a hole that matched the jack and epoxied it in place. This connector has 8 pins, so just enough to make the connections shown in the table. You can cut a network cable in half, strip and tin the ends of the wires, and they will then plug directly into your breadboard. With a big booger of hot glue you can turn the cut end of the network cable into a connector for a more permanent solution that can be easily plugged and unplugged. The next photo shows the wires from the BMBB PCB to the punchdown connector.

At this point you have control over BMBB and can experiment with sounds and moving body parts. You could write a program with embedded audio data and produce a functional BMBB, but you would be limited to the storage available in mbed memory. It would be much better if you had more storage available, so that's why the micro SD card socket will be added. It attaches with 6 more wires as shown in the following table.
| SD card socket pin | Function | To MBED pin |
|---|---|---|
| 1 | CS, chip select | 13 |
| 2 | DI, serial data in | 5 |
| 3 | VCC | 40 (VOUT) |
| 4 | SCK, serial clock | 7 |
| 5 | GND | 1 (GND) |
| 6 | DO, serial data out | 6 |
SDcards are a terrific addition to mbed projects. With a simple 6 pin interface you have access to gigabytes of storage and a reasonably high data rate. mbed has support for FAT filesystems on non HD type cards.
The last thing to do is to load up the firmware into the online compiler and run it. This firmware comes with several audio clips in WAV format and the associated motion files that specify when to move each body part. The WAV file and the motion file go together in pairs, and the format of the motion file is simply a sample time followed by which body part to move. The firmware uses PWM to drive the motors, and the motion file allows you to specify the PWM percentage. In theory this allows you to move a body part to less that it's full range of motion, but in practice, on my mbed, the body part motions didn't have good resolution or repeatability, probably because of friction and working against the spring.
If you want to create your own motions it's simple but tedious. Simply get a WAV file of the sound you want to play, and load it up in a WAV file editor (I used the open source Audacity program). Play the clip over and over, zooming in on the part of the audio that you are working on, and make a note of which times (in ms) you want each body part to move. This information goes into the movement file, the format of which is self explanatory. Keep in mind that each motion has to be started a little early in order to visually be synchronized with the music. The mouth has fairly fast response but the body and tail don't.
I have published the BMBB firmware as a program here on mbed.org.
Enjoy! Steve Ravet