Assembly Language
Calling an Assembly Language Function from C/C++
Here is a simple example showing an ARM assembly language routine called from C/C++ that blinks an LED. At the same time, the C/C++ API DigitalOut is used to blink a different LED to show the easier alternative in C/C++. First in C/C++, the assembly language function, my_asm, must be declared external at the beginning of the C/C++ module. Then the assembly code can be called just like a C/++ function using the C/C++ statement my_asm(value). In the code below, LED1 blinks using the assembly language function to write the new value to the bit, and LED4 blinks using the C/C++ API DigitalOut available in the mbed compiler.
Inline assembly code using _asm{…} inside a C/C++ source file is not currently supported in the mbed compiler, so the ARM assembly language source code must be placed in a separate *.s file. This file must be created or imported as a file into the project’s directory. The compiler will assemble and link *.s files in the project's directory when you hit compile
main.cpp
#include "mbed.h"
// This program will blink LED1 and LED4
// using assembly language for LED1 and
// API functions for LED4
// declare external assembly language function (in a *.s file)
extern "C" int my_asm(int value);
// declare LED outputs – let C set them up as output bits
DigitalOut myled1(LED1);
DigitalOut myled4(LED4);

int main() {
    int value = 0;
    // loop forever
    while(1) {
      //call assembly language function to control LED1
      my_asm(value);
      //API function to control LED4
      myled4 = value;
      // flip value and wait
      value = ~ value;
      wait(0.2);
    }
}
ARM Assembly Language Example
The ARM assembly language source file for this example is seen below. This ARM assembly language example is for the mbed LPC1768. For the new mbed LPC11U24, the Cortex MO instruction set must be used and the I/O hardware setup is a bit different. The AREA directive must appear on line 1 and directives cannot start in column 1. The entry point is my_asm setup as a label on the first instruction below and made available to C using the assembler directive EXPORT. The function’s argument, value, passed from the C compiler is placed in R0 and the assembly language routine is then called from C.
The assembly language code writes the new value to the GPIO bit connected to LED1. In the C API DigitalOut the compiler automatically determines the port address and bit number using the pin names. From pinnames.h or the LPC1768 Pin functions table, LED1 is shown as being connected to GPIO port 1 bit 18. This could also be determined by checking the mbed LPC1768 module schematics to find the chip pin number connected to LED1. This information can then be used to find the address of the I/O registers used to control the pin by consulting Chapter 9 General Purpose Input/Output (GPIO) of the LPC1768 User Manual. For other pins, the pin's function may also need to be set to GPIO first as described in Chapter 8 Section 3. Chapter 34 Section 2 has a short instruction set description. Here is a Cortex M3 Instruction Set Summary page.
The code below writes the new bit out using GPIO Port 1’s FIOSET set or FIOCLR clear register along with a mask value used to select the correct bit. After finishing the write operation, the code returns to the C program code using the instruction BX LR, Branch indirect using link register. An assembly language source module must have the END directive on the last line.
Most pins have several functions. The function is selected by a pin function register, and a GPIO pin's direction (in or out) must also be setup in the direction register. The C/C++ statement DigitalOut myled1(LED1); automatically sets up the pin's function register and the pin's direction register. If this statement was removed, these registers would need to be initialized by the assembly language routine.
Functions with more arguments will place the arguments in R0, R1, R2, R3 and then after four they will be passed on the stack. The first four registers r0-r3 (a1-a4) are used to pass argument values into a subroutine and to return a result value from a function. They may also be used to hold intermediate values within a routine (but, in general, only between subroutine calls). A subroutine must preserve the contents of registers r4-r8, r10, r11 and the SP. This can be done on the stack with push and pop operations. See the ARM Procedure Call Standard for additional details on argument passing. Keep in mind that there is additional overhead to call, pass arguments, and return from a function as opposed to inline code. Short function calls may not make sense once you consider this additional overhead.
my_asm.s
    AREA asm_func, CODE, READONLY
; Export my_asm function location so that C compiler can find it and link
    EXPORT my_asm
my_asm
;
; ARM Assembly language function to set LED1 bit to a value passed from C
; LED1 gets value (passed from C compiler in R0)
; LED1 is on GPIO port 1 bit 18
; See Chapter 9 in the LPC1768 User Manual
; for all of the GPIO register info and addresses
; Pinnames.h has the mbed modules pin port and bit connections
;
; Load GPIO Port 1 base address in register R1
    LDR     R1, =0x2009C020 ; 0x2009C020 = GPIO port 1 base address
; Move bit mask in register R2 for bit 18 only
    MOV.W   R2, #0x040000   ; 0x040000 = 1<<18 all "0"s with a "1" in bit 18
; value passed from C compiler code is in R0 - compare to a "0"
    CMP     R0, #0          ; value == 0 ?
; (If-Then-Else) on next two instructions using equal cond from the zero flag
    ITE EQ
; STORE if EQ - clear led 1 port bit using GPIO FIOCLR register and mask
    STREQ   R2, [R1,#0x1C]  ; if==0, clear LED1 bit
; STORE if NE - set led 1 port bit using GPIO FIOSET register and mask
    STRNE   R2, [R1,#0x18]  ; if==1, set LED1 bit
; Return to C using link register (Branch indirect using LR - a return)
    BX      LR
    END
Assembly Language or C/C++?
The classical argument for assembly language programming is that will produce more efficient code. With today’s modern compilers this may still be true in some cases, but only for experienced assembly language programmers that can afford to spend the time optimizing code. The vast majority of programmers will have more efficient code using the compiler and will also be several times more productive since it takes fewer lines of code in a higher level language such as C/C++ and these lines can also be coded and debugged faster to implement an application. In most cases, more speedup will typically be obtained by concentrating the development effort on improving the algorithms used in an application.
Some assembly language functions in application programs may still be used but only in a few critical places where low level routines interface with the device hardware or in a rare case where something is all but impossible with existing C/C++ features. Its use continues to decline every year as compilers improve and processors become faster and cheaper, at the same time as labor costs for software development increase. Compiler writers and processor hardware designers will of course always need to fully understand the processor’s assembly language, so students in those areas still need to learn assembly language.
For additional examples, there is a recent ARM assembly language textbook and an ARM Cortex M3 textbookavailable. The Cortex-M3 Technical Reference Manual contains a short instruction set summary. The ARMv7-M Architecture Reference Manual describes the instruction set, memory model, and programmers' model for Cortex-M3 processors. The ARM and Thumb-2 Instruction Set Quick Reference Card is also handy.
While it is possible to try ARM assembly language programming on the mbed module, it is not the ideal environment to learn assembly language. A debugger that allows single stepping of instructions, breakpoints, and that can display register contents is really needed for anyone new to assembly language. A software emulator that simulates the execution of assembly language programs on a desktop computer is really the ideal environment for students learning assembly language. There are some free ARM emulators available, but they do not directly support the mbed LPC1768 hardware configuration.
Debugging Assembly Language
To debug a complex assembly language program, download the free demo version of the Keil Tools ARM emulator.
It is limited to 32K code size, but that should not be a issue.
It even supports I/O emulation of the NXP LPC1768 processor used in the mbed module. You can single step, set breakpoints, examine registers, and even monitor I/O pins with a logic analyzer style display.
The screen capture below shows my_asm.s being debugged using the Keil tools. It is seen single stepping through the code. Note the register values on the left and the highlighting of the current instruction in the code window.

Here are the basic steps to get started using the Keil uVision tools to debug an assembly language program. Start the Keil uVision tool and select Project -> New uVision Project and assign a name to your project.
In the target selection dialog box that pops up, expand NXP and select LPC1768 and click OK. Then click yes to include startup code.
Expand Target in the upper left and right click Source Group 1. Select ADD files to group, and use it to add your *.s files to the project.
A few extra lines of test setup code are required in the *.s file.
The automatic reset startup assembly code initializes a few registers along with the vector table and jumps to __main (prefixed with two underscores) and you will need some code in your *s. module starting with the global label __main to load arguments
in the registers and call your assembly language code just like C code. Select Project -> Build Target to assemble the code and watch for errors in the bottom message display area.
Warnings are OK, but fix any errors and rebuild.
Use Debug -> Start/Stop to start running the code.
Then experiment with breakpoints, single step, and watch the code and register display. Click Help for online manuals to explore the more advanced features.
The extra test code below was added to the start of the my_asm.s module to interface to the Keil tools reset startup code and to call the assembly language program for testing.
Code_added_for_debugger
	GLOBAL __main
	AREA main, CODE, READONLY
	EXPORT __main
	EXPORT __use_two_region_memory
__use_two_region_memory EQU 0
	EXPORT SystemInit
	ENTRY
; Dummy System Init routine
SystemInit
	BX		LR
; ASM setup above to keep Keil tools happy - starts at label __main
; (for version 4.21 - might need minor changes for another version)
;
; Simulate C arg in R0, a Call to my_asm, and then loop forever
__main
	LDR		R0,=0
	BL		my_asm
	LDR		R0,=1
	BL		my_asm
	B		__main
; Assembly code to test below:
After debugging your code, remove the added test code, and move it back to the mbed compiler to try it on real hardware.
Debugging an mbed project using the Keil Tools ARM Emulator
It is possible to port mbed projects to the Keil uVision tool using the procedures outlined in ARM Application note 207 – Porting an mbed Project to MDK-ARM. Download and install the free demo version of the Keil Tools ARM emulator. The free demo version is limited to 32K code size. Mbed applications with networking will be near the max code size supported in the demo version. One work around would be to debug the application without the networking features first and then move back to the online compiler for networking. Printf() also requires quite a bit of code. In addition to the application note, be sure to download the example code project setup files provided with the application note for mbed. These files will be needed to setup an initial project. Recent changes to the compiler make it a lot easier to setup these project files by just using the compiler's export for Keil uVision feature.
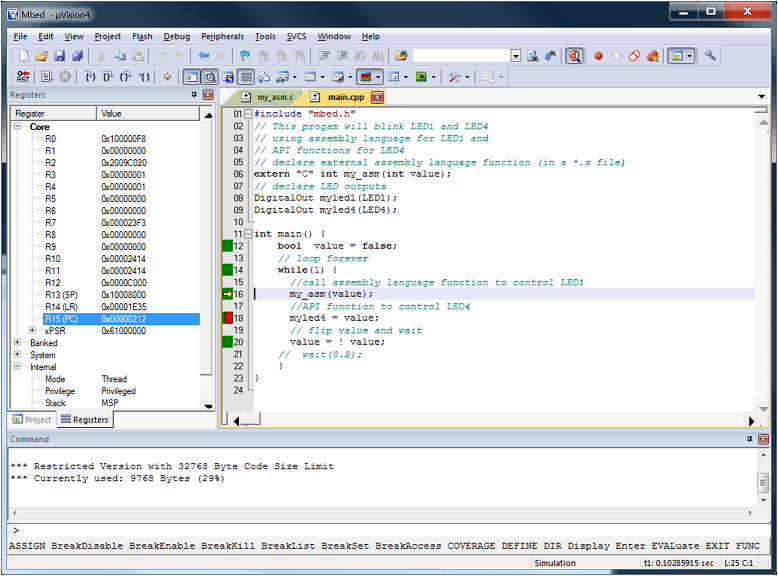
After moving over the mbed source files from the online compiler as outlined in the application note, you can compile code and download the *.bin file manually to run it on the mbed board. You can compile code offline, but the real advantage is the ability to use the emulator to debug complex mbed projects with mbed's API libraries. You can run the code on the emulator and set breakpoints both in C/C++ and assembly. The earlier example project with both C/C++ and assembly files was ported to the Keil Tools using the Export feature of the mbed online compiler. The example mbed project running on the Keil Tools is seen below single stepping through the C/C++ code.

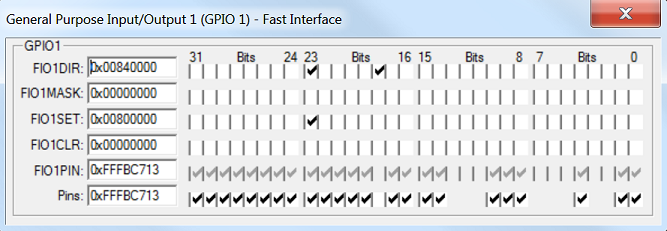
In addition to breakpoints and the ability to single step and check values to debug code, the tools also emulate the mbed’s I/O pins. Below is a debug display of the GPIO registers used to control the on board LEDs and you can watch them change as you single step through the code.

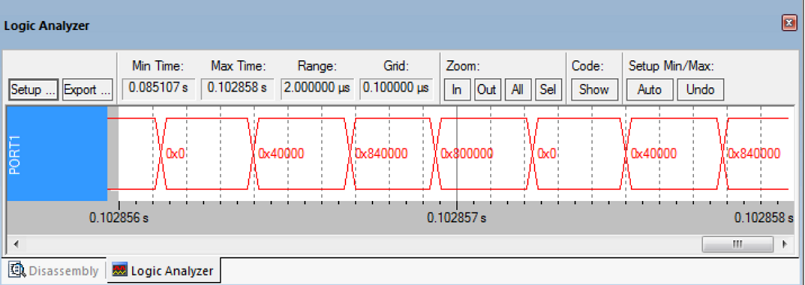
With the emulator's Logic Analyzer feature seen below, the value of the two pins on GPIO Port 1 that drive the two LEDs in the example program can be monitored and will flip each time through the while loop. This is seen in the changes in Port1's hex value over time as the code executes the loop. The wait statement was commented out to speed up emulation.

After debug, the source code files can also be moved back to the mbed online compiler.
Debugging an mbed project using hardware breakpoints via USB on Keil Tools MDK

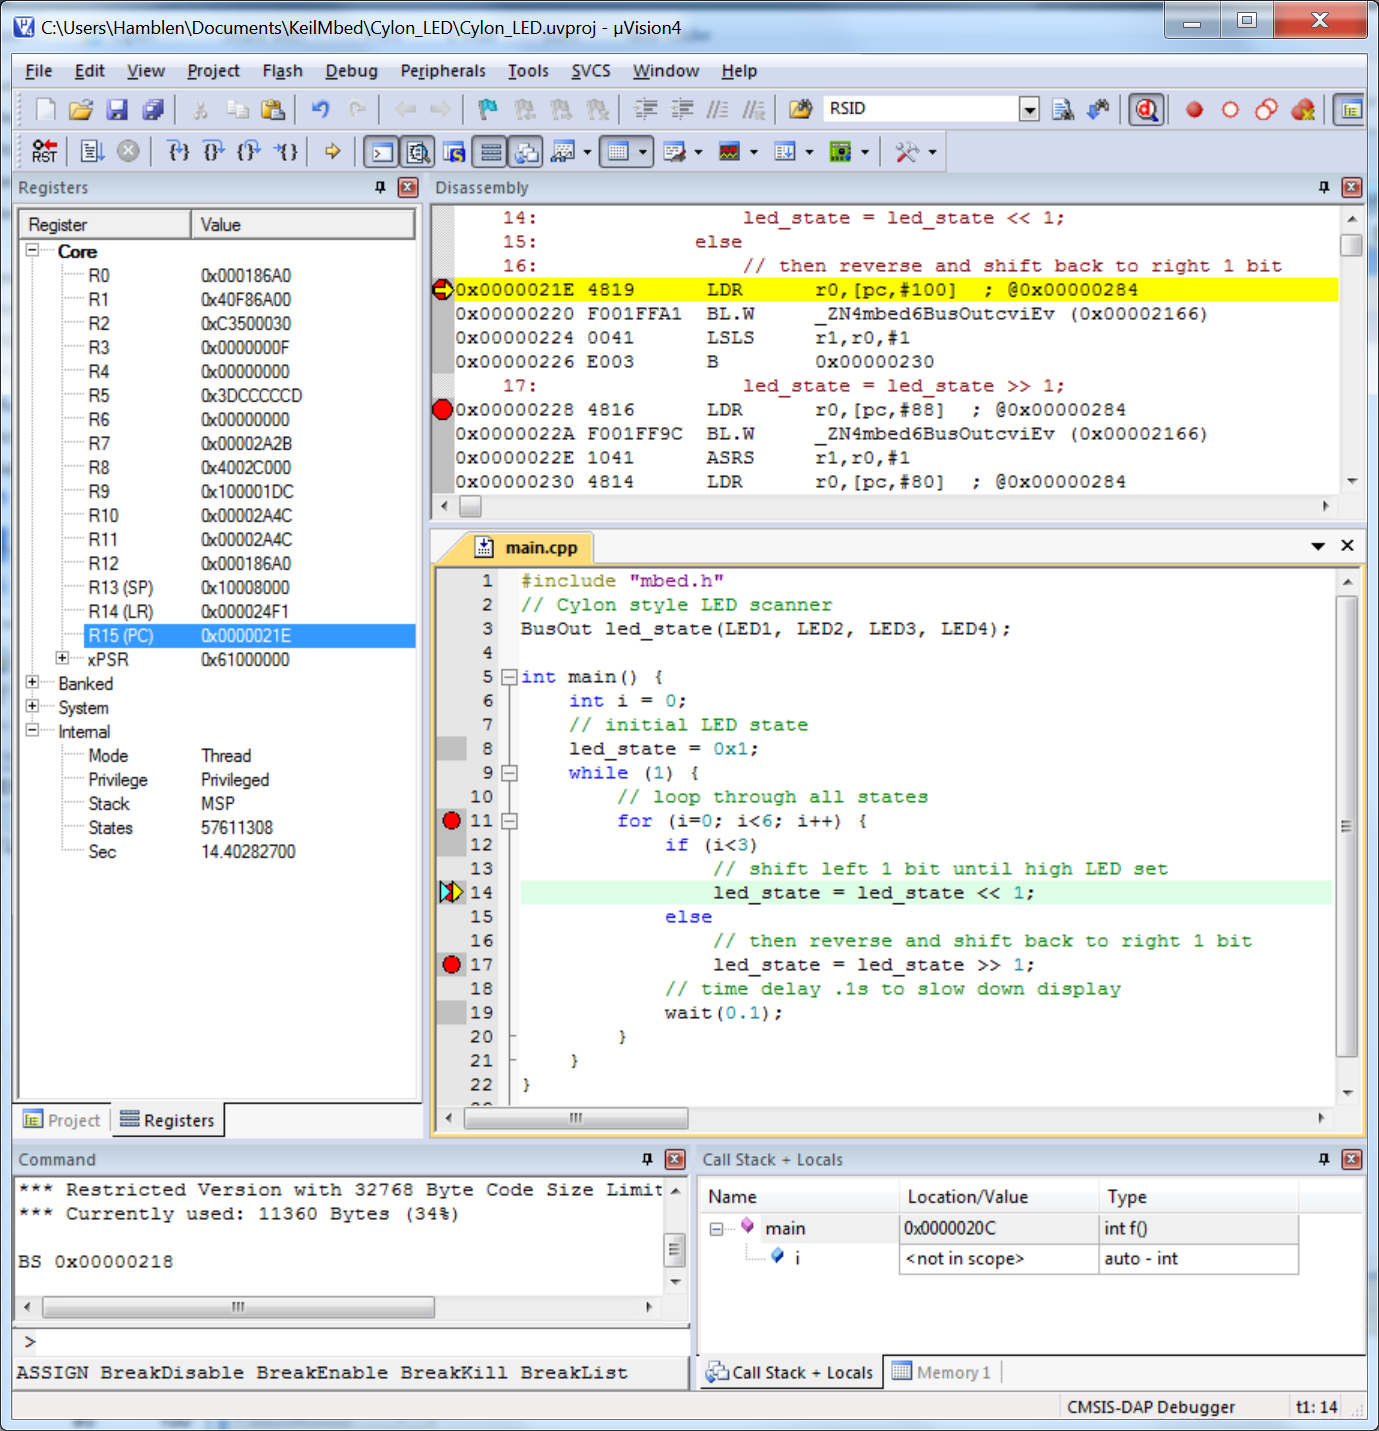
Recently, hardware breakpoints for debugging mbed prototype hardware via USB were added as shown above. The mbed’s firmware must be updated and version 4.6 or newer Keil MDK is required. Complete instructions and details can be found at http://mbed.org/handbook/CMSIS-DAP-MDK.
For additional assembly language examples, there is also an optimized assembly language DSP library for the LPC1700 family available from NXP. It contains source code for a number of widely used DSP functions such as a biquad filter, Fast Fourier transform, dot product, vector manipulation, FIR filter, Resonator, PID controller, and a random number generator. Use the source code version provided for the Keil tools. There is also a FFT assembly language example program available on the mbed site. Chapter 4 and Appendix A of the Definitive Guide to the ARM Cortex M3 contains descriptions of assembly language instructions and several code examples for the Cortex M3 processor.
References
ARM RealView Assembler Reference Guide
ARM assembly language textbook
ARM Cortex M3 textbook
ARM Procedure Call Standard
LPC1768 processor data and user manuals
mbed LPC1768 module schematics
LPC1768 Pin functions
Table of Cortex M3 Instructions
Cortex-M3 Technical Reference Manual
ARMv7-M Architecture Reference Manual
ARM and Thumb-2 Instruction Set Quick Reference Card
Demo version of the Keil Tools ARM emulator
ARM Application note 207 – Porting an mbed Project to MDK-ARM