Ch4_8 mbed 와 LabVIEW 연결하기
하드웨어와 소프트웨어 구성
- mbed와 연결된 센서에서 데이터를 수집하여 LabIEW로 보내게 됩니다.
- LabVIEW 에서 mbed에 연결된 액츄에이터 작동하게 됩니다.
- LabVIEW programs (hardware-in-the-loop기능 보유)은 모든 계산을 수행하고 mbed를 제어를 하게 됩니다.
LabVIEW 와 mbed를 인터페이스하는 두가지 방법.
- LabVIEW RPC
- Serial Communication
LabVIEW 셋업
- http://www.ni.com/trylabview/ - LabVIEW trial version
- http://www.ni.com/visa/ - 시리얼포트 NI-VISA 드라이버
The LabVIEW vi's 예제
- LabVIEW vi's: mbed_LVLibrary.zip - NB: For consistency the name of mbedSerial has been changed to SerialRPC
- Examples: mbed_LabVIEW_demos.zip
- LabVIEW Libraries for versions 8.5 and 8.6: LabVIEW_Previous_Version.zip
Relinking Files
When you download the files (especially the demos) they may not be in the same locations relative to the files they depend on as they were on the computer they were developed on. LabVIEW is very good at relinking files so just okay error messages or reconnect the files according to the locations in which you have saved them.
Using the LabVIEW RPC vi's
The LabVIEW vi's have been created to mirror the mbed api as closely as possible. They therefore take a similar object oriented approach. We create an mbed object and then using this create objects for each of the inputs and outputs. The vi's are contained in two folders:
- The "mbed Interface" folder includes all the vi's for creating and controlling inputs and outputs on mbed.
- The "Transport Mechanisms" folder contains the vi's for creating a connection to an mbed and then closing it.
We've provided the vi's as a zipped file which you can extract to any where on your computer. To make it a bit easier to access them we've also created a Library which might be a bit easier to develop with as you can drag vi's in from it. Just open the file mbed_LVlibrary from within LabVIEW.
Using the API
Information
To use these vi's your mbed needs to be running code which can receive and execute RPC commands. Information and examples of this, can be found on the Interfacing-Using-RPC page. Compile and run the program for RPC over serial to use the vi's on this page.
- First create an mbed interface by using a transport mechanism. This can be either SerialRPC or HTTPRPC.
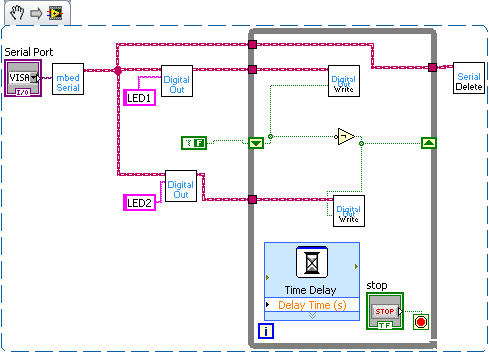
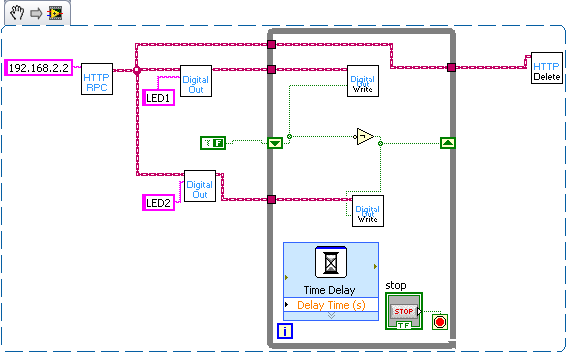
- You can now create objects on mbed such as DigitalOut or AnalogIn. Wire up the input of a DigitalOut to the output from mbedSerial
- To create an object connect controls or constants to the pin number. Pins are passed as a string eg "p21" or "LED1"
- If you have an object created on mbed then you can tie to it by passings its name as a string into the existing object name.
- You can now execute the methods that are defined in the mbed api. For example you can execute a write block on a DigitalOut to set the value of the pin. Wire the write block to the object you want to act on and then add a control to set the value of the pin.
- Finally wire up the SerialRPC_delete method to the mbed wire so that the serial port is closed and is avaliable to other programs.
This is demonstrated in the LED flash example the block diagrams for which are displayed above. Note that only the write method is contained within the while loop as the object only needs to be created once at the start.
Using this approach you can connect multiple mbeds on different ports and control them from LabVIEW. The vi's have been designed to align as closely as possible with the api so looking in the Handbook should help explain what each method does. As its using the RPC the vi is directly calling the methods in the api.
Using RPC with Custom Code
The RPC-Interface-Library provides a mechanism for quickly adding RPC functionality to your own code. This LabVIEW library includes support for the RPCFunction and RPCVariable Objects.
You can tie an RPCFunction or RPCVariable object to the corresponding object on mbed. You can then run the function or read and write to the variables which are attached.
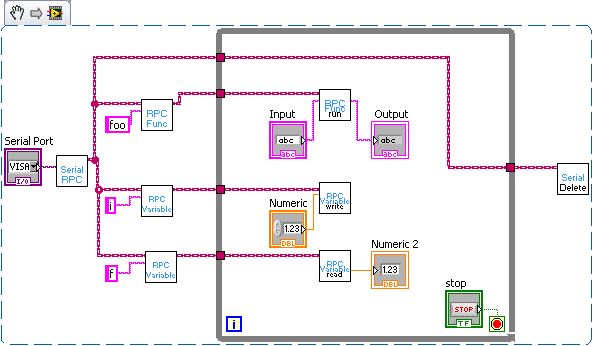
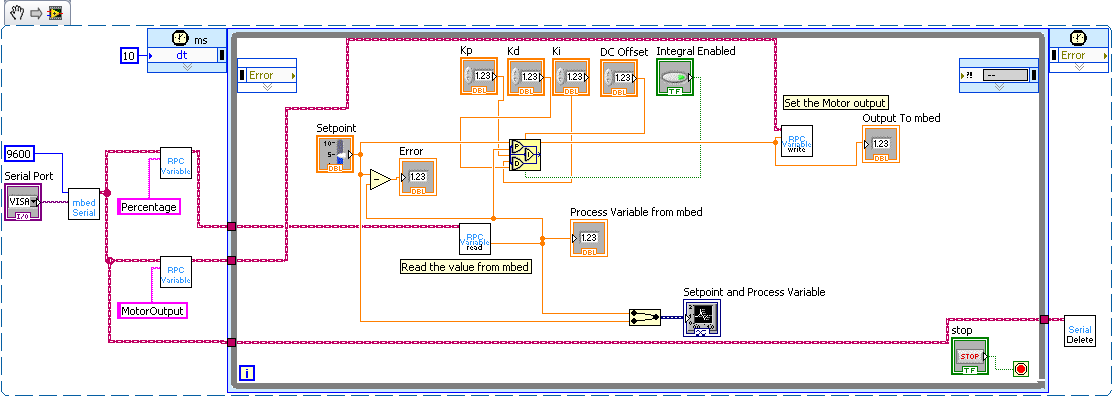
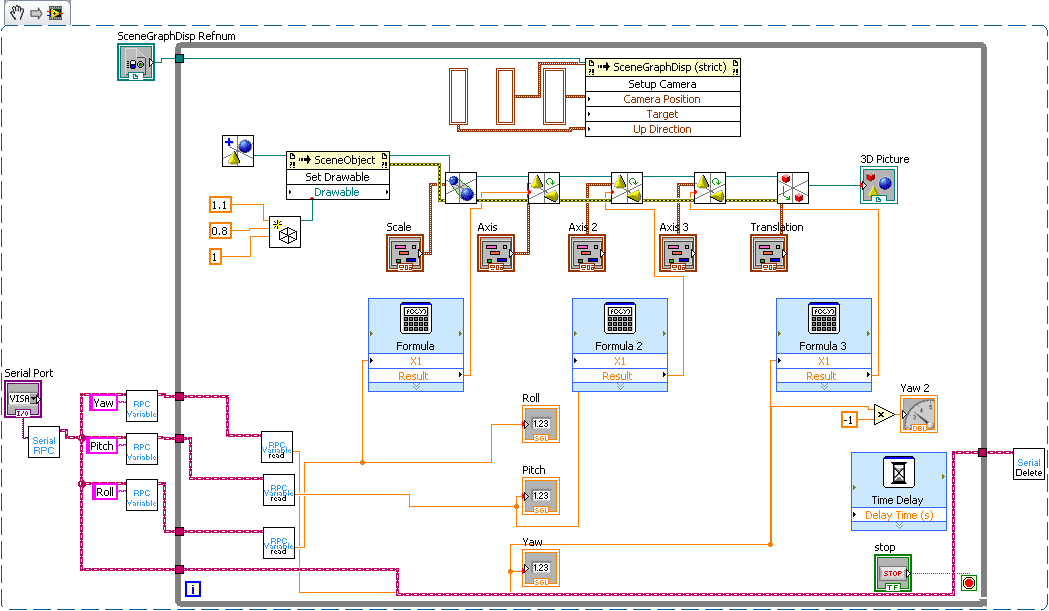
The RPCVariable read and write blocks have both numeric and string inputs and outputs. You should wire to the appropriate one according to the type of variable it is corresponds with on mbed. The motor control IMU display demo at the bottom of the page show examples of these VIs in use.
Information
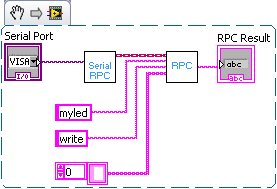
If you need to write your own entirely custom RPC command then you can use the RPC method that is part of the mbed class. Don't use the RPC methods in the Serial or HTTP class as this will prevent you from swapping transport mechanisms in the future. You can use this RPC method to create new interface classes. The name and method are passed as strings and the arguments are passed as an array of strings.
Serial Communication
Here are the mbed vi's we've created to communicate between mbed and LabVIEW:
- mbed-ni.zip - mbed read and write VI's, plus Hello World examples
Download these and use them as components in your LabVIEW designs.
The Protocol
To keep things simple, we're assuming the communication between LabVIEW and mbed is a line-based text protocol. That means every "packet" between LabVIEW and mbed is a string followed by a newline character (\n). The mbed-read.vi returns a line read from mbed every time you run it, and the mbed-write.vi writes a string to the mbed every time you run it, so you can use this however you want.
Whilst the line string is the underlying data, there are also some common cases we've added support for such as sending single numbers, or comma separated value (csv) "packets". The inputs and outputs supported are:
- A string (e.g. "hello" is transferred as "hello\n")
- A number (e.g. 1 is transfered as "1.0000\n")
- An array of strings (e.g. ["foo", "bar"] is transferred as "foo,bar\n")
- An array of numbers (e.g. [1, 0.5] is transferred as "1.000,0.5000\n")
These make it easy to work in LabVIEW without having to do lots of packing/unpacking/conversion yourself.
mbed Read Hello World
A simple labview example is included that plots the state of an AnalogIn input, which looks like:
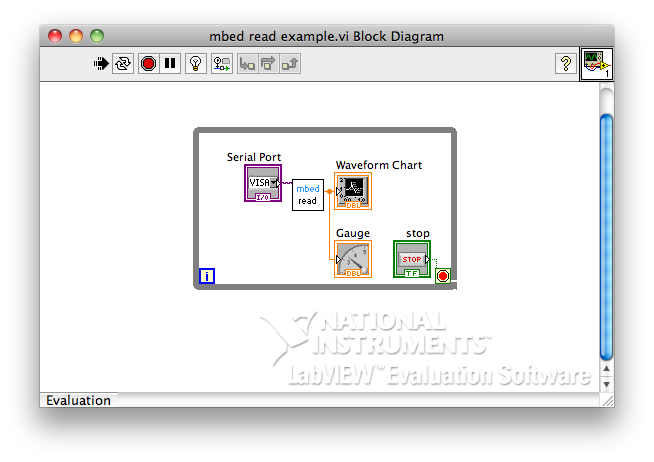
And here is an example program to send some data:
The resulting output once the mbed COM port number has been selected in the VISA control, and when modifying AnalogIn, looks like:
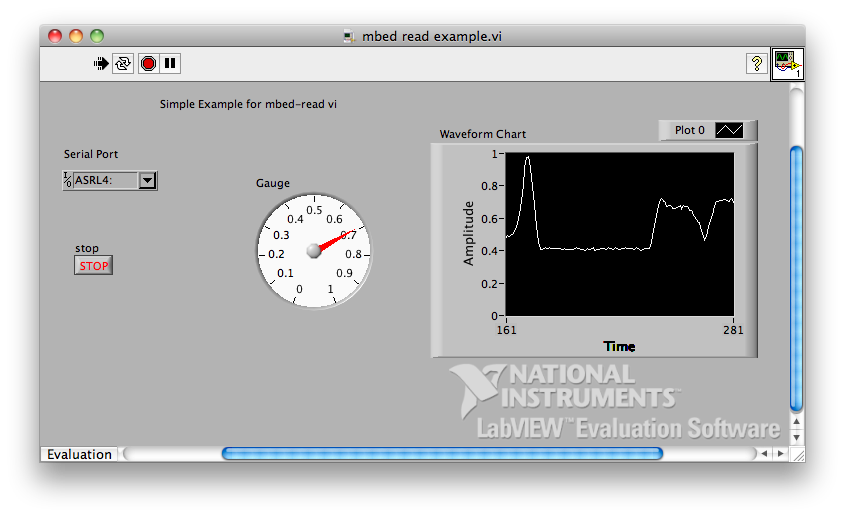
mbed Write Hello World
A simple labview example is included that controls the brightness of LED1 and LED2, which looks like:
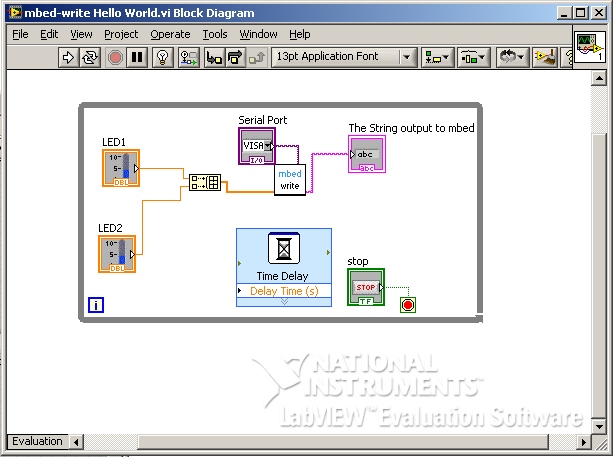
And here is an example program that responds to the commands:
The control panel looks like:
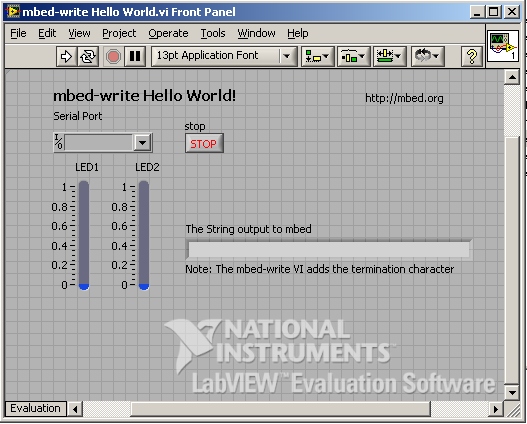
Closed-Loop Motor Control Example - Serial Version
Here is an example of closed loop PID control of a motors position using LabVIEW. LabVIEW is very useful for experimenting with control because it allows you change the control constants on the go and you can graph the outputs of both demanded and actual response to see how well the control system is performing. Its also possible to pass any signal into your system as the demanded value, in this case a slider is used but this can be replaced with a function generator.
The basic serial version is for the serial examples is here:
Import program
00001 #include "mbed.h"
00002 #include "QEI.h"
00003 #include "Motor.h"
00004
00005 Serial pc(USBTX, USBRX);
00006 QEI Encoder(p29 ,p30, NC, 48);
00007 Motor Wheel(p23, p21, p22);
00008
00009 int main() {
00010     float MotorOutput = 0;
00011     Encoder.reset();
00012     while (1) {
00013         pc.scanf("%f", &MotorOutput);
00014         float NoPulses = Encoder.getPulses();
00015
00016         float Percentage = (NoPulses / 48) * 100;
00017         pc.printf("%f\n", Percentage);
00018
00019         Wheel.speed((MotorOutput - 50) * 2 / 100);
00020
00021         wait(0.005);
00022     }
00023 }
Closed-Loop Motor Control Example - RPC Version
Also, RPCVariable objects can be used to pass the position of the wheel as a percentage of one rotation and the output to the motor. The Motor that has been used is from Pololu and includes an encoder. The wheel position is found using the QEI library and the motor is controlled using an L293D and the Motor library.
Here is the front panel and the block diagram for the LabVIEW vi. (Pictures of the setup coming soon!)
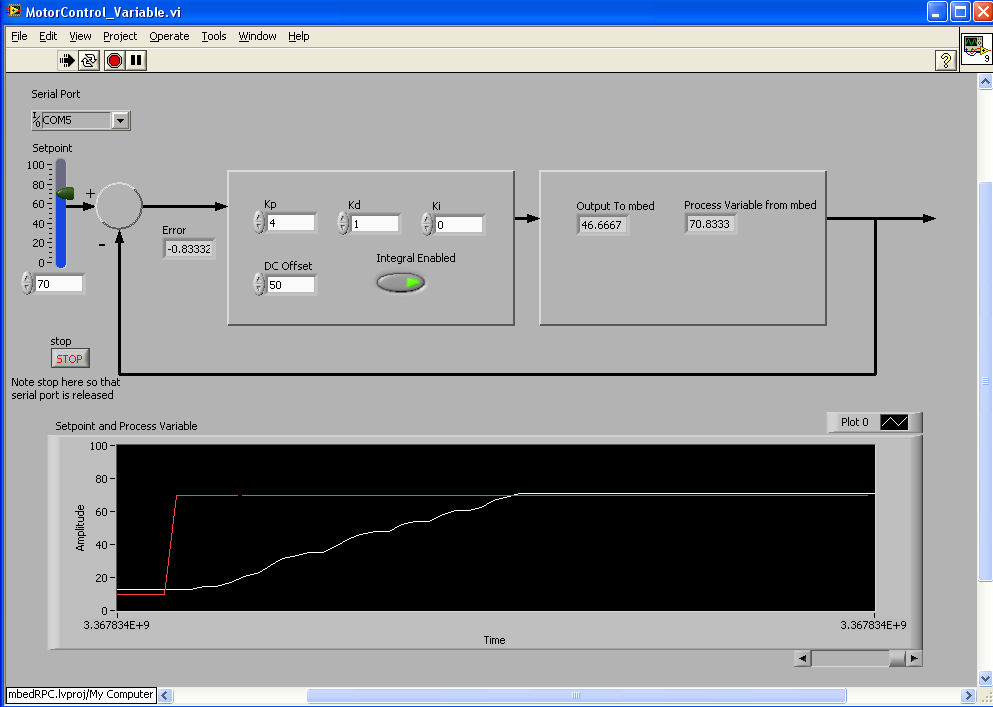
The red line shows the demanded value and the white line the actual motor position. As the motor has a gear box its quite slow and theres a lot of damping this means that the control is very simple and changing Kp just changes how long it takes to get to the demanded value. However at some values the porportional output to the motor becomes too low to actually drive the motor before it reaches the demanded position, in which case the integral control can be used elimiate the error.
Here is the code that was running on mbed for this demo.
Import program
00001 /**
00002 * Copyright (c)2010 ARM Ltd.
00003 * Released under the MIT License: http://mbed.org/license/mit
00004 */
00005
00006 #include "mbed.h"
00007 #include "QEI.h"
00008 #include "Motor.h"
00009 #include "SerialRPCInterface.h"
00010
00011 //Create the interface on the USB Serial Port
00012 SerialRPCInterface SerialInterface(USBTX, USBRX);
00013
00014 QEI Encoder(p29 ,p30, NC, 48);
00015 Motor Wheel(p23, p21, p22);
00016
00017 //Create float variables
00018 float MotorOutput = 50;
00019 float Percentage = 0;
00020
00021 //Make these variables accessible over RPC by attaching them to an RPCVariable
00022 RPCVariable<float> RPCMotorOut(&MotorOutput, "MotorOutput");
00023 RPCVariable<float> RPCPercentage(&Percentage, "Percentage");
00024
00025 int main(){
00026
00027     Encoder.reset();
00028     float NoPulses;
00029
00030     while(1){
00031          NoPulses = Encoder.getPulses();
00032         Percentage = ((NoPulses / 48) * 100);
00033         //RPC will be used to set the value of MotorOutput.
00034         Wheel.speed((MotorOutput - 50) * 2 / 100);
00035         wait(0.005);
00036     }
00037 }
IMU Demo
As well as control LabVIEW can also be used to visualise data in a much more intuitive way than just printing it to a terminal. This is the LabVIEW VI featured on Aaron's IMU page where its used to show the output from the IMU. Its gives a visual output which shows the measured orientation. Its then a lot easier to see what the values mean and how errors acumulate than when you're looking at a long list of figures at a terminal. The program running on mbed uses the example program on the IMU page but with a few changes. As the IMU class doesn't support RPC, RPCVariable objects were used to pass the yaw pitch and roll variables and so a few lines were altered in the example program:
//With the other object intialisations
float Roll, Pitch, Yaw;
//Now attach these varaibles to RPCVariable Objects
RPCVariable<float> rpcRoll(&Roll, "Roll");
RPCVariable<float> rpcPitch(&Pitch, "Pitch");
RPCVariable<float> rpcYaw(&Yaw, "Yaw");
SerialRPCInterface LabVIEW(USBTX, USBRX);


//And the while loop in main becomes
    while (1) {

        wait(FILTER_RATE);

        Roll = toDegrees(imuFilter.getRoll());
        Pitch = toDegrees(imuFilter.getPitch());
        Yaw = toDegrees(imuFilter.getYaw());

    }
This is the Block diagram for the VI which visualises the output.
Interfacing Using RPC
There are many occasions when its useful to be able to talk to your mbed from a computer. This could be to control actuators using the mbeds outputs, gather data using the mbeds sensors or create remote applications over a network. Creating an interface between mbed and a computer can be difficult because it requires you to specify a communication format and then to write code on both the mbed and the computer you are interfacing with.
The mbed is capable of receving and interpretting RPC commands and this can be used to greatly simplfy creating an interface. The RPC commands are in a predefined format and can be sent over any transport mechanism that can send a stream of text. They allow you to directly interact with objects on mbed.
This page shows the code that needs to be running on mbed for RPC to work, we've also created libraries for several popular languages which allow you to use RPC over several transport mechanisms without having to have to do any work to set up the transport mechanism or formatting of your messages. Libraries have been developed for: MATLAB, LabVIEW, Python, Java and .NET.
Information
RPC Commands are in the format: "/<Object name>/<Method name> <Arguments separated by spaces>
If you send just "/" mbed will return a list of objects that can be used
If you send "/<object name>/" then mbed will return the methods which can be used on this object.
This is an example of the RPC command required to create an LED object and turn it on:
/DigitalOut/new LED1 myled
/myled/write 1
You can also interact with objects that are created in code on the mbed you just refer to them by their name.
Troubleshooting!
If you want to interact with an object then make sure you define it on mbed with a name: DigitalOut myled(LED1, "myled")
On mbed you need to pass these commands into the rpc function:
char buf[256], outbuf[256];
strcpy(buf, "/DigitalOut/new LED1 myled");
rpc(buf, outbuf);
You can use any communication method to receive the string and pass it into RPC function
RPC Over Serial
To carry out RPC over serial you need to receive the commands from the serial port and then pass them into the RPC function. Finally you return the result. This can be done using a program like this:
Import program
00001 #include "mbed.h"
00002 #include "mbed_rpc.h"
00003
00004 /**
00005  *  This example program has been updated to use the RPC implementation in the new mbed libraries.
00006  *  This example demonstrates using RPC over serial
00007  */
00008
00009 //Use the RPC enabled wrapped class  - see RpcClasses.h for more info
00010 RpcDigitalOut myled(LED4,"myled");
00011
00012 Serial pc(USBTX, USBRX);
00013 int main() {
00014     //The mbed RPC classes are now wrapped to create an RPC enabled version - see RpcClasses.h so don't add to base class
00015
00016     // receive commands, and send back the responses
00017     char buf[256], outbuf[256];
00018     while(1) {
00019         pc.gets(buf, 256);
00020         //Call the static call method on the RPC class
00021         RPC::call(buf, outbuf);
00022         pc.printf("%s\n", outbuf);
00023     }
00024 }
Or here is a bin file which you can download straight on to your mbed: rpc_serial_lpc1768.bin Note that its not a case of either having rpc or your own code. You can do both at the same time you just need to make sure you receive the serial commands when they are sent.
Once you have this running on mbed you can control mbed from a terminal by just typing commands in the format above (make sure you have your terminal set to transmit CR+LF).
RPC Over HTTP
The HTTP Server has an rpc handler, so by using the HTTP server example program below and download it on to your mbed you will be able to use RPC over HTTP. The rpc commands are sent by adding them to the URL of the mbed in a browser.
Information
RPC Commands over HTTP are in the format: http://<url of mbed>/rpc/<Object name>/<Method name> <Arguments separated by spaces>
The mbed will pass the URL it is assigned over the USB serial.
The important line of code for RPC is to add the RPC handler.
svr.addHandler<RPCHandler>("/rpc");
Import programRPC_HTTP
A slight Alteration to Donatien's HTTP Server Example so that it registers all the classes with RPC support to demonstrate RPC over HTTP
Adding RPC to your own code
Nearly all projects involve using more than just the mbed's Digital and Analog I/O and so the RPC interface above can rapidly become insufficient and you're back to creating your own communication protocol and programming the low level communication on both the mbed and in your software application. The RPC Interface Library provides a mechanism which can help over come these problems by allowing you to call custom functions over RPC and read and write to variables on mbed using RPC. The cook book page for the RPC Interface Library gives detailed information on how to use this library within your own code.
Software Libraries
You now have a program running on mbed which handles the RPC commands. To make a complete application your software needs to set up the transport mechanism on its end and format the commands into strings. To make this easier we've created libraries that not only give you simple access to the RPC from several programming languages but also include classes for much of the mbed API. The software libraries also include classes for the RPC Interface Library to help extend RPC into your own code.
They all use a consistent interface which is a close as possible to the interface for programming on mbed. They've been designed so that is easy to switch between transport mechanisms and so that an application can control multiple mbeds.
Please log in to post comments.

