Getting started with mbed HRM1017
このページの日本語版は、mbed HRM1017をはじめようをご覧ください。
Overview
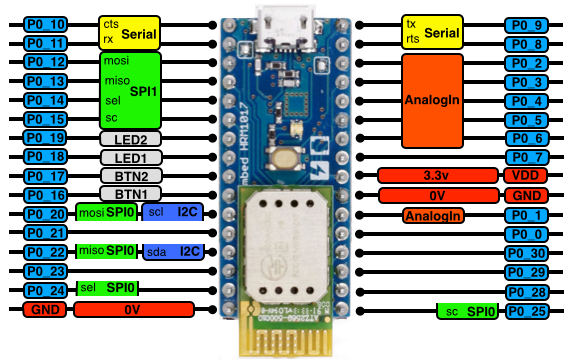
Pinout:

Block chart:

The tact switch on the board will be a reset switch. Currently, this is not working. We are working on this issue, and it will be solved by future release.
Solder jumpers on top of the board is connecting UART RX and TX between mbed interface and BLE module. When you want to connect UART signal out of the board, please remove the solder. We are using lead free solder.
A solder jumper bottom of the board is connecting 3V3 of BLE module - pin header and regulator - mbed interface. When you want to use exterior power source such as coin-cell buttery, please remove the solder.
Schematic(PDF)
Warning
When you want to drive LED and other energy eaters, please connect through FETs.
The maximum output current of nRF51822's ports is only 0.5mA!
Note
On Microsoft Windows, you need to install driver to use COM port. You can download the driver software from Windows serial configuration.
Distributors
First touch
Please add mbed HRM1017 to your online compiler and import this project.
Import programBLE_HTM_HRM1017
BLE_Health_Thermometer; based on todotani-san's mod. Libraries are now genuine.
By pressing compile button, you can download hex file.
nRF51822 is having SoftDevice technology, that allows change BLE stack. This hex file contains your program and this SoftDevice.
When you connect mbed HRM1017 to your PC via USB cable, "MBED" drive will be mounted. By Drag&Drop the hex file, you can flash. After flashing, "MBED" drive will be unmounted automatically, and will be mounted again. nRF51822 will be reset and your program run.
Note: You will not be able to find your hex file in the "MBED" drive, after unmounted/mounted.
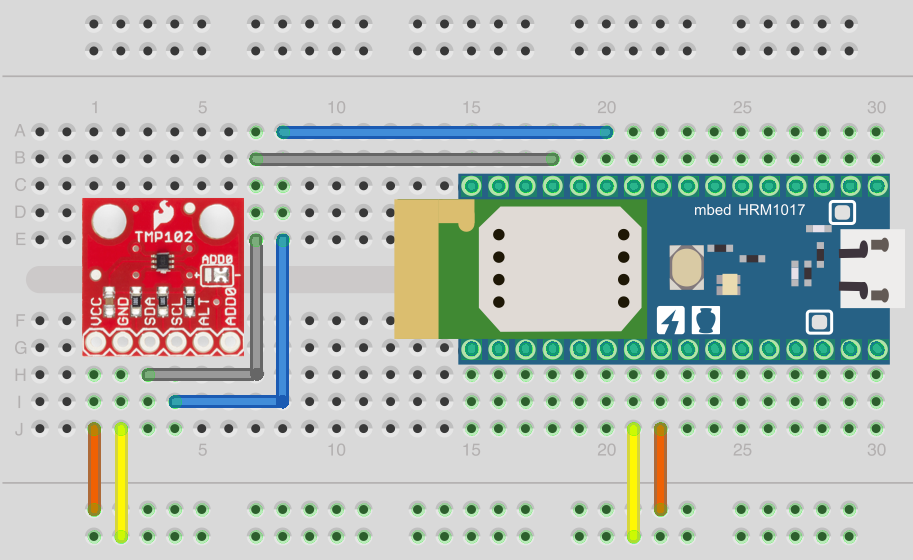
Please install "nRF Toolbox" by Nordic to your smart phone. You can find your mbed HRM1017, by tapping "CONNECT" button of "HTM". Do you want to see the temperature? Please connect TMP102 I2C sensor like this.

FAQ
My program is not ran by writing HEX file!
By downloading hex file directly to "MBED" drive with Internet Explorer, this matter happen. Please do not save directly with Internet Explorer. You can resolve this issue by downloading to other place and drag-n-drop the file into MBED drive.
LED on the board will not blink even if I run Blinky!
The LED on the board is an access lamp of mbed interface.
Please connect your LED and current-limiting resistor through FET.
Warning
When you want to drive LED and other energy eaters, please connect through FETs.
The maximum output current of nRF51822's ports is only 0.5mA!
I can not reset by pressing tactile switch!
Sorry, we are working on solving this issue.
Examples
ANCS
Import programBLE_ANCS_SDAPI_IRC
changed low freq. clock source to IRC
1. Compile the code, transfer the hex file to mbed.
2. Use serial terminal software on your PC to connect to mbed com port (9,600bps, 8N1).
3. On iOS7, select "Settings", "Bluetooth". You should see "ANCC" on the devices list. Click it to connect. LED2(connected) should turn on.
4. A Dialog will appear: "Bluetooth Pairing Request" Press "Pair"
5. When you receive push notifications, you can see the log on serial terminal.
RCBController
Import programBLE_RCBController
iOSのBLEコントローラアプリ「RCBController」と接続し、コントローラの操作を取得するサンプルプログラムです。 mbed HRM1017で動作を確認しています。

