Importing code
This content relates to a deprecated development tool
The Mbed Online Compiler is now deprecated and we encourage you to switch over to our latest online IDE: Keil Studio Cloud.
Try Keil Studio Cloud, our new browser IDE for Mbed and CMSIS
For the best development experience use Keil Studio Cloud, a free browser-based IDE for Mbed OS application and library development. Keil Studio Cloud gives you a powerful modern editor, debugger and integrated source control management, helping you prototype Mbed applications quickly and easily.
The mbed eco-system makes it easy to import programs and libraries published by mbed users. This is useful for importing code that has been packaged as a reusable library component (e.g. a class for a peripheral), so you can quickly pull in the building blocks for your project. You can also import code stored on your local machine.
In this manual we are going to review different ways to import code in your workspace.
Importing from mbed.org
While exploring the mbed Website, repository pages, follow links in cookbook, forum, activity feeds, tutorials, or come to a code example, you can one-click import code in your workspace if it's marked with a button or a normal http link titled "Import program" or "Import library". Such links look like the examples below:
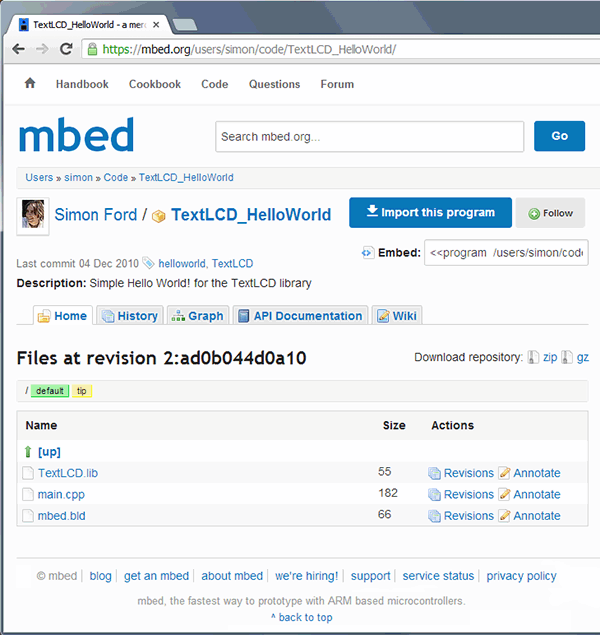
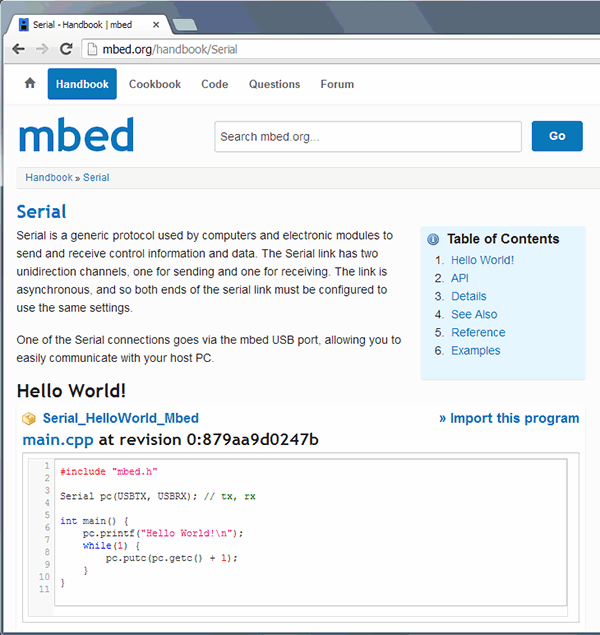
Once clicked, the mbed Compiler will be opened in a new browser tab and the Import dialog will give you complete control over the import process.
Importing with Import Wizard
The Import Wizard is a sub-functionality of the mbed Compiler and allows you to quickly find and import published code based on a search criteria, right inside the IDE. It also lets you sort the results via the list column header.
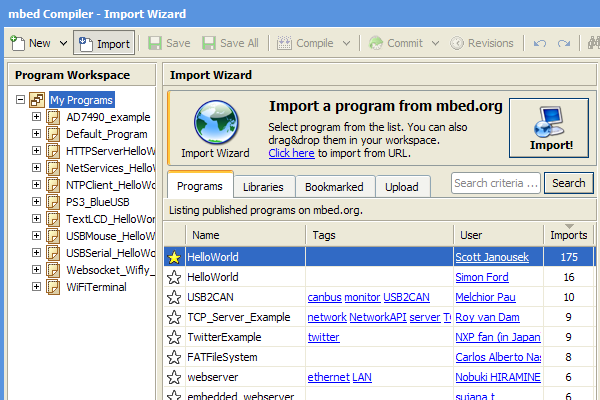
To import a program you have to select an entry from the list and click the "Import" button.
Import options
The Import dialog lets you define the import type and name for a program import:
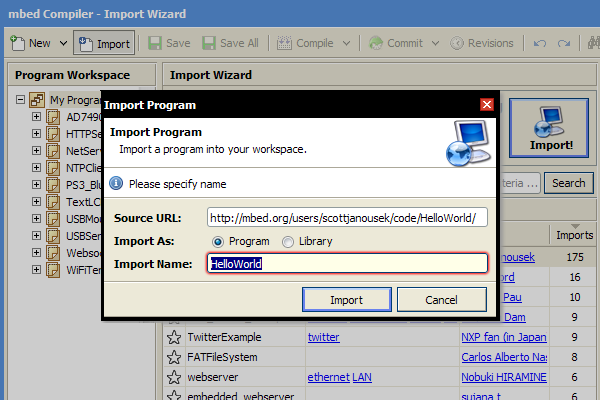
The "Import Name" field will be populated from the imported resource. The "Import As" option allows you to change the import type regardless of the published type, thus you can import programs as libraries and vice-versa. In the given example "HelloWorld" could be imported as library in a program (see below).
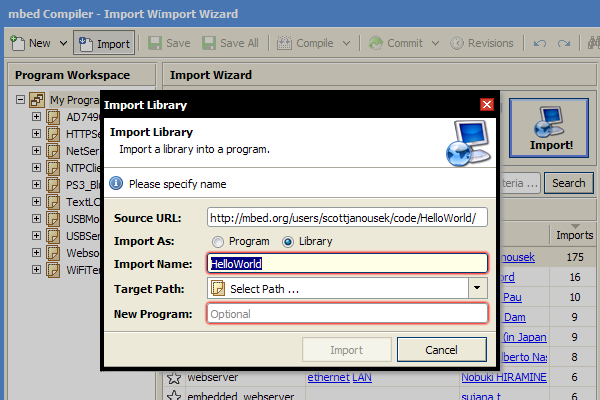
The Import dialog interface would be transformed to reflect the "Import As" selection and in this case two new options will be added - "Target Path" and "New Program" both of which define the import destination.
"Target Path" defines destination programs, folders and libraries that already exist in your workspace, "New Program" will create new empty program with the specified name and import the desired library in it. Note that "Target Path" and "New Program" override each other and valid option would be the latter specified/modified.
Once the required fields are filled and validated, the "Import" button will be activated, indicating that you can import the resource.
Alternative methods
If you don't want to fiddle with the Import dialog options, one way to quickly import a resource is to initially select the desired destination in the navigation tree, then open the Import Wizard, and double-click the desired program or library (alternatively you can hit "Enter" key). The properties of the imported resource will be based on the nav tree selection:
- If a program, folder or library is selected, the resource will be imported as library, if "My Programs" is selected, the resource will be imported as program.
- The import name will be populated from the resource name.
- If a duplicate or other conflict is detected, the Import dialog will be opened to guide you through.
Alternatively, if you have opened the Import Wizard already and would like to quickly import a resource without changing the navigation tree selection, then you can simply drag and drop the resource from the list into your workspace. Similar to the behavior described above, the resource will be imported based on the drop target.
Multiple imports
It's also possible to select multiple items in the Import Wizard using the Ctrl/Shift+Click combo and import them either via the Import dialog/button or drag and drop them in your workspace. This, so called batch mode, will attempt to import all selected resources even if a conflict or error occurs during import.
Importing from local machine
The Import Wizard also allows you to import source files and zip archive stored on your local machine. To use this method, you have to click the "Upload" tab in the Import Wizard, then click the "Browse" or "Choose File" (depending on the browser) in the very bottom and navigate the operating system file picker to the desired file or archive.
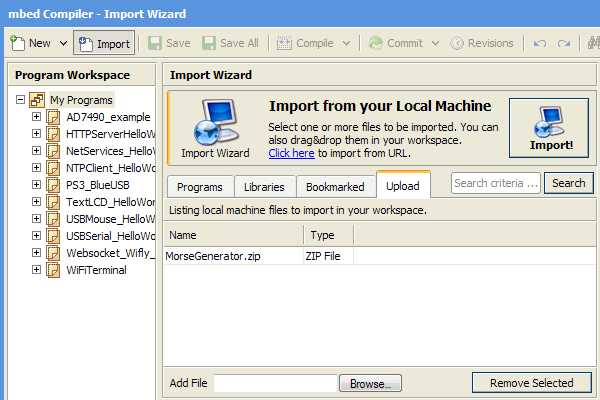
The interface allows multiple files to be added to the import list, but due to browser restrictions only one file can be picked at a time. We strongly suggest to use zip archive instead as it will allow multiple file and folders to be imported in your workspace.
If you'd like to remove a file from the list, then you can select it and click the "Remove Selected" button.
Alternative methods
An alternative method to import files from your local machine is to use HTML5-enabled browser and native operating system file manager, like Windows Explorer in Windows and Finder in Mac OS. You can simply select single or multiple files in the file manager and drag them directly into the browser window/tab and over the navigation tree item of your choice. Valid drop targets will be highlighted once you move the mouse over them, and once you drop the files, they would be imported in the your workspace as follows:
Archive files
- Archive files will have their contents imported in program/library container named after the zip archive name.
- If the drop target is a program, library or folder, the archive will be imported as library, if "My Programs" is the drop target, the archive will be imported as program instead.
Source non-archive files (.c, .cpp, .h, .hpp, .s)
- Source files will be imported in the drop destination without container - e.g. they will be imported as single files in the drop target.
- Source non-archive files cannot be dropped in "My Programs"
Notice
Some early versions of popular browsers like Chrome, Firefox and Opera doesn't correctly support the HTML5 standards, thus it's recommended to use their latest version. Also note that the Internet Explorer browser family (up to version 10) have the HTML5 drag&drop broken in quirks mode, which means HTML5 drag&drop import is currently not possible for Internet Explorer browsers.