You are viewing an older revision! See the latest version
iRobot Create Robot
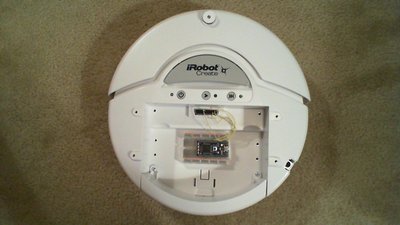
This is a simple project that shows how to interface mbed to control the iRobot Create robot. The Create is basically a Roomba without the vac parts designed for educational users. The Create has an internal microcontroller and a serial port. Over the serial port you can send motor commands and read back sensor packets. The Create comes with a serial cable, but it uses RS-232 signal levels so that it can plug into a PC serial port. To control it using mbed you need to connect to the serial port with TTL levels and provide power for the mbed module.
mbed Hardware Interface
Inside the Create robot cargo area is a DB25 connector that has all of these connections. With only four jumper wires you can connect everything needed. This is not a standard pinout for a serial connector, all of the pins have special uses for the Create. Pin assignments can be found in the Create User Manual.
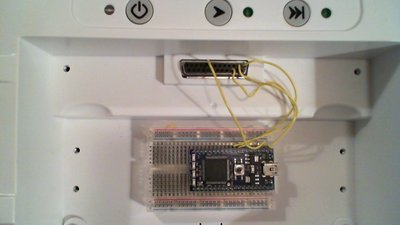
Here are the four connections to the Create:
| mbed | Create DB25 Pin | Description |
|---|---|---|
| p9 | 1 - RXD (0 – 5V) | Serial input to iRobot Create |
| p10 | 2 - TXD (0 – 5V) | Serial output from iRobot Create |
| Vin | 8 - Switched 5V | Provides a regulated 5V supply (low current) |
| GND | 16 - GND | iRobot Create battery ground |
mbed Create Demo Code
The demo code sends out serial commands to the Create. Serial commands can be found in the Create Open Interface Manual. Sensor values are also reported back over the serial port, but are not used in the short demo code. Here is a short video of the demo code running on the Create:
The demo code is shown below. Basically it waits for the Create to power up, sets the baud rate to 57600, and then starts sending a sequence of commands over the serial port with time delays between commands.
Create_Demo
#include "mbed.h"

Serial device(p9, p10);  // tx, rx

// Definitions of iRobot Create OpenInterface Command Numbers
// See the Create OpenInterface manual for a complete list


//                 Create Command              // Arguments
const char         Start = 128;
const char         SafeMode = 131;
const char         FullMode = 132;
const char         Drive = 137;                // 4:   [Vel. Hi] [Vel Low] [Rad. Hi] [Rad. Low]
const char         DriveDirect = 145;          // 4:   [Right Hi] [Right Low] [Left Hi] [Left Low]
const char         Demo = 136;                 // 2:    Run Demo x
const char         Sensors = 142;              // 1:    Sensor Packet ID
const char         CoverandDock = 143;         // 1:    Return to Charger
const char         SensorStream = 148;               // x+1: [# of packets requested] IDs of requested packets to stream
const char         QueryList = 149;            // x+1: [# of packets requested] IDs of requested packets to stream
const char         StreamPause = 150;          // 1:    0 = stop stream, 1 = start stream
const char         PlaySong = 141;
const char         Song = 140;
                /* iRobot Create Sensor IDs */
const char         BumpsandDrops = 7;
const char         Distance = 19;
const char         Angle = 20;

int speed_left =  200;
int speed_right = 200;
void start();
void forward();
void reverse();
void left();
void right();
void stop();
void playsong();
void charger();

// Demo to move around using basic commands
int main() {
// wait for Create to power up to accept serial commands
    wait(5);
// set baud rate for Create factory default
    device.baud(57600);
// Start command mode and select sensor data to send back
    start();
    wait(.5);
    forward();
    wait(.5);
    stop();
    wait(.1);
    reverse();
    wait(.5);
    left();
    wait(1);
    stop();
    wait(.1);
    right();
    wait(1);
    stop();
    wait(.5);
// Play a song
    playsong();
    wait(10);
// Search for battery charger IR beacon
    charger();
}


// Start  - send start and safe mode, start streaming sensor data
void start() {
   // device.printf("%c%c", Start, SafeMode);
    device.putc(Start);
    device.putc(SafeMode);
    wait(.5);
  //  device.printf("%c%c%c", SensorStream, char(1), BumpsandDrops);
    device.putc(SensorStream);
    device.putc(1);
    device.putc(BumpsandDrops);
    wait(.5);
}
// Stop  - turn off drive motors
void stop() {
    device.printf("%c%c%c%c%c", DriveDirect, char(0),  char(0),  char(0),  char(0));
}
// Forward  - turn on drive motors
void forward() {
    device.printf("%c%c%c%c%c", DriveDirect, char((speed_right>>8)&0xFF),  char(speed_right&0xFF),
    char((speed_left>>8)&0xFF),  char(speed_left&0xFF));

}
// Reverse - reverse drive motors
void reverse() {
    device.printf("%c%c%c%c%c", DriveDirect, char(((-speed_right)>>8)&0xFF),  char((-speed_right)&0xFF),
    char(((-speed_left)>>8)&0xFF),  char((-speed_left)&0xFF));

}
// Left - drive motors set to rotate to left
void left() {
    device.printf("%c%c%c%c%c", DriveDirect, char((speed_right>>8)&0xFF),  char(speed_right&0xFF),
    char(((-speed_left)>>8)&0xFF),  char((-speed_left)&0xFF));
}
// Right - drive motors set to rotate to right
void right() {
    device.printf("%c%c%c%c%c", DriveDirect, char(((-speed_right)>>8)&0xFF),  char((-speed_right)&0xFF),
    char((speed_left>>8)&0xFF),  char(speed_left&0xFF));

}
// Charger - search and return to charger using IR beacons (if found)
void charger() {
    device.printf("%c%c", Demo, char(1));
}
// Play Song  - define and play a song
void playsong() { // Send out notes & duration to define song and then play song

    device.printf("%c%c%c%c%c%c%c%c%c%c%c%c%c%c%c%c%c%c%c%c%c%c%c%c%c%c%c%c%c%c%c%c%c%c%c",
                  Song, char(0), char(16), char(91), char(24), char(89), char(12), char(87), char(36), char(87),
                  char(24), char(89), char(12), char(91), char(24), char(91), char(12), char(91), char(12), char(89),
                  char(12),char(87), char(12), char(89), char(12), char(91), char(12), char(89), char(12), char(87),
                  char(24), char(86), char(12), char(87), char(48));

    wait(.2);
    device.printf("%c%c", PlaySong, char(0));
}
What is next?
Once you have the demo running, you can get started on more complex robotics projects. First, you would want to read the incoming serial sensor packets to use sensor data to modify the commands sent. Additional sensors could be added to the robot such as IR and Sonar to detect objects without hitting them. The Create is the pickup truck of small robot kits. It is not the fastest, but it can handle a lot of additional hardware in the cargo area.
Power
Once you decide to work on more projects a bit with the Create, it is a good idea to invest in the rechargeable battery. The low cost version comes without them and it needs 12 AA batteries. The robot can find the charger on its own, if you get the charger with the IR beacons.
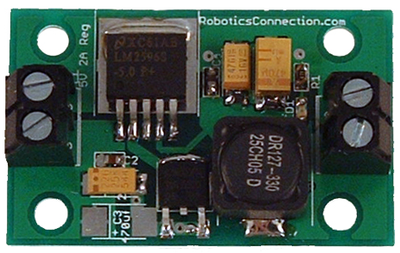
With additional sensors, it is likely that you will need to provide a 5V regulated supply since the current is very limited on the internal 5V supply being used for mbed. It is already at the maximum level. This is possible without an additional battery by using the 18V battery voltage from the Create's battery. It is also available on the DB25 connector pins. Make sure that the 5V voltage regulator chip used can tolerate that high of an input voltage. The low cost linear regulator chips will overheat with this large of an input voltage. A special 5V 3A switching regulator board designed just for this purpose is available from Robotics Connection. The first version of this board had a regulator could handle the input voltage from the battery, but there may have been some recent production changes. The data sheet on the web now says 16V max, so you may need to add a resistor or some diodes in series on the input to drop it down to those levels. One you add a regulator, it would be a good idea to get a male DB25 connector and solder all of the connections.
Mounting Additional Hardware
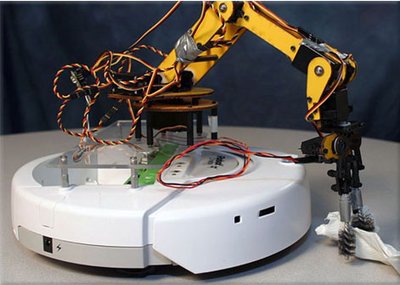
It is common to mount a sheet of plastic over the cargo bay area using the 6-32 screw holes provided. Additional sensors and hardware can then be attached to the plastic sheet. One such project using a clear plastic sheet to mount a robot arm is seen below.
And here is another level used to mount a camera
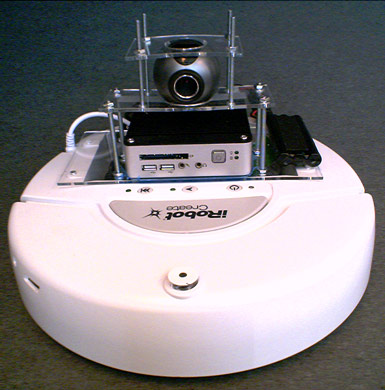
Here are a couple of videos of student projects showing more hardware on the Create.
Create with a windshield washer pump to put out fires.
Parts from an old printer on the Create use powder to print on the floor.