You are viewing an older revision! See the latest version
Websocket and Mbed
As explained in this webpage, the WebSocket protocol allows full-duplex, bi-directional communications between a server and clients.
The websocket server
In this tutorial, we will be using a public server provided by mbed for testing purposes.
So you just have to program your mbed!
If you want more information regarding the server side code, go to this webpage
This tutorial is divided into three parts:
- Part 1 - Setup
- Part 2 - Sending accelerometer data over a WebSocket over WiFi
- Part 3 - Sending accelerometer data over a WebSocket over Ethernet
You may wish to skip to the relevant section after you have chosen whether you are using WiFi or Ethernet
1 - Set up
1.1 - Protocol used by the serve
The url format to establish a connection with the server is: ws://sockets.mbed.org:444/mbed-demo/<mode>/<channel> (Don't try and go here, it will not work)
The WebSockets are divided into channels.
When the server receives a message from a client in a certain channel:
- it will broadcast the message to all clients connected to this channel who are not in 'w' mode
- A client in 'w' mode connected to this channel can only 'write' (send) messages to this channel. It cannot receive messages
- A client in a mode other than 'w' can send and receive messages over the channel
1.2 - Javascript part
This code is very similar to the one presented in second part of this tutorial.
Take note!
We present this code for you to modify as you wish, but if you want to just go to our website to see the webpage, you can skip this section, and visit this.
<!doctype html>
<html>

  <head>
    <style type="text/css">
      body {
        text-align: center;
        min-width: 500px;
      }
    </style>
    <script src="http://code.jquery.com/jquery.min.js"></script>
    <script>
    function log(m) {
		d = document.getElementById("log");
        d.innerHTML = m + "<br/>" + d.innerHTML;
    }

    $(document).ready(function () {

	$("#open").click(function(evt) {
        evt.preventDefault();

        var channel = $("#channel").val();
        var ws = new WebSocket("ws://sockets.mbed.org:444/mbed_demo/rw/" + $("#channel").val());

        ws.onopen = function(evt) {
			$("#channel").css("background", "#00ff00");
			document.getElementById("title").innerHTML = "Websockets streaming on channel: " + $("#channel").val();
		};
        ws.onmessage = function(evt) { log("message: " + evt.data); };
        ws.onclose = function(evt) { log("socket closed"); };
        });

    });

    </script>
  </head>

  <body>
    <h1 id="title">Websockets Streaming</h1>
    <label for="channel">channel:</label>
    <input type="text" id="channel" style="background:#ff0000;"/><br />
    <input type="submit" id="open" value="open" />
    <div id="log"></div>


  </body>
</html>
On this webpage, you must associate your connection with a 'channel'. In this example, I will use the channel samux, but I could use anything. So I fill in the channel field and press open
If the connection is established:
- we change the background of the channel field from red to green
- we change the title according to the channel
When a message is received: - we print the message received below


So the WebSocket is opened, now the Mbed part!
Part 2 - Sending data from the Mbed: Wifi
Materials required
For this part you need:
- an mbed ;)
- a Wifly module like this
- a router
- sensor(s) (for this tutorial, I will use this accelerometer)
2.1 - Schematics
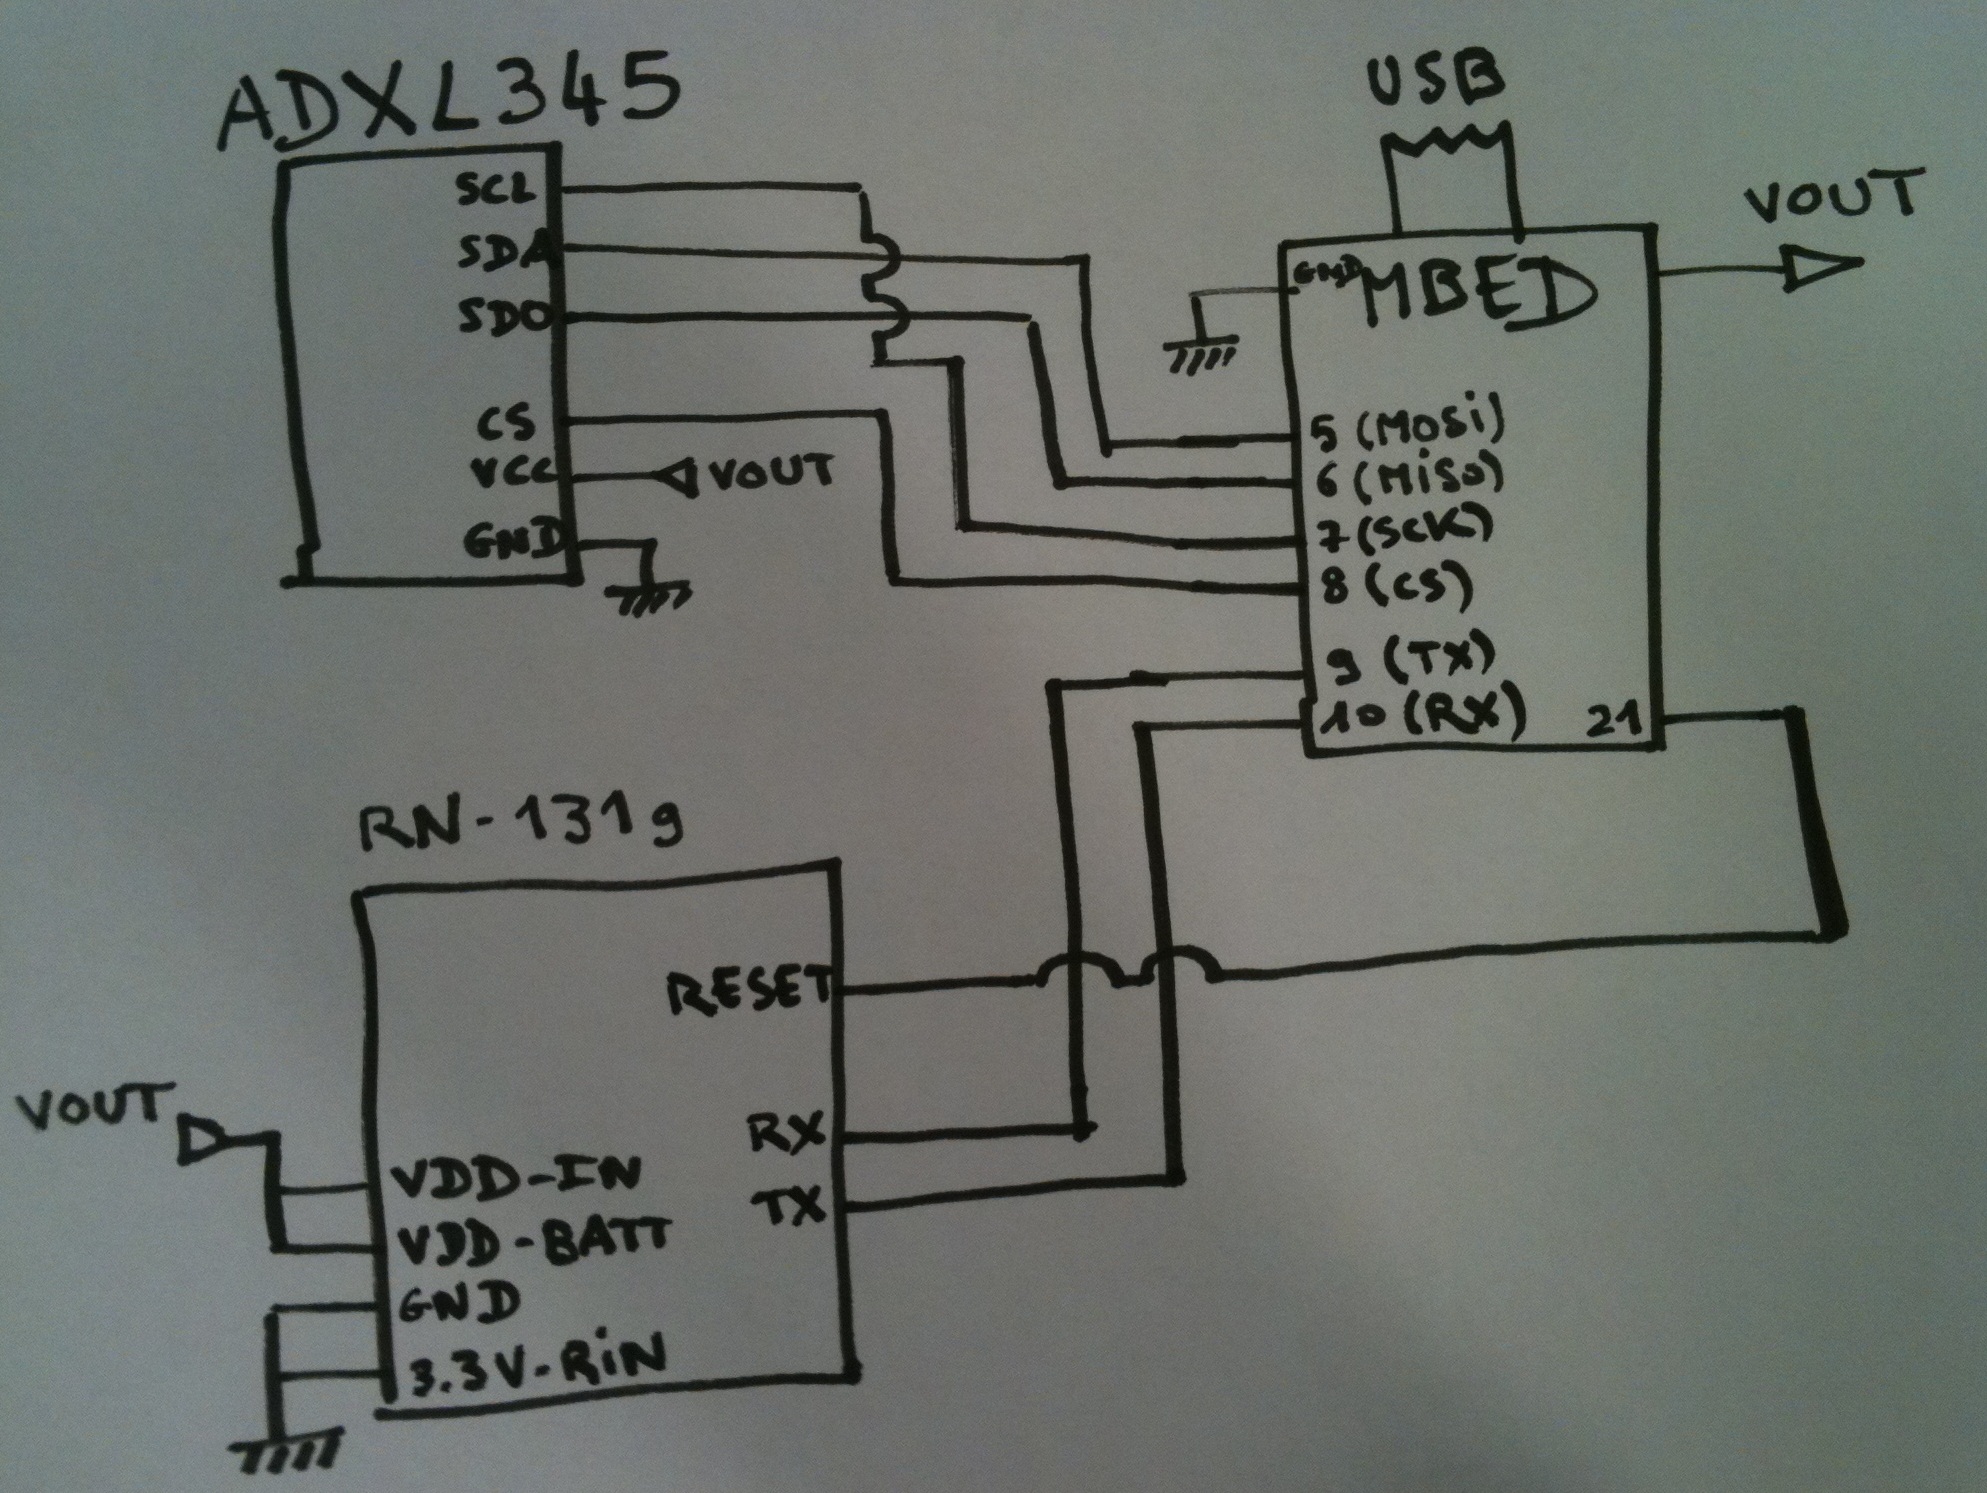
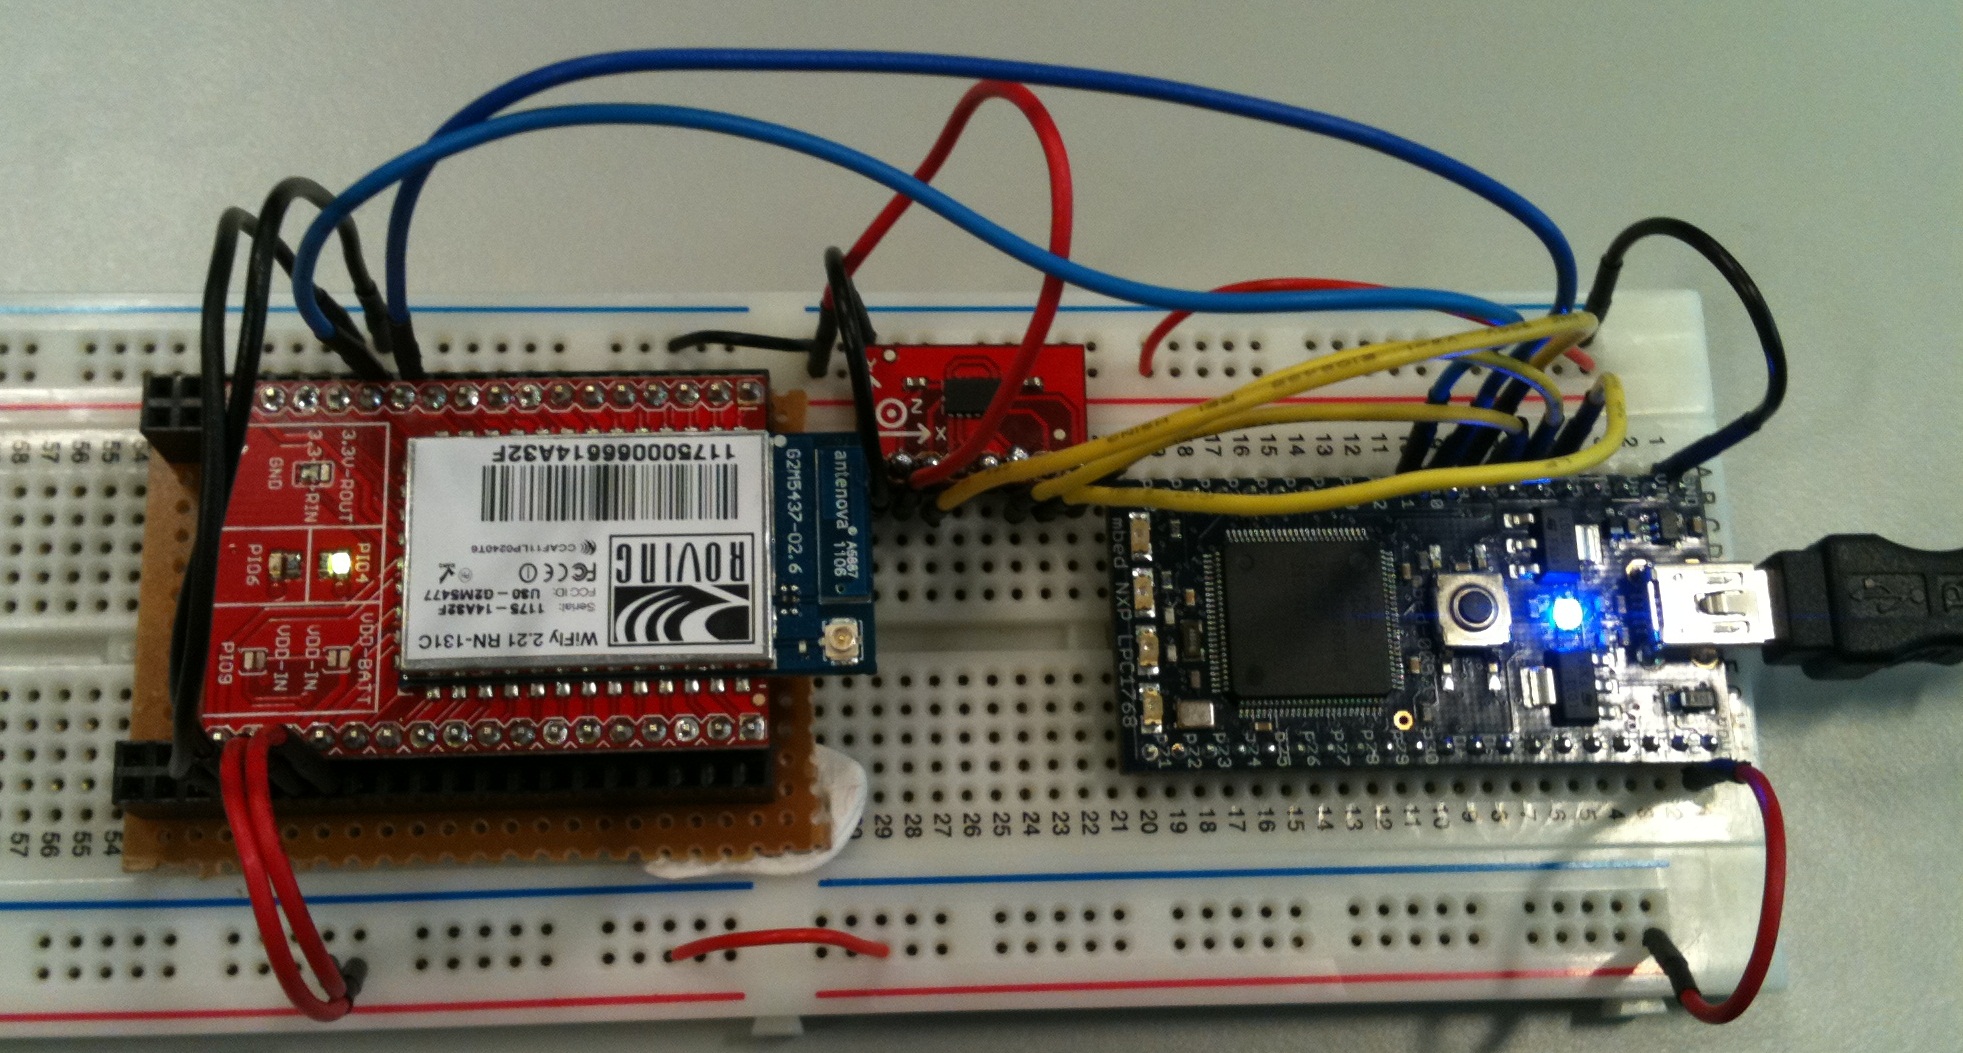
2.2 - Code
Libraries required
For this part you need to import these libraries:
- WebSocket
- Wifly
- EthernetIf. You must import the program as a library
- DNSResolver
- For the sensor: ADXL345
You may wish to skim the page on the WiFly module.
The main code:
#include "mbed.h"
#include "Wifly.h"
#include "Websocket.h"
#include "ADXL345.h"

Serial pc(USBTX, USBRX);

ADXL345 accelerometer(p5, p6, p7, p8);

//Here, we create an instance, with pins 9 and 10 connecting to the
//WiFly's TX and RX pins, and pin 21 to RESET. We are connecting to the
//NETGEAR network, password bananna2, and we are using WPA.
Wifly wifly(p9, p10, p21, "NETGEAR", "bananna2", true);

//Here, we create a WebSocket instance in 'w' (write) mode
//on the 'samux' channel
Websocket ws("ws://sockets.mbed.org:444/mbed_demo/w/samux", &wifly);

int main() {
    char json_str[100];

    int readings[3] = {0, 0, 0};

    pc.printf("Starting ADXL345 test...\r\n");
    pc.printf("Device ID is: 0x%02x\r\n", accelerometer.getDevId());

    //Go into standby mode to configure the device.
    accelerometer.setPowerControl(0x00);

    //Full resolution, +/-16g, 4mg/LSB.
    accelerometer.setDataFormatControl(0x0B);

    //3.2kHz data rate.
    accelerometer.setDataRate(ADXL345_3200HZ);

    //Measurement mode.
    accelerometer.setPowerControl(0x08);


    while (1) {
        while (1) {

            while (!wifly.Join())  //we connect to the network
                wifly.reset();

            if (!ws.connect())    //we connect to the server
                wifly.reset();
            else
                break;
        }

        while (1) {
            wait(0.1);

            //we read accelerometers values
            accelerometer.getOutput(readings);

            //Here, we format the string we will be sending to the server
            //the format we are sending in is JSON
            sprintf(json_str, "{\"id\":\"wifly_acc\",\"ax\":\"%d\",\"ay\":\"%d\",\"az\":\"%d\"}", (int16_t)readings[0], (int16_t)readings[1], (int16_t)readings[2]);
            ws.Send(json_str);  //And we send the string
        }
    }
}
Import programwebsockets_hello_world_wifi
Websocket Hello World over a wifi network
This code is very simple:
- accelerometer initialization
- connect to the router
- connect to the WebSocket server
- send data from the accelerometer in a JSON string each 0.1s
ssid, key, mode, channel
Don't forget to adapt:
- the ssid and the key of your network in the Wifly constructor
- the mode and the channel of your choice in the WebSocket constructor
Download to your Mbed
- You can now download this program into your mbed
- enter your channel in this webpage and click open to see messages from your mbed to the server
2.3 - Demo
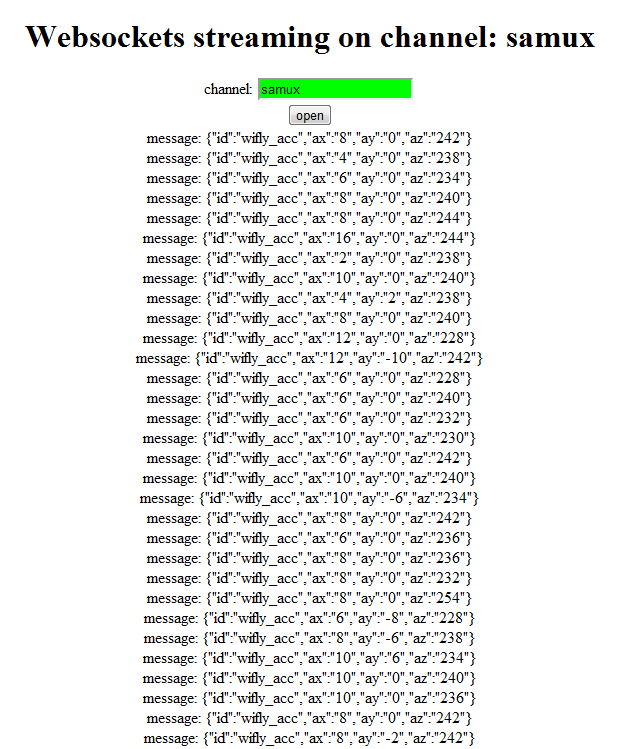
Et Voilà! We are able to see on our webpage the data from our accelerometer!
Part 3 - Sending data from the Mbed: Ethernet
Materials required
For this part you need:
- an Mbed ;)
- an Ethernet RJ45 jack
- a router
- a sensor (for this tutorial, I will use this accelerometer)
3.1 - Schematics
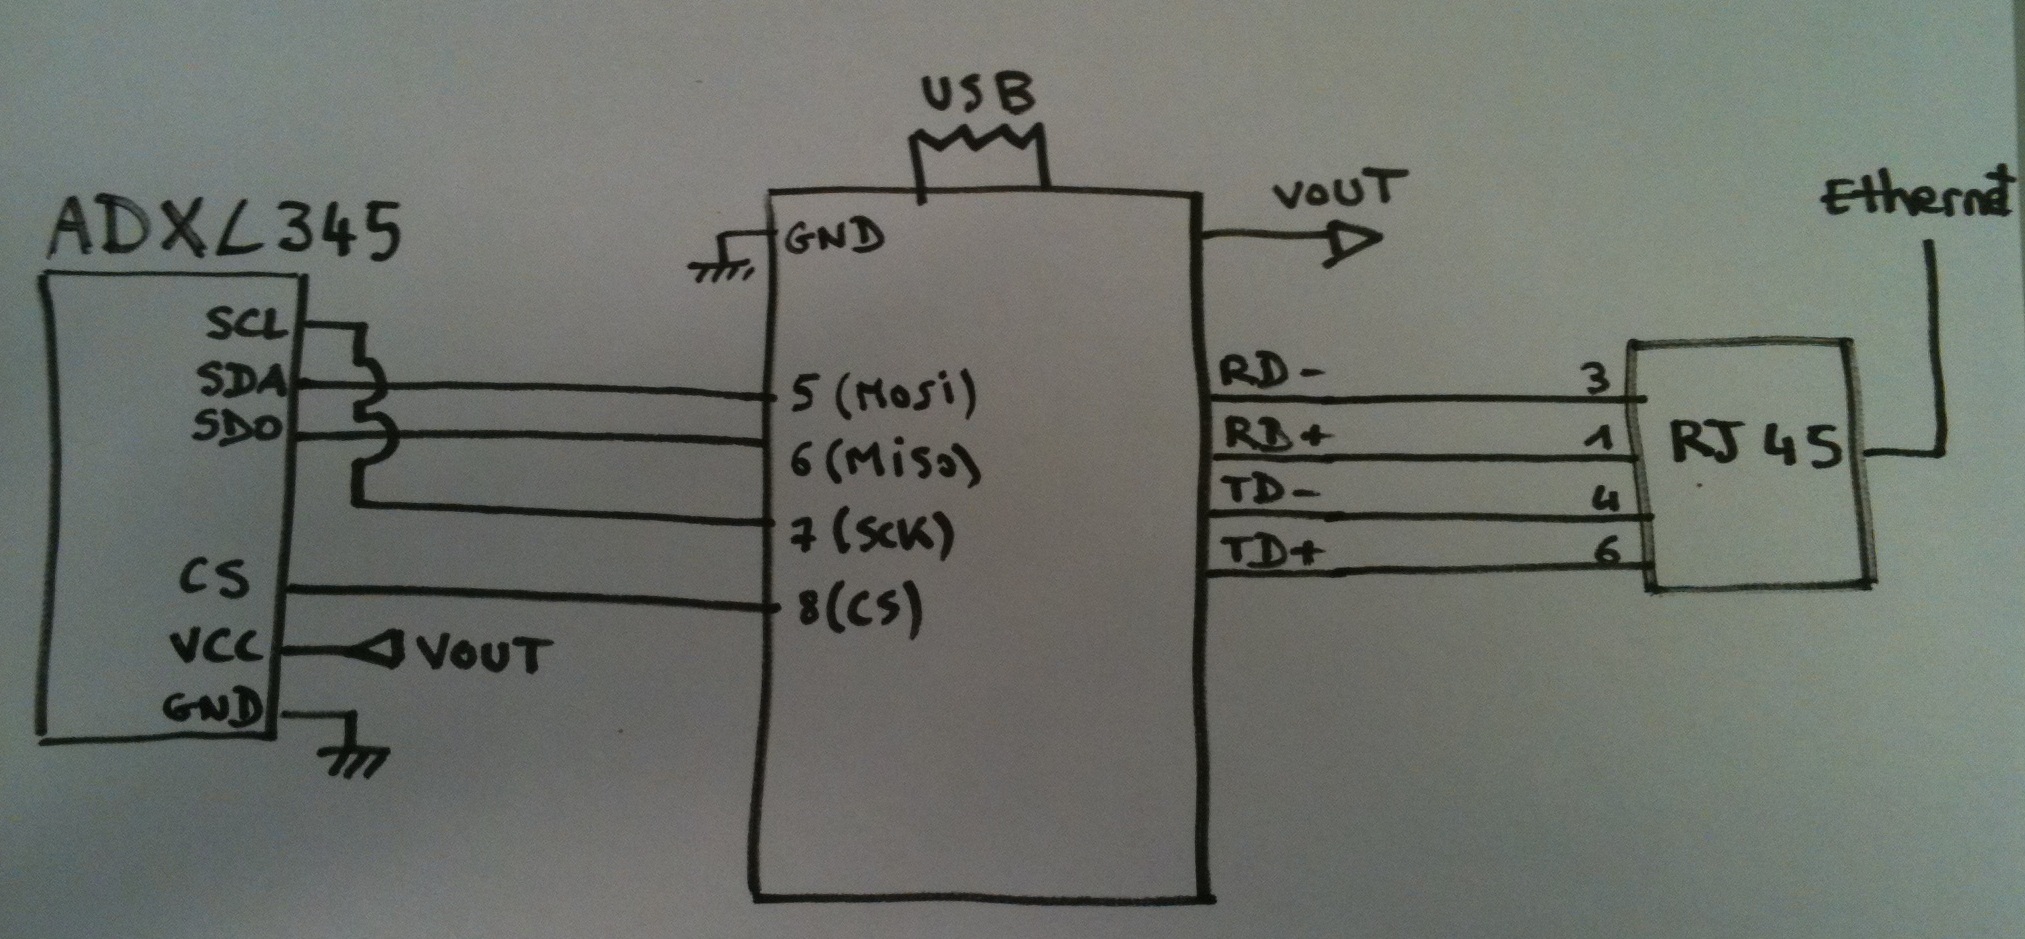
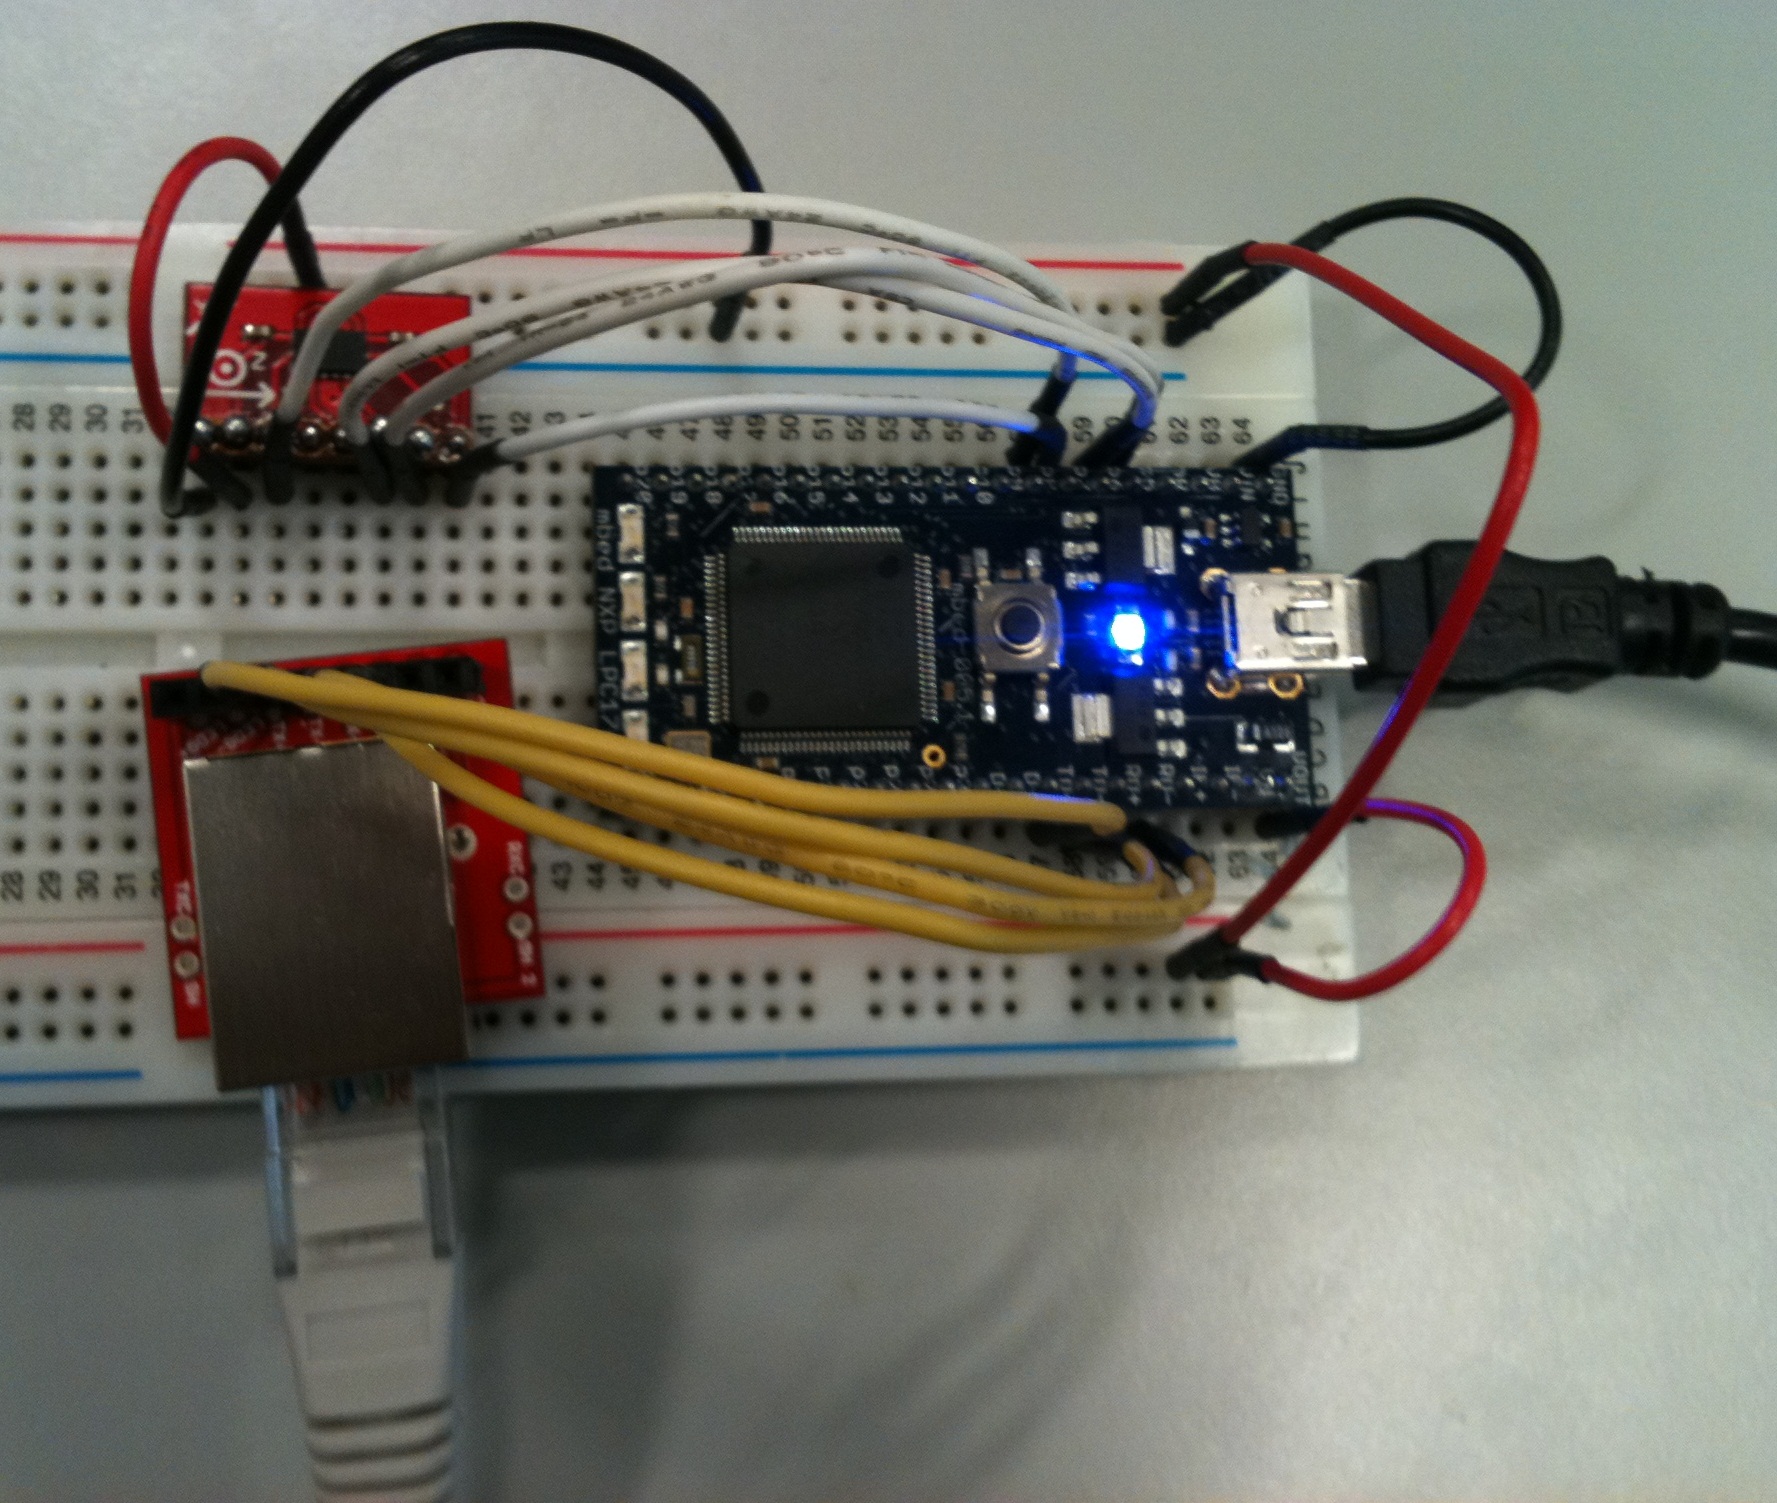
3.2 - Code
Library required
For this part you need to import these libraries:
- WebSocket
- EthernetIf. You must import the program as a library
- Wifly - the WebSocket library uses this
- DNSResolver
- For the sensor: ADXL345
The main code:
#include "mbed.h"
#include "Websocket.h"
#include "ADXL345.h"

Serial pc(USBTX, USBRX);

ADXL345 accelerometer(p5, p6, p7, p8);

//Here, we create a Websocket instance in 'w' (write) mode
//on the 'samux' channel
Websocket ws("ws://sockets.mbed.org:444/mbed_demo/w/samux");

int main() {
    char json_str[100];

    int readings[3] = {0, 0, 0};

    pc.printf("Starting ADXL345 test...\r\n");
    pc.printf("Device ID is: 0x%02x\r\n", accelerometer.getDevId());

    //Go into standby mode to configure the device.
    accelerometer.setPowerControl(0x00);

    //Full resolution, +/-16g, 4mg/LSB.
    accelerometer.setDataFormatControl(0x0B);

    //3.2kHz data rate.
    accelerometer.setDataRate(ADXL345_3200HZ);

    //Measurement mode.
    accelerometer.setPowerControl(0x08);


    while (1) {

        while(!ws.connect())
            pc.printf("cannot connect websocket, retrying\r\n");

        while (1) {
            wait(0.1);

            //we read accelerometers values
            accelerometer.getOutput(readings);

            //Here, we format the string we will be sending to the server
            //the format we are sending in is JSON
            sprintf(json_str, "{\"id\":\"wifly_acc\",\"ax\":\"%d\",\"ay\":\"%d\",\"az\":\"%d\"}", (int16_t)readings[0], (int16_t)readings[1], (int16_t)readings[2]);
            ws.Send(json_str);
        }
    }
}
Import programwebsockets_hello_world_ethernet
Websocket Hello World over an ethernet network
This code is very simple:
- accelerometer initialization
- connection to the WebSocket server, open a WebSocket
- send data from accelerometer in a JSON string each 0.1s
Note that the WebSocket API is the same for using a WiFi module or an Ethernet connection
mode, channel
Don't forget to edit:
- the mode and the channel of your choice in the WebSocket constructor
3.3 - You should be ready!
- You can now download this program into your mbed
- enter your channel in this webpage and click open to see messages from your mbed to the server
3.4 - Demo
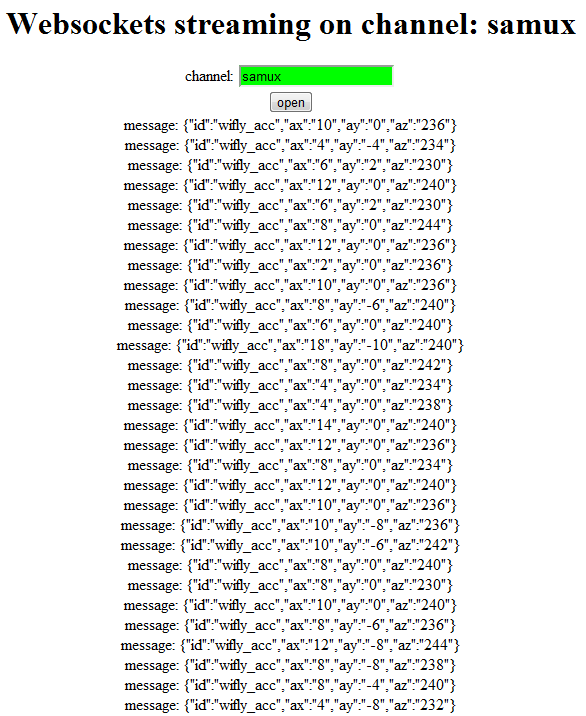
Et Voilà! We are able to see on our webpage the data from our accelerometer over an Ethernet network!
Now, if you want, you can write your own webpage to process and display the data coming in on your channel whichever way you wish!
Conclusion
You are now able to design your own Internet of Things project. If you want to see the huge potential of WebSockets and Internet of Things, take a look at this project.
