Using low cost STM32F407VET6 boards with mbed.
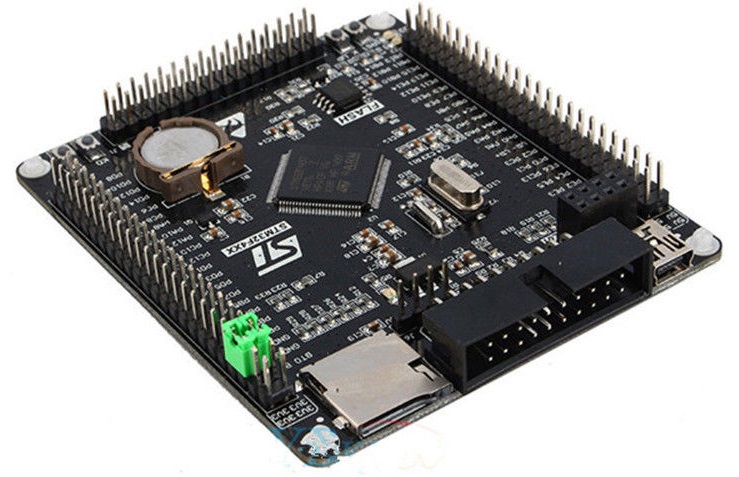
STM32F407VET6 black board
It provides an affordable (about $9 on eBay) and flexible way for users to try out new ideas and build prototypes. The board is equipped with an STM32F407VET6 microcontroller compatible with the Seeed Arch Max platform.
Microcontroller features
- STM32F407VET6 in LQFP100 package
- ARM®32-bit Cortex®-M4 CPU + FPU
- 168 MHz max CPU frequency
- VDD from 1.8 V to 3.6 V
- 512 KB Flash
- 192+4 Kbytes of SRAM including 64-Kbyte of CCM (core coupled memory) data RAM
- GPIO (82) with external interrupt capability
- 12-bit ADC (3) with 16 channels
- 12-bit DAC (1) with 2 channels
- RTC
- Timers (14)
- I2C (3) interfaces (SMBus/PMBus)
- I2S (2)
- USART (4)
- SPI (3)
- USB 2.0 full-speed
- USB 2.0 OTG
- CAN (2)
Board features
- JTAG/SWD header
- Micro SD
- Winbond W25Q16 16Mbit SPI Flash
- RTC battery CR1220
- 10/100 Ethernet MAC
- 3.3V LDO voltage regulator
- Mini USB connector
- 1x power LED
- 2x user LEDs D2 (PA6) D3 (PA7)
- 2x jumpers for bootloader selection
- Reset button,
- Wakeup button
- 2x user buttons K0 (PE4) and K1 (PE3)
- 2x24 side pins + 2x16 bottom pins + 1x4 ISP pins
- 2x16 FMSC LCD Interface
- NRF24L01 socket
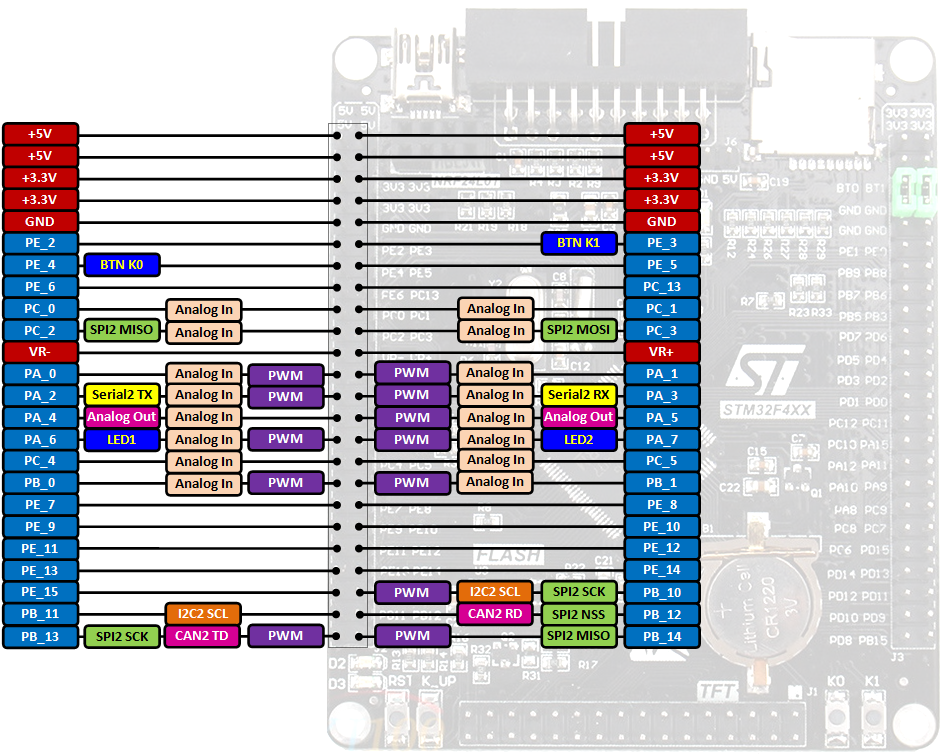
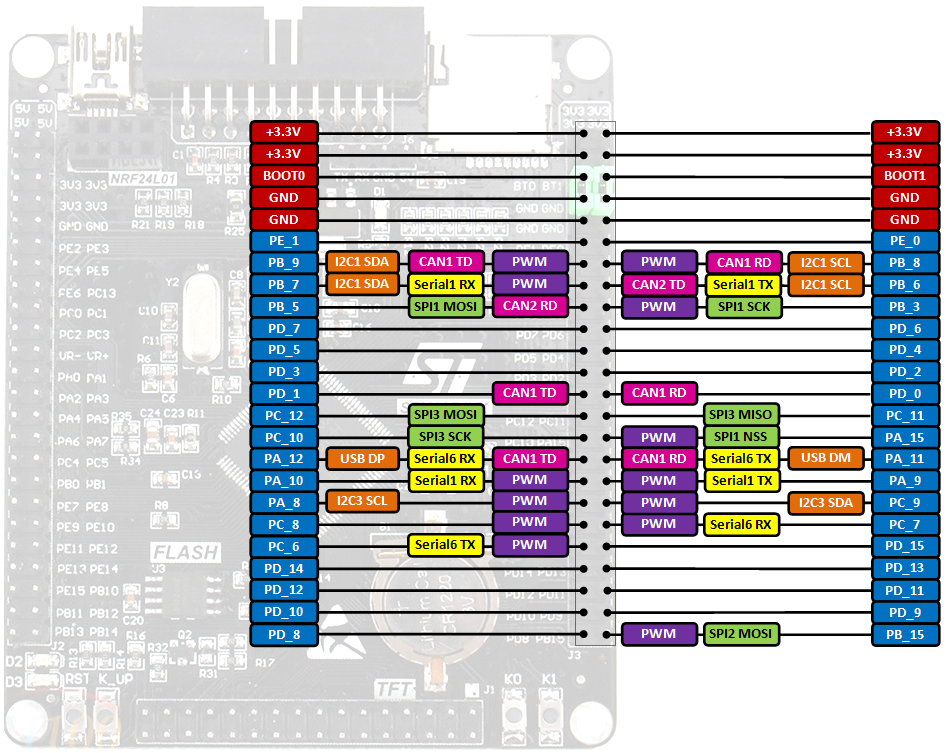
Board pinout
 |
For more details on pin definitions see Table 9 in the Datasheet and
Reference Manual.
Information
Only the labels printed in blue/white (i.e. PC_6, PB_9 ...) must be used in your code. The other labels are given as information (alternate-functions, power pins, ...). You can also use these additional pin names:
USBTX=PC_6  I2C_SCL=PB_8  SPI_MOSI=PC_3
USBRX=PC_7  I2C_SDA=PB_9  SPI_MISO=PC_2
                          SPI_SCK =PB_10
                          SPI_CS  =PE_3
Please notice that the on-board LEDs are connected via a resistor, to +3.3V. So to turn the LEDs on or off you have to set the DigitalOut to 0 or 1 respectively.
Schematic
View the schematic.
Using the mbed online compiler
- Create a program as if it was for a Seed Arch Max board (select Seeed Arch Max as target platform for the online compiler).
Programming the STM32F407VET6 board
NUCLEO ST-LINK/V2-1 and drag & drop
You can use the NUCLEO virtual disk to program the STM32F407VET6 board (drag and drop programming). To do that, an additional NUCLEO board is needed (any type equipped with ST-LINK/V2-1 will do).
- Remove the two jumpers from the CN2 connector as illustrated in Figure 8:
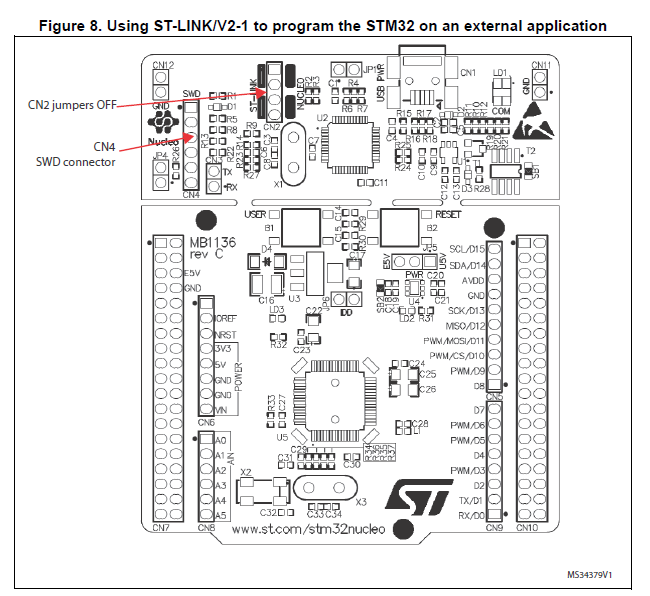
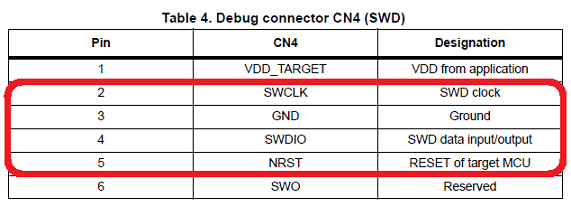
- Connect the NUCLEO board CN4 connector to the STM32F407VET6 board using flying wires as follows:
| NUCLEO board CN4 connector | STM32F407VET6 SWD connector | |||
|---|---|---|---|---|
| SWCLK | <=> | SWCLK | ||
| GND | <=> | GND | ||
| SWDIO | <=> | SWDIO | ||
| NRST | <=> | NRST |
Warning
Please notice that VDD_TARGET is not connected. That works with the ST-Link programmer but could potentially damage the target micro controller in case it's running at a lower voltage (e.g. 2V5) than the programmer (e.g. 3V3). That's why it's recommended to connect also the VDD_TARGET line when an external programmer such as a Segger J-Link is hooked up to program the board.
- Provide power for the STM32F407VET6 board through a 3.3V pin, 5V pin or over a USB cable. (The VDD_TARGET pin on the NUCLEO board CON4 does not work as source of power).
- Connect the NUCLEO board to your PC over a USB cable.
- To program the STM32F407VET6 board, click on the Compile button and save the binary to the NUCLEO virtual disk .
For more details have a look at the User Manual, chapter 6.2.4 Using ST-LINK/V2-1 to program and debug an external STM32 application.
ST-Link V2 USB dongle and STM32 ST-LINK utility
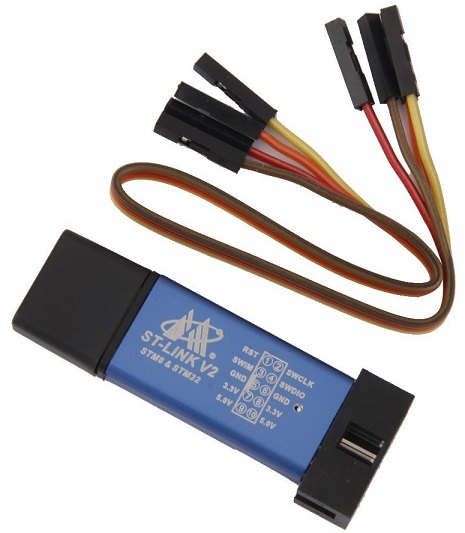
If you would like to use an ST-Link V2 USB dongle (aka ST-Link V2 Programming Unit) to program the board apply the same wiring as specified above. If not done yet install an ST-Link/V2 driver onto your PC. Plug the ST-Link V2 dongle into your PC. Then click on the Compile button and save the binary to your local disk. Install and run the STM32 ST-LINK utility. Once the program is running open the binary built with the online compiler and click on the Program verify button.
STM32 USART system memory bootloader and Flasher-STM32
Have a look at the STM32 Embedded Bootloader.
Download: FLASHER-STM32
For more details read:
Appliction Note AN2606.
Using serial port (not just for debugging)
- Connect an FTDI or similar USB to Serial TTL converter to your PC and to an on-board serial port (for example PC_6, PC_7 - NOTE: Connect to these pins also when printing to the default USART port with simple
printfcommand). Make sure you connect the on-board TX pin to the converter's RX pin and the on-board RX pin to the converter's TX pin.
- In your code, create a
Serialobject (using TX and RX pin names of the connected serial port).
- Use
printffunction to send serial messages to the connected PC.
Sending debug messages over the ST-Link virtual com port
In case you would like to spare the external USB-Serial converter for other purposes then there is available an alternative solution proposed by X M (bitman). You can use the ST-Link virtual com port also for debugging of programs running on the STM32F103C8T6 board. However, that will require a soldering iron (and probably some soldering skills). According to the User Manual, chapter 6.8 "USART communication", solder bridges (on the back side of the NUCLEO board) SB62 and SB63 should be ON, SB13 and SB14 should be OFF. In such case it is possible to connect another USART to the NUCLEO (ST-Link) CN3 connector using flying wires. For instance on STM32F103C8T6 board it is possible to use USART2 available on PA_2 (TX) and PA_3 (RX). Two flying wires shall be connected as follows:
| STM32F407VET6 board, pin PC_6 (Serial2 TX) | <=> | NUCLEO board CN3 connector, pin RX |
| STM32F407VET6 board, pin PC_7 (Serial2 RX) | <=> | NUCLEO board CN3 connector, pin TX |
A smart trick proposed by Nothing Special makes even soldering needless.
The point is to redirect the UART on the NUCLEO board by software (without modifying the solder bridges on the back side of the NUCLEO board) and convert it into a "Debugger". On the NUCLEO board that you are going to use as programmer/ debugger, choose any Serial port other than Serial2 (other than the default port used for standard UART) to be initialized as standard UART. In the program below (using NUCLEO-F103RB as programmer/debugger) Serial1 (PA_9, PA_10) was selected.
Debugger
#include "mbed.h"

// declarations needed to change the parameters of stdio UART
extern serial_t     stdio_uart;
extern int          stdio_uart_inited;

int main() {
    serial_init(&stdio_uart, PA_9, PA_10); // other than Serial2
    stdio_uart_inited = 1;
    printf("Ready for debugging\r\n");
}
Once compiled (remember to select the NUCLEO board used for programing/debugging as target for the online compiler), download the "Debugger" program to the NUCLEO board. Please make sure you have the two jumpers in place on the CN2 connector when programming the NUCLEO board. Once the "Debugger" binary has been downloaded to the NUCLEO board, remove the two jumpers again.
Ethernet interface
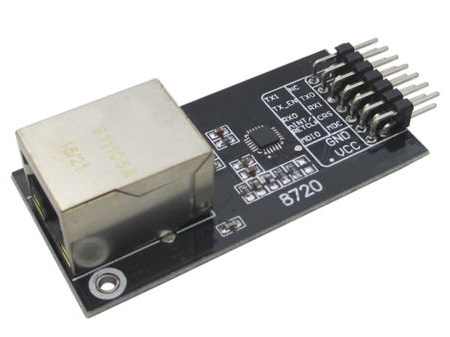
There are available low cost (about $2.50 on eBay) LAN8720 small footprint RMII 10/100 Ethernet modules suitable for the STM32F407VET6 board. For more details see the LAN8720 datasheet.
Wiring
We can connect a LAN8720 module to the STM32F407VET6 black board as follows:
| LAN8720 module | STM32F407VET6 board | |||
|---|---|---|---|---|
| TX1 | <=> | PB_13 | ||
| TX_EN | <=> | PB_11 | ||
| TX0 | <=> | PB_12 | ||
| RX0 | <=> | PC_4 | ||
| RX1 | <=> | PC_5 | ||
| nINT/RETCLK | <=> | PA_1 | ||
| CRS | <=> | PA_7 | ||
| MDIO | <=> | PA_2 | ||
| MDC | <=> | PC_1 | ||
| GND | <=> | GND | ||
| VCC | <=> | +3.3V |
Notice that because the RX_ER line is not used the LAN8720 module doesn't have to modified.
MBED library modifications
No MBED library modifications are needed. However, please notice that because pin PA_7, which is driving the on-board LED2 (D3), is used also by the Ethernet interface (as CRS) the LED will emit light.
Demos for Ethernet interface
CAN peripheral
Unfortunately there is no CAN interface configuration available for the Seeed Arch Max board in mbed. However, we can easily add such by modifying the mbed-dev library as described below.
- Import the CAN_Hello demo into the online compiler.
- Select Seeed Arch Max as target platform for the online compiler.
- Open and modify the
main.cppas follows:
main.cpp
...

#if defined(TARGET_STM32F103C8T6)
#include "stm32f103c8t6.h"
#define LED_PIN     PC_13
const int           OFF = 1;
const int           ON = 0;
#else
//#define LED_PIN     LED1
//const int           OFF = 0;
//const int           ON = 1;
#define LED_PIN     PA_6
const int           OFF = 1;
const int           ON = 0;
#endif

...
- Connect the STM32F407VET board to the CAN bus as illustrated on the CAN_Hello Schematic.
- Delete the mbed library from the project.
- Import the mbed-dev library into the project.
- Open the
mbed-dev/targets/TARGET_STM/TARGET_STM32F4/TARGET_STM32F407xG/TARGET_ARCH_MAX/PeripheralNames.hfile and insert the following code at the end of the file just before the C preprocessor#ifdef __cplusplusdirective:
PeripheralNames.h
typedef enum {
    CAN_1 = (int)CAN1_BASE,
    CAN_2 = (int)CAN2_BASE
} CANName;
- Open the
mbed-dev/targets/TARGET_STM/TARGET_STM32F4/TARGET_STM32F407xG/TARGET_ARCH_MAX/PeripheralPins.cfile and append the following code:
PeripheralPins.c
const PinMap PinMap_CAN_RD[] = {
    {PA_11, CAN_1, STM_PIN_DATA(STM_MODE_AF_PP, GPIO_NOPULL, GPIO_AF9_CAN1)},
    {PB_8,  CAN_1, STM_PIN_DATA(STM_MODE_AF_PP, GPIO_NOPULL, GPIO_AF9_CAN1)},
    {PD_0,  CAN_1, STM_PIN_DATA(STM_MODE_AF_PP, GPIO_NOPULL, GPIO_AF9_CAN1)},
    {PB_5 , CAN_2, STM_PIN_DATA(STM_MODE_AF_PP, GPIO_NOPULL, GPIO_AF9_CAN2)},
    {PB_12, CAN_2, STM_PIN_DATA(STM_MODE_AF_PP, GPIO_NOPULL, GPIO_AF9_CAN2)},
    {NC,    NC,    0}
};

const PinMap PinMap_CAN_TD[] = {
    {PA_12, CAN_1, STM_PIN_DATA(STM_MODE_AF_PP, GPIO_NOPULL, GPIO_AF9_CAN1)},
    {PB_9,  CAN_1, STM_PIN_DATA(STM_MODE_AF_PP, GPIO_NOPULL, GPIO_AF9_CAN1)},
    {PD_1,  CAN_1, STM_PIN_DATA(STM_MODE_AF_PP, GPIO_NOPULL, GPIO_AF9_CAN1)},
    {PB_6 , CAN_2, STM_PIN_DATA(STM_MODE_AF_PP, GPIO_NOPULL, GPIO_AF9_CAN2)},
    {PB_13, CAN_2, STM_PIN_DATA(STM_MODE_AF_PP, GPIO_NOPULL, GPIO_AF9_CAN2)},
    {NC,    NC,    0}
};
- Add
mbed_app.jsonfile with the following content to the project :
mbed_app.json
{
    "target_overrides": {
        "ARCH_MAX": {
            "target.device_has": ["CAN"]
        }
    }
}
- Compile the project and download the binary to the STM32F407VET6 board. Then proceed as explained in the CAN_Hello demo.
Micro SD card slot
The board is equipped with a micro SD card slot which is connected to the microcontroller's SDIO interface. Unfortunately MBED doesn't support such type of peripheral. Nevertheless, it's still possible to use the on-board micro SD card slot. Have a look at the STM32F407VET6_SDCard example program to see how.
On-board 16Mbit SPI Flash memory
A Winbond W25Q16 16Mbit SPI Flash is installed on the board. See the STM32F407VET6_SPIFlash example program how to use it.
NRF24L01 connector
Additional example programs
- Blinky_RTOS
- HTTP File Server using SD Card
- USB mass storage device (USB flash disk)
- USB mouse
- USB keyboard
- Simple Pong game with ILI9341 320x240 TFT display.
- Tiny HTTP server built with Mbed OS-5.
Mbed OS-5
Thanks to Johannes Stratmann we can now create also Mbed OS-5 projects for the Seeed Arch Max board with the Mbed CLI, Mbed Studio and the Mbed Online Compiler.
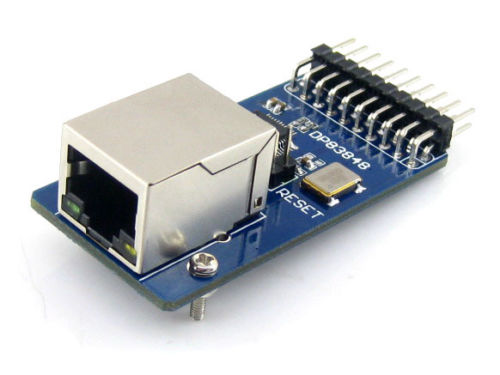
For Mbed OS-5 projects you can use also a DP83848 module as Ethernet interface rather than a LAN8720 module. The latter does not work for some unknown reason.
EDIT: Have a look at https://forums.mbed.com/t/ethernetinterface-in-mbed-os5-with-lan8720/6373 how to make a LAN8720 work with Mbed OS-5.
Wiring
| DP83848 module | STM32F407VET6 board | |||
|---|---|---|---|---|
| VCC | <=> | +3.3V | ||
| GND | <=> | GND | ||
| MDIO | <=> | PA_2 | ||
| MDC | <=> | PC_1 | ||
| OSCIN | <=> | PA_1 | ||
| CRS | <=> | PA_7 | ||
| RX0 | <=> | PC_4 | ||
| RX1 | <=> | PC_5 | ||
| TX_EN | <=> | PB_11 | ||
| TX0 | <=> | PB_12 | ||
| TX1 | <=> | PB_13 |
Notice that because the RX_ER line is not used the DP83848 module doesn't have to be modified.
