Embedded Artists

We are the leading providers of products and services around prototyping, evaluation and OEM platforms using NXP's ARM-based microcontrollers.
You are viewing an older revision! See the latest version
LPC4088DM Guide to Working with emWin
The goal of this guide is to get you up and running with the emWin Graphical Library on the LPC4088 Display Module.
There is a short introduction to DMemWin which is the wrapper/porting layer for the emWin library.
Requirements for this guide:
Step 1: Quick Background
This is one of the GUI libraries to help you create a better user interface on the display by giving you access to high level widgets rather than drawing each pixel yourself.
LPCWare describes emWin like this:
The high performance emWin embedded graphics library developed by SEGGER Microcontroller is now offered by NXP Semiconductors in library form for free commercial use with NXP microcontrollers.
Follow the link above to read more about what is available in the emWin library supplied by NXP.
To read more about emWin as well as see lots of examples on the Segger site.
Step 2: Setup the Project
As there are limitations regarding distribution and re-publishing of the emWin library it is not provided in the DMemWin library, just some placeholders.
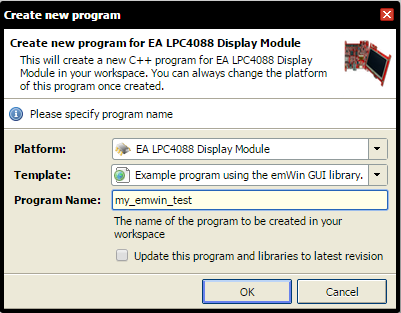
To get started, open the online compiler and select New->New Project from the menu. A dialog like this will appear, select EA LPC4088 Display Module in the to drop-down menu (if you can't see that option, go to the platform page and click the Add to your mbed compiler button).

Warning
Make sure that the Update this program and libraries to latest revision box is NOT selected as it could potentially cause problems. The specific versions of the libraries have been picked to be compatible. Randomly updating some of them could cause incompatibility issues.
Select the Example using the emWin GUI library option in the second drop-down menu and then give your project a suitable name.
Click the OK button and wait for the project to be created. This may take up to a couple of minutes depending on the load on the system.
The next step depends on which IDE you are using.
Keil uVision 4.x
1. Right click the project in the online compiler and select to export to Keil uVision. When the export completes (may take a while if the system is under load) a zip file will be saved. Unpack it.
2. As our project is called my_emwin_test the resulting zip file will be my_emwin_test_uvision_lpc4088_dm.zip and after extracting it in c:\temp\ there will be a c:\temp\my_emwin_test\ folder.
3. The exporter for Keil uVision produce a rather bad project file. To make it easier to use it is recommended to run the uv4reorganizer.py script described in the Scripts section on the platform page.
You run it on the command line like this:
c:\temp\my_emwin_test> python uv4reorganizer.py my_emwin_test.uvproj
c:\temp\my_emwin_test> move my_emwin_test.uvproj.pyout my_emwin_test.uvproj
4. Download the latest precompiled emWin library from LPCWare. Currently this is NXP_emWin524h_libraries.exe. Run the executable to extract the files somewhere. This will result in a folder that looks like this:
    emWin_Config\
    emWin_header\
    emWin_library\
    readme.txt
5. Copy all three folders to the DmemWin\emwin\ folder of your project. E.g. to
c:\temp\my_emwin_test\DMemWin\emwin\
6. The the 5.24h version (and possibly other later versions as well) is missing PNG support but the manual (available on the linked page above) has instructions on how to add it. Download www.segger.com/link/emwin_png.zip and extract it into the png/ folder. After extracting the folder should contain one or more version folders. This is what the png/ folder may look like:
        emWin_V5.18/
        emWin_V5.28/
Delete the version(s) that you don't need (probably the oldest one).
7. The last thing is to add the emWin files to your uVision project:
- Open the my_emwin_test.uvproj.
- Select the Project->Manage->Components, Environment, Books... menu
- Add a new group emWin Lib
- Add all DMemWin/png/emWin_V5.28/GUI/PNG/*.c files to the emWin Lib group
- Add DMemWin/emwin/emWin_library/Keil/emWin_M4.lib to the emWin Lib group
- Close the dialog
LPCXpresso 7.6
1. Right click the project in the online compiler and select to export to LPCXpresso. When the export completes (may take a while if the system is under load) a zip file will be saved. As our project is called my_emwin_test the resulting zip file will be my_emwin_test_lpcxpresso_lpc4088_dm.zip. Don't unpack it
2. Start LPCXpresso with a new workspace
3. Click on Import project(s) in the Start Here box
4. Browse to the downloaded my_emwin_test_lpcxpresso_lpc4088_dm.zip file and click next/finish to import the project
5. Download the latest precompiled emWin library from LPCWare. Currently this is NXP_emWin524h_libraries.exe. Run the executable to extract the files somewhere. This will result in a folder that looks like this:
    emWin_Config\
    emWin_header\
    emWin_library\
    readme.txt
6. Copy only the emWin_header and emWin_library folders to the DmemWin\emwin\ folder in your workspace. E.g. to
c:\temp\workspaces\my_emwin_test\DMemWin\emwin\
7. The the 5.24h version (and possibly other later versions as well) is missing PNG support but the manual (available on the linked page above) has instructions on how to add it. Download www.segger.com/link/emwin_png.zip and extract it into the png/ folder. After extracting the folder should contain one or more version folders. This is what the png/ folder may look like:
        emWin_V5.18/
        emWin_V5.28/
Delete the version(s) that you don't need (probably the oldest one).
8. Now go back to LPCXpresso and right-click on the DMemWin folder in the tree. Select to refresh it to have it reload the files you added in steps 6 and 7 above.
9. Right click the my_emwin_test tree node and select properties.
- Got to C/C++ General -> Paths and Symbols and select the Library Paths tab.
- Click the Add button
- Copy-paste the following into the dialog box:
/${ProjName}/DMemWin/emwin/emWin_library/LPCXpresso
- Make sure that the Is a workspace path option is selected and click OK
- Switch to the Libraries tab
- Click the Add button
- Copy-paste the following into the dialog box:
emWin_M4
- Click the OK button until all dialogs are closed.
Other IDEs
All IDEs are different but the tasks to get this to work are basically the same for all:
- Export from the mbed online compiler
- Download and extract the precompiled emWin library from LPCWare
- Copy the extracted emWin_header\ and emWin_library\ into the my_emwin_test\DMemWin\emwin\ folder
- Download www.segger.com/link/emwin_png.zip and extract it into the my_emwin_test\DMemWin\png\ folder
- Modify your project file to use the correct library (they are all in my_emwin_test\DMemWin\emwin\emWin_library\)
- Add all PNG source files in my_emwin_test\DMemWin\png\emWin_V5.28\GUI\PNG\ to the project
Step 3: Compile, Download, Run
Select the new project and click the Compile button. What happens when the project has compiled depends on what browser you are using. Either the file is directly downloaded and saved on your computer or you could be presented with a dialog asking you to save it. Regardless of what happened you should now have a .bin file.
Connect your display module to the PC. A MBED drive will appear. Drag-n-drop the .bin file to it. When the file has been flashed the drive will reload and the file will disappear.
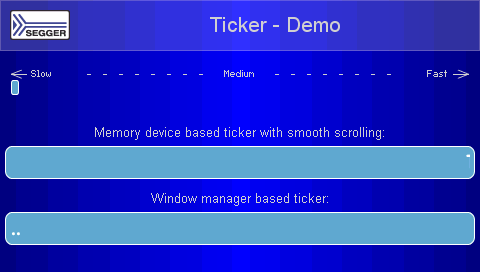
Reset the display module by pressing the RESET button on the back of it. Your should now see this on the display:

Step 4: Have a Look at the Code
The project that you get using the template will contain the DMSupport and DMemWin libraries and these files:
| MEMDEV_WM_Ticker.c | The Ticker Sample from the Segger examples |
| dm_board_config.h | Configuration of the DMSupport library |
| main.cpp | The actual program |
The main.cpp file initializes everything and then calls the MainTask() function that all Segger examples have:
main.cpp
#include "mbed.h"
#include "DMBoard.h"
#include "EwHAL.h"
#include "WM.h"

void MainTask(void);

int main()
{
  DMBoard::BoardError err;
  DMBoard* board = &DMBoard::instance();
  RtosLog* log = board->logger();
  Display* disp = board->display();

  do {
    err = board->init();
    if (err != DMBoard::Ok) {
      log->printf("Failed to initialize the board, got error %d\r\n", err);
      break;
    }

    log->printf("\n\nHello World!\n\n");

    // Create the HAL for emWin
    // - Use 3 frame buffers for tripple-buffering
    // - Allow emWin to use 12MByte of external SDRAM
    EwHAL hal(3, 12*1024*1024);

    // Start display in default mode (16-bit)
    Display::DisplayError disperr = disp->powerUp(hal.getFrameBufferAddress());
    if (disperr != Display::DisplayError_Ok) {
      log->printf("Failed to initialize the display, got error %d\r\n", disperr);
      break;
    }

    // Add extra options here
    // - Set WM_CF_MEMDEV option to use "Memory Devices" to reduce flickering
    WM_SetCreateFlags(WM_CF_MEMDEV);

    // Execute the emWin example and never return...
    MainTask();
  } while(false);

  mbed_die();
}
Step 5: Test Another Example
Many of the examples work without modification. Download the source code and replace the MEMDEV_WM_Ticker.c file with the downloaded file. Compile and run.
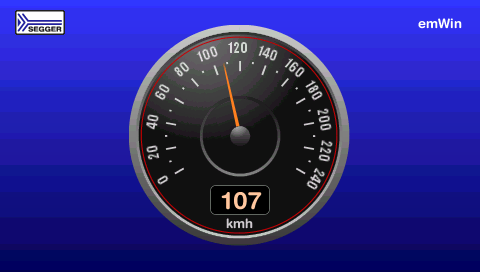
The Speedometer example:

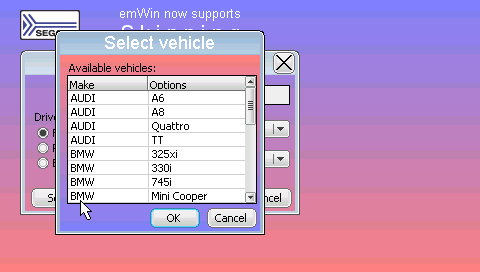
The Skinning example:

Where to go from here?
- The emWin library comes with a GUI Builder to help you to create your user interface. To get the tool you have to install one of the Board Support Packages found here.
- Using one of the examples as a starting point - attemp to write your own emWin code.
- Read the pdf documentation. It is comprehensive. Available from LPCWare, or directly UM03001_emWin5_6.pdf