Embedded Artists

We are the leading providers of products and services around prototyping, evaluation and OEM platforms using NXP's ARM-based microcontrollers.
LPC4088DM Guide to Create Your Own Menu
The goal of this guide is to get you up and running with a custom menu system using your own icons and applications.
Requirements:
- A set of icons, we will use som icons from http://www.how-to-draw-funny-cartoons.com/royalty-free-animals.html
- Python 2.7.x, installation instructions can be found here
- A LPC4088 Display Module
Step 1: Create a New Project
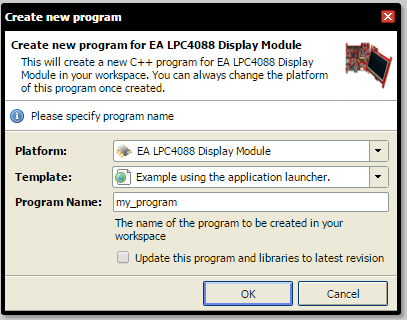
Open the online compiler and select New->New Program from the menu. A dialog like this will appear, select EA LPC4088 Display Module in the to drop-down menu (if you can't see that option, go to the platform page and click the Add to your mbed compiler button).
Warning
Make sure that the Update this program and libraries to latest revision box is NOT selected as it could potentially cause problems. The specific versions of the libraries have been picked to be compatible. Randomly updating some of them could cause incompatibility issues.
Select the Example using the application launcher option in the second drop-down menu and then give your project a suitable name.
Click the OK button and wait for the project to be created. This may take up to a couple of minutes depending on the load on the system.
Step 2: Compile, Download, Run
Select the new project and click the Compile button. What happens when the project has compiled depends on what browser you are using. Either the file is directly downloaded and saved on your computer or you could be presented with a dialog asking you to save it. Regardless of what happened you should now have a .bin file.
Connect your display module to the PC. A MBED drive will appear. Drag-n-drop the .bin file to it. When the file has been flashed the drive will reload and the file will disappear.
Reset the display module by pressing the RESET button on the back of it. Your should now see this on the display:
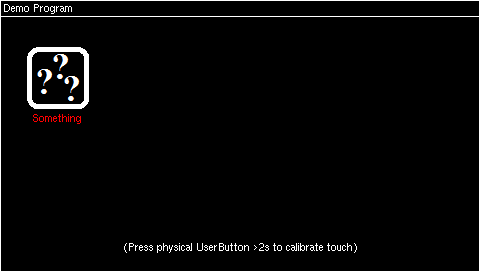
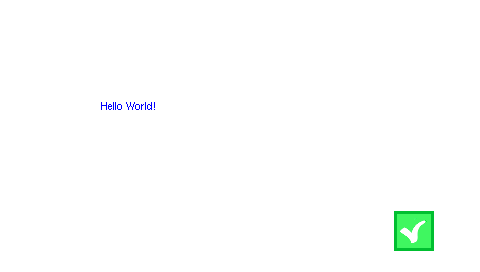
Click on the Something button to launch the app behind it:
Step 3: Have a Look at the Code
The project that you get using the template will contain the DMSupport and DMBasicGUI libraries and these files:
| AppTemplate.cpp / .h | The application launched by the Something button |
| dm_board_config.h | Configuration of the DMSupport library |
| image_data.c / .h | The icons and button images |
| main.cpp | The actual program |
The main.cpp file has four parts. The first is an enumeration where all apps that you will start from the launcher will get an identifier. It has one for MyFirstApp and for the CalibrationApp.
typedef enum {
    MyFirstApp,

    // Add an application ID here

    CalibrationApp =  AppLauncher::CalibrationApp,
} myapps_t;
The next part is the launchApp() function. The launcher will call it with an identifier from the enumeration above to create that app.
static App* launchApp(uint32_t id)
{
  App* a = NULL;
  switch ((myapps_t)id) {
      case CalibrationApp:
          a = new AppTouchCalibration();
          break;
      case MyFirstApp:
          a = new AppTemplate();
          break;

      // Create your application here

      default:
          break;
  }
  return a;
}
Next is the guiTask function which is running in its own Thread. It creates the launcher, adds all the buttons to it and then run it. The guiTask function will never return.
void guiTask(void)
{
  RtosLog* log = DMBoard::instance().logger();

  log->printf("guiTask started\n");

  AppLauncher launcher;

  if (launcher.setup()) {
    launcher.addImageButton(MyFirstApp, "Something", RED, img_empty, img_size_empty);

    // Add more buttons here

    launcher.setAppCreatorFunc(launchApp);
    log->printf("Starting menu system\n");
    launcher.runToCompletion();
    launcher.teardown();
  } else {
    log->printf("Failed to prepare menu system\n");
  }

  // Should never end up here
  mbed_die();
}
Finally, the main function that will initialize everything and then start the GUI thread:
int main()
{
  DMBoard::BoardError err;
  DMBoard* board = &DMBoard::instance();
  RtosLog* log = board->logger();
  err = board->init();
  if (err != DMBoard::Ok) {
    log->printf("Failed to initialize the board, got error %d\r\n", err);
    ThisThread::sleep_for(2000); // allow RtosLog to flush messages
    mbed_die();
  }

  log->printf("\n\n---\nApplication Launcher Example\nBuilt: " __DATE__ " at " __TIME__ "\n\n");

  Thread tGui(osPriorityNormal, 8192);
  tGui.start(guiTask);

  while(1) {
    // Wait forever (in 1h increments) to prevent the tGui
    // thread from being garbage collected.
    ThisThread::sleep_for(3600*1000);
  }
}
If you don't want to use a separate thread to run the GUI in then it is possible to change main to something like this instead:
int main()
{
  DMBoard::BoardError err;
  DMBoard* board = &DMBoard::instance();
  RtosLog* log = board->logger();
  err = board->init();
  if (err != DMBoard::Ok) {
    log->printf("Failed to initialize the board, got error %d\r\n", err);
    ThisThread::sleep_for(2000); // allow RtosLog to flush messages
    mbed_die();
  }

  log->printf("\n\n---\nApplication Launcher Example\nBuilt: " __DATE__ " at " __TIME__ "\n\n");

  // run the guiTask in the context of the main thread
  guiTask();
}
Step 4: Adding More Applications
The icons selected for this tutorial are of animals so the apps will be named based on that. The first step is to add them to the enumeration in main.cpp:
typedef enum {
    BeeApp,
    CrabApp,
    CrocodileApp,
    DogApp,
    DolphinApp,
    GiraffeApp,
    KangarooApp,
    OctopusApp,
    RabbitApp,
    SheepApp,

    CalibrationApp =  AppLauncher::CalibrationApp,
} myapps_t;
Will will start by having all buttons launch the same app:
static App* launchApp(uint32_t id)
{
  App* a = NULL;
  switch ((myapps_t)id) {
      case CalibrationApp:
          a = new AppTouchCalibration();
          break;
      case BeeApp:
      case CrabApp:
      case CrocodileApp:
      case DogApp:
      case DolphinApp:
      case GiraffeApp:
      case KangarooApp:
      case OctopusApp:
      case RabbitApp:
      case SheepApp:
          a = new AppTemplate();
          break;

      // Create your application here

      default:
          break;
  }
  return a;
}
All apps will have the same icons at this time:
void guiTask(void)
{
  RtosLog* log = DMBoard::instance().logger();

  log->printf("guiTask started\n");

  AppLauncher launcher;

  if (launcher.setup()) {
    launcher.addImageButton(BeeApp,       "Bee",       RED, img_empty, img_size_empty);
    launcher.addImageButton(CrabApp,      "Crab",      RED, img_empty, img_size_empty);
    launcher.addImageButton(CrocodileApp, "Crocodile", RED, img_empty, img_size_empty);
    launcher.addImageButton(DogApp,       "Dog",       RED, img_empty, img_size_empty);
    launcher.addImageButton(DolphinApp,   "Dolphin",   RED, img_empty, img_size_empty);
    launcher.addImageButton(GiraffeApp,   "Giraffe",   RED, img_empty, img_size_empty);
    launcher.addImageButton(KangarooApp,  "Kangaroo",  RED, img_empty, img_size_empty);
    launcher.addImageButton(OctopusApp,   "Octopus",   RED, img_empty, img_size_empty);
    launcher.addImageButton(RabbitApp,    "Rabbit",    RED, img_empty, img_size_empty);
    launcher.addImageButton(SheepApp,     "Sheep",     RED, img_empty, img_size_empty);

    launcher.setAppCreatorFunc(launchApp);
    log->printf("Starting menu system\n");
    launcher.runToCompletion();
    launcher.teardown();
  } else {
    log->printf("Failed to prepare menu system\n");
  }

  // Should never end up here
  mbed_die();
}
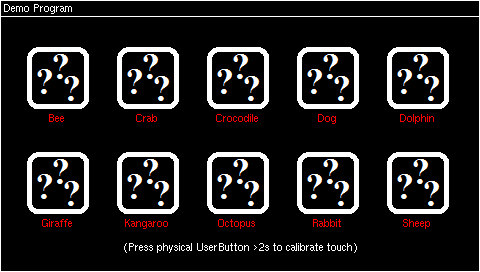
Compile and run. It should look like this:
Step 5: Changing Icons
Now it is time to change the UI. The first thing is to add icons.
- Get your icons, we will use these icons in this tutoria
- Unpack and pick the ones that should be used
- The animal icons that we will use are very large, like 1000x1800 pixels, and not all square. Use a program like IrfanView to scale down the images. The end result should be a set of 10 images, each 64x64 pixels in size.
After selecting and scaling down the images it is time to get them into the program. There are two alternatives for this: one a removable media (USB memory stick or SD card) or by compiling them into the program.
5.1 Icons on Removable Media
- Save your images on e.g. a uSD card
- Enable the media in the dm_board_config.h file by uncommenting one or both of these depending on which media you selected:
// #define DM_BOARD_USE_USB_HOST
#define DM_BOARD_USE_MCI_FS
- Change the code that creates the buttons so that it will load the images from files:
void guiTask(void)
{
    ...
    launcher.addImageButton(BeeApp,       "Bee",       RED, "/mci/Bee.png");
    launcher.addImageButton(CrabApp,      "Crab",      RED, "/mci/Crab.png");
    launcher.addImageButton(CrocodileApp, "Crocodile", RED, "/mci/Crocodile.png");
    launcher.addImageButton(DogApp,       "Dog",       RED, "/mci/Dog.png");
    launcher.addImageButton(DolphinApp,   "Dolphin",   RED, "/mci/Dolphin.png");
    launcher.addImageButton(GiraffeApp,   "Giraffe",   RED, "/mci/Giraffe.png");
    launcher.addImageButton(KangarooApp,  "Kangaroo",  RED, "/mci/Kangaroo.png");
    launcher.addImageButton(OctopusApp,   "Octopus",   RED, "/mci/Octopus.png");
    launcher.addImageButton(RabbitApp,    "Rabbit",    RED, "/mci/Rabbit.png");
    launcher.addImageButton(SheepApp,     "Sheep",     RED, "/mci/Sheep.png");
    ...
}
5.2 Icons Compiled into the Program
The scripts section on the platform page has a img2c.py script that can extract the data from image files and create arrays suitable to be included in your program.
- Download the script from the link above.
- Install python if you don't have it already (there are instructions in the link above).
- Run the script in the folder where you have your prepared images like this:
c:\temp\images> python img2c.py
Found .\Bee.png
Found .\Crab.png
Found .\Crocodile.png
Found .\Dog.png
Found .\Dolphin.png
Found .\Giraffe.png
Found .\Kangaroo.png
Found .\Octopus.png
Found .\Rabbit.png
Found .\Sheep.png
The result is two files: image_data.c and image_data.h.
image_data.h
extern const unsigned char img_Bee[];
extern const unsigned int img_size_Bee;

extern const unsigned char img_Crab[];
extern const unsigned int img_size_Crab;
...
image_data.c
#define IMAGE_LOCATION
//#define IMAGE_LOCATION  __attribute__((section("SPIFI_MEM")))

const unsigned char img_Bee[] IMAGE_LOCATION = {
	0x89,0x50,0x4E,0x47,0x0D,0x0A,0x1A,0x0A,0x00,0x00,0x00,0x0D,0x49,0x48,0x44,0x52,
        ...
	0x70,0x94,0x2D,0x00,0x00,0x00,0x00,0x49,0x45,0x4E,0x44,0xAE,0x42,0x60,0x82
};
const unsigned int img_size_Bee = sizeof(img_Bee);

const unsigned char img_Crab[] IMAGE_LOCATION = {
	0x89,0x50,0x4E,0x47,0x0D,0x0A,0x1A,0x0A,0x00,0x00,0x00,0x0D,0x49,0x48,0x44,0x52,
        ...
Copy the contents of the two files into the already existing files with the same names in your project.
Now that you have the images, all that is left is to change the code that creates the buttons to use it:
void guiTask(void)
{
    ...
    launcher.addImageButton(BeeApp,       "Bee",       RED, img_Bee,       img_size_Bee);
    launcher.addImageButton(CrabApp,      "Crab",      RED, img_Crab,      img_size_Crab);
    launcher.addImageButton(CrocodileApp, "Crocodile", RED, img_Crocodile, img_size_Crocodile);
    launcher.addImageButton(DogApp,       "Dog",       RED, img_Dog,       img_size_Dog);
    launcher.addImageButton(DolphinApp,   "Dolphin",   RED, img_Dolphin,   img_size_Dolphin);
    launcher.addImageButton(GiraffeApp,   "Giraffe",   RED, img_Giraffe,   img_size_Giraffe);
    launcher.addImageButton(KangarooApp,  "Kangaroo",  RED, img_Kangaroo,  img_size_Kangaroo);
    launcher.addImageButton(OctopusApp,   "Octopus",   RED, img_Octopus,   img_size_Octopus);
    launcher.addImageButton(RabbitApp,    "Rabbit",    RED, img_Rabbit,    img_size_Rabbit);
    launcher.addImageButton(SheepApp,     "Sheep",     RED, img_Sheep,     img_size_Sheep);
    ...
}
5.3 The Result
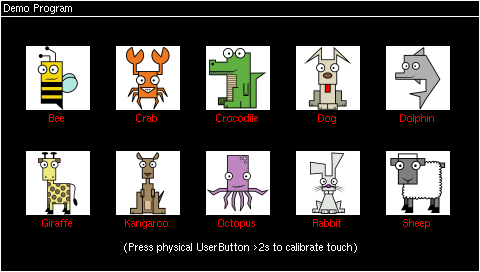
Regardless of where you load your images from the result will be something like this:
Step 6: Tweak the UI
The UI looks better with the new icons, but as can be seen in the image, the background color is wrong and perhaps the caption should be changed or removed.
To change the caption, have a look at the draw function in DMBasicGUI/Application/AppLauncher.cpp file:
AppLauncher.cpp
void AppLauncher::draw()
{
    // Prepare fullscreen
    swim_window_open(_win,
                     _disp->width(), _disp->height(),         // full size
                     (COLOR_T*)_fb,
                     0,0,_disp->width()-1, _disp->height()-1, // window position and size
                     1,                                       // border
                     WHITE, BLACK, BLACK);                    // colors: pen, backgr, forgr
    swim_set_title(_win, "Demo Program", BLACK);

    if (_supportsCalibration) {
      const char* msg = "(Press physical UserButton >2s to calibrate touch)";
      int w, h;
      swim_get_string_bounds(_win, msg, &w, &h);
      swim_put_text_xy(_win, msg, (_disp->width()-w)/2, _disp->height()-h*4);
    }

    for (int i = 0; i < _usedButtons; i++) {
        _buttons[i]->draw();
    }
}
To change the text in the caption, alter the parameters to swim_set_title():
swim_set_title(_win, "Animals", BLACK);
Or just remove the line to skip the caption completely.
The window border (defaults to one pixel wide white lines) can be changed by altering the parameters to swim_window_open. To have a wider and green border:
    swim_window_open(_win,
                     _disp->width(), _disp->height(),         // full size
                     (COLOR_T*)_fb,
                     0,0,_disp->width()-1, _disp->height()-1, // window position and size
                     4,                                       // border
                     GREEN, BLACK, BLACK);                    // colors: pen, backgr, forgr
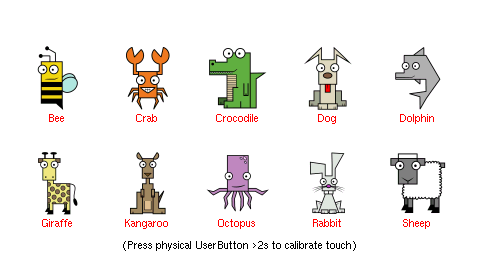
For this tutorial we will skip the border, skip the caption and change the background to white. The pen color is also changed from WHITE to BLACK to make the text visible against the background.
    swim_window_open(_win,
                     _disp->width(), _disp->height(),         // full size
                     (COLOR_T*)_fb,
                     0,0,_disp->width()-1, _disp->height()-1, // window position and size
                     0,                                       // border
                     BLACK, WHITE, BLACK);                    // colors: pen, backgr, forgr
    //swim_set_title(_win, "Animals", BLACK);
With the changes to the AppLauncher the image should now look like this:
If you prefer a different color for the button captions instead of red, then modify the button code in guiTask():
void guiTask(void)
{
    ...
    launcher.addImageButton(BeeApp,       "Bee",       RED,     img_Bee,       img_size_Bee);
    launcher.addImageButton(CrabApp,      "Crab",      GREEN,   img_Crab,      img_size_Crab);
    launcher.addImageButton(CrocodileApp, "Crocodile", BLUE,    img_Crocodile, img_size_Crocodile);
    launcher.addImageButton(DogApp,       "Dog",       YELLOW,  img_Dog,       img_size_Dog);
    launcher.addImageButton(DolphinApp,   "Dolphin",   CYAN,    img_Dolphin,   img_size_Dolphin);
    launcher.addImageButton(GiraffeApp,   "Giraffe",   MAGENTA, img_Giraffe,   img_size_Giraffe);
    launcher.addImageButton(KangarooApp,  "Kangaroo",  BLACK,   img_Kangaroo,  img_size_Kangaroo);
    launcher.addImageButton(OctopusApp,   "Octopus",   RED,     img_Octopus,   img_size_Octopus);
    launcher.addImageButton(RabbitApp,    "Rabbit",    RED,     img_Rabbit,    img_size_Rabbit);
    launcher.addImageButton(SheepApp,     "Sheep",     RED,     img_Sheep,     img_size_Sheep);
    ...
}
Step 7: Add a New App
In step 4 all buttons were linked to the AppTemplate app. It is now time to create the first new app.
- Add two new files to the project AppCrab.h and AppCrab.cpp. In the mbed online compiler this is done by right-clicking on the project and selecting New File...
- Copy the contents of the AppTemplate.cpp file into AppCrab.cpp
- Copy the contents of the AppTemplate.h file into AppCrab.h
- Search and replace in both file to change all APP_TEMPLATE_H into APP_CRAB_H and AppTemplate into AppCrab
The interesting parts of the AppCrab will now look like this:
static void buttonClicked(uint32_t x)
{
  bool* done = (bool*)x;
  *done = true;
}

void AppCrab::draw()
{
    // Prepare fullscreen
    swim_window_open(_win,
                   _disp->width(), _disp->height(),         // full size
                   (COLOR_T*)_fb,
                   0,0,_disp->width()-1, _disp->height()-1, // window position and size
                   0,                                       // border
                   BLUE, WHITE, BLACK);                     // colors: pen, backgr, forgr

    // Show a message
    swim_put_text_xy(_win, "Hello World!", 100, 100);

    // Create the OK button that will end this application
    _btn = new ImageButton(_win->fb, _win->xpmax - BTN_OFF - BTN_WIDTH,
                           _win->ypmax - BTN_OFF - BTN_HEIGHT, BTN_WIDTH, BTN_HEIGHT);
    _btn->loadImages(img_ok, img_size_ok);
    _btn->draw();
}

...

void AppCrab::runToCompletion()
{
    // Draw on the frame buffer
    draw();

    // Configure the button to call buttonClicked() when clicked
    bool done = false;
    _btn->setAction(buttonClicked, (uint32_t)&done);

    // Switch to "our" frame buffer, but save the old one so it can be
    // restored when we exit our application
    void* oldFB = _disp->swapFramebuffer(_fb);

    TouchPanel* touch = DMBoard::instance().touchPanel();
    touch_coordinate_t coord;
    while(!done) {
      // wait for a new touch signal (signal is sent from AppLauncher,
      // which listens for touch events)
      ThisThread::flags_wait_any(0x1);
      if (touch->read(coord) == TouchPanel::TouchError_Ok) {

        // you can do something where with the touch event if you like
        // for example
        //
        //  swim_put_circle(_win, coord.x, coord.y, 2, 1);
        //


        // See if the touch event effects the button
        if (_btn->handle(coord.x, coord.y, coord.z > 0)) {
          _btn->draw();
        }
      }
    }

    // User has clicked the button, restore the original frame buffer
    _disp->swapFramebuffer(oldFB);
    swim_window_close(_win);
}
...
Lets make some quick changes to make it different compared to the default template. Change the background color to orange, and the text color to black:
    swim_window_open(_win,
                   _disp->width(), _disp->height(),         // full size
                   (COLOR_T*)_fb,
                   0,0,_disp->width()-1, _disp->height()-1, // window position and size
                   0,                                       // border
                   BLACK, 0xfbe0, BLACK);                   // colors: pen, backgr, forgr
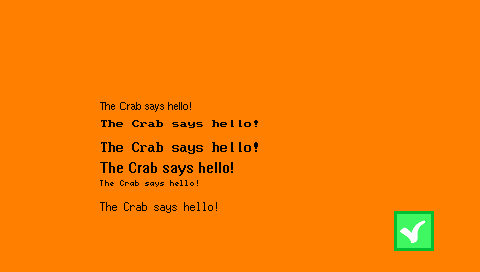
To show off the different fonts we will draw the same string several times with changed fonts. To do this, first include all the font files and then replace the call to swim_put_text_xy() in draw() with this:
...
#include "lpc_helvr10.h"
#include "lpc_rom8x8.h"
#include "lpc_rom8x16.h"
#include "lpc_winfreesystem14x16.h"
#include "lpc_x5x7.h"
#include "lpc_x6x13.h"
void AppCrab::draw()
{
    ...

    // Show the same message with different fonts
    int y = 100;
    swim_set_font(_win, (FONT_T*)&font_helvr10);
    swim_put_text_xy(_win, "The Crab says hello!", 100, y);
    y += 20;
    swim_set_font(_win, (FONT_T*)&font_rom8x8);
    swim_put_text_xy(_win, "The Crab says hello!", 100, y);
    y += 20;
    swim_set_font(_win, (FONT_T*)&font_rom8x16);
    swim_put_text_xy(_win, "The Crab says hello!", 100, y);
    y += 20;
    swim_set_font(_win, (FONT_T*)&font_winfreesys14x16);
    swim_put_text_xy(_win, "The Crab says hello!", 100, y);
    y += 20;
    swim_set_font(_win, (FONT_T*)&font_x5x7);
    swim_put_text_xy(_win, "The Crab says hello!", 100, y);
    y += 20;
    swim_set_font(_win, (FONT_T*)&font_x6x13);
    swim_put_text_xy(_win, "The Crab says hello!", 100, y);

    ...
}
Now all that is left is to use the app in main.cpp:
...
#include "AppCrab.h"
...
static App* launchApp(uint32_t id)
{
  App* a = NULL;
  switch ((myapps_t)id) {
      case CalibrationApp:
          a = new AppTouchCalibration();
          break;
      case BeeApp:
      case CrocodileApp:
      case DogApp:
      case DolphinApp:
      case GiraffeApp:
      case KangarooApp:
      case OctopusApp:
      case RabbitApp:
      case SheepApp:
          a = new AppTemplate();
          break;
      case CrabApp:
          a = new AppCrab();
          break;

      // Create your application here

      default:
          break;
  }
  return a;
}
The end result is now a launcher / menu system with your own icons and the start for a new set of apps behind it. This is what the launcher and AppCrab looks like with the icons we selected:

Suggested Improvements
- Support both 4.3" and 5" with the same code using the Resource class
- Read the Using SWIM guide and try to improve the looks of the Apps. Maybe add a background image?
- Have a look at the other Apps in the DMBasicGUI library:
- DMBasicGUI/Application/AppColorPicker
- DMBasicGUI/Application/AppTouchCalibration
- DMBasicGUI/SlideShow/AppSlideShow
- Replace the icon for the OK button with something from your own icon collection