Eclipse
This document explains how to build and debug Arm Mbed OS applications using Eclipse. Before starting, please choose a compiler with which to build your project.
Installing Eclipse
You need to install Eclipse CDT with the GNU Arm Eclipse plugins to begin:
- Install Eclipse IDE for C/C++ Developers.
- Open Eclipse.
- Create a workspace directory. This will be separate from your code.
- Install the GNU Arm Eclipse plugin:
-
Click the Help menu item and select Install New Software.
-
In the Work with box, paste the install address, and press Enter:
http://gnuarmeclipse.sourceforge.net/updates.If this does not work, please see the GNU ARM Eclipse solutions and workarounds page.
-
The package GNU Arm C/C++ Cross Development Tools appears. Select it.
 Selecting the cross development tools
 -
Click Next repeatedly, and accept the license agreements.
-
Click Finish. If prompted to restart Eclipse, click Yes.
-
Exporting a project
To export your project to Eclipse, you can use either the Arm Mbed Online Compiler or Arm Mbed CLI.
Online compiler
-
Right click on your project.
-
Select Export Program....
-
Under Export toolchain, select Eclipse (GCC ARM).
- For most targets you can also export to IAR or ARMCC.
-
Click Export.
-
Unpack to a convenient location. Make a note of this location for the import step.
 Exporting to Eclipse
Arm Mbed CLI
In your project folder, run:
# Replace K64F with your target board
# If you're not using GCC ARM, use -i eclipse_armc5 for ARMCC, or -i eclipse_iar for IAR

$ mbed export -i eclipse_gcc_arm -m K64F --profile debug
Importing the project in Eclipse
-
Open Eclipse.
-
On the Welcome screen, select Import a project with a working Makefile.
-
Select the folder to which you extracted your Mbed OS project.
-
Under Toolchain for Indexer Settings, select
<none>. Import project
 -
Click Finish.
-
Dismiss the Welcome screen.
-
Select Project > Build Project to build the project.
Once the project builds, you can configure the debugger. The configuration depends on the debug server you're using: pyOCD or OpenOCD.
If the build fails with an error:
make[1]: arm-none-eabi-g++: No such file or directory, you need to configure Eclipse's PATH (not your OS PATH).Program "make" not found in PATH, install GNU-Make utility, version at least 4.0:- On Windows, you can find a compatible version of Make in Cygwin and MSYS2 distrubitions. Install the
makepackage, and add eitherC:/cygwin64/binorC:/msys64/usr/binto Eclipse's PATH. - On macOS, you can install
makeas part of Xcode command-line tools. - On Linux, the distrubition package manager provides
make.
- On Windows, you can find a compatible version of Make in Cygwin and MSYS2 distrubitions. Install the
Steps to update Eclipse's PATH:
-
In Eclipse, click Project > Properties > C/C++ Build > Environment.
-
Click Add.
-
Under Name, enter
PATH. -
Under Value, add the location of the GNU ARM Embedded Toolchain. To find it:
- On Windows, from a CMD window, run
where arm-none-eabi-g++. - On macOS and Linux, from a Terminal, run
which arm-none-eabi-g++.
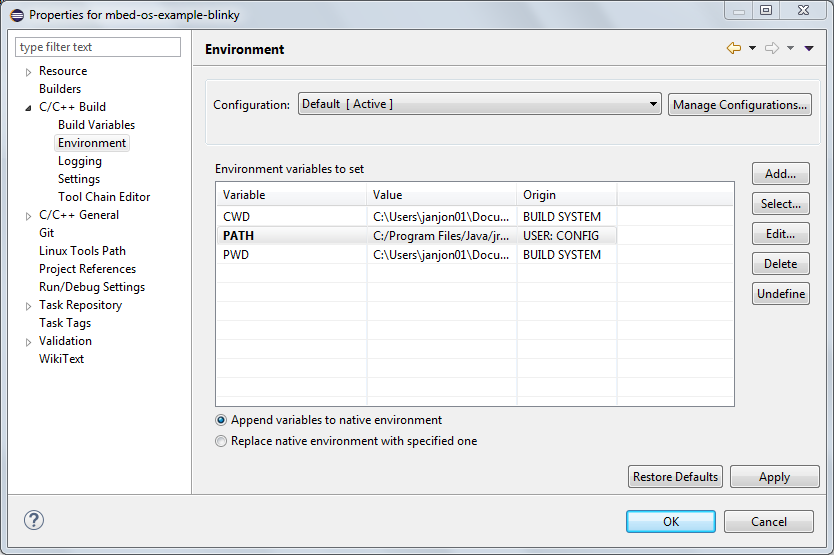 Setting up PATH
 - On Windows, from a CMD window, run
pyOCD
-
Select Run > Debug Configurations....
-
If no configuration exists under GDB pyOCD Debugging, click on New launch configuration.
-
In the Main tab:
- Under C/C++ Application, select the
.elffile (BUILD/projectname.elf).
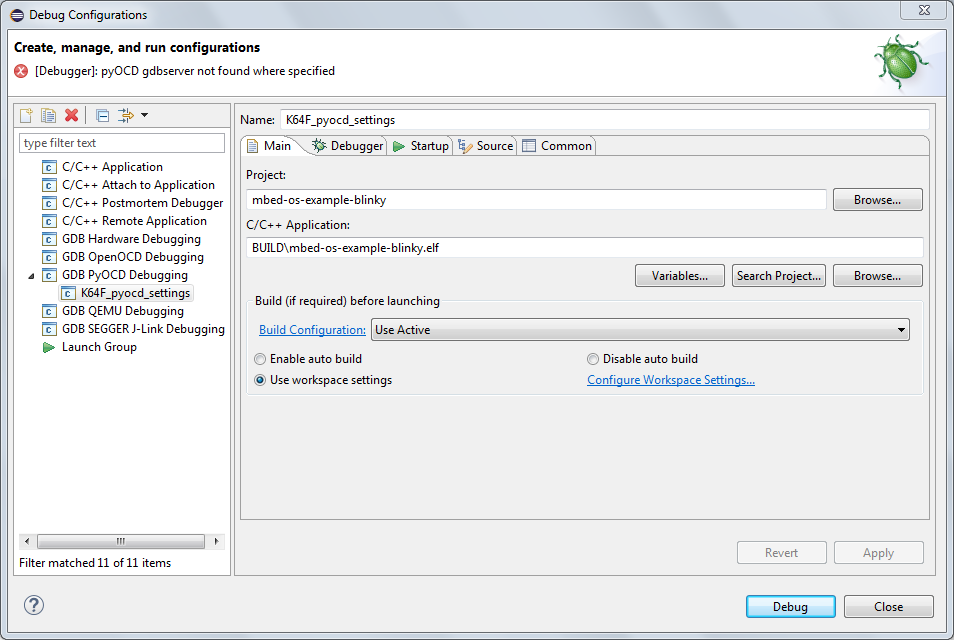 Main tab
 - Under C/C++ Application, select the
-
In the Debugger tab:
- Under pyOCD Setup, set the Executable path to your copy of
pyocd-gdbserver. - Under GDB Server Setup, set the Executable path to your copy of
arm-none-eabi-gdb. - If you cannot see the GDB Server Setup section, the scrollbar might be hidden; switch tabs to make the scrollbar reappear.
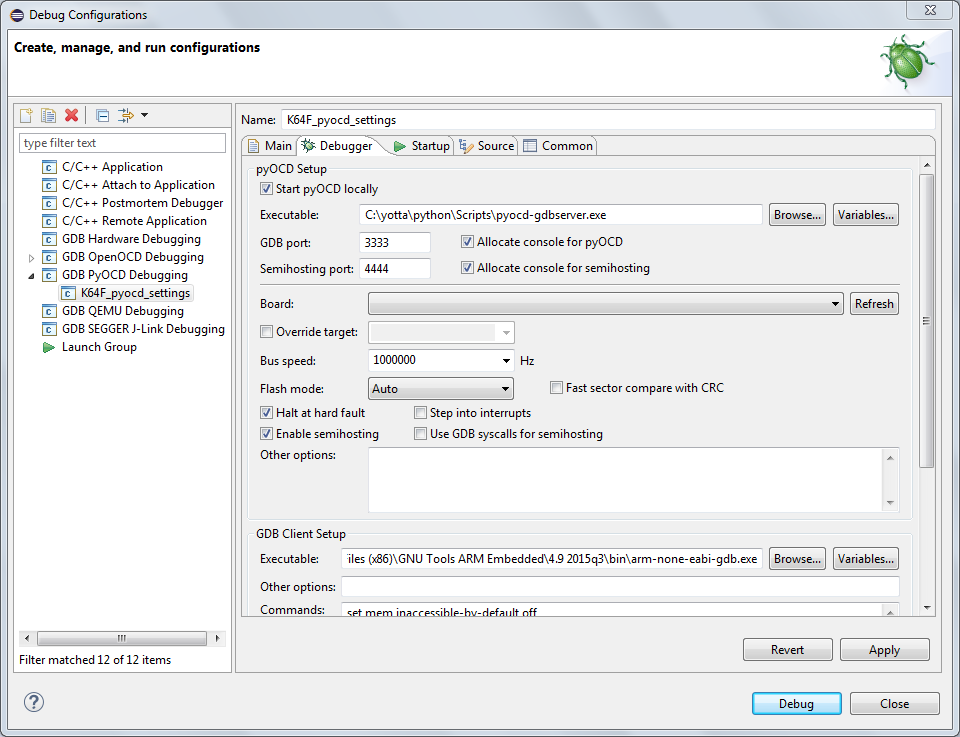 Debugger tab
 - Under pyOCD Setup, set the Executable path to your copy of
-
Click Apply.
-
Click Debug to start debugging.
OpenOCD
-
Select Run > Debug Configurations....
-
If a configuration already exists under GDB pyOCD Debugging, please remove it.
-
If no configuration exists under GDB OpenOCD Debugging, click on New launch configuration.
-
In the Main tab:
- Select the
.elffile (BUILD/projectname.elf) under C/C++ Application.
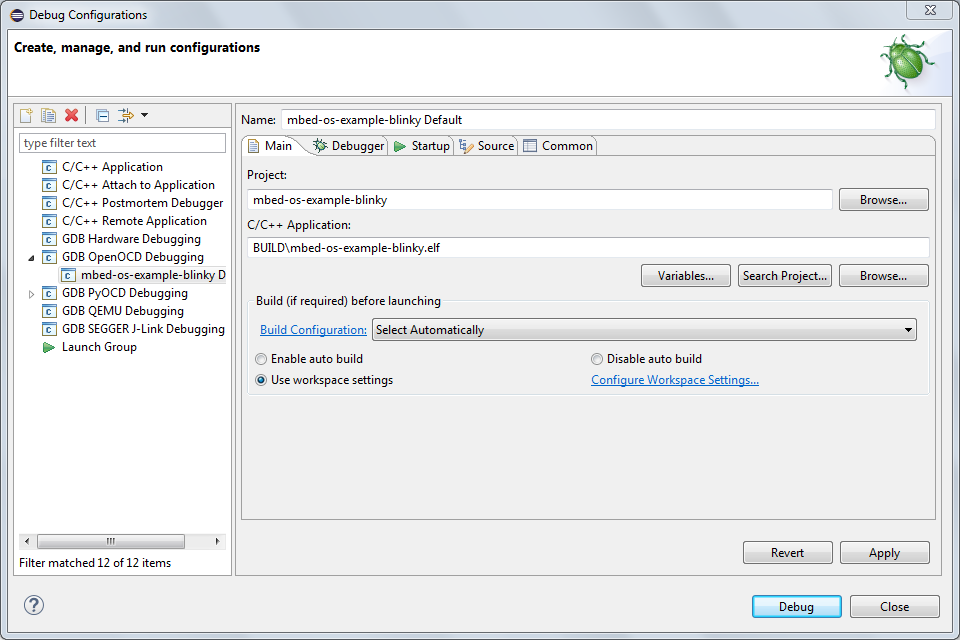 Main tab
 - Select the
-
In the Debugger tab:
- Under OpenOCD Setup, set the Executable path to your copy of
openocd. - Under OpenOCD Setup, set the Config options to the setup options from the Configure your local debug toolchain guide.
- Under GDB Client Setup, set the Executable path to your copy of
arm-none-eabi-gdb. - If you cannot see the GDB Server Setup section, the scrollbar might be hidden; switch tabs to make the scrollbar reappear.
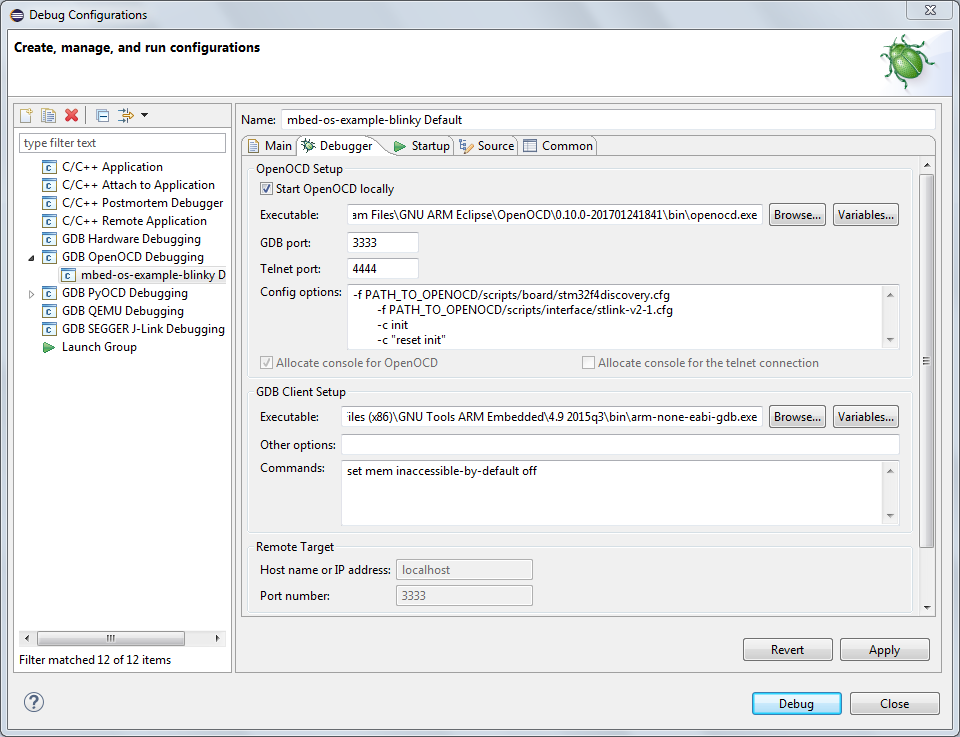 Debugger tab
 - Under OpenOCD Setup, set the Executable path to your copy of
-
Click Apply.
-
Click Debug to start debugging.
 Debugging an Mbed OS 5 application in Eclipse
Building with Mbed CLI
We build using Make, but you can also use Mbed CLI for building from Eclipse:
- Go to Project > Properties > C/C++ Build.
- Remove the check Use default build command.
- Set Build command to
mbed. - Under Behavior > Build (Incremental build), select your Mbed CLI build options. For example:
compile -m K64F -t GCC_ARM --profile debug. - Make sure to update the paths to the
.elffile in your debug configuration.