Connecting BLE devices to the cloud
Note
This blog post uses (the now deprecated) Mbed Device Connector. There is an updated version of Mbed Bluetooth Devicelink that connects to Pelion Device Management available on GitHub.
The internet protocol (IP) is the basis of the internet as we know it; it contains addressing and routing across network boundaries, and you can run application protocols such as MQTT or CoAP right on top of it. For a device to work with IP directly, it uses a radio such as cellular, Wi-Fi or Thread. However, IP also comes with some downsides. Its memory overhead doesn’t always make it the best choice for constrained devices. Also, because addressing is part of the protocol, packet sizes are relatively big, which means the radio takes more time to transmit. This has a negative effect on power consumption. Thus, not all small IoT devices support IP but instead support protocols such as Bluetooth Low Energy (BLE) and LoRaWAN, which are cheap and energy-efficient but do not allow direct access to the internet.
To let these IoT devices connect to the internet, you therefore need to use a gateway device: a device that supports both IP and non-IP protocols, and can thus connect to the internet and your IoT device at once. For example, a BLE gateway would have both a Wi-Fi and a BLE radio. The gateway performs a 'protocol translation', transforming BLE packets into IP packets, which the gateway then sends to the cloud.
As part of our investigation on how to connect non-IP devices to ARM's device management services - mbed Device Connector and mbed Cloud - we've released mbed Cloud Bluetooth Devicelink. This is experimental software that runs on a Raspberry Pi (or other Linux box) and connects BLE devices to mbed Device Connector. From Connector, you can then control these devices over the internet like any other IP-based device.
In this blog post you'll see how to install mbed Cloud Bluetooth Devicelink, how to connect to a BLE device, how protocol translation is done, and how to control this device over the internet.
Building a BLE device
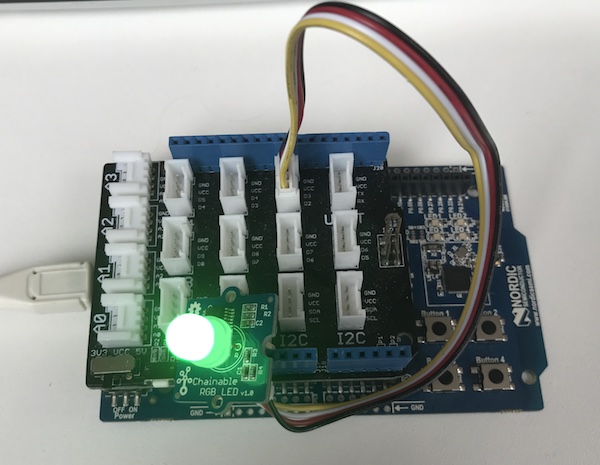
To demonstrate the software, you first need a device. Grab an mbed OS 5 development board with BLE, or use a supported BLE shield. Then connect a Grove Chainable RGB LED to pin D2 on the development board.

Import the ble-devicelink-example program and compile it using the Online Compiler or mbed CLI, then run the program on the board. This program exposes two services with a single characteristic each: one to see the number of times button 1 was pressed (0xA001), and the other to control the color of the LED (0xB001). To test whether the device works properly:
- Install nRF Connect on your Android or iOS smartphone.
- Connect to
DeviceLinkTest. - Select the
0xB000service. - Click the up symbol next to the
0xB001characteristic. - Write
00ff00, and click SEND. - The color of the LED changes from red to green.
Installing mbed Cloud Bluetooth Devicelink
To connect this device to the cloud, you need two parts:
- mbed Cloud Bluetooth Devicelink - a Node.js application that connects over BLE to the device and forwards the data to mbed Cloud Linux Devicelink.
- mbed Cloud Linux Devicelink - a scriptable version of mbed Client.
mbed Client is a library that you can use to set up a secure end-to-end encrypted connection to mbed Device Connector through the LWM2M protocol. For devices with an IP connection, you run a single instance of mbed Client on the end-device, but for BLE devices, this is not possible because mbed Client requires IP connectivity. Through mbed Cloud Linux Devicelink, you can run the instance of mbed Client on the gateway instead. This means that you can use mbed Device Connector to manage the devices that connect through mbed Cloud Linux Devicelink like you would any other device with native IP support.
To make mbed Cloud Linux Devicelink work with Bluetooth devices, you need another application that can do the protocol translation from LWM2M to BLE characteristics. mbed Cloud Bluetooth Devicelink handles this. It's an application that handles all BLE actions, such as connecting to devices, reading and writing to characteristics and subscribing to new values. The data that it retrieves from the BLE devices is then sent to Linux Devicelink, which exposes the values through mbed Device Connector.
Note: Development can be cumbersome if you're not using Linux as your main operating system because mbed Cloud Linux Devicelink only runs on Linux. To mitigate this, you can run Linux Devicelink in an Ubuntu virtual machine (VM) and run Bluetooth Devicelink in your host OS.
Installing Bluetooth Devicelink
- Install Node.js 6.x or higher.
- If you're on Linux, install
libudev, for example on Ubuntu via:
$ sudo apt-get install libudev-dev
- Open a terminal, and run:
$ git clone https://github.com/armmbed/cloud-bluetooth-devicelink
$ cd cloud-bluetooth-devicelink
$ git checkout connector
$ npm install
$ node bt.js

# output should be similar to

# Bluetooth state is unknown
# TCP server listening on port 1337!
# Web server listening on port 3000!
# Bluetooth stateChange, start scanning
Installing Linux Devicelink
- Install yotta.
- Open a terminal, and run:
$ git clone https://github.com/armmbed/cloud-linux-devicelink
$ cd cloud-linux-devicelink
$ ./setup.sh
$ yt target x86-linux-native
$ yt build
- Start Linux Devicelink via:
```
$ build/x86-linux-native/source/mbed-cloud-linux-devicelink

# output should be similar to:
# [27494] EventBridge::start, 192.168.23.1:1337
#  EventBridge::socket opened
Note: If you run Linux Devicelink in a VM, pass in the hostname of your host OS as the first argument and 1337 as the second argument:
build/x86-linux-native/source/mbed-cloud-linux-devicelink 192.168.23.1 1337
Now, mbed Cloud Bluetooth Devicelink is running properly.
Configuring your device
Note: Make sure you disconnected from the device in nRF Connect.
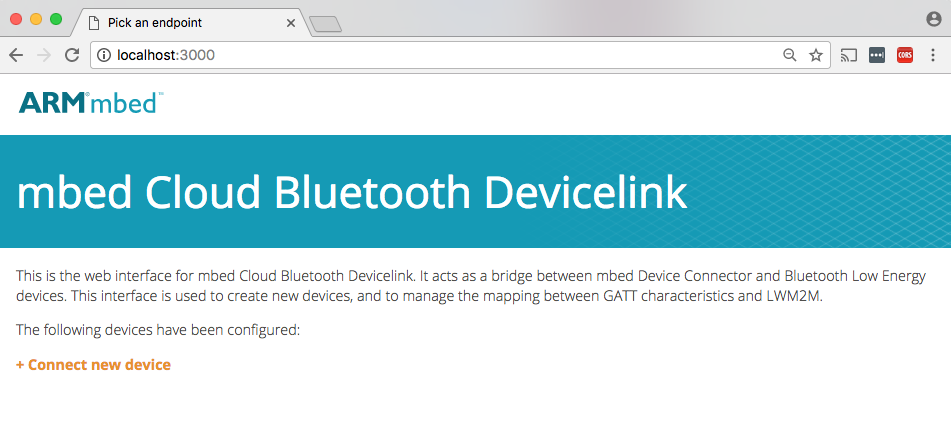
Part of mbed Cloud Bluetooth Devicelink is a web UI through which you can provision devices. To see the interface, open a web browser, and navigate to localhost:3000.

To add your device:
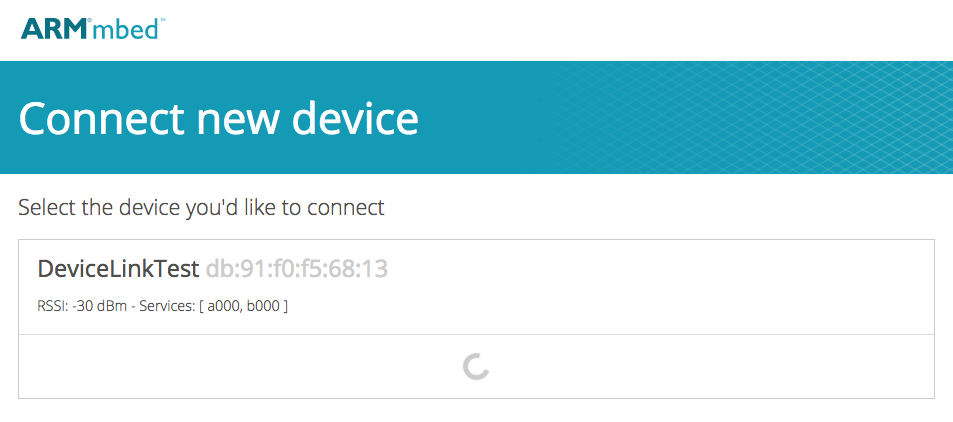
- Click Connect new device.
- Wait for the device to show up:

- Click on the device name.
- The web interface asks you for a security certificate. You can obtain one from mbed Device Connector.
- Go to Security credentials.
- Click GET MY DEVICE SECURITY CREDENTIALS.
- Copy the content from the gray box, and paste it in the Devicelink interface.
- Devicelink connects to your device and determines whether your device contains already known services.
- After connection succeeds, click No thanks, I'll write them myself.
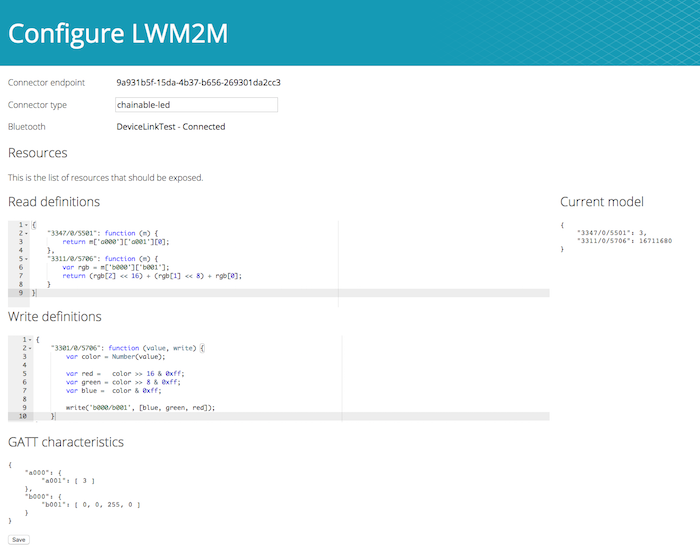
You can now create the protocol translation layer between BLE characteristics and the LWM2M model. In this case, you have two LWM2M resources:
3347/0/5501- the number of times you pressed the push button (registry page).3311/0/5706- the color of the LED (registry page).
You can define the mapping from BLE characteristics to these resources in the UI by writing JavaScript. Add the following code in the Configure LWM2M screen:
Read definitions
{
    "3347/0/5501": function (m) {
        // read the first byte of the a001 characteristic
        return m['a000']['a001'][0];
    },
    "3311/0/5706": function (m) {
        // encode the rgb bytes into a uint32
        var rgb = m['b000']['b001'];
        return (rgb[2] << 16) + (rgb[1] << 8) + rgb[0];
    }
}
Write definitions
{
    "3311/0/5706": function (value, write) {
        // read the value, and then retrieve the individual channels out of the color
        var color = Number(value);

        var red =   color >> 16 & 0xff;
        var green = color >> 8 & 0xff;
        var blue =  color & 0xff;

        // write it back to the color characteristic
        write('b000/b001', [blue, green, red]);
    }
}
Result

When you click the push button, the model changes. Now, click Save.
Observing the device in mbed Device Connector
The device is visible under Connected devices in mbed Device Connector, and you can use the API Console to interact with the device.
To change the color of the LED:
- Go to the API Console in mbed Device Connector.
- Switch to the PUT tab.
- Select your endpoint and the
3311/0/5706resource. - Under PUT Data, enter
65535(which is the decimal version of0x00ffff). - Click Test API.
- The color of the LED changes to yellow.
You can now address this BLE device in exactly the same manner as an IP device that runs the full mbed Client.
Conclusion
Keep in mind that mbed Cloud Bluetooth Devicelink is an experimental project that is mostly used in demo scenarios, and we currently do not actively support it. However, connecting devices without an IP connection to the cloud remains an interesting proposition, and the software we released can be applied to many proprietary networking protocols. A benefit of our current approach is that all the logic happens on the gateway, and the connectivity from the gateway to the cloud uses device security certificates, just like an IP-enabled device running mbed Client.
Regarding the future, the Bluetooth SIG - the standards body for Bluetooth - is also working on a gateway proposal, so we might switch to that implementation. Also note that our current approach only works for bridging data. It does not provide any of the other interesting mbed Cloud features, such as device provisioning and firmware updates.
If you have any questions, please open an issue on GitHub.
-
Jan Jongboom is a Developer Evangelist IoT at ARM and the author of mbed Cloud Bluetooth Devicelink.

