You are viewing an older revision! See the latest version
From Device to Cloud
Putting it all Together: From Device to Cloud
This tutorial will show how to connect your Nucleo board to the cloud using a U-Blox Cellular module and AT&T's M2X services.
- Gather the following hardware:
- Connect the Nucleo Sensor Shield to the STM32 Nucleo Ardiuno connector
- Connect the connectivity module to the STM32 Nucleo Ardiuno connector

- Plug the STM32F411 Nucleo board into your PC with a USB cable
Import the STM32 ACKme Wifi Connect M2X or STM32 U-Blox Cellular Connect M2X (depending on which module you’re using) into your mbed compiler
- At the program landing page, click on the "Import this program" button

- Click “Import” button on the pop up window shown below

- Open the main.cpp file (or in the case of ACKme, the example.cpp file) and make the following modifications:
- Enter your M2X API key, Feed ID, Stream, and Name in the corresponding fields as shown below

Information
The M2X information is obtained from the M2X Blueprint you should have already created. Refer to Getting Started with M2X for details.
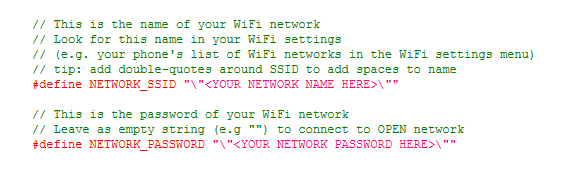
- Enter the SSID and password of your local WiFi hotspot
For the ACKme WiFi Module
Note
Note: make sure your WiFi router is setup for 802.11g as the module is 802.11g compliant.
- Compile and load the image onto the STM32F411 Nucleo board
Information
Refer to Getting Started with mbed and the STM32F to learn how to compile and load your code into the Nucleo board.
- Open your terminal emulation program for serial communications. Set the baudrate to 9600
Information
Refer to Creating Console Output for instructions on configuring a terminal emulation program
After you have loaded your code onto the Nucleo, the console should show your board connecting to the WiFi network. After it has successfully joined the network, the application will perform a device location update before it starts reading the temperature sensor. It reports temperature readings to your M2X “temperature” stream every 5 seconds.

- Go to your M2X account and select the blueprint created previously from Getting Started with ATT M2X
You should see a chart plot of your device’s temperature sensor data from your M2X stream as shown below.

Congratulations! You have now connected an embedded device to the cloud.