QVGA TFT with HX8347D controller

Quote:

Please use the actual Page : http://mbed.org/cookbook/SPI-driven-QVGA-TFT

The TFT from MikroElektronika http://www.mikroe.com/eng/products/view/474/tft-proto-board/ come on a pcb with a easy to use pinout.
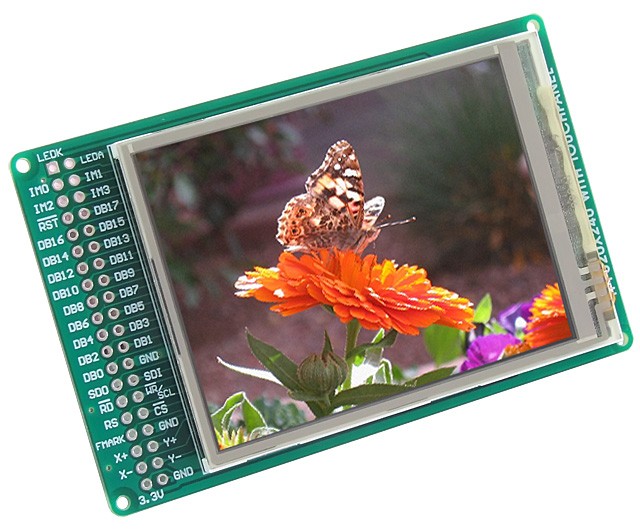
/media/uploads/dreschpe/tft_proto_01.jpg

Connecting to the mbed

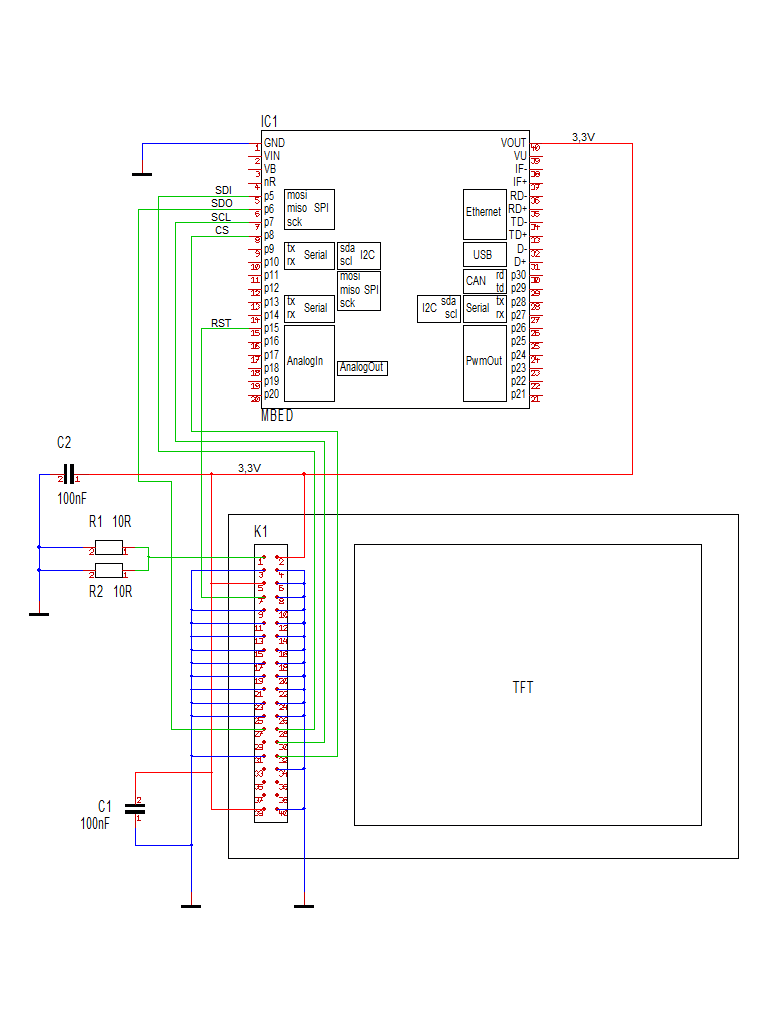
The board use 3.3V so we can attach it direct to the mbed. The backlite LED need a resistor to limit the current. I use two 10R resistors parallel to get 5R driven by 3.3V. I also add two 100nF for the supply voltage.

The interface can be driven in 16 bit,8 bit, 18 bit, 9 bit or SPI mode. Because I don't want to spend all mbed IOs to the display I use the SPI mode.

For SPI mode we need only the tree SPI signals, a cs and a reset signal. 5 pins at all. SPI is serial and we have to transfer 320 * 240 * 16 = 1228800 bits to the display to fill it up. Will it be to slow ? No ! We can drive the SPI to display with 48Mhz clock speed ! 50Mhz is the limit, but the mbed is running at 96Mhz and we can divide this clock by two.
/media/uploads/dreschpe/tft.png

Software: SPI_TFT library

http://mbed.org/users/dreschpe/libraries/SPI_TFT/lu6n2h

How to get nice looking fonts ?

To print characters to a graphic screen we need a font. To code a font by paper is ok for a small lcd, but for a 320*240 pixel display we need bigger fonts. A 12*12 pixel font is readable, but a lot of work to construct.

Fonts can be made with the GLCD Font Creator also from http://www.mikroe.com .

With this program you can load a window font and convert it into a c-array. To use this Font with my lib you have to add 4 parameter at the beginning of the font array. - the number of byte / char - the vertial size in pixel - the horizontal size in pixel - the number of byte per vertical line (it is vertical size / 8 ) You also have to change the array to char[]. After that you can switch between different fonts with set_font(unsigned char* font); The horizontal size of each character is also stored in the font. It look better if you use bigger fonts or italic. The letter M is wider than a l.

Or use my font file : http://mbed.org/users/dreschpe/libraries/TFT_fonts/lx0q9r

Text commands :

You can use the claim() function to redirect the output to stdout or stderr to the TFT. After claim(stdout) you can simply use the printf function to print to the TFT.

  • locate(x,y); function is used to setup the cursor position. The actual pixel position is calculated out of the font size. x,y are the character column and row.

There are two parameter to setup the color of the text :

  • background(color);
  • foreground(color); All color are 16bit: R5 G6 B5.
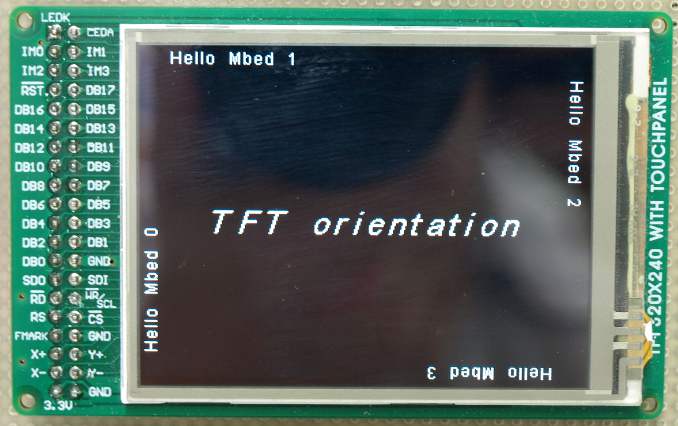
  • set_orientation(); This command select one of the 4 directions to use the display. This command is also working on the graphical commands.

Graphic commands :

  • cls(); Fill the screen with background color
  • pixel(x,y,color); set a single pixel at x,y with color
  • line(x0,y0,x1,y1,color); draw a line from x0,y0 to x1,y1 with color
  • rect(x0,y0,x1,y1,color); draw a rectangle x0,y0 to x1,y1 with color
  • fillrect(x0,y0,x1,y1,color); draw a filled rectangle
  • circle( x0,y0,radius ,color); draw a circle around x0,y0 with radius
  • Bitmap(x0,y0,w,h,*bitmap); paint a bitmap with width w and high h starting at x0,y0 (upper left corner)

How to transfer a grafic to the mbed ?

To construct a bitmap we can use gimp. http://www.gimp.org/ Load a image (edit and resize) and save it as BMP. You have to select the option 16 bit R5 G6 B5 !

To convert this file into a c-array you can use the hex-editor winhex. (http://www.x-ways.net/winhex/index-m.html) The eval version can handle the small files. We don`t need the bmp header. Mark the data starting at offset 0x46 to the end of file. Use "edit -> copy block -> C Source" to export this data as C array. Paste the data into a C file into the mbed compiler. Check if the resulting array has the size of x * y * 2.

With the Bitmap command we can load the picture to the display.

The demo code : (It is difficult to make pictures from the screen - it looks better)

 // example to test the TFT Display
 // Thanks to the GraphicsDisplay and TextDisplay classes from 

#include "stdio.h"
#include "mbed.h"
#include "SPI_TFT.h"
#include "string"
#include "Arial12x12.h"
#include "Arial24x23.h"
#include "Arial28x28.h"
#include "font_big.h"

extern unsigned char p1[];  // the mbed logo

// the TFT is connected to SPI pin 5-7 
SPI_TFT TFT(p5, p6, p7, p8, p15,"TFT"); // mosi, miso, sclk, cs, reset

int main() {
    int i;
    TFT.claim(stdout);      // send stdout to the TFT display 
    //TFT.claim(stderr);      // send stderr to the TFT display

    TFT.background(Black);    // set background to black
    TFT.foreground(White);    // set chars to white
    TFT.cls();                // clear the screen
    TFT.set_font((unsigned char*) Arial12x12);  // select the font
      
    // first show the 4 directions  
    TFT.set_orientation(0);
    TFT.locate(0,0);
    printf("  Hello Mbed 0");
    TFT.set_orientation(1);
    TFT.locate(0,0);
    printf("  Hello Mbed 1");
    TFT.set_orientation(2);
    TFT.locate(0,0);
    printf("  Hello Mbed 2");
    TFT.set_orientation(3);
    TFT.locate(0,0);
    printf("  Hello Mbed 3");
    TFT.set_orientation(1);
    TFT.set_font((unsigned char*) Arial24x23);
    TFT.locate(2,5);
    TFT.printf("TFT orientation");
       
    wait(5);        // wait two seconds 
/media/uploads/dreschpe/orientation.jpg

 // draw some graphics 
    TFT.cls();          
    TFT.set_orientation(1);
    TFT.set_font((unsigned char*) Arial24x23);
    TFT.locate(5,5);
    TFT.printf("Graphic");
     
    TFT.line(0,0,100,200,Green);
    TFT.rect(100,50,150,100,Red);
    TFT.fillrect(180,25,220,70,Blue);
    TFT.circle(80,150,33,White);
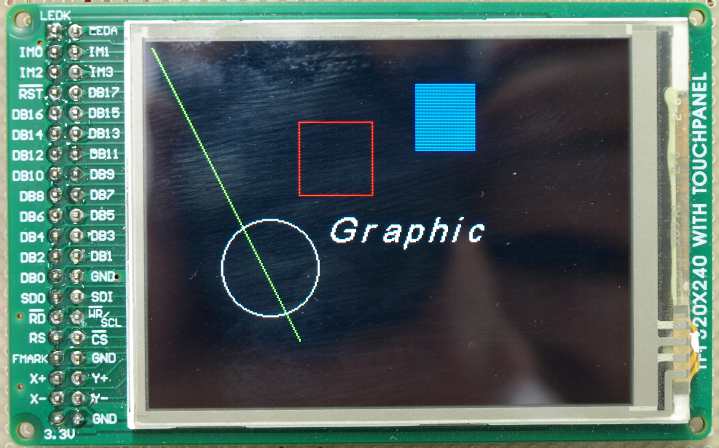
/media/uploads/dreschpe/graphic.jpg

 wait(5);        // wait two seconds
    
    // bigger text
    TFT.foreground(White);
    TFT.background(Blue);
    TFT.cls();
    TFT.set_font((unsigned char*) Arial24x23);
    TFT.locate(0,0);
    TFT.printf("Different Fonts :");
    
    TFT.set_font((unsigned char*) Neu42x35);
    TFT.locate(0,1);
    TFT.printf("Hello Mbed 1");
    TFT.set_font((unsigned char*) Arial24x23);
    TFT.locate(2,4);
    TFT.printf("Hello Mbed 2");
    TFT.set_font((unsigned char*) Arial12x12);
    TFT.locate(5,12);
    TFT.printf("Hello Mbed 3");

/media/uploads/dreschpe/fonts.jpg

wait(5);
  
    // mbed logo  
    TFT.set_orientation(1);
    TFT.background(Black);
    TFT.cls();
    TFT.Bitmap(90,90,172,55,p1);
}

/media/uploads/dreschpe/logo.jpg

Touchscreen

The next step is to connect the touchscreen to the mbed. We need 4 additional lines. You can see how to do on :

http://mbed.org/users/dreschpe/notebook/touchscreen/


38 comments on QVGA TFT with HX8347D controller:

15 Jul 2011

I noticed you do not set the speed of the SPI interface, how fast can the display handle SPI ? The demo looks nice!

15 Jul 2011

The speed of the SPI interface is set to 48MHz. The controller can handle up to 50 Mhz. You will not much more faster if you connect the display to 8 bit parallel, because you have to handle the control lines.

You can see the speed on my video:

http://www.youtube.com/watch?v=spCLFkKMMS4

25 Jul 2011

Hey Peter, Last week I went out and purchased this TFT. It was at a reasonable cost and it arrived to the US from Serbia in two days!! I was surprised. I had pre-made an adapter cable from an "Orange Board" baseboard. Using your code examples, I had the TFT running (including touch) within hours. It was also easy to create new fonts with GLCD Font Creator. It took a little while to figure out that you needed 4 extra bytes in the font file itself. I did update your touch drivers and added a .ini file so I wouldn't have to calibrate the TFT every time I reset or power cycled.

Thanks again for your work Peter, ...kevin

29 Jul 2011

Hello Kevin, did you post your update ? I was also thinking about a local ini file.

Peter

30 Jul 2011

I add loading of bmp files from local filesystem.

int BMP_16 (unsigned int x, unsigned int y, const char * Name_BMP)

The local filesystem is not as fast. If you load a full screen image, it took 2 seconds to load it from memory (151Kb).

But it is ok to load smaler items. You don`t have to waste flash memory.

Peter

http://mbed.org/users/dreschpe/libraries/SPI_TFT/lv5loz/docs/

31 Jul 2011

Most controller have a function to define a x*y area to fill up with pixel. Most of my functions are using this feature to speed up the pixel transfer. You have to adapt this function to your controller. I also switch to 16 bit SPI commands to send the pixel data faster. On a fast look the ILI9325 is alike to the HX8347D. If you look into the datasheet of the ILI9325 you see that the SPI clock has to be 2* 40ns for write transfers : 12,5Mhz and 2*100ns : 5MHz for read access. You see the SPI clock to this controller has to be 5 times slower than the HX8347D.

Not all displays have the mode selection pins on the connector. I have a ILI9328 based display, were only one mode pin is connected to the outside. You can`t use SPI mode with this display.

Peter

01 Aug 2011

Hey Peter, I just uploaded my program TFTdisp-104 . Sorry that most functions reside in main.cpp (I'm a h/w person by trade and using mbed to learn C). There is a lot of stuff in there you probably won't need such as an NTP client, SDHC Flash check routine, Text LCD output and serial booting-progress output. Serial speed is 921600 BTW.

Notes: 1. If you don't have an Ethernet hookup, the program will run anyway after the Ethernet times out. The date/time may be wrong, however. 2. There is a time GMT Time Zone and DST offset in the .ini file you can change. 3. If you need to recalibrate the touchscreen, set the .ini file "TftCalib=0" parameter to a "1" and it will recalibrate after the next reboot. 4. IMPORTANT NOTE: This code will FREEZE if the SD Flash chip is missing. It's a bug in the SDHC driver code. You can remove all of the SD Flash code for this demonstration program since it never references the SD other than at boot time. I'm reserving the SD code for later image loading.

...kevin

01 Aug 2011

About the TFT screen I forgot to mention: 1. Touching the Red/Black box clears the etch-a-sketch 2. Touching the White box changes the box's color (and pen color) 3. Touching the blue circle with "3" changes the pen width and the number in the circle (1-8) 4. Touching a "secret area" near the T of the TFT text will reboot the mbed 5. I added a local Orange color to your original color palette. The color is defined in main.cpp 6. After bootup, a color palette shows up. It will go away the first time you hit the Red/Black box

...kevin

06 Aug 2011

Hello Kevin, I'm on holiday at the moment, but after that I will add the ini-file to the lib. I think I have a patch for the bug in the SDHC driver. There are two lines of code without a timeout.

Regards, peter

06 Aug 2011

Hello Kevin, I'm on holiday at the moment, but after that I will add the ini-file to the lib. I think I have a patch for the bug in the SDHC driver. There are two lines of code without a timeout.

Regards, peter

08 Sep 2011

Where can I get the font files from ?

and the MBED Logo file ?

Cheers Ceri

08 Sep 2011

Oh - I forgot the link to the fonts : http://mbed.org/users/dreschpe/libraries/TFT_fonts/lx0q9r

You can also make your own fonts with the GLCD Font Creator described above.

Peter

03 Nov 2011

Hi, I just received my TFT Proto. But I think it's does'nt work because when I try to start it nothing happen. I correctly protect the TFT Proto as shown in the manual (with resistors for LED). Could you explain me how I can test this TFT Proto please ?

03 Nov 2011

First of all, double check all of your wiring. Use an ohm meter to verify that the pins on the LCD are 1:1 to the proper pins on the mbed. Are IM0 - IM3 wired correctly? For SPI mode, IM0, IM1 and IM3 should be grounded, IM2 is left floating. Did you connect all 3 of the ground pins on the LCD? Does the LCD power up (grey screen)? Do you have access to an oscilloscope?. If so, you can verify that RESET, CS, SCK, SDO, SDI are toggling on the LCD. How long is your connecting cable between the LCD and mbed?

...kevin

04 Nov 2011

I checked all cable and i think it's OK. The IM pins are correctly connected. The LCD doesn't power up. I don't have oscilloscope. The length of cables is 10cm. I really don't understand why it's doesn't work :S

04 Nov 2011

I add a schematic with all connections for the TFT. Most pins have to connect to GND. Hope that help.

Peter

04 Nov 2011

You know Peter, The next question will be "why are there no connections for the touchscreen in the schematic"? Just FYI

Sensovery Company, You should get a grey screen if you have power/grounds connected to the LCD -and- LED (LED needs small dropping resistor). See schematic above. If you don't at least have that, then the other connections won't matter. I'd start with that. Are you sure you didn't accidentally "mirror" the wiring connections on the LCD? ...kevin

04 Nov 2011

Hi Kevin, start without the touch. The connections are there: http://mbed.org/users/dreschpe/notebook/touchscreen/

:-) Peter

07 Nov 2011

Hi Peter, I've had mine running for a few months now. I was helping out the Sensovery Company's debugging efforts. I sure wish that this was a more widely used display / touch-screen for mbed.

...kevin

07 Nov 2011

An amazing display, real easy to use, great value, and a touch screen as well.

I wish I knew about this display years ago!

An excellent addition to any project.

Enjoy

Ceri

14 Nov 2011

Hi I'm sorry I didn't answer quickly. I'm glad because with your help I have a grey screen. I forgot capacitor between the LED. I will check everything and I suppose it's will be OK. Thanks everybody

23 Nov 2011

richtig gut ! ;-)

25 Nov 2011

Hello Peter !

Do you mind, if I use your work as base to write a library for ST7735 with a 128x160 TFT ? I'll credit you ofcourse, when it is ready.

Br, Jonne

26 Nov 2011

Hello Jonne, feel free to use parts of my code to implement you library if you publish the code here. After a short look into the datasheet of the ST7735 it looks that the controller has no "window" function. I use this window to speed up the drawing of character and rectangles. With setting a window you can fill up this area without setting the pixel address. If you have no window you have to add code to set the new pixel address after each line.

Regards, Peter

26 Nov 2011

Hello Peter

Thank you ! Sharing knowledge is what makes these communities great.

I have a notebook page about the work in progress here: http://mbed.org/users/smultron1977/notebook/spi-18-tft--mbed-work-in-progress/

I wrote the first version of the library last night, I got all the init commands working, screen comes on and goes to sleep as ordered etc. But alas, the beef of the thing is missing: I'm not yet able to output pixels to the screen, and it seems that this is where most work is going to be needed.

I'm going to make it into a "formal" library/cookbook page to the best of my ability once I get it up and running properly. I'll publish the work-in-progress code as well. This is my first mbed project ever, I've been working on the Arduino before, and its going to take a while to get the hang of how things work with mbed.

28 Nov 2011

Does any one know of a supplier for the bare LCD screen? I have been looking around and cant find a source of 3.2" HX8347D tft modules.

I know Watterott have 2.8", but Im looking for 3.2"

Thanks, Andrew

02 Dec 2011

For your information:

Here's an online tool to convert .bmp to C array:

http://www.cemetech.net/projects/basicelite/sourcecoder2.php

Much easier than using GIMP & Hex editor. Limited to 100k file size though.

05 Jan 2012

Hey Peter !

Here's a small thing I noticed: in your example TFT LCD prog, the SPI pins are different from the pins shown here and in the library documentation. And I was wondering what I had done wrong ! No problems, but I started trying the lib out from the TFT example and was getting a white screen only. I triplechecked my wiring before I noticed you had changed the SPI pins in the TFT definition in the TFT LCD prog.

Wonderful display and library works like a charm ! Thanks for your excellent work !

18 Mar 2012

I had a question about the current limiting resistor. Is that a two 10 ohm resistor there? can't figure out what the 10R on the diagram means..

Thanks!

18 Mar 2012

I put 2x 10ohm resistors in there, so 5ohms total, and it's working fine for me.

Matt

18 Mar 2012

We have to limit the current thru the led's. I have used two 10 ohm resistors parallel to get 5 ohms. 10 ohm is the smalest in my box :-).

If you want to dimm the light you can use a BS170 fet between the ground and the resistors. Use a pwm output to switch / dimm the light. You can connect the gate direct to the pwm pin of the mbed. The source pin is connected to ground and the drain pin is connected to the resistors.

08 Jan 2013

Wow, that’s a great project. I am very impressed with the speed. With this in mind perhaps you can help me. I have a similar display (does not have touch screen) and HX8347 controller connected as in the following MBED project link:

https://mbed.org/cookbook/TFT-LCD-with-HX8347

But I have a question that an expert like you may be able to answer. When I load a 24bit .bmp image to the display it takes some time to load (see video in previous link). I think this is because the data is being directly written to the GRAM and displayed. But I want the image to only display once the GRAM has been fully written to.

Unfortunately I have already used the layout presented in the other project so changing to SPI is not an option. Hopefully you or another MBED community member can help me.

Thanks,

K

08 Jan 2013

The problem isn't as much the writing, as it is the reading.

Writing the entire display can be done in 25ms (at least that is what I reach, and I assume this one does too, the one you link seems to be slower, but still it isn't the part that costs most time). The problem is reading from your localfilesystem, that is slow. Reading from flash memory is fast, and reading from RAM memory is fast. Since we don't have nearly enough RAM to store an entire picture, we skip that one (you can store small ones).

So we need the flash memory. You got two options. Option 1 is what is done for this library, you can change the picture into an array, you store that array in your flash memory by giving it the 'const' modifier, and you load that picture using the code from this library. (Yes you are going to have to do some code adaption, you won't get around that).

Plan B is similar, but a bit different. Get the bitmap from your filesystem, write it on your flash memory, and then see previous point. So same one, but you can still easily store it on your localfilesystem, a flash card, etc. I just did that for a different LCD screen together with Frank (and I quickly checked, they at least aren't compatible on which registers need to be initialized): http://mbed.org/users/frankvnk/code/Mini-DK/. It isn't a seperate library yet, so you just need to look at what is in the SPI_TFT folder.

Hopefully either of those options help you.

08 Jan 2013

Copy to flash can be a solution. The datasheet specify 10000 to 100000 write cycles. So you have to be careful.

There is other solution, but i have not tried. The controller has a "Partial display mode". You can switch off some rows. If you work with a black background and switch off the lines which are drawn by the graphic you will not see the painting process - i think ... The Partial Area - the area which is active starts at row register 0x0a bit 15-8 0x0b bit 7-0 and end on row register 0x0c - 0x0d; The normal use is reg 0xa, 0xb = 0 and reg 0xc = 1 0xd = 0x3f -> line 0 - 319 are active. Switch off the lines with graphic, load the graphic and switch on again.

10 Jan 2013

Has anyone tried using chan_fatfs_sd instead of SDFileSystem? Just to compare the two to see which file system has better performance. chan_fatfs_sd has many more features, but you cannot access the local file system with it.

...kevin

29 Jan 2013

Hi all,

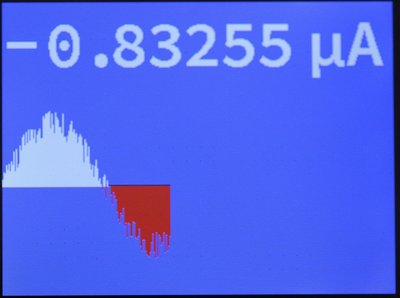
I needed a font for large readouts (like on a multimeter), so I created one with 55x31 characters based on Source Code Pro semi-bold, which is published under OFL 1.1 (http://sourceforge.net/projects/sourcecodepro.adobe/)

It includes optional characters for mu/micro (µ), omega/Ohm (Ω), superscript 2 and 3 (² ³), plus-minus (±), degree (°).

See https://mbed.org/users/pholzleitner/code/SourceCodePro31-SB/

Here's a sample image (full screen shown):

/media/uploads/pholzleitner/_scaled_scpro31sb.jpg

Regards, Peter

05 Mar 2013

Hi Peter !

I have a problem with the Bitmap function. When i use it, my image is cut on the middle.

The left size image's is on the right, and the right size is on the left.

I used Winhex to had the C-Code of my image, and i tried with other images, same result.

Can you help me please ?

EDIT: Problem solved: Do not start at offset 46 but offset 138, ie the beginning of the image.

01 Sep 2014

Hi Peter,

Grat work,

I have managed to get the display working, but not the touch. Is there a new version of the Demo paint that is working?

Andrew

Please log in to post comments.