Important changes to repositories hosted on mbed.com
Mbed hosted mercurial repositories are deprecated and are due to be permanently deleted in July 2026.
To keep a copy of this software download the repository Zip archive or clone locally using Mercurial.
It is also possible to export all your personal repositories from the account settings page.
Local_debugging_of_QW_dev_kits
Importing an mbed project under System Workbench for STM32
To import an mbed project into System Workbench for STM32 is possible but a bit complex; We will try to explain how to do it below. As an example we will use the Nucleo_blink_led program, on a NUCLEO-L152RE board.
On the mbed web site
The first part of the procedure must be done on the mbed website.
Create your mbed program
Because we only wish to demonstrate how to debug locally on the Nucleo-L152RE board, we'll use the following code example:
[Repository '/teams/ST/code/Nucleo_blink_led/' not found]
Import the mbed-src library into the code example
You need to import the mbed-src library, as otherwise you will get a precompiled library during the export phase. However this precompiled library may be compiled using options conflicting with the ones used by System Workbench for STM32. This is especially true for floating point, as there is three ways to generate floating point operations, and two incompatible ABIs on ARM:
- the soft ABI, where the compiler uses no FPU operation or register
- the softfp ABI, where the compiler generates FPU instructions but pass floating point parameters in general purpose registers
- the hardfp ABI where the compiler not only uses FPU instructions but also pass floating point parameters in FPU registers
The soft and softfp ABIs are compatible and can interoperate on the same MCU (provided it has an FPU or they are emulated by the illegal instruction exception handler); however the hardfp ABI is incompatible with the other two ABI. By default System Workbench for STM32 will use the hardfb ABI as it is a lot more efficient than the softfp (the overhead of moving parameters from FPU registers to GP registers or memory is often several times higher than the time needed for the computation itself...).
Export the mbed program for a GCC-ARM toolchain
You may also export your program as a ZIP, but in this case you will get support for all mbed-supported processors and boards, which will have two inconvenients:
- It will generate a very heavy file (about 30Mb)
- You will have to manually select which target libraries to compile and use
On your local PC
The rest of the procedure will run on your PC, under System Workbench for STM32
Create a C++ Project
You must first create a standard C++ project (Do not create a C project, as the mbed library is written in C++):
- "New" >> "Project..." >> "C/C++" >> "C++ Project"
- Create an "Executable" "Ac6 STM32 MCU Project", using the "Ac6 STM32 MCU GCC"
- Select the proper board (here the STM32F4-based NUCLEO-L152RE)
- Select the No firmware radio button (this should be the default anyway)
Then you must clean the created project; the reason is that we will not use some of the files prepared by System Workbench for SMT32 as the MBED library provides its own.
- Delete the automatically provided main.c file, as you will use the one you've defined under mbed
- Delete the system_stm32l1xx.c file as we will use the one provided by mbed
Import the MBED-generated source code
Now you will import the program exported from mbed in the src directory of your project and configure it for proper compilation:
1. Right click on the src directory of your project
- "Import..."
- "Archive File"
- select the downloaded zip file

- select the directories and files to import
- import in the src folder of your newly created project It should be selected by default
- import the Nucleo_blink_led directory
- Do not import Nucleo_blink_led/mbed This is the precompiled mbed library, together with its header files, we will use those from mbed-src.
- Do not import either the Nucleo_blink_led/mbed-src/targets/cmsis/TARGET_STM/TARGET_STM32L1/TARGET_NUCLEO_L152RE/TOOLCHAIN_GCC_ARM folder This folder contain toolchain-dependent files that conflict with files provided by System Workbench for STM32
- You may keep just the main.c file in Nucleo_blink_led Other files, like Makefile, will not be used by System Workbench for STM32 You may elect to keep some for reference...
- You may also elect to ignore the .hg mercurial metadata, if you use another source control system Note there is one such .hg directory in several sub-directories In this case you should also ignore the .hgignore file in Nucleo_blink_led

- "Finish"
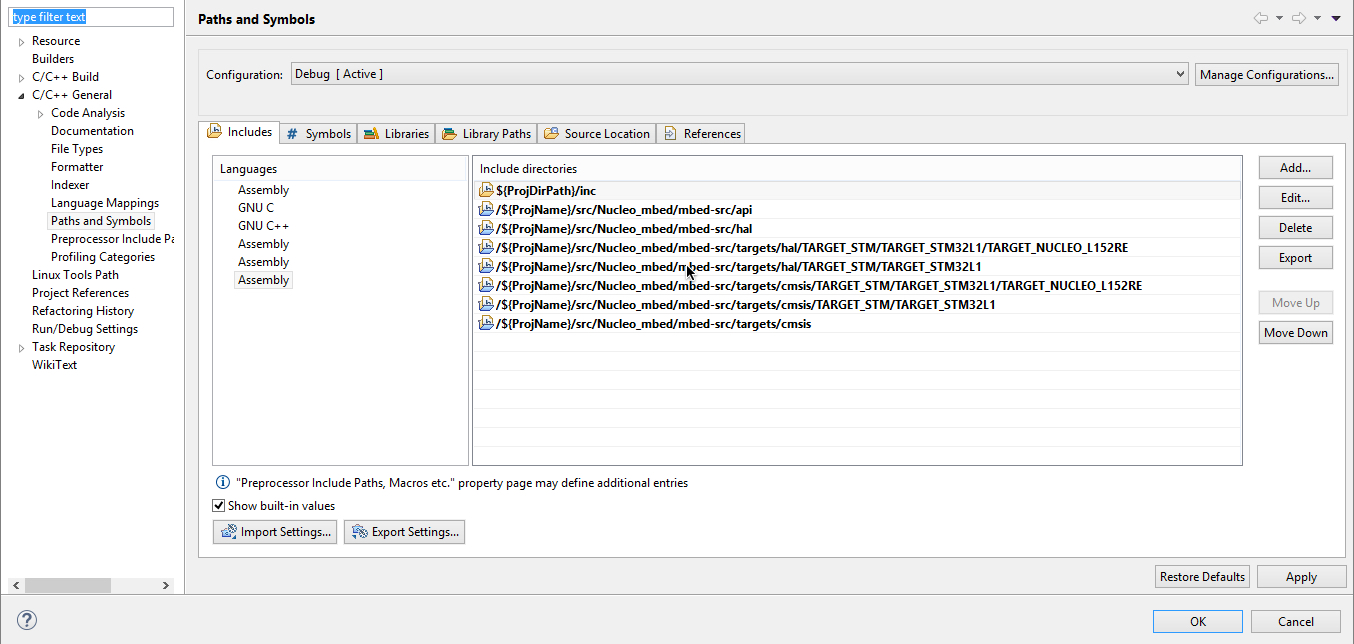
2. Direct the compiler to the proper header files
- This is done in the project properties >> "C/C++ General" >> "Paths and Symbols"
- Go to the "Includes" tab, where you must add various directories to the Include path You may either type the paths provided as they are given below, or use the "Workspace..." button to browse your project. Add them in the order given below Be careful, for each directory, to check both "Add to all configurations" and "Add to all languages":
- You must add the following directories:

Build and debug your program