Data acquisition and device control with Scilab.
Desciription
Scilab is a freeware alternative to MATLAB. For low-cost data acquisition and device control a nice Arduino toolbox is available.
This site presents a Mbed port which allows to use Mbed boards (equipped with Arduino header) rather than Arduino to import real time data into Scilab and to control real equipment witch Scilab.

Installation
- Install Scilab to your PC, if not done yet.
- Launch Scilab and install the Arduino toolbox by executing the following command from the Scilab console:
--> atomsInstall("arduino")
Controlling Mbed's digital output from Scilab
- In Xcos open
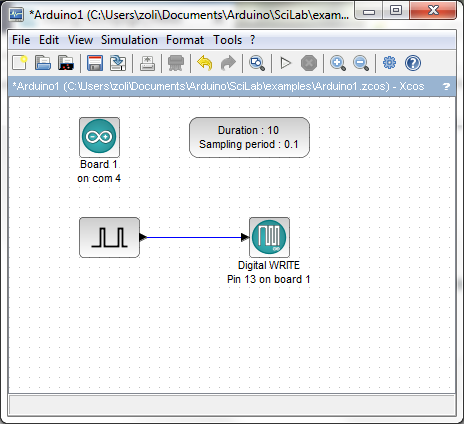
examples/Arduino1.zcos
- Double click on the
Boardsetup block and replace the serial port number with mbed's actual virtual serial port number.
- Double click on the
Digital WRITEblock and set Digital Pin to 13 (D13 is connected to LED1).
- Start simulation and LED1 on the Mbed board should start blinking.
Reading and displaying Mbed's analog input
- In Xcos open
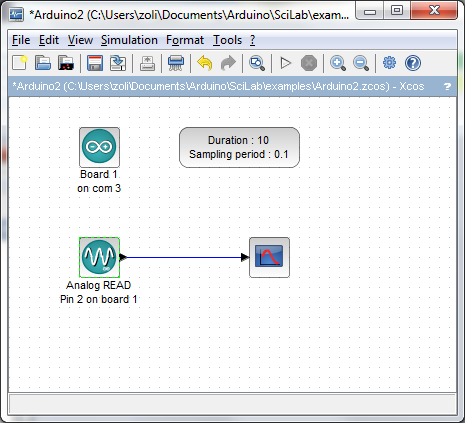
examples/Arduino2.zcos
- Double click on the
Boardsetup block and replace the serial port number with mbed's actual virtual serial port number.
- Double click on the
Analog READblock and set Analog Pin to 2.
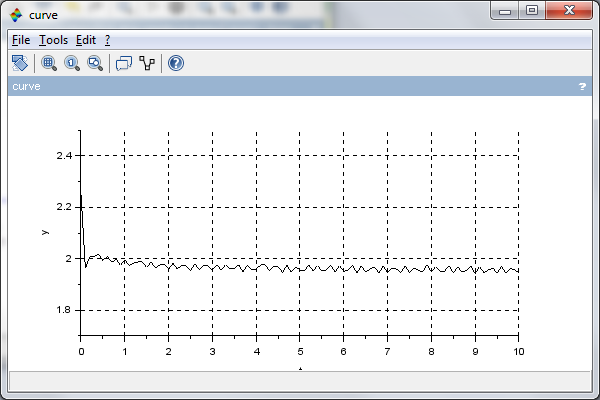
- Start simulation and a graph should appear showing the analog signal measured on Mbed's pin A2.
NOTE: Currently, there is bug in the toolbox ARDUINO_ANALOG_READ_sim function (I have reported to Scilab) so the analog readings are not correct.
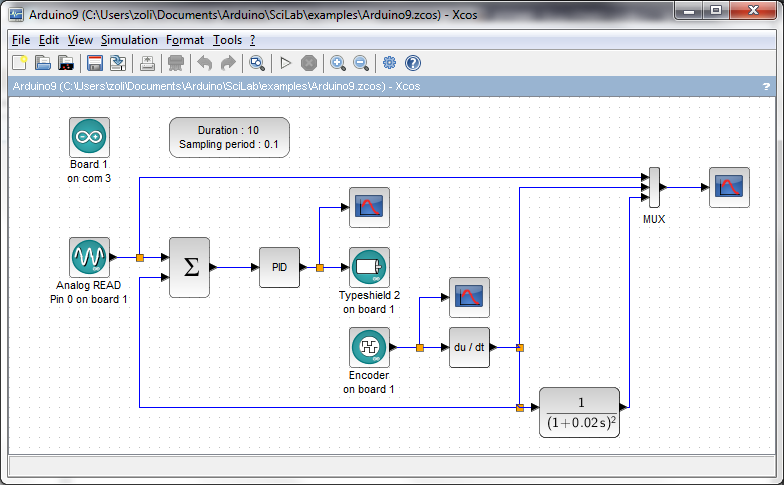
PID controller
- In Xcos open
examples/Arduino9.zcos
Diff: README.md
- Revision:
- 0:295b7e1c12f3
diff -r 000000000000 -r 295b7e1c12f3 README.md --- /dev/null Thu Jan 01 00:00:00 1970 +0000 +++ b/README.md Mon Jan 18 19:51:22 2021 +0000 @@ -0,0 +1,64 @@ + +# Blinky Mbed OS example + +The example project is part of the [Arm Mbed OS Official Examples](https://os.mbed.com/code/) and is the [getting started example for Mbed OS](https://os.mbed.com/docs/mbed-os/v5.14/quick-start/index.html). It contains an application that repeatedly blinks an LED on supported [Mbed boards](https://os.mbed.com/platforms/). + +You can build the project with all supported [Mbed OS build tools](https://os.mbed.com/docs/mbed-os/latest/tools/index.html). However, this example project specifically refers to the command-line interface tool [Arm Mbed CLI](https://github.com/ARMmbed/mbed-cli#installing-mbed-cli). +(Note: To see a rendered example you can import into the Arm Online Compiler, please see our [import quick start](https://os.mbed.com/docs/mbed-os/latest/quick-start/online-with-the-online-compiler.html#importing-the-code).) + +1. [Install Mbed CLI](https://os.mbed.com/docs/mbed-os/latest/quick-start/offline-with-mbed-cli.html). + +1. Clone this repository on your system, and change the current directory to where the project was cloned: + + ```bash + $ git clone git@github.com:armmbed/mbed-os-example-blinky && cd mbed-os-example-blinky + ``` + + Alternatively, you can download the example project with Arm Mbed CLI using the `import` subcommand: + + ```bash + $ mbed import mbed-os-example-blinky && cd mbed-os-example-blinky + ``` + + +## Application functionality + +The `main()` function is the single thread in the application. It toggles the state of a digital output connected to an LED on the board. + +## Building and running + +1. Connect a USB cable between the USB port on the board and the host computer. +2. <a name="build_cmd"></a> Run the following command to build the example project and program the microcontroller flash memory: + ```bash + $ mbed compile -m <TARGET> -t <TOOLCHAIN> --flash + ``` +The binary is located at `./BUILD/<TARGET>/<TOOLCHAIN>/mbed-os-example-blinky.bin`. + +Alternatively, you can manually copy the binary to the board, which you mount on the host computer over USB. + +Depending on the target, you can build the example project with the `GCC_ARM`, `ARM` or `IAR` toolchain. After installing Arm Mbed CLI, run the command below to determine which toolchain supports your target: + +```bash +$ mbed compile -S +``` + +## Expected output +The LED on your target turns on and off every 500 milliseconds. + + +## Troubleshooting +If you have problems, you can review the [documentation](https://os.mbed.com/docs/latest/tutorials/debugging.html) for suggestions on what could be wrong and how to fix it. + +## Related Links + +* [Mbed OS Stats API](https://os.mbed.com/docs/latest/apis/mbed-statistics.html). +* [Mbed OS Configuration](https://os.mbed.com/docs/latest/reference/configuration.html). +* [Mbed OS Serial Communication](https://os.mbed.com/docs/latest/tutorials/serial-communication.html). +* [Mbed OS bare metal](https://os.mbed.com/docs/mbed-os/latest/reference/mbed-os-bare-metal.html). +* [Mbed boards](https://os.mbed.com/platforms/). + +### License and contributions + +The software is provided under Apache-2.0 license. Contributions to this project are accepted under the same license. Please see contributing.md for more info. + +This project contains code from other projects. The original license text is included in those source files. They must comply with our license guide.