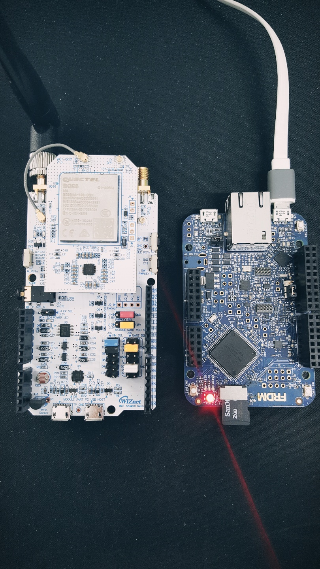
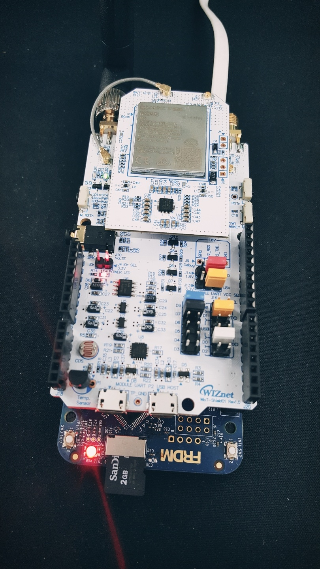
Pelion example for WIZnet IoT Shield with BG96 Cat.M1, K6xF board (SK telecom network in Korea)
Dependencies: FXAS21002 FXOS8700Q
Overview
This document is based on https://os.mbed.com/teams/NXP/code/pelion-example-frdm/ and the code forked Daniel_Lee's BG96_K6xF_pelion-example-frdm repository and added some features. Need a WIZnet IoT Shield BG96 board and development board.
This example is known to work great on the following platforms:


- FRDM-K64F - onboard Ethernet and onboard SD card holder.
- FRDM-K66F - onboard Ethernet and onboard SD card holder.
Requirement
- FRDM-K64F or FRDM-K66F
- WIZnet IoT Shield BG96 board
- USIM card
Example functionality
This example showcases the following device functionality:
Read onboard FXOS8700Q accelerometer and magnetometer, and report the values as Pelion LWM2M resources (see image below). (FRDM-K66F only) Read onboard FXAS21002 gyroscope and report the values as Pelion LWM2M resources. On user button click, increment Pelion LWM2M button resource. Allow the user to change the state of the board LED from Pelion LWM2M led_state resource and PUT request.
1. Import the application into your desktop:
mbed import https://os.mbed.com/users/hkjung/code/BG96_K6xF_pelion-example-frdm/

cd BG96_K6xF_pelion-example-frdm
2. Install the CLOUD_SDK_API_KEY
mbed config -G CLOUD_SDK_API_KEY <PELION_DM_API_KEY>
For instructions on how to generate your API key, please see the documentation.
3. Initialize firmware credentials (done once per repository). You can use the following command:
mbed dm init -d "<your company name in Pelion DM>" --model-name "<product model identifier>" -q --force
If the above command does not work for your Mbed CLI, please consider upgrading Mbed CLI to version 1.9.x or above.
4. Compile and program:
mbed compile -t <toolchain> -m <TARGET_BOARD>
(supported toolchains : GCC_ARM / ARM / IAR)
5. You can connect on a virtual terminal/COM port to the platform using:
mbed sterm -b 115200
6. If successfully connect to cellular networks(SK Telecom) then you can get below message
[BOOT] Mbed Bootloader
[BOOT] ARM: 00000000000000000000
[BOOT] OEM: 00000000000000000000
[BOOT] Layout: 0 83A8
[BOOT] Active firmware integrity check:
[BOOT] SHA256: 76F082FDFF2C0E6C64A76DCF8957773A14B4146629424A0C7F71858788F24521
[BOOT] Version: 1556777151
[BOOT] Slot 0 is empty
[BOOT] Active firmware up-to-date
[BOOT] Application's start address: 0x10400
[BOOT] Application's jump address: 0x10B11
[BOOT] Application's stack address: 0x20030000
[BOOT] Forwarding to application...


Starting Simple Pelion Device Management Client example
You can hold the user button during boot to format the storage and change the device identity.

Sensors configuration:
FXOS8700Q accelerometer = 0xC7
FXOS8700Q magnetometer  = 0xC7

Connecting to the network using the default network interface...
Connected to the network successfully. IP address: 000:000:000:000
Initializing Pelion Device Management Client...
Initialized Pelion Device Management Client. Registering...
Press the user button to increment the LwM2M resource value...
Registered to Pelion Device Management. Endpoint Name: xx Your Endpoint Name xx

FXOS8700Q mag:    0.903 x,  -0.073 y,   0.477 z [gauss]
FXOS8700Q acc:   -1.143 x,  -2.459 y,   3.316 z [g]
Diff: main.cpp
- Revision:
- 8:28b898a501b4
- Parent:
- 5:f2123dc31d30
--- a/main.cpp	Thu Apr 25 06:45:36 2019 +0000
+++ b/main.cpp	Thu May 02 06:12:45 2019 +0000
@@ -22,6 +22,14 @@
 #include "FATFileSystem.h"
 #include "LittleFileSystem.h"

+/* Pin configuraiton */
+// Cat.M1
+#define MBED_CONF_IOTSHIELD_CATM1_RESET             D7
+#define MBED_CONF_IOTSHIELD_CATM1_PWRKEY            D9
+// On-board sensors
+#define MBED_CONF_IOTSHIELD_SENSOR_CDS              A0
+#define MBED_CONF_IOTSHIELD_SENSOR_TEMP             A1
+
 // Default network interface object. Don't forget to change the WiFi SSID/password in mbed_app.json if you're using WiFi.
 NetworkInterface *net = NetworkInterface::get_default_instance();

@@ -90,6 +98,23 @@
 // When the device is registered, this variable will be used to access various useful information, like device ID etc.
 static const ConnectorClientEndpointInfo* endpointInfo;

+void iotshield_modem_init(void)
+{
+    DigitalOut _RESET_IOTSHIELD(MBED_CONF_IOTSHIELD_CATM1_RESET);
+    DigitalOut _PWRKEY_IOTSHIELD(MBED_CONF_IOTSHIELD_CATM1_PWRKEY);
+
+    _RESET_IOTSHIELD = 1;
+    _PWRKEY_IOTSHIELD = 1;
+    wait_ms(300);
+
+    _RESET_IOTSHIELD = 0;
+    _PWRKEY_IOTSHIELD = 0;
+    wait_ms(400);
+
+    _RESET_IOTSHIELD = 1;
+    wait_ms(1000);
+}
+
 /**
  * PUT handler - sets the value of the built-in LED
  * @param resource The resource that triggered the callback
@@ -235,6 +260,9 @@
     }

     sensors_init();
+
+    // Cat.M1 module init: Hardware reset and power on
+    iotshield_modem_init();

     // Connect to the Internet (DHCP is expected to be on)
     printf("Connecting to the network using the default network interface...\n");
 Eric Jung