LPC812 MAX Experiment: PWM
Experiment: Pulse Width Modulation
In this experiment you will learn how to generate a pulse width modulated (PWM) signal. The PWM signals will be generated purely in software. A more hardware oriented implementation with the help of timers will be investigated in later experiments.
Information
The mbed library includes a PwmOut class that handles most of what is done in this lab, however it is not supported by all mbed platforms and more spcifically not by the LPC812 MAX board.
Software
The I2C bus is explained in the I2C Experiment so for now a helper class is supplied to help you get started with the analog inputs without prior knowledge of how I2C works. The class is PCF8591:
Use the "Import Library" button to copy it into your project.
1) Hardware
In this lab you will need:
- 1x breadboard
- 1x photo resistor
- 5x 330 ohm resistor
- 1x green LED
- 1x red LED
- 2x trimming potentiometer
- cables
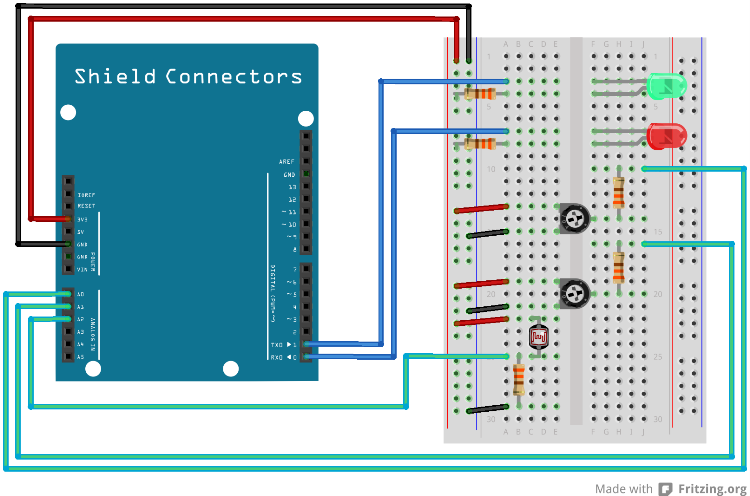
Mount the components on the breadboard and connect the breadboard to the LPC812 as show in the image below.

The pin(s) are specified in the mbed library with the actual pin names as well as some useful aliases:
| Schematic Name | mbed Pin Name | Arduino Shield Alias | Description |
|---|---|---|---|
| AIN0_XPIO0 (SJ5 in 1-2 pos) | N/A | A0 | Upper trimming potentiometer |
| AIN1_XPIO1 (SJ6 in 1-2 pos) | N/A | A1 | Lower trimming potentiometer |
| AIN2_XPIO1 (SJ7 in 1-2 pos) | N/A | A2 | Photo resistor |
| PIO0_0 | P0_0 | D0 | Red LED |
| PIO0_4 | P0_4 | D1 | Green LED |
1) Description
In this experiment you shall investigate how to generate a signal with a given duty cycle and how the LED intensity varies with duty cycle. The figure below illustrates the PWM signal structure. The high-time defines the duty cycle. It this signals directly drives a LED, the LED will be fully on when duty cycle is 0 and fully off when the duty cycle is 1 (100%).

Below is a code structure that can be used to generate a signal with a specified duty cycle. The loop should be repeated as often as possible in order to keep generating the signal. As seen the loop below will perform 100 iterations so the resolution of the duty cycle control is 1%. Higher resolution is possible by increasing the number of iterations but the trade-off is lower frequency of the duty cycle. This may, or may not, be a problem as we will investigate in later experiments.
main.cpp
#include "mbed.h"

DigitalOut greenLed(D1);

int main() {
    // set wanted duty cycle
    int wantedDutyCycle = ...;

    while(1) {
        // set output high
        ...

        for (int loopCounter = 0; loopCounter < 100; loopCounter++) {
            if (loopCounter == wantedDutyCycle) {
                // set output low
                ...
            }
        }
    }
}
Create a program that generate a fixed duty cycle and controls a LED. Define the duty cycle with a constant in the program.
About what frequency does the PWM signal have?
(measure with an oscilloscope or logic analyzer, if possible)
2) Description
In this experiment let the value from the trimming potentiometer control the duty cycle. Build on the code that was developed in the Analog Input experiment. Read the A0 value with the help of the imported PCF8591 class and set duty cycle between 0-100% accordingly.
As an extra experiment, let the light sensor control the duty cycle. If the room is dark have full intensity on the LED and vice versa.
3) Description
In the first PWM experiment, the duty cycle frequency was fixed to a relatively high value. In this experiment you shall investigate how this frequency affects the LED intensity. At some point (when lowering the frequency) you will notice a flickering on the LED.
Create a program where one trimming potentiometer controls the duty cycle and another trimming potentiometer controller the frequency.
Tip: Add a variable delay in the loop. Let the delay be 1 us, or multiples of it. At 1 us delay, a total of 100us delay will be added per cycle. This equals 10 kHz. Measure and verify that you get about this frequency. It will be slightly lower since more than just delays are performed in the loop. If the delay is 2 us the frequency will be 5 kHz, if 3 us it will be 3.3 kHz, etc.
At what frequency does the LED flickering become apparent?
4) Description
In this experiment you shall create a program that controls the intensity of two LEDs with the help of two trimming potentiometers. One loop shall now control two different PWM signals. As seen it becomes more and more complicated to control multiple signals, especially if the signals have different frequencies. The microcontroller is also fully occupied with generating the signals. If other work is performed, the PWM signals will be affected (not correct duty cycle or frequency). This is why it is typically simpler to let a timer generate the PWM signal, without software intervention (other than setup). You can experiment with this on your own.
Solution(s)
Import programlpc812_exp_solution_pwm
Solutions for the PWM experiments for LPC812 MAX
Please log in to post comments.
