IMU Daughterboard

I've designed and built a small IMU add-on for the mbed. It adds a triple axis gryo (ITG3200), triple axis accel (ST LIS331DLH), a microSD card slot, triple axis magnetometer, a li-po power jack on the back side (probably requires a minimum of 2 cell battery), and pin headers that let it snap right onto an mBed.

So far I've gotten raw counts out of the gyro (thanks to Aaron's library here: http://mbed.org/cookbook/ITG-3200-Gyroscope ), and raw counts from the Accel. I'll publish my accel lib shortly. All it can do is just the accels, and I'd like to add some additional commands to better setup the chip. (But if anyone wants it as it is now, let me know and I'll publish it now)

11/16/10 - Got IMUfilter up and running. Linked the mbed/imu to matlab over the serial port and got three orthogonal rods to sort of track the mbed's position.

Video here:/media/uploads/atommota/video90.mpg

1/11/11 - - Got SDCard interface working. Many thanks to Klaus Bu's SDHC MicroSD card library. It worked great on my 16GB card. You can get it here: http://mbed.org/users/xxll/programs/SDHCFileSystem/5zdtq - Populated the magnetometer, and it also works correctly. I recorded two data sets from RC helicopters. They are available for download /media/uploads/atommota/mikeb_-_flight_1.txt and /media/uploads/atommota/johans_-_flight_1.txt here if anyone would like to play with some 9axis inertial sensor data. The data is formatted as follows: Time (sec), Accel (raw counts - divide by 4096 to get Gs) X, Y, Z, Gyro (rad/sec) X, Y, Z, Mag (raw counts) X, Y, Z

Here is a Matlab script to import, convert accels to G's and plot. /media/uploads/atommota/postprocessimu.m

ToDo:

  • DONE (1/11/11): Get SDcard interface working. Only have a 16gb card to test with now, and its proving difficult.
  • DONE (1/11/11): Order and populate the magnetometer. UPDATE: Ordered. Will be here and populated by Thursday.
  • Here are PDFs of the designs:

Schematic: /media/uploads/atommota/imu_board_-_v1_schematic.pdf

PDB: /media/uploads/atommota/imu_board_-_v1_pcb.pdf

ZIP of Eagle PCB/SCH Files: /media/uploads/atommota/mbed_imu_daughterboard_files.zip

Additionally, I'll probably be putting in another order for the pcb's so if anyone wants to build their own copy, let me know and I can get some extras for whoever is interested.
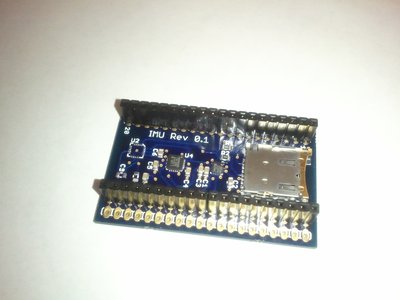
http://mbed.org/media/uploads/atommota/_scaled_2010-10-14_13.40.18.jpg


Quick Start Guide and Basic Documentation

Since a few people have built their own or purchased completed copies of this board it was time to put together a brief documentation and reference area for it.

Pin Outs

p9 = Accel, Gyro, Magnetometer - i2c Data Line
p10 = Accel, Gyro, Magnetometer - i2c Clock Line

p28 = Accel INT Line
p29 = Accel INT Line
p30 = Gyro INT Line
All of the INT lines (digital I/O, i2c, serial, and CAN) may be used for other purposes by default. They need to be explicitly enabled inside the sensors via i2c commands if you would like to make use of the sensor's interrupt functionality.

p5 = microSD Card - SPI MOSI
p6 = microSD Card - SPI MISO
p7 = microSD Card - SPI Clock
p8 = microSD Card - Card Select

GND and VIN are connected to the two pads on the backside for soldering a lipo battery socket on. I've never actually used these, choosing to just solder a 9V battery clip to the outside row of holes for power

I2C 7-Bit Device Addresses

LIS331(DLH/HH) - 0x19 (DLH is the standard option, HH is the high g version for rockets)
ITG3200 - 0x68
HMC5843 - 0x1E

Acceptance Test Program
This will demo the basic functionality
http://mbed.org/users/atommota/programs/AcceptanceTest/ln0maj


Many thanks to Scott O. for catching some of my errors and general feedback on my board. Check out his project over here: http://mbed.org/users/scotto/notebook/scottrov1/


13 Nov 2010

Hey Tim,

Nice project. How does what you are doing compare with using a separate IMU board such as one of the sparkfun Razors? I have been mucking around with one of these for a while now and I'm just interested as to why you chose this route instead. At a guess I would have thought this would be a cheaper solution than buying an off the shelf IMU and as such is enough to spark my further interest. I'll be interested to follow your progress on this one mate. Keep up the good work!

Sam

13 Nov 2010

Thanks for your interest! I've been working this for a few months now, and finally have something working to show for it, so I'm happy to share what I've accomplished to help everyone else out. Let me know if I can get you any of the design files, or source code to it.

Initially it was indeed because of the cost. I felt I could build one cheaper, add a few extra features (mount directly on an mbed, provide an sdcard socket, and power mbed via a lipo battery), and create a really compact package that i could fit in narrow rocket body tubes or small uavs's without wires etc. I have to say though getting this first one up and running cost me more than a razor would have (adding stencil, solder paste, etc), however my final bill of materials is definitely cheaper than the razor and includes everything the razor has plus a few bonus features. I think fully populated it costs me around $90 in materials (gotta double check that, but its in the ball park) and takes about an hour to assemble//reflow each one.

My next revision will be only minor improvements (no bugs found so far!). Probably switching to sparkfun's great selection of the ADXL345 for the accel (wider dynamic range), add a right angle header socket to support the sparkfun micro-mini gps's (our plain UART interface), headers for servos (so i can totally eliminate the redundant row of breakouts on the sides to narrow the profile) and low profile pin headers to make it thinner. Anything suggestions of what you would like to see on an mBed IMU addon board? I'd love to make this as useful as I can to people, because the more people we have using it, the faster it's code base will mature.


Tim

14 Nov 2010

Tim,

great to hear you haevn't found any bugs so far and have achieved what you set out to do in terms of building a cheaper unit (I had similar thoughts just before I bought my razor but in light of my time constraints convenience won out). It is also good to know you are going to continue improving upon this idea. The GPS is a good move from my point of view and those other modifications all seem to be moving down the right path also. All I would say about additional sensors/upgrading the sensors you already have is to keep an eye on what is coming out right now, for example, I saw a combined 3-axis gyro/compass and a combined 3-axis gyro/accelerometer the other day and surely it can't be long until they combine all three! It is almost impossible to keep up with but you have made a start in the right direction for sure.

I would be most appreciative if you could share the source and design files with me (slpatto@gmail.com or just publish it :D) as I'm looking at going down a similar path for an idea I'm working on. In essense, my idea seems to be very similar to yours but there are probably some things I would leave off the board I am working towards. My ideal would be to produce a sort of 'customised mBed' which would be all on one chip. The great thing about mBed is that it allows you to experiment with many different sensors and modes of data transfer but once you are past that initial stage then what's left on the mBed is usually a bit superfluous. Your design files would give me a bit of a head start on that front.

Are you intending to use this system in robotics, UAVs, or some other super-top-secret project?

I guess in the end it comes down weighing your options between what price you are willing to pay (larger profile board, heavier unit, more power hungry) to retain the flexibility to attach other sensors in the future and whether the reduced flexibility is worth what you would gain by strictly defining your bare minimum needs for a particular project and going after that.


Sam

16 Nov 2010

Sam,

The new sensors are constantly beating me. My orginal design had two gyro chips on it, and at the last minute I saw that the itg3200 came out and subbed it in. It's impossible to keep up but I'll keep trying. My biggest problem is just sourcing these newer chips. Digikey and Mouser take forever to stock them after they are announce and I have to go to small distributors that charge a premium.

Eagle files will be posted shortly. If you have any questions or comments, let me know

As for its use...My primary purpose is for UAVs, but I do have friends who will be using them for ground robotics as well.


Tim

7 comments on IMU Daughterboard:

28 Jan 2011

I'd be interested in one, subject to cost.

26 Jan 2012

Tim, Could you share the source and design files with me(bharat.tak8@gmail.com), I am working on a similar project.

Bharat

26 Jan 2012

Bharat:

I've uploaded a zip file with my schematic and pcb files from Eagle here: /media/uploads/atommota/mbed_imu_daughterboard_files.zip All of my source code is posted on this page already. Start with the 'Acceptance Test' since it has all of the code I wrote and its what I used to test my modules before I ship them. If you have any questions feel free to post here (or email, but if its posted here I can answer for everyone)

Tim

27 Jan 2012

Tim,

Thanks a lot for the files. I visited the google code page(http://code.google.com/p/mbed-autopilot/) looking for an open source AutoPilot firmware that works on the mBed board(with a sensor board like sparkfun SEN-10724 - http://www.sparkfun.com/products/10724), but it seems like the last activity on it was over an year ago. I'd really appreciate if you could fill me in on any such project that you might have worked on, or developed any flight code using the IMU data you collect from the sensors.

Thanks, Bharat

27 Jan 2012

Hi Tim

I was just passing by and saw your really nice work. Congratulations! I'm glad to se how people like share their work (I've not done anything that really worth to share yet... shame on me =(... )

Anyways, I think you should tell in the description that 1 Li-po cell (3,7v nom) would be very tight in the limit of Vin, because of the dropout of the reg. and the Vf of the diode. So people can be more aware of this (I know maybe you didn't designed it for just 1 li-po cell).

For example in the case that they use your work with a 3,7 li-po bat and a uSD memory with SDFilesystem library. This library send a command telling that the voltage supplied is 3,3v and that is not the supplied voltage... maybe it won't work and people could say "awwww.. it don't work... =(" and go to bed depressed XD.

Well... just a sugestion... but.... hmmm... you know... Good Work!

Rolando

27 Jan 2012

Bharat,

I did start that project up on google code, since I needed a bug tracking system while I was developing the code for this board. I titled it mbed autopilot because that has been my goal all along, but I haven't written any flight code yet. After the development of this board, I started designing a second generation board that is similar, except it adds an onboard gps module. As my hardware designs were evolving, I just never had time to work on the software so I'm afraid I dont have anything to offer up in the autopilot code department yet.

I've been looking over several other open source auto pilot projects and hope to borrow heavily from them to build my on on the mbed. All my code will of course be posted here. I'll probably just use google code as my bug tracking. Although, I see no reason to not post the code in google code as well. It wont be just a direct port of much of this code however, since a lot of the assumptions they use for flying planes, don't apply to my rockets.

Since I dont have any of my own code at the moment, here are some other projects I'm looking at to use as my starting point: Paparazzi: http://paparazzi.enac.fr/wiki/Main_Page Sparkfun 9DOF AHRS: http://code.google.com/p/sf9domahrs/source/list Gluonpilot: http://code.google.com/p/gluonpilot/downloads/list

Let me know if you have any other questions

Tim

27 Jan 2012

Rolando:

A very good observation. I had expected to use a 2 cell but hadn't even considered the problems coming from one cell. I have to admit, I've never even ran the board from li-po's at all...choosing instead to just use a 9V alkaline battery for all of my work to this point.

Good catch, and I'll try to make that a little more clear above.

Thanks

Tim

Please log in to post comments.