An Introduction to Solenoids


A Small 5VDC Solenoid from Sparkfun
Unlike motors, solenoids directly provide linear (and not rotational) movement. Solenoids are found in many devices such as door locks and valves. If you have a car or have a washing machine, they are using solenoids. Note the spring on the sliding cylindrical bar or armature in the image above. The spring holds the bar out to the left, but when the coil is energized the magnetic force pulls it to the right. Whenever the coil is turned off, the spring pulls the bar out to the left again. André-Marie Amphere invented the solenoid in the late 1820s.
Applications of Solenoids
Solenoids are around everywhere in your home and car. Cars use then in starters, fuel injectors, some electric door locks, and shifting gears in automatic transmissions. Most older electric doorbells use a solenoid to strike the metal chime. In the home, solenoid controlled water valves can be found in washing machines, dishwashers, icemakers, central humidifiers, and automatic sprinkler systems for yards. Pinball machines use solenoids for flippers and bumpers.

Fuel injectors in car engines contain a solenoid

A solenoid water valve from Sparkfun
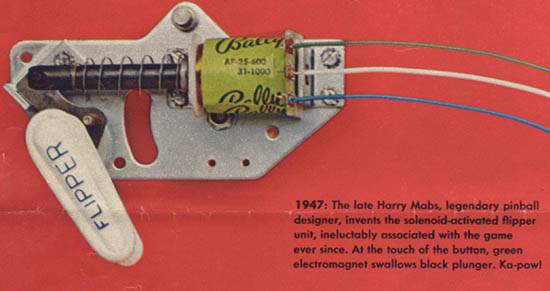
![]()
Solenoids shift gears in a car's automatic transmission

Home Doorbells hit the metal chimes using solenoids

A solenoid door lock from Adafruit

This model train track switch has a twin coil solenoid.

Pinball flipper image from: http://findinglincolnillinois.com/gambling/flippermechanism.jpg
A recent CBS Network news story on the comeback of pinball machines
A Solenoid Hello World
If you want to try using a solenoid with mbed, Sparkfun has a small solenoid that uses 5VDC at 1.1A max. It is somewhat small, most solenoids are larger and need higher voltages and more current. The tricky bits are that it will require a driver circuit (i.e., needs more current than an mbed output pin provides) , an external 5V power supply must be used (i.e., it requires more current than the mbed's power supply provides), and it can only be left on for short periods of time (i.e, it can overheat and burn out).

Sparkfun Power MOSFET driver board
For this example, a small MOSFET driver board was used from Sparkfun. This MOSFET has a maximum rating of 60V 30A, so it can also handle larger solenoids that may need a higher voltage and more current. It also has the internal snubber or suppression diode that should always be used on inductive loads. The board's PCB traces and terminal blocks would likely fail well below 30A. Larger gauge wires may also be needed for higher current solenoids. Breadboard jumper wires are only good for a bit more than one amp, but the MOSFET PCB's terminal blocks allow the use of larger wires on high current devices. For higher voltage or AC solenoids, a relay or solid state relay can be used instead for the driver circuit. Sparkfun also has a 5VDC 2A low cost AC wall adapter power supply that was used for this test. Breadboard jumper wires can be attached to the MOSFET driver board screw terminals and they can also be pushed into the connector on the solenoid, so everything will hookup on a breadboard.
Information
When using multiple DC power supplies, don't forget to connect power supply grounds together, but not the V+ outputs!
Wiring
| mbed | MOSFET PCB | External Device | External 5 V supply |
|---|---|---|---|
| gnd | JP2-2 gnd | gnd | |
| JP2-1 RAW | 5V | ||
| P8 | JP2-3 Control | ||
| JP1-1 | Device(neg) | ||
| JP1-2 | Device(pos) |
Demo Code
A basic code demo using the mbed DigitalOut API and the MOSFET driver circuit is shown below. Time delays are needed to ensure that the solenoid is turned on long enough to close, but this solenoid also needs waits for the time delay to cool down to avoid overheating. The on and off cool down times will vary quite a bit depending on the application and solenoid used.
#include "mbed.h"

DigitalOut myled(LED1);
DigitalOut Ctrl(p8); //Solenoid output control bit

int main() {
    while(1) {
        Ctrl = 1; //ON
        myled = 1;
        wait(0.5);
        Ctrl = 0; //OFF
        myled = 0;
        wait(2);
    }
}
The code is simple enough, but it must always be turned off to avoid overheating. It might make sense in many applications to use a timer to automatically turn it off later in a timer interrupt routine, so that a program can do other things while the solenoid is on. Assuming the RTOS is not used, the TimeOut API can be used. With the RTOS, multiple threads could be used to avoid the issue of blocking while the solenoid is on.
Here is an example with a "Solenoid" class that sets up a timer to automatically turn off the solenoid. The solenoid works exactly the same as the first example, but the program does not need to stop for the solenoid on-time delay and it turns off automatically later with a timer interrupt.
#include "mbed.h"
//Solenoid Hello World
DigitalOut myled(LED1);
//Non blocking with auto off delay using timer interrupt setup by class
class Solenoid
{
public:
    Solenoid (PinName pin, float delay=0.5);
    void write(bool state);
    Solenoid& operator= (bool value);

private:
    void Solenoid_Off_Int();
    DigitalOut _pin;
    Timeout tint;
    float ontime;
};
Solenoid::Solenoid(PinName pin, float delay) : _pin(pin), ontime(delay)
{
    _pin=0;
}
void Solenoid::Solenoid_Off_Int()
{
    _pin=0;//timer interrupt routine to auto turn off solenoid
}
void Solenoid::write(bool value)
{
    _pin = value;
    if (value!=0) //do auto off with timer interrupt
        tint.attach(this,&Solenoid::Solenoid_Off_Int,ontime);//setup a timer interrupt
}
Solenoid& Solenoid::operator= (bool value)
{
    write(value);
    return *this;
}

Solenoid mySolenoid(p8);
int main()
{
    while(1) {
        mySolenoid = 1; //ON with timer auto off
        myled = 1;
        wait(.5); //just for LEDs - solenoid turns off with timer interrupt
        myled = 0;
        wait(2.0);
    }
}
Warning
This solenoid is rated only for intermittent duty. It may overheat and fail, if left on for longer than a few seconds. The data sheet suggests a 25% duty cycle with a max on-time of 1 sec followed by 3 seconds off. Even running the example code (20% duty cycle), it gets a bit hot after several minutes. Only a larger and more expensive continuous duty rated solenoid can be left on, but most are rated for intermittent duty only.
If an external event triggers the solenoid, it might also make sense to ensure in software that it stays off long enough to cool down. For example, consider a system where a user presses a button to activate the solenoid. If the user kept the button pushed down forever or the button fails in a short condition, the solenoid would burn out. A wait or timer could be used to ensure that the solenoid would remain off long enough to avoid overheating. If needed, this feature could also be added to the solenoid class. This can also be handled by a hardware pulse (one shot) circuit. Once a system has a microprocessor, the software solution is likely to be more economical.
Here is the new class setup that enforces a minimum off time delay with a timer and also still turns off automatically using a timer interrupt. Even through the code turns on the solenoid in an infinite loop without any waits as fast as possible, it functions in a identical way to the two earlier examples as far as the solenoid is concerned. It turns on for 0.5 seconds and then off for 2.0 seconds. So it is not possible to overheat it and burn it out.
#include "mbed.h"
//Solenoid Hello World
DigitalOut myled(LED1);
//Non blocking with auto off and min off-time delay using timer interrupt and timer setup by class
class Solenoid
{
public:
    Solenoid (PinName pin, float ondelay=0.5, float offdelay=2.0);
    void write(bool state);
    Solenoid& operator= (bool value);

private:
    void Solenoid_Off_Int();
    DigitalOut _pin;
    Timeout tint;
    Timer offtimer;
    float ontime;
    float offtime;
};
Solenoid::Solenoid(PinName pin, float ondelay, float offdelay) : _pin(pin), ontime(ondelay), offtime(offdelay)
{
    _pin=0;
    offtimer.start();

}
void Solenoid::Solenoid_Off_Int()
{
    _pin=0;//OFF timer interrupt routine to auto turn off solenoid
    offtimer.start(); //start off-time delay count
}
void Solenoid::write(bool value)
{
    if (value!=0) {//ON so do auto off with timer interrupt
        while(offtimer.read() < offtime); //wait for min OFF time before next ON allowed
        offtimer.stop();
        offtimer.reset(); //reset off timer delay count
        tint.attach(this,&Solenoid::Solenoid_Off_Int,ontime);//setup a timer interrupt for on time
    } else
        offtimer.start(); //solenoid turned off with a write call (not timers) so start off count
    _pin = value;
}
Solenoid& Solenoid::operator= (bool value)
{
    write(value);
    return *this;
}

Solenoid mySolenoid(p8); //use default on and off time delays for solenoid

int main()
{
    while(1) {
        mySolenoid = 1; //ON with timer interrupt auto off and the min off time delay is enforced
    } //can't overheat the solenoid!
}
It is probably advisable to back off the maximum rated duty cycle a bit. It is likely that this value assumes the solenoid is mounted on a piece of metal that provides a heatsink effect and is also probably for room temperature conditions with some airflow. Mine seems a bit too hot even at 20% after several minutes of operation on the breadboard. Some newer devices with solid state drivers (i.e., not relays) even use a PWM output control bit to vary the power of the solenoid's stroke.
One could still envision a possible scenario where the processor crashes while the solenoid is on and it somehow disables the timer interrupt and the solenoid burns out (possible, but with extremely low probability of ever occurring over the life of a device). The watch dog timer and/or the brown out detection interrupts could also be used to make such a burnout event so unlikely that numerous other failure modes including hardware failures become more likely to occur first.
A solenoid RTOS timer setup
If an application is using the RTOS, a thread can be used to time the solenoid on/off cycles. Since the solenoid timing is 10-100ms or more, the RTOS scheduler with a thread::wait() can do the timing delays and other threads can all run during the delays. Keep in mind that RAM size limits the total number of threads possible with the RTOS to just a few (each thread needs it's own stack and some other RAM). Here is a simple example with a class that sets up the solenoid thread and delays. Main sets a flag, turnon, that the solenoid thread checks. This could also be done with a signal, but it is a little messy doing it in a class for more than one solenoid since the thread object name must be used to get the signal to the correct thread. Once again, it operates the same as the earlier examples as far as the solenoid is concerned (i.e., 0.5s on and 2.0s off).
#include "mbed.h"
// Need include below to add the RTOS
#include "rtos.h"
//Solenoid Hello World using the RTOS
DigitalOut myled(LED1);
//Non blocking with auto off and min off-time delay using RTOS with a new solenoid thread
class Solenoid
{
public:
    Solenoid (PinName pin, float ondelay=0.5, float offdelay=2.0);
    void write(bool state);
    Solenoid& operator= (bool value);
    void Solenoid_Thread(void const *argument);
private:
    DigitalOut _pin;
    float ontime;
    float offtime;
    volatile bool turnon;
};
//code for thread to handle each solenoid(s) on and off with delays
void Solenoid::Solenoid_Thread(void const *argument)
{
    while(1) {
        while(turnon==0) Thread::yield(); //wait for turn on command from another thread
        turnon = 0; //reset turn on flag
        _pin = 1;//turn on solenoid
        myled = 1;//just to confirm operation - can delete, if needed
        Thread::wait(ontime*1000.0); //on time delay using RTOS
        _pin = 0;//turn off solenoid
        myled = 0;//just to confirm operation - can delete, if needed
        Thread::wait(offtime*1000.0); //off time delay using RTOS
    }
}
Solenoid::Solenoid(PinName pin, float ondelay, float offdelay) : _pin(pin), ontime(ondelay), offtime(offdelay)
{
    _pin=0;
}
void Solenoid::write(bool value)
{
    if (value==0) {
        _pin = value;
        turnon = 1;
    } else turnon = 1;
}
inline Solenoid& Solenoid::operator= (bool value)
{
    write(value);
    return *this;
}

Solenoid mySolenoid(p8); //use default on and off time delays for solenoid

//Some funky wrapper stuff is needed to get a member function pointer for the Thread startup
void inline mySolenoid_Thread_Ptr_Wrapper(void const *argument)
{
    mySolenoid.Solenoid_Thread(argument);
}

int main()
{
    Thread ST(mySolenoid_Thread_Ptr_Wrapper);//starts thread & main keeps running
    while(1) {
        mySolenoid = 1; //ON with timer interrupt auto off and the min off time delay is enforced
        wait(1);
    } //can't overheat the solenoid!
}
Some larger and higher voltage solenoids can be found in stock at Sparkfun, Adafruit, and Digikey. The MOSFET will handle almost all of them, but you are going to need a higher voltage DC power supply.
Other Types of Solenoids
There are a couple of additional types of DC solenoids although they are not as common this basic type with one coil and a spring. The other two types do not use a spring to return to the other position. Although they require a bit more complex driver circuit and two control bits, they offer an advantage in that power is only consumed briefly when changing positions.
A twin coil solenoid has two coils with one wound clockwise and another counter clockwise. A coil must be activated to move it to either end. Often these have three wires with one wire being common on the two coils. This type of solenoid will require two output bits and two driver circuits (one for each coil). It is pulsed briefly on one of the coils to move it one way or the other and when the coil is turned off, it stays in the last position.
Another type of DC solenoid is sometimes called a latching solenoid. It requires the current to be reversed though the coil to move it the other direction. An H-bridge driver is needed for this type of solenoid with two output bits (i.e., forward and reverse) to control it. Sometimes a latching solenoid still has a small return spring and a permanent magnet that holds it at the other end in addition to the single coil.
Interesting Solenoid Videos
A Solenoid Rhythm Section
Eight Solenoids used to power a strange V8 style engine for those that hate normal boring DC motors. Note the relays under the solenoids on the right side and crankshaft contacts on the left.
Another V8, but with state-of-the-art mbed-based electronic ignition. Note the mbed and eight power transistors with LEDs near end of video. It uses a shaft encoder, PWM for solenoid control, and a PID control loop for timing.
Brain control for Solenoid Flippers on a Pinball Machine
A Player Pipe Organ using Solenoid Air Flow Valves
Smart yard sprinkler systems are basically IoT controlled solenoid valves
Many hotel room locks with swipe card keys use a solenoid. A hacker with an Arduino and a cable plug can unlock over 4 million of the older ones. A tragic security design flaw for a lock!
An electronic design error is believed to have overheated an intermittent duty solenoid that blew up one of the world’s first military drones in WWII killing Joseph Kennedy, the older brother of U.S. President John Kennedy. In addition to RF remote control, it also had live video feeds. The drone’s mission was to destroy Hitler’s Supergun bunkers in France that were designed to destroy London.
Please log in to post comments.