SunTracker_BLE
Dependencies: BLE_API X_NUCLEO_6180XA1 X_NUCLEO_IDB0XA1 X_NUCLEO_IHM01A1 X_NUCLEO_IKS01A1 mbed
Fork of SunTracker_BLE by
Overview
The SunTracker is a demo application running on ST Nucleo-F401RE stacking a set of ST X-NUCLEO expansion boards.
Main features provided are:
- A solar panel follows the light source, orienting the panel in order to achieve the best panel efficiency.
- Orientation is controlled thanks to a couple of VL6180X FlightSense light sensors mounted on a X-NUCLEO-6180XA1 expansion board and driven by X-NUCLEO-IHM01A1 controlled stepper motor acting as actuator to orientate the panel.
- The system features a progressive control on the stepper motor in order to modulate the panel rotation speed according to the light angle.
- The application is also able to control the panel productivity reading the panel voltage through an ADC and proving feedback on the local display.
- A manual orientation is possible by using the accelerometer on a X-NUCLEO-IKS01A1 expansion board that, according on board tilt, controls the speed and the rotate direction.
- A remote control is available using a X-NUCLEO-IDB04A1 or a X-NUCLEO-IDB05A1 Bluetooth Low Energy expansion board. Remote control software is here.
![]()
Working Status
- SunTracker has 3 working status visible on FlightSense display and switchable by pressing the User Button:
Status 0 (Idle)
- Motor: Free Turning
- Display: Waiting for User Button
Status 1
- Motor: Driven by Light
- Display: Direction and Light Intensity = Direction and Motor Speed
Status 2
- Motor: Driven by Light
- Display: Solar Panel Efficiency
Status 3
- Motor: Driven by Accelerometer
- Display: Direction and Accelerometer Intensity
Server Startup
- When you plug the power supply, the word ‘PUSH’ is shown on display.
- You can manually rotate the structure to assign the ‘Zero Point’. Then press the User Button to launch the application.
- The display will show this status, which means that the structure is oriented to maximize the efficiency of the solar panel.
- If there is a light displacement, the structure will rotate, left or right, to follow the light source and on display is shown the direction and the speed.
- You can press the User Button to show the panel efficiency with 4 digits that represent the range from 0v (0000) to 3,3v (3300).
- Further pressing the User Button you will manual rotate the panel by tilt the Server or Client accelerometer depending by BLE connection.
Client Startup
- The Client application can remotely control the User Button and the Accelerometer functions.
- Power on the Client AFTER the Server, it will automatically search for the SunTracker and will establish a BLE connection.
- The Green Led on Nucleo Client board will be powered on.
Rotation Features
- It has been implemented a block of rotation to avoid cables twist.
- The blocking point can be set in the firmware by changing a constant.
- You can manually rotate the structure to assign the ‘Zero Point’ before press the User Button to launch the application.
- The system features a progressive control on the stepper motor in order to modulate the rotation speed according to the light or accelerometer angle.
List of Components
SERVER SunTracker_BLE
- Nucleo-F401RE platform using a STM32F401RET6 microcontroller.
- X-NUCLEO-IHM01A1 - Stepper motor driver board based on the EasySPIN L6474.
- X-NUCLEO-6180XA1 - 3-in-1 proximity and ambient light sensor board based on ST FlightSense technology.
- VL6180X-SATEL - Satellite boards compatible with X-NUCLEO-6180XA1 board.
- X-NUCLEO-IKS01A1 - Motion MEMS and environmental sensor board.
- X-NUCLEO-IDB04A1 or X-NUCLEO-IDB05A1 - Bluetooth Low Energy Bluetooth low energy evaluation board.
- Stepper Motor 400’’ (Part Number 5350401) - To orientate the Mechanical Structure.
- Solar Panel 0.446w (Part Number 0194127) - To capture sunlight and generate electrical current.
- Power Supply 12v (Part Number 7262993) - To provide power supply at the Stepper Motor.
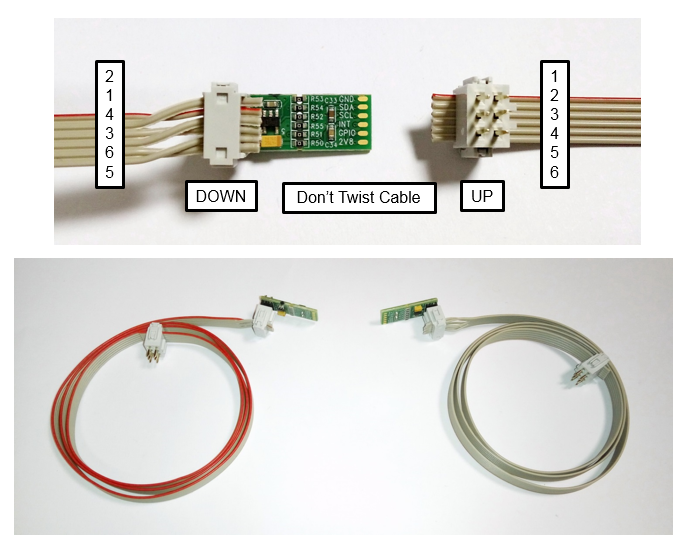
- Flat Cable 6 ways (Part Number 1807010) - To plug VL6180X-SATEL with X-NUCLEO-6180XA1 (60cm length each x2).
- Cable Connector (Part Number 6737694) - To plug the Flat Cable (x4).
- Power Connector (Part Number 0487842) - To provide Power Supply to X-NUCLEO-IHM01A1.
CLIENT SunTracker_BLE_Remote
- Nucleo-F401RE platform using a STM32F401RET6 microcontroller.
- X-NUCLEO-IKS01A1 - Motion MEMS and environmental sensor board.
- X-NUCLEO-IDB04A1 or X-NUCLEO-IDB05A1- Bluetooth Low Energy Bluetooth low energy evaluation board.
MECHANICAL STRUCTURE
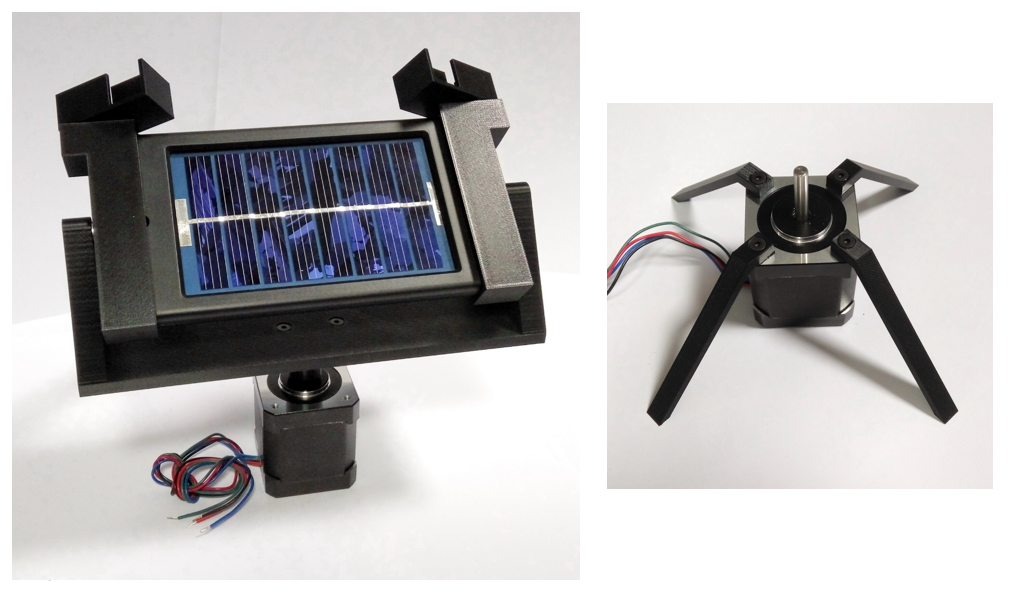
Find here the STL files to print with a 3D printer.


FLAT CABLE ASSEMBLY

HARDWARE SETUP
Nucleo ADC + Solar Panel
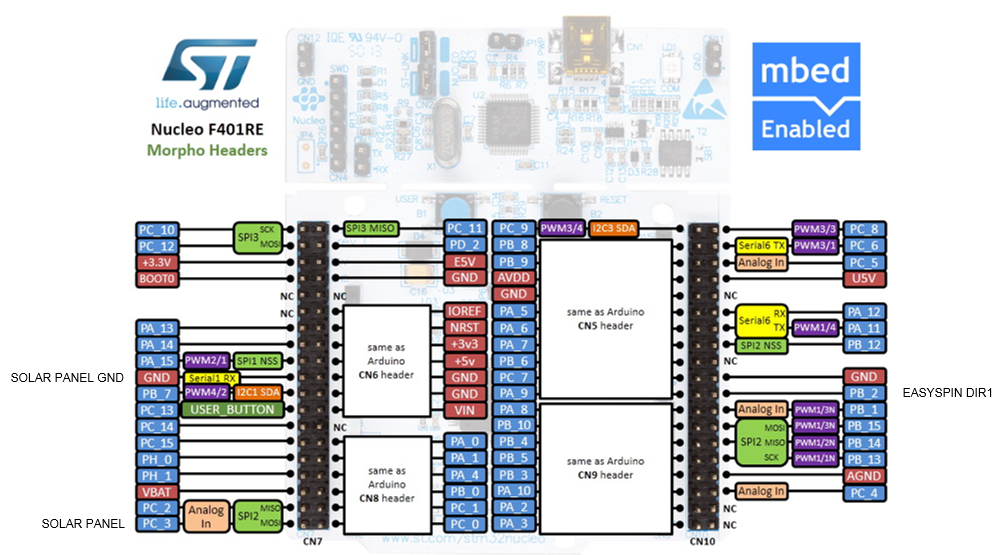
Connect Solar Panel cables to Nucleo Morpho PC_3 (white) and Nucleo Morpho GND (black). Connect a capacitor 10uF between PC_3 and GND to stabilize its voltage value shown on display.
EasySpin (L6474) + BLE
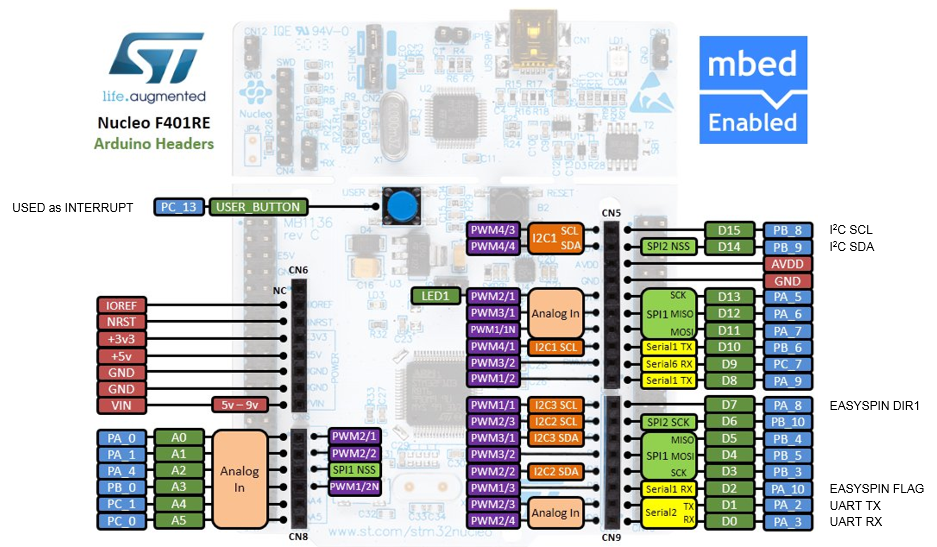
Hardware conflict between EasySpin DIR1 and BLE Reset, both on same Arduino Pin PA_8. Disconnect PA_8 between EasySpin and Nucleo by fold EasySpin Pin. PB_2 has been configured as EasySpin DIR1 in the firmware . Connect Nucleo Morpho PB_2 to FlightSense Arduino PA_8 by a wire.
FlightSense Satellites
In case of instability with I2C due to long flat cables, solder 4 SMD capacitors 47pF on FlightSense board in parallel between R15, R16, R17, R18 and plug 2 capacitors 15pF between FlightSense Arduino PB_8 and PB_9 to GND pin to cut-off noises over 720 KHz.
Arduino & Morpho Pinout


