Web Camera for mbed-os. This sample works on GR-LYCHEE besides GR-PEACH. When you use this program, we judge you have agreed to the following contents. https://developer.mbed.org/teams/Renesas/wiki/About-LICENSE
Dependencies: HttpServer_snapshot_mbed-os
You are viewing an older revision! See the latest version
Homepage
Information
Japanese version is available in lower part of this page.
このページの後半に日本語版が用意されています.
What is this ?
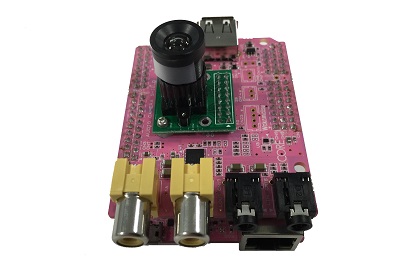
Web Camera sample program using GR-PEACH and Audio/Camera Shield. When you access GR-PEACH from a web browser, a Camera input picture is indicated. When importing this programming, please put a check in "Update all libraries to the latest version".
I consulted this about HTTPServer and RPC./users/yueee_yt/code/HttpServerSample/
Composition
GR-PEACH, Audio/Camera Shield, Camera, PC and ethernet cable.

MT9V111 is being used for a camera by this sample program. When using a camera besides MT9V111, please change the setting according to the used camera.
main.cpp (camera input config 1)
/**** User Selection *********/
#define VIDEO_INPUT_METHOD     (VIDEO_CMOS_CAMERA) /* Select  VIDEO_CVBS or VIDEO_CMOS_CAMERA                       */
#define VIDEO_INPUT_FORMAT     (VIDEO_YCBCR422)    /* Select  VIDEO_YCBCR422 or VIDEO_RGB888 or VIDEO_RGB565        */
#define USE_VIDEO_CH           (0)                 /* Select  0 or 1            If selecting VIDEO_CMOS_CAMERA, should be 0.)               */
#define VIDEO_PAL              (0)                 /* Select  0(NTSC) or 1(PAL) If selecting VIDEO_CVBS, this parameter is not referenced.) */
/*****************************/
main.cpp (camera input config 2)
    /* MT9V111 camera input config */
    ext_in_config.inp_format     = DisplayBase::VIDEO_EXTIN_FORMAT_BT601; /* BT601 8bit YCbCr format */
    ext_in_config.inp_pxd_edge   = DisplayBase::EDGE_RISING;              /* Clock edge select for capturing data          */
    ext_in_config.inp_vs_edge    = DisplayBase::EDGE_RISING;              /* Clock edge select for capturing Vsync signals */
    ext_in_config.inp_hs_edge    = DisplayBase::EDGE_RISING;              /* Clock edge select for capturing Hsync signals */
    ext_in_config.inp_endian_on  = DisplayBase::OFF;                      /* External input bit endian change on/off       */
    ext_in_config.inp_swap_on    = DisplayBase::OFF;                      /* External input B/R signal swap on/off         */
    ext_in_config.inp_vs_inv     = DisplayBase::SIG_POL_NOT_INVERTED;     /* External input DV_VSYNC inversion control     */
    ext_in_config.inp_hs_inv     = DisplayBase::SIG_POL_INVERTED;         /* External input DV_HSYNC inversion control     */
    ext_in_config.inp_f525_625   = DisplayBase::EXTIN_LINE_525;           /* Number of lines for BT.656 external input */
    ext_in_config.inp_h_pos      = DisplayBase::EXTIN_H_POS_CRYCBY;       /* Y/Cb/Y/Cr data string start timing to Hsync reference */
    ext_in_config.cap_vs_pos     = 6;                                     /* Capture start position from Vsync */
    ext_in_config.cap_hs_pos     = 150;                                   /* Capture start position form Hsync */
    ext_in_config.cap_width      = 640;                                   /* Capture width  */
    ext_in_config.cap_height     = 468u;                                  /* Capture height Max 468[line]
                                                                             Due to CMOS(MT9V111) output signal timing and VDC5 specification */
The IP address is acquired from DHCP Server by this sample program. When you'd like to use a static IP address, please change the below.
main.cpp (IP address config)
    printf("EthernetInterface Setting up...\r\n");
//    if (eth.init() != 0) {                             //for DHCP Server
    if (eth.init("192.168.0.2","255.255.255.0","192.168.0.3") != 0) { //for Static IP Address (IPAddress, NetMasks, Gateway)
        printf("EthernetInterface Initialize Error \r\n");
        return -1;
    }
To specify MAC address, add fllowing function to main.cpp.
Specify MAC address
// set mac address
void mbed_mac_address(char *mac) {
    mac[0] = 0x00;
    mac[1] = 0x02;
    mac[2] = 0xF7;
    mac[3] = 0xF0;
    mac[4] = 0x00;
    mac[5] = 0x00;
}
How to use
- Please turn on the power to GR-PEACH and start terminal software.
- Please connect an ethernet cable and press the reset button of GR-PEACH.
- An IP address is output on terminal.
The after explanation assumes an IP address "192.168.0.2".
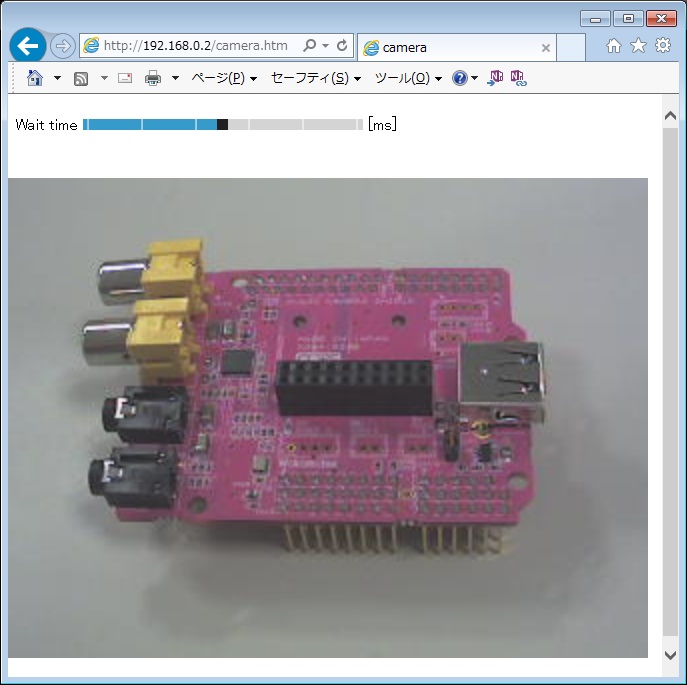
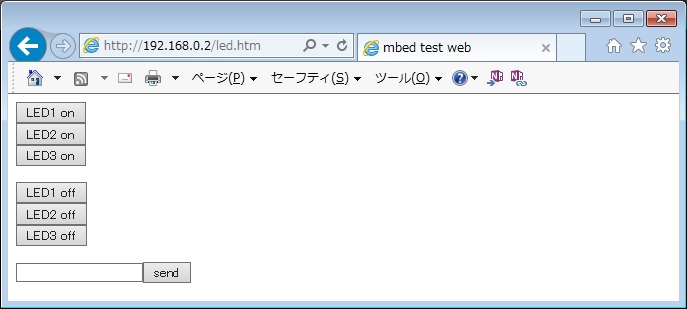
- When "http://192.168.0.2/camera.htm" is opened by a web browser, pictures of a camera are indicated.
It can be changed at a slider bar in "Wait time" at the timing of a renewal of a camera picture. (Defaults are 500ms.) - When "http://192.168.0.2/led.htm" is opened by a web browser, an LED operation screen is indicated.
The Terminal indication when being a reset start.
| ********* PROGRAM START *********** EthernetInterface Setting up... IP Address is 192.168.0.2 NetMask is 255.255.255.0 Gateway Address is 192.168.0.3 Ethernet Setup OK |
”camera.htm” screen

”led.htm” screen

Processing
- At the time of a reset start.
- Data for Web pages written on file_"table.h" is registered with FileSystem. ".htm" files and ".js" files are indicated on "file_table.h "as binary data.
- The merit of the picture is begun from a camera using GR-PEACH_video library.
- To allow LED operation and Terminal output from the Web browser, registration with the mbed-rpc library is done.
- EthernetInterface is started and an IP address is acquired from DHCP Server. (It's possible to set a static IP address.)
The after explanation assumes an IP address "192.168.0.2". - SnapshotHandler (for pictures), FSHandler (for Web page indication) and RPCHandler (for operation) are registered with HTTPServer.
- At the time of "camera.htm" access.
- When "http://192.168.0.2/camera.htm" is opened by a web browser, the function in the JavaScript "http://192.168.0.2/camera.js" is called, and a picture acquisition request to SnapshotHandler occurs periodically.
- When GR-PEACH accepts a picture acquisition order to SnapshotHandler, GR-PEACH change the camera picture acquired from GR-PEACH_video library to JPEG in JPEG Converter in a GraphicsFramework library and reply to a web browser.
The picture size GR-PEACH sends is QVGA (320 x 240). Even biggest VGA (640 x 480) is expanded on the web browser.
- When "http://192.168.0.2/camera.htm" is opened by a web browser, the function in the JavaScript "http://192.168.0.2/camera.js" is called, and a picture acquisition request to SnapshotHandler occurs periodically.
- At the time of "led.htm" access.
- When "http://192.168.0.2/led.htm" is opened by a web browser and a button is operated, the function in the JavaScript "http://192.168.0.2/mbedrpc.js" is called, and an operational request of "http://192.168.0.2/rpc/led1/write 1" etc. occurs to RPCHandler.
- When I accept a picture acquisition order to RPCHandler, GR-PEACH operates an LED using mbed-rpc library.
- When "http://192.168.0.2/led.htm" is opened by a web browser and a button is operated, the function in the JavaScript "http://192.168.0.2/mbedrpc.js" is called, and an operational request of "http://192.168.0.2/rpc/led1/write 1" etc. occurs to RPCHandler.
File in the "file_table.h"
It's modified by making reference to something introduced here about the RPC function ("led.htm" and "mbedrpc.js").
/users/yueee_yt/code/HttpServerSample/
概要
GR-PEACHとAudio/Camera Shieldを使ったWeb Cameraサンプルプログラムです。WebブラウザからGR-PEACHにアクセスするとCamera入力画像が表示されます。Importの際は"Update all libraries to the latest version"にチェックを入れてください。
HTTPServer、および、RPCについて、こちらを参考にさせていただきました。/users/yueee_yt/code/HttpServerSample/
構成
GR-PEACH、Audio/Camera Shield、Camera、PC、イーサーネットケーブル。

サンプルプログラムではCameraにMT9V111を使用しています。MT9V111以外のCameraを使用する際は使用するCameraにあわせて設定を変更して下さい。
main.cpp (camera input config 1)
/**** User Selection *********/
#define VIDEO_INPUT_METHOD     (VIDEO_CMOS_CAMERA) /* Select  VIDEO_CVBS or VIDEO_CMOS_CAMERA                       */
#define VIDEO_INPUT_FORMAT     (VIDEO_YCBCR422)    /* Select  VIDEO_YCBCR422 or VIDEO_RGB888 or VIDEO_RGB565        */
#define USE_VIDEO_CH           (0)                 /* Select  0 or 1            If selecting VIDEO_CMOS_CAMERA, should be 0.)               */
#define VIDEO_PAL              (0)                 /* Select  0(NTSC) or 1(PAL) If selecting VIDEO_CVBS, this parameter is not referenced.) */
/*****************************/
main.cpp (camera input config 2)
    /* MT9V111 camera input config */
    ext_in_config.inp_format     = DisplayBase::VIDEO_EXTIN_FORMAT_BT601; /* BT601 8bit YCbCr format */
    ext_in_config.inp_pxd_edge   = DisplayBase::EDGE_RISING;              /* Clock edge select for capturing data          */
    ext_in_config.inp_vs_edge    = DisplayBase::EDGE_RISING;              /* Clock edge select for capturing Vsync signals */
    ext_in_config.inp_hs_edge    = DisplayBase::EDGE_RISING;              /* Clock edge select for capturing Hsync signals */
    ext_in_config.inp_endian_on  = DisplayBase::OFF;                      /* External input bit endian change on/off       */
    ext_in_config.inp_swap_on    = DisplayBase::OFF;                      /* External input B/R signal swap on/off         */
    ext_in_config.inp_vs_inv     = DisplayBase::SIG_POL_NOT_INVERTED;     /* External input DV_VSYNC inversion control     */
    ext_in_config.inp_hs_inv     = DisplayBase::SIG_POL_INVERTED;         /* External input DV_HSYNC inversion control     */
    ext_in_config.inp_f525_625   = DisplayBase::EXTIN_LINE_525;           /* Number of lines for BT.656 external input */
    ext_in_config.inp_h_pos      = DisplayBase::EXTIN_H_POS_CRYCBY;       /* Y/Cb/Y/Cr data string start timing to Hsync reference */
    ext_in_config.cap_vs_pos     = 6;                                     /* Capture start position from Vsync */
    ext_in_config.cap_hs_pos     = 150;                                   /* Capture start position form Hsync */
    ext_in_config.cap_width      = 640;                                   /* Capture width  */
    ext_in_config.cap_height     = 468u;                                  /* Capture height Max 468[line]
                                                                             Due to CMOS(MT9V111) output signal timing and VDC5 specification */
サンプルプログラムではDHCP ServerからIPアドレスを取得します。固定IPアドレスを使用する場合は以下を変更してください。
main.cpp (IP address config)
    printf("EthernetInterface Setting up...\r\n");
//    if (eth.init() != 0) {                             //for DHCP Server
    if (eth.init("192.168.0.2","255.255.255.0","192.168.0.3") != 0) { //for Static IP Address (IPAddress, NetMasks, Gateway)
        printf("EthernetInterface Initialize Error \r\n");
        return -1;
    }
main.cppの最後にの下記のように関数を追加し、用意したMACアドレスを設定してください。
Specify MAC address
// set mac address
void mbed_mac_address(char *mac) {
    mac[0] = 0x00;
    mac[1] = 0x02;
    mac[2] = 0xF7;
    mac[3] = 0xF0;
    mac[4] = 0x00;
    mac[5] = 0x00;
}
使い方
- GR-PEACHに電源を入れ、Terminalソフトを立ち上げます。
- イーサーネットケーブルを接続し、GR-PEACHをリセットします。
- Terminal上にIPアドレスが出力されます。
以降は取得(設定)したIPアドレスが"192.168.0.2"として説明します。
- PCのWebブラウザで”http://192.168.0.2/camera.htm”を開くと、Camera画像が表示されます。
"Wait time"のスライダーバーでCamera画像の更新タイミングが変更できます。(初期値は500msです) - PCのWebブラウザで”http://192.168.0.2/led.htm”を開くと、LED操作画面が表示されます。
リセットスタート時のTerminal表示
| ********* PROGRAM START *********** EthernetInterface Setting up... IP Address is 192.168.0.2 NetMask is 255.255.255.0 Gateway Address is 192.168.0.3 Ethernet Setup OK |
”camera.htm”画面

”led.htm”画面

処理の流れ
- リセットスタート時
- "file_table.h"に書かれたWeb page用データをFileSystemに登録します。 "file_table.h"には".htm"ファイルと".js"ファイルがバイナリデータとして記載されています。
- GR-PEACH_videoライブラリを用いてCameraからの画像取得を開始します。
- WebブラウザからLED操作とTerminal出力ができるように、mbed-rpcライブラリへの登録を行います。
- EthernetInterfaceを起動し、DHCP ServerからIPアドレスを取得します。(固定アドレスを設定することもできます)
以降は取得(設定)したIPアドレスが"192.168.0.2"として説明します。 - HTTPServerにSnapshotHandler(画像用)、FSHandler(Webページ表示用)、RPCHandler(操作用)を登録します。
- camera.htmアクセス時
- Webブラウザで"http://192.168.0.2/camera.htm"を開くと、JavaScript "http://192.168.0.2/camera.js"内の関数が実行され、定期的にSnapshotHandlerへの画像取得要求が発生します。
- GR-PEACHはSnapshotHandlerへの画像取得要求を受けると、GR-PEACH_videoライブラリから取得したCamera画像をGraphicsFrameworkライブラリのJPEG ConverterにてJPEGに変換し、Webブラウザに応答します。
GR-PEACHが送信する画像サイズはQVGA(320 x 240)です。Webブラウザ上で最大VGA(640 x 480)まで拡大されます。
- Webブラウザで"http://192.168.0.2/camera.htm"を開くと、JavaScript "http://192.168.0.2/camera.js"内の関数が実行され、定期的にSnapshotHandlerへの画像取得要求が発生します。
- led.htmアクセス時
- Webブラウザで"http://192.168.0.2/led.htm"を開き、ボタンを操作すると、JavaScript "http://192.168.0.2/mbedrpc.js"内の関数が実行され、RPCHandlerへ "http://192.168.0.2/rpc/led1/write 1" などの操作要求が発生します。
- GR-PEACHはRPCHandlerへの画像取得要求を受けると、mbed-rpcライブラリを通してLEDなどの操作を行います。
- Webブラウザで"http://192.168.0.2/led.htm"を開き、ボタンを操作すると、JavaScript "http://192.168.0.2/mbedrpc.js"内の関数が実行され、RPCHandlerへ "http://192.168.0.2/rpc/led1/write 1" などの操作要求が発生します。
"file_table.h"内のファイル
RPC機能("led.htm"、"mbedrpc.js")については、こちらで紹介されているものを参考に一部変更しています。
/users/yueee_yt/code/HttpServerSample/