You are viewing an older revision! See the latest version
MQTT Python Broker with Mbed Client
Building an MQTT Python Broker with Mbed Client
This tutorial will guide you through creating an MQTT Python Broker with Mbed Client using the Mbed Connect Cloud board. We first will cover creating the embedded client for the board.
To learn about the specifics of MQTT and how it works, check out this slideshow. The Mbed and Python code in this tutorial is based off of the HelloMQTT example here.
Prerequisites
- An Mbed account - sign up here
- Install the Mbed serial driver (for Windows PCs)
- Python 2.7 - download here
- Pip - installation instructions here
Required Hardware
- Mbed Connect Cloud board
- An active WiFi network
Setup
- Connect the board to your computer via the micro USB port.
- The board mounts as a mass-storage device (like a USB drive). Verify that you can see it (the drive name will be DAPLINK).
- Add the u-blox EVK-ODIN-W2 board to your online Mbed Compiler here
Making the Mbed application
Import the example program. DO NOT CHECK the checkbox next to "Update all libraries to the latest revision".
Import programMQTT-Python-Demo
Demo for Mbed Connect Cloud board and an MQTT Python Broker/Client
Last commit 17 Nov 2017 by  Cambridge Hackathon
Printing to the screen
Open main.cpp
Instantiate a C12832 variable to write to the LCD screen on the board. Under 'GLOBAL VARIABLES HERE' add the following code:
C12832 lcd(PE_14, PE_12, PD_12, PD_11, PE_9);
Create a function to print to the LCD screen. Under 'FUNCTION DEFINITIONS HERE' add the following code:
void lcd_print(const char* message) {
    lcd.cls();
    lcd.locate(0, 3);
    lcd.printf(message);
}
Setting up WiFi
We will add some code to initialize the Mbed Connect Cloud board's WiFi module and connect to your local WPA/WPA2 WiFi network.
Open mbed_app.json
We need to tell Mbed the name of our WiFi network's SSID and password.
Under wifi-ssid change the "value" from SSID to your WiFi's name (for example: "\"iotlab\"") and do not remove the quotes.
Under wifi-password change the "value" from PASSWORD to your WiFi's password (for example: "\"abcd1234\"") and do not remove the quotes.
Open main.cpp
The Mbed Connect Cloud board uses the u-blox EVK-ODIN-W2 WiFi module. So to initialize our WiFi connection we need to instantiate a OdinWifiInterface variable. Under 'GLOBAL VARIABLES HERE' add the following code:
OdinWiFiInterface wifi;
Add some code to tell the WiFi module to connect to your wifi network. We will also print to the LCD the status of the WiFi connection. Under 'MAIN CODE HERE' add the following code:
lcd_print("Connecting...");
int ret = wifi.connect(MBED_CONF_APP_WIFI_SSID, MBED_CONF_APP_WIFI_PASSWORD, NSAPI_SECURITY_WPA_WPA2);
if (ret != 0) {
    lcd_print("Connection error.");
    return -1;
}
lcd_print("Successfully connected!");
The MBED_CONF_APP_WIFI_SSID and MBED_CONF_APP_WIFI_PASSWORD are variables defined by the mbed_app.json file we edited previously. NSAPI_SECURITY_WPA_WPA2 tells Mbed OS that our WiFi network has WPA or WPA2 security (so it requires an SSID and password).
Connecting to the MQTT broker
Now that we have set up the board's WiFi connection, we need to tell the board to connect to the MQTT network. Under 'MAIN CODE HERE' add the following code:
NetworkInterface* net = &wifi;
MQTTNetwork mqttNetwork(net);
MQTT::Client<MQTTNetwork, Countdown> client(mqttNetwork);

const char* host = "IP_ADDRESS_HERE";
const char* topic = "Mbed";
lcd_print("Connecting to MQTT network...");
int rc = mqttNetwork.connect(host, 1883);
if (rc != 0) {
    lcd_print("Connection error.");
    return -1;
}
lcd_print("Successfully connected!");
Next, we need to initialize the connect data and we also need to have the board subscribe to the "Mbed" topic to receive messages published by the Python client. Under 'MAIN CODE HERE' add the following code:
MQTTPacket_connectData data = MQTTPacket_connectData_initializer;
data.MQTTVersion = 3;
data.clientID.cstring = "connect-cloud-board";
// data.username.cstring = "";  // Your mqtt username if required
// data.password.cstring = ""; // Your mqtt password if required
client.connect(data);
client.subscribe(topic, MQTT::QOS2, messageArrived);
When we subscribe to a topic, the client (aka the board) will receive any messages broadcasted to that topic by the broker. We need to add a messageArrived function to take care of processing the received subscribed messages published by the broker. Under 'FUNCTION DEFINITIONS HERE' add the following code:
void messageArrived(MQTT::MessageData& md) {
    MQTT::Message &message = md.message;
    char msg[300];
    sprintf(msg, "Message arrived: QoS%d, retained %d, dup %d, packetID %d\r\n", message.qos, message.retained, message.dup, message.id);
    lcd_print(msg);
    wait_ms(1000);
    char payload[300];
    sprintf(payload, "Payload %.*s\r\n", message.payloadlen, (char*)message.payload);
    lcd_print(payload);
}
This code will print the received message information from the broker, wait one second, then print the message's payload to the board's LCD screen.
Adding a button interrupt
We will now add some code to instantiate an InterruptIn variable so the SW1 button on the board can interrupt the main program. We will also create a bool variable that changes state (true/false) whenever the button is clicked. This button will allow us to tell the board when to publish a message to the Python MQTT broker (which it then distributes to the topic's subscribers).
Open main.cpp
To keep track of when the button is pressed and how many messages are sent by the board, we need two integer variables and a boolean variable. Under 'GLOBAL VARIABLES HERE' add the following code:
InterruptIn button(PF_2);
volatile bool publish = false;
volatile int message_num = 0;
Add a function that will be called when the button interrupts the main function. When the button is clicked, the publish variable will be set to true. Under 'FUNCTION DEFINITIONS HERE' add the following code:
void publish_message() {
    publish = true;
}
Attach the publish_message function to the falling edge of the InterruptIn button. We will also add a while loop so the program will run indefinitely. Under 'MAIN CODE HERE' add the following code:
button.fall(&publish_message);
while (true) {
    // WHILE LOOP CODE HERE

}
We will handle constructing the messages to be published to the MQTT broker inside this while loop. Whenever the button is pressed, the button interrupts the main function and calls publish_message(). Within publish_message() the boolean variable publish is set to true. Then, within the while loop we need to have an if statement that runs whenever the publish variable is true. Under 'WHILE LOOP CODE HERE' add the following code:
if (publish) {
    message_num++;
    MQTT::Message message;
    char buff[100];
    sprintf(buff, "QoS0 Hello, Python! #%d", message_num);
    message.qos = MQTT::QOS2;
    message.retained = false;
    message.dup = false;
    message.payload = (void*) buff;
    message.payloadlen = strlen(buff) + 1;
    rc = client.publish(topic, message);
    client.yield(100);
    publish = false;
}
The code above constructs a message to be published to the broker, which then broadcasts to each of the topic's subscribers. At the end of the if statement the publish variable is set back to false. Next we will create the Python broker which processes these messages and a Python client that subscribes to the board's messages.
Using a hosted MQTT Server
Sign up at CloudMQTT, create a New Instance. In the instance Details page you will find the following fields: Server, Port, User, Password. You will need to fill these detail in your code in the online compiler. Then you don't need to set up your own MQTT Server.
You can interact with the server from your laptop using the python code below:
import paho.mqtt.client as mqtt
# The callback for when the client receives a CONNACK response from the server.
def on_connect(client, userdata, flags, rc):
print("Connected with result code "+str(rc))
# Subscribing in on_connect() means that if we lose the connection and
# reconnect then subscriptions will be renewed.
client.subscribe("Mbed")
client.subscribe("BBED")
# The callback for when a PUBLISH message is received from the server.
def on_message(client, userdata, msg):
print(msg.topic+" "+str(msg.payload))
client = mqtt.Client()
client.on_connect = on_connect
client.on_message = on_message
client.username_pw_set("your-username", "your-password")
client.connect("your-url.cloudmqtt.com", YOUR_PORT_NUMBER_HERE, 60)
# Blocking call that processes network traffic, dispatches callbacks and
# handles reconnecting.
# Other loop*() functions are available that give a threaded interface and a
# manual interface.
client.loop_forever()
<<code>>
== Creating the MQTT Python Server
Now that we have created the Mbed client, next we need to set up a local Python MQTT broker and client. First, you need to have the "paho-mqtt" Python package installed on your computer in order to run an MQTT broker/client locally on your machine. (To learn more about "paho-mqtt" visit their website [[https://www.eclipse.org/paho/clients/python/docs/|here]].)
Install the "paho-mqtt" Python package by running the following command in your terminal: ##pip install paho-mqtt##
Download ##broker.py## from the example repository's "broker" folder [[https://os.mbed.com/teams/Cloud-Hackathon/code/MQTT-Python-Demo/|here]] to your computer.
Open a command-line window on your computer and navigate to the directory you downloaded ##broker.py## into. Run the following command to start the script: ##python broker.py##
You should receive output similar to the following:
<<code>>
$ python broker.py
Your IP address is: 192.168.0.77
Connecting to /Mbed/#
Traceback (most recent call last):
File "broker.py", line 35, in <module>
mqttc.connect(host, port=1883, keepalive=60)
File "/usr/local/lib/python2.7/site-packages/paho/mqtt/client.py", line 767, in connect
self.connect_async(host, port, keepalive, bind_address)
File "/usr/local/lib/python2.7/site-packages/paho/mqtt/client.py", line 822, in connect_async
raise ValueError('Invalid host.')
ValueError: Invalid host.
<</code>>
We receive this error because we did not yet specify our MQTT broker's local host IP address. Copy the IP address printed after "Your IP address is:" in your command-line window.
Open ##broker.py## in a text editor on your computer. Paste your IP address over "IP_ADDRESS_HERE" after ##host = ## on line 10 (under ### Settings for connection##).
Now run the ##python broker.py## command again in your command-line window. You should now be able to successfully start your MQTT broker/client and your output should be similar to the following:
<<code>>
$ python broker.py
Your IP address is: 192.168.0.77
Connecting to 192.168.0.77/Mbed/#
Connected rc: 0
Subscribed OK
<</code>>
Do not exit/close this command-line window or your local MQTT broker/client will be terminated (and your broadcasts will not go through).
Open ##main.cpp##
Now that we have our computer's local IP address, we need to change the host IP address we connect to in ##main.cpp##. Find the ##const char* host## variable in the main function. Copy your IP address from your command-line window and paste it over "IP_ADDRESS_HERE" and keep the quotes. For example, my ##host## variable looks like the following:
<<code>>
const char* host = "192.168.0.77";
<</code>>
Now we can successfully compile and run our Mbed application on the board. Compile and run your program by following the instructions below.
==== Compile and run
# Select the **u-blox EVK-ODIN-W2** target board in the upper right hand corner
# Press "Compile"
# Wait for a binary to be downloaded
# Drag the binary to the DAPLINK disk
# Press the board's reset button
# The WiFi connection and MQTT connection status should now be displaying on the board, once you see "Successfully connected!" you can press the button (SW1) and see the received message and payload from our local MQTT broker/client displayed on the LCD screen.
Based on the code in this example, the Python broker receives the published messages by the board on the topic "Mbed", and the Python client subscribes to this topic and echoes the messages back to the board.
You should see output similar to the following in your command-line window (where you are running your MQTT ##broker.py## script) after pressing the board's button a few times:
<<code>>
$ python broker.py
Your IP address is: 192.168.0.77
Connecting to 192.168.0.77/Mbed/#
Connected rc: 0
Subscribed OK
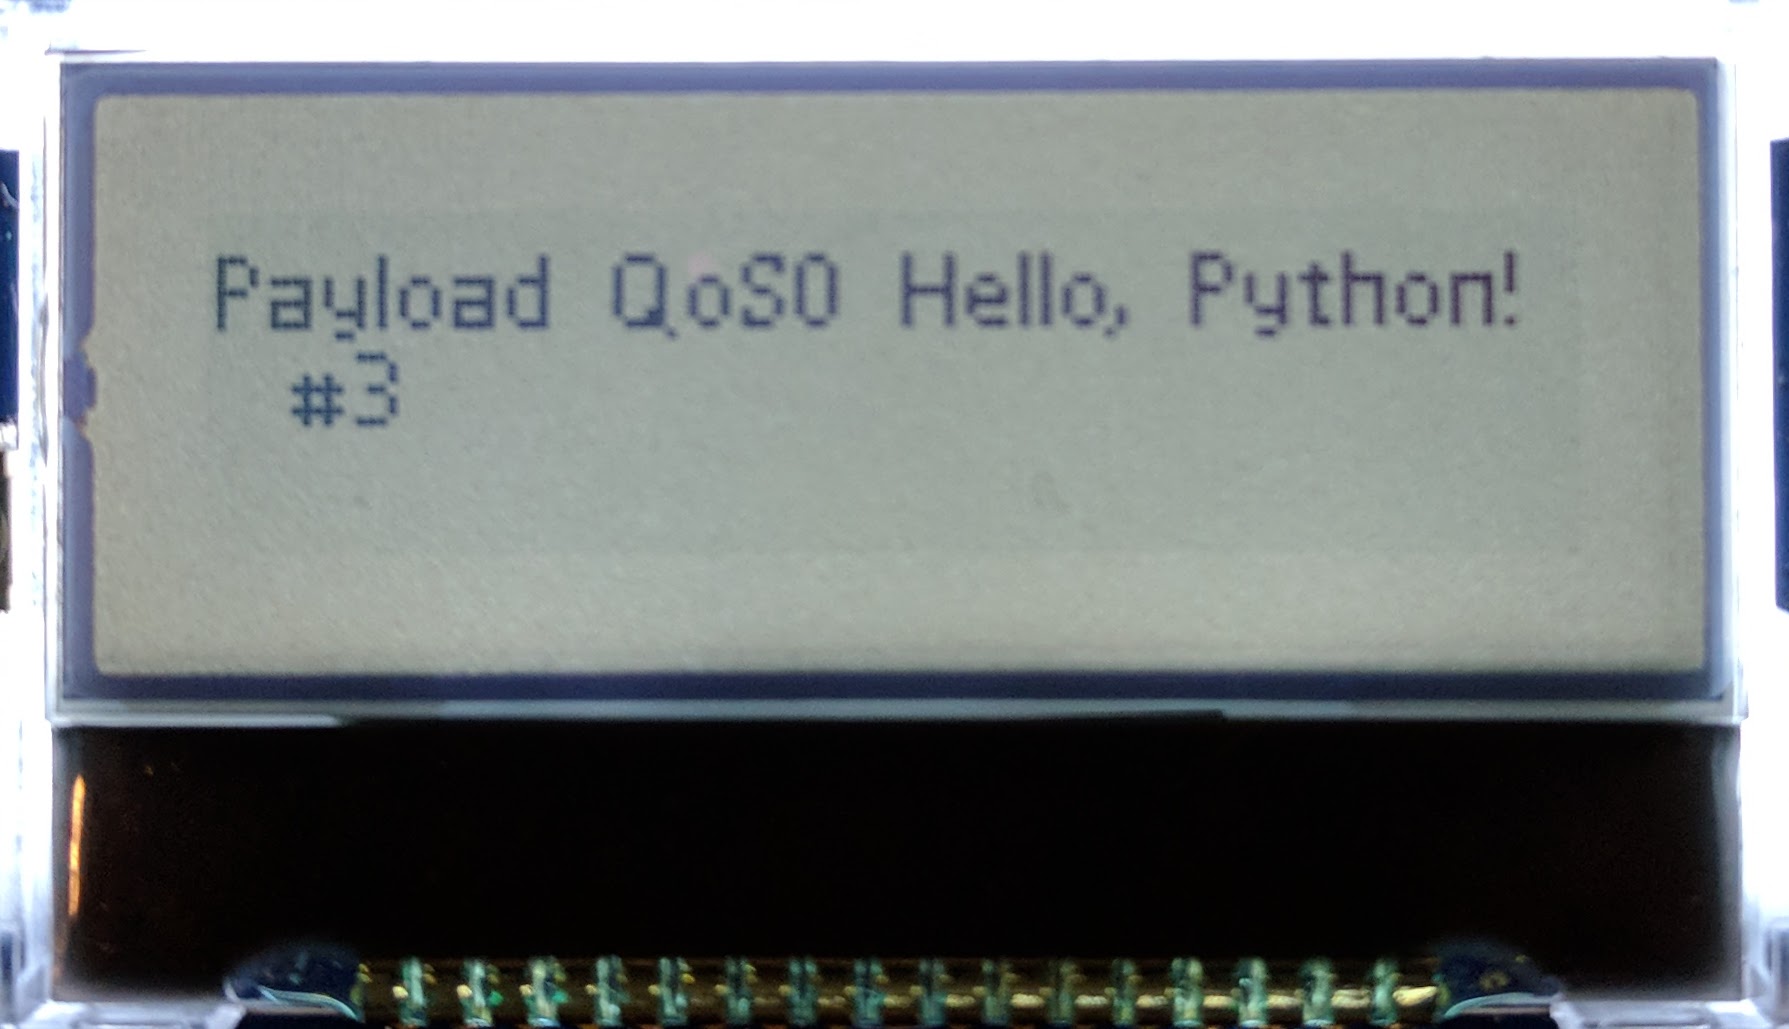
[Received] Topic: Mbed, Message: QoS0 Hello, Python! #1
[Received] Topic: Mbed, Message: QoS0 Hello, Python! #2
[Received] Topic: Mbed, Message: QoS0 Hello, Python! #3
You should also see similar output on the LCD screen regarding the echoed message's payload:
Publishing changes
- Right click the project folder
- Select "Publish"
- Write a commit message in the "Revision Commit" menu
- Press OK
- Select "Fork..." in the "Publish Repository" menu
- Write a Description
- Press OK
You have now successfully created an MQTT Python Broker with Mbed Client!