IFTTT Google Sheets Mbed Application
Building an IFTTT Mbed Application
This tutorial will guide you through creating an IFTTT Mbed application for the Mbed Connect Cloud board.
Prerequisites
- An Mbed account - sign up here
- Install the Mbed serial driver (for Windows PCs)'
- An IFTTT Maker account - sign up here
Required Hardware
- Mbed Connect Cloud board
- An active WiFi network
Setup
- Connect the board to your computer via the micro USB port.
- The board mounts as a mass-storage device (like a USB drive). Verify that you can see it (the drive name will be DAPLINK).
- Add the u-blox EVK-ODIN-W2 board to your online Mbed Compiler here
Making the Mbed application
Import the example program. DO NOT CHECK the checkbox next to "Update all libraries to the latest revision".
Import programIFTTT-Google-Sheets-Demo
Demo for Mbed Connect Cloud board and an IFTTT integration with Google Sheets
Last commit 17 Nov 2017 by  Cambridge Hackathon
Printing to the screen
Open main.cpp
Instantiate a C12832 variable to write to the LCD screen on the board. Under 'GLOBAL VARIABLES HERE' add the following code:
C12832 lcd(PE_14, PE_12, PD_12, PD_11, PE_9);
Create a function to print to the LCD screen. Under 'FUNCTION DEFINITIONS HERE' add the following code:
void lcd_print(const char* message) {
    lcd.cls();
    lcd.locate(0, 3);
    lcd.printf(message);
}
Setting up WiFi
We will add some code to initialize the Mbed Connect Cloud board's WiFi module and connect to your local WPA/WPA2 WiFi network.
Open mbed_app.json
We need to tell Mbed the name of our WiFi network's SSID and password.
Under wifi-ssid change the "value" from SSID to your WiFi's name (for example: "\"iotlab\"") and do not remove the quotes.
Under wifi-password change the "value" from PASSWORD to your WiFi's password (for example: "\"abcd1234\"") and do not remove the quotes.
Open main.cpp
The Mbed Connect Cloud board uses the u-blox EVK-ODIN-W2 WiFi module. So to initialize our WiFi connection we need to instantiate a OdinWifiInterface variable. Under 'GLOBAL VARIABLES HERE' add the following code:
OdinWiFiInterface wifi;
Add some code to tell the WiFi module to connect to your wifi network. We will also print to the LCD the status of the WiFi connection. Under 'MAIN CODE HERE' add the following code:
lcd_print("Connecting...");
int ret = wifi.connect(MBED_CONF_APP_WIFI_SSID, MBED_CONF_APP_WIFI_PASSWORD, NSAPI_SECURITY_WPA_WPA2);
if (ret != 0) {
    lcd_print("Connection error.");
    return -1;
}
lcd_print("Successfully connected!");
The MBED_CONF_APP_WIFI_SSID and MBED_CONF_APP_WIFI_PASSWORD are variables defined by the mbed_app.json file we edited previously. NSAPI_SECURITY_WPA_WPA2 tells Mbed OS that our WiFi network has WPA or WPA2 security (so it requires an SSID and password).
Adding a button interrupt
We will add some code to instantiate an InterruptIn variable so the SW1 button on the board can interrupt the main program. We will also create an int variable to store the number of times the button has been clicked, and a bool variable that changes state (true/false) whenever the button is clicked. We will also print the number of times the button has been clicked to the board's LCD screen.
Open main.cpp
To keep track of the number of times the button has been pressed, we need an integer variable and a boolean variable. Under 'GLOBAL VARIABLES HERE' add the following code:
InterruptIn button(PF_2);
volatile int count = 0;
volatile bool clicked = false;
Add a function that will be called when the button interrupts the main function. When the button is clicked, the clicked variable will be set to true and the count will be incremented by one. The number of clicks will also be printed to the LCD screen. Under 'FUNCTION DEFINITIONS HERE' add the following code:
void button_clicked() {
    clicked = true;
    count += 1;
    char val[32];
    sprintf(val, "# of clicks = %d", count);
    lcd_print(val);
}
Attach the button_clicked function to the rising edge of the InterruptIn button. We will also add a while loop so the program will run indefinitely. Under 'MAIN CODE HERE' add the following code:
button.rise(&button_clicked);
while (true) {
    // WHILE LOOP CODE HERE

}
Compile and run
- Select the u-blox EVK-ODIN-W2 target board in the upper right hand corner
- Press "Compile"
- Wait for a binary to be downloaded
- Drag the binary to the DAPLINK disk
- Press the board's reset button
- The WiFi connection status should now be displaying on the board, once you see "Successfully connected!" you can press the button and see the number of button clicks on the LCD screen.
Creating the IFTTT applet
We will now create an IFTTT Webhooks applet to use with our Mbed application. Navigate to https://platform.ifttt.com/maker/ and login with your IFTTT username and password. Click on the blue "New Applet" button.
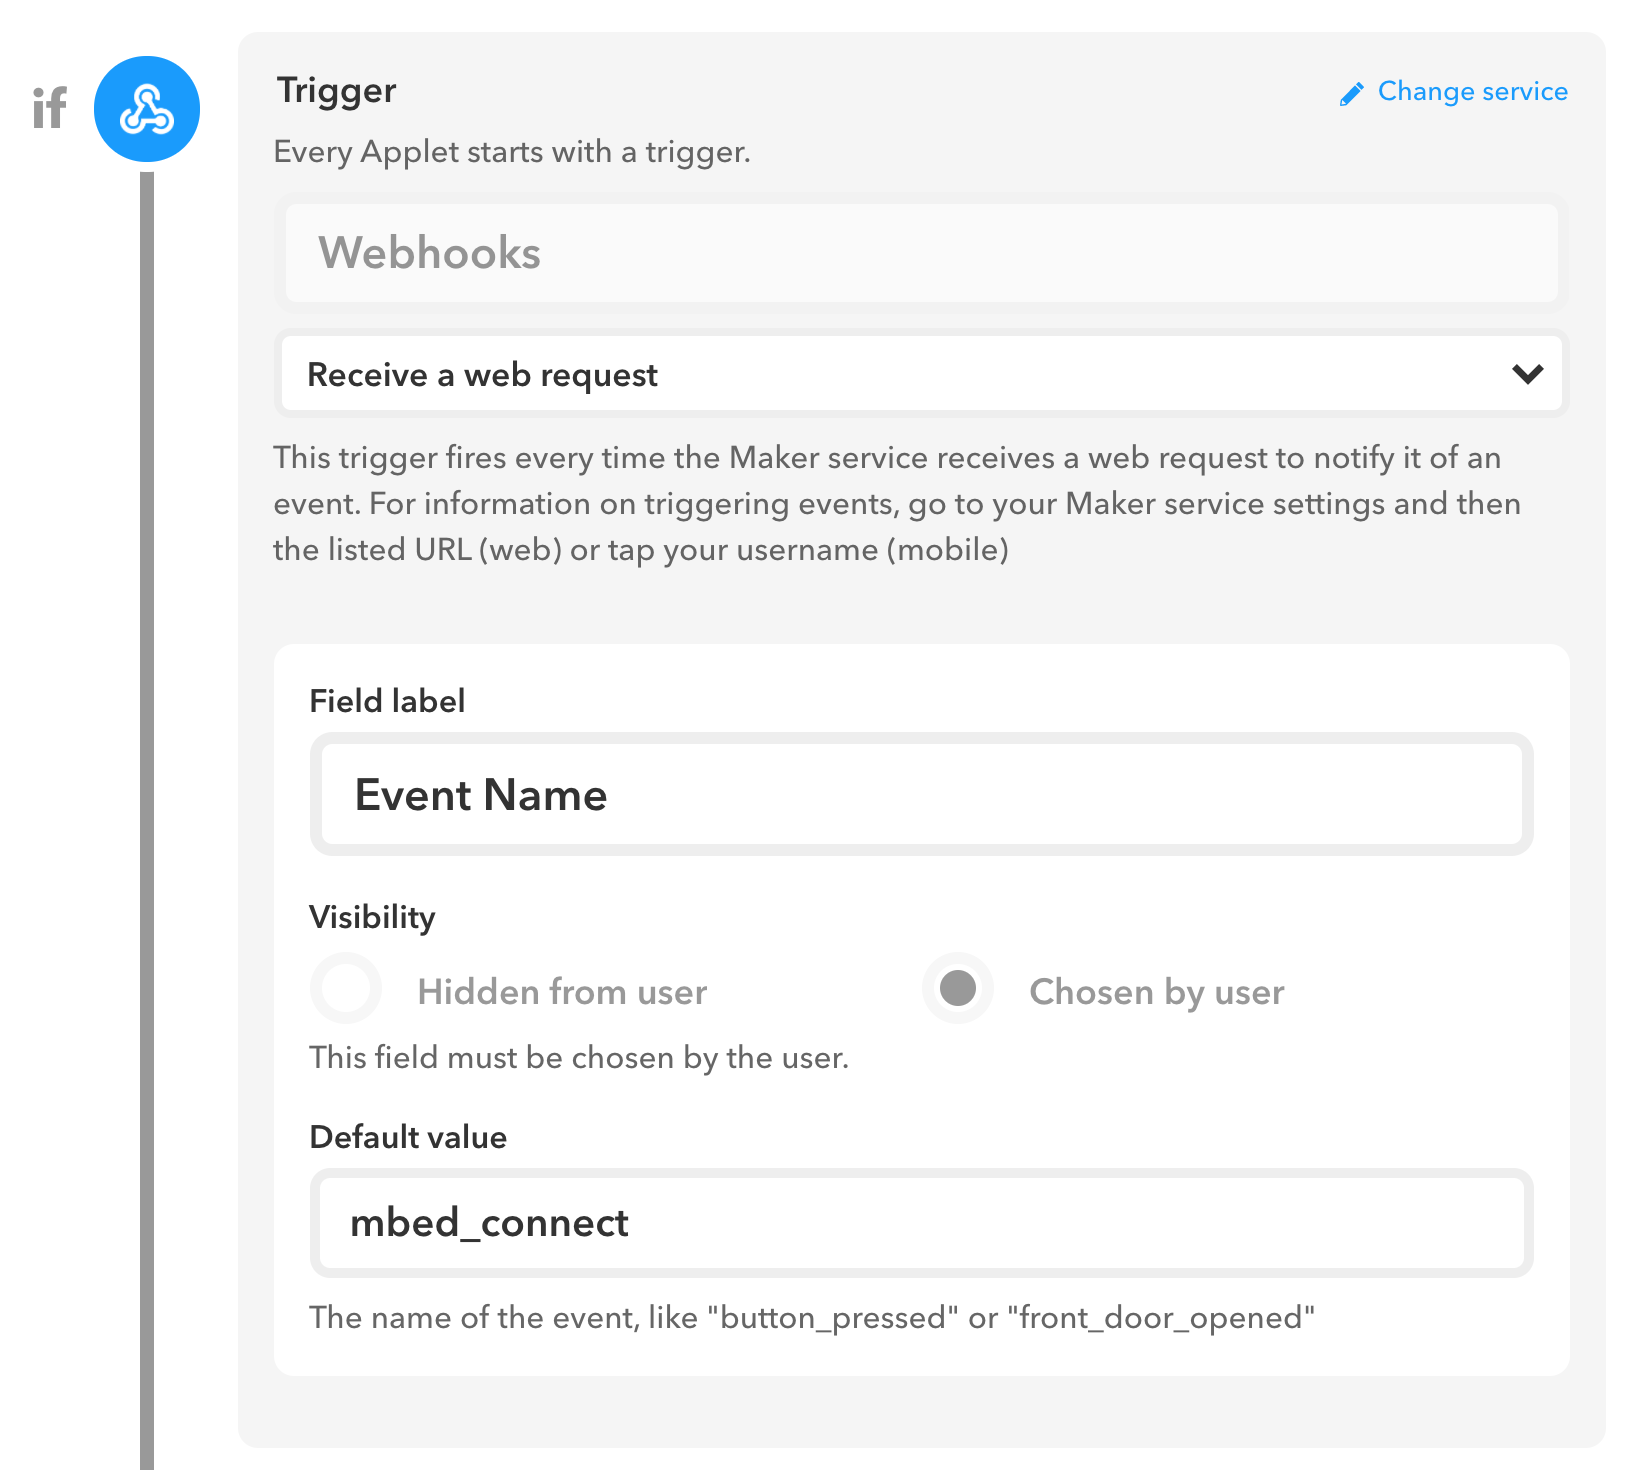
Following the screenshot above for our IFTTT "If" statement - under "Trigger" type in "Webhooks". Select Webhooks, then in the drop-down click on "Receive a web request".
Leave the "Field label" the same and for the "Default value" type in "mbed_connect".
Click on the blue "Add action" button.
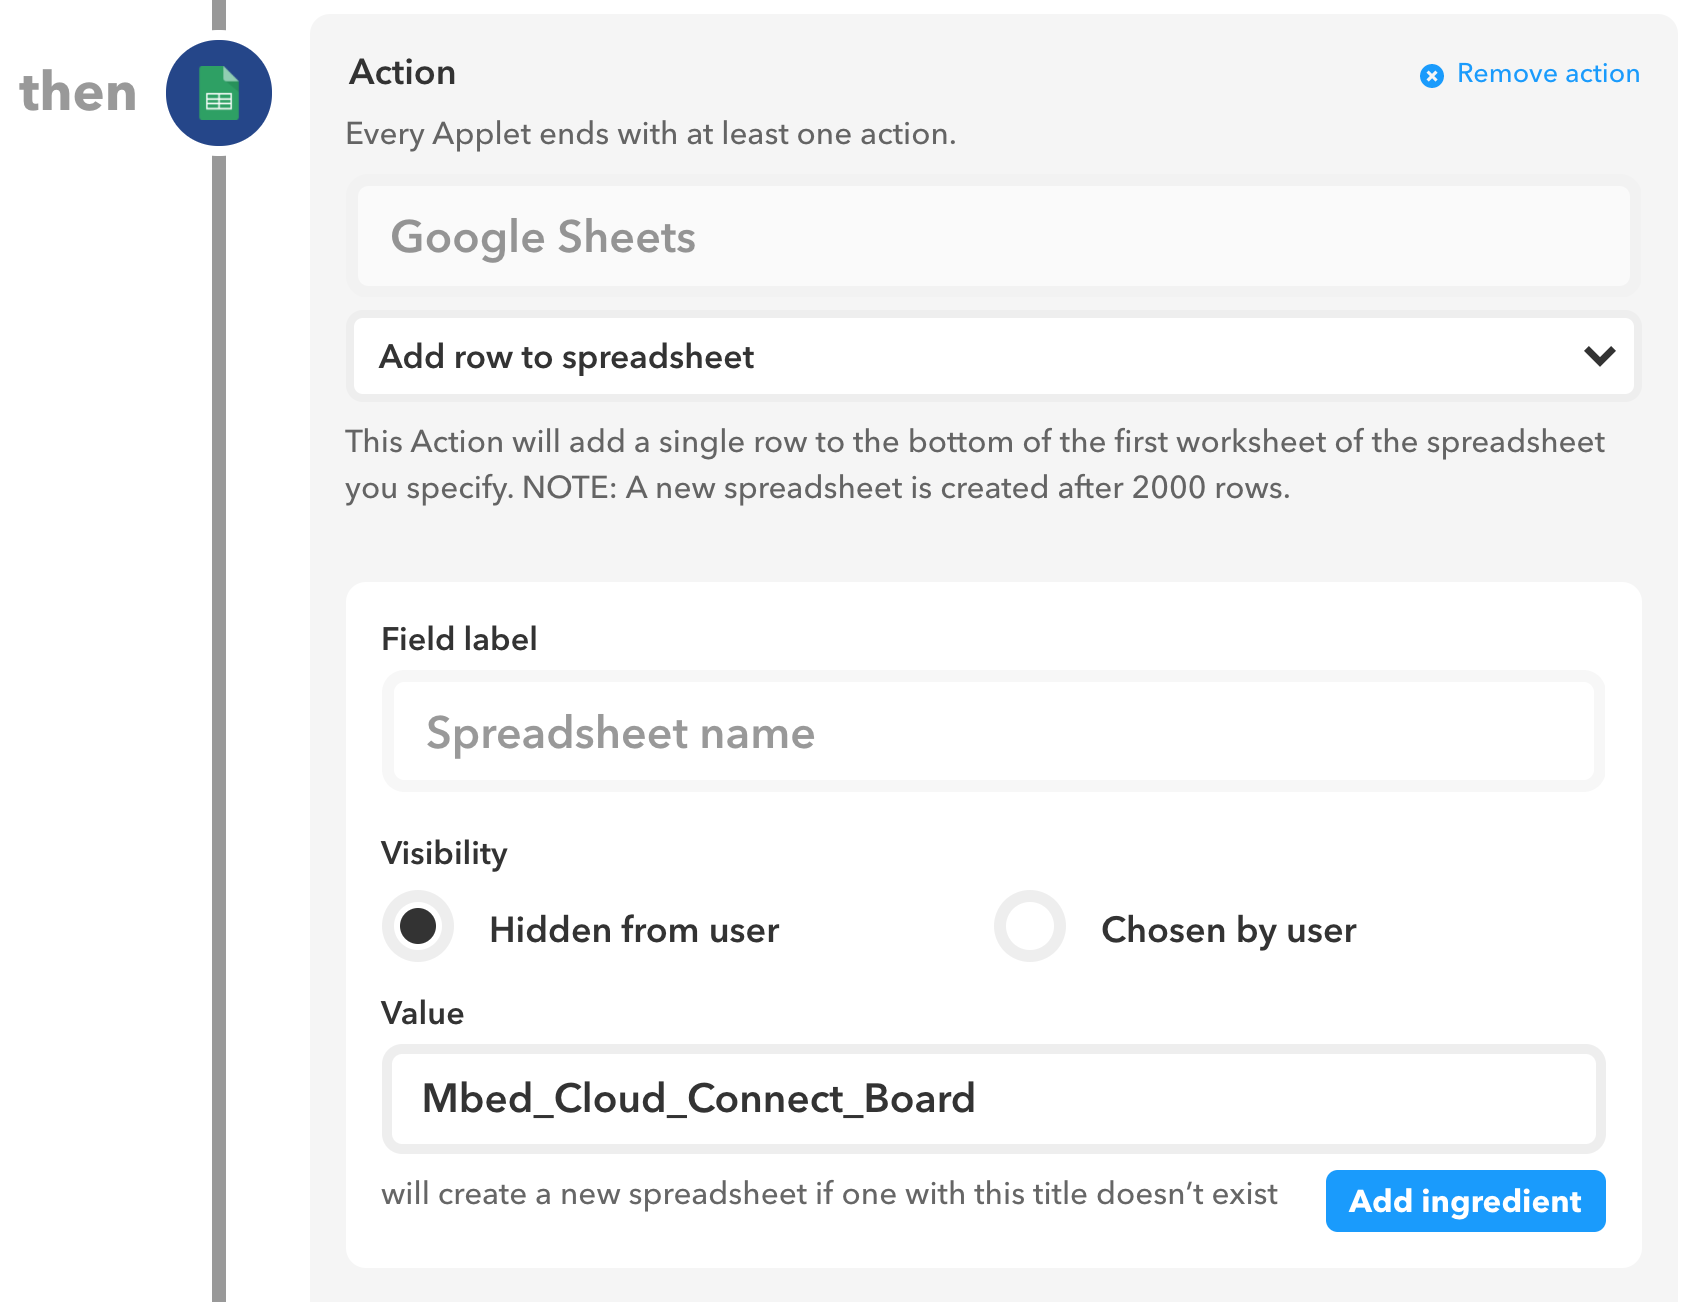
Following the screenshots above for our IFTTT "Then" statement - in the "Action" box search for the "Google Sheets" service. Follow IFTTT's instructions to connect your Google account to your IFTTT account. Select Google Sheets then select "Add row to spreadsheet" from the drop-down box.
For the spreadsheet name, under "Value" type in "Mbed_Cloud_Connect_Board" or your preferred name for your Google Sheets spreadsheet.
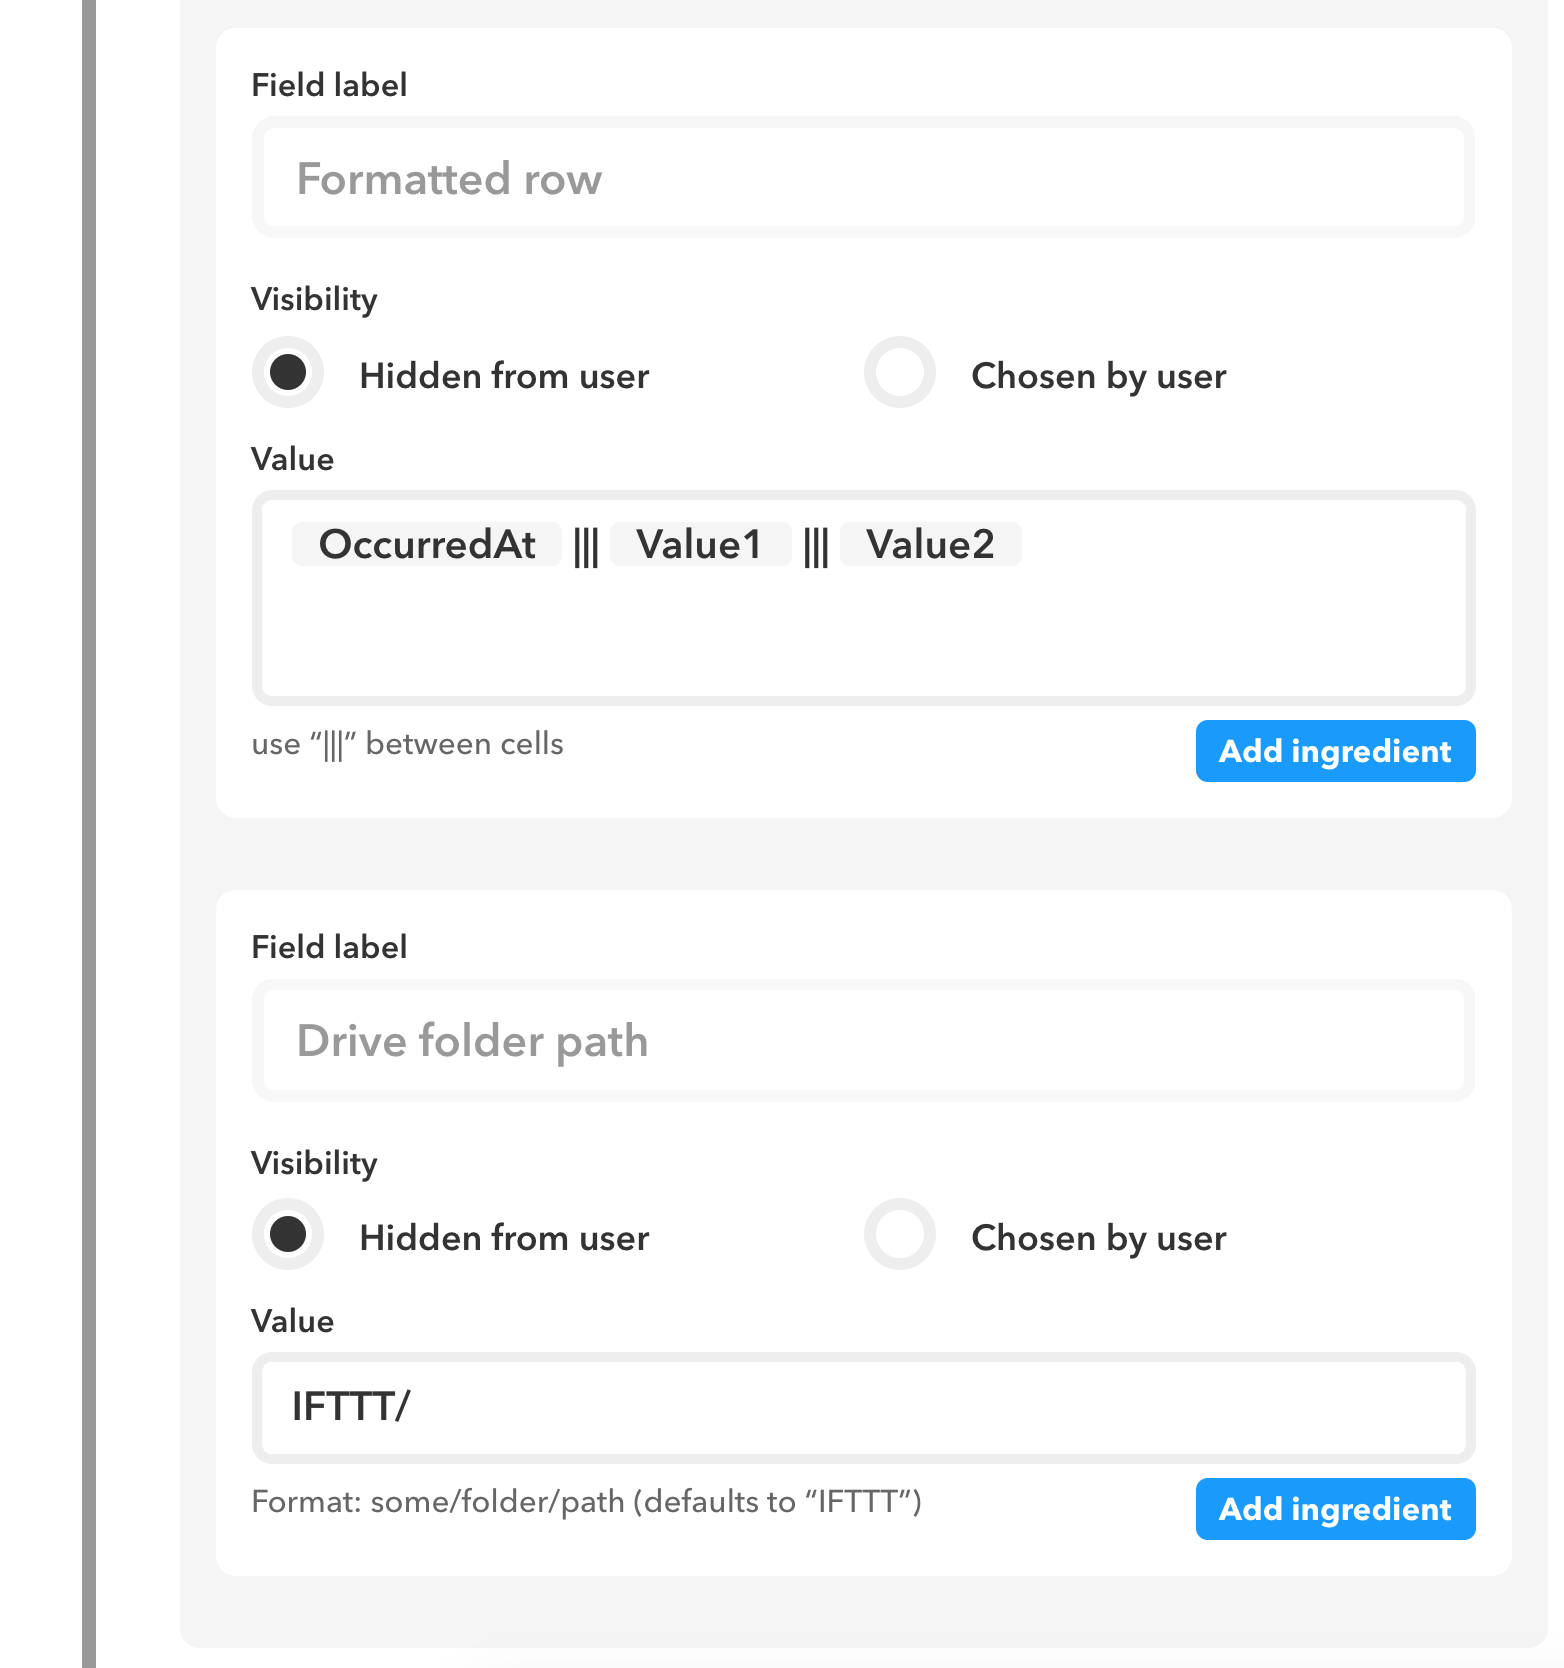
For the "Formatted row" field, under "Value" type in the following:
{{OccurredAt}} ||| {{Value1}} ||| {{Value2}}
For the "Drive folder path" field, under "Value" you can either leave it as the default or shorten it to "IFTTT/" as I did in the screenshots above.
Scroll down to the end of the webpage.
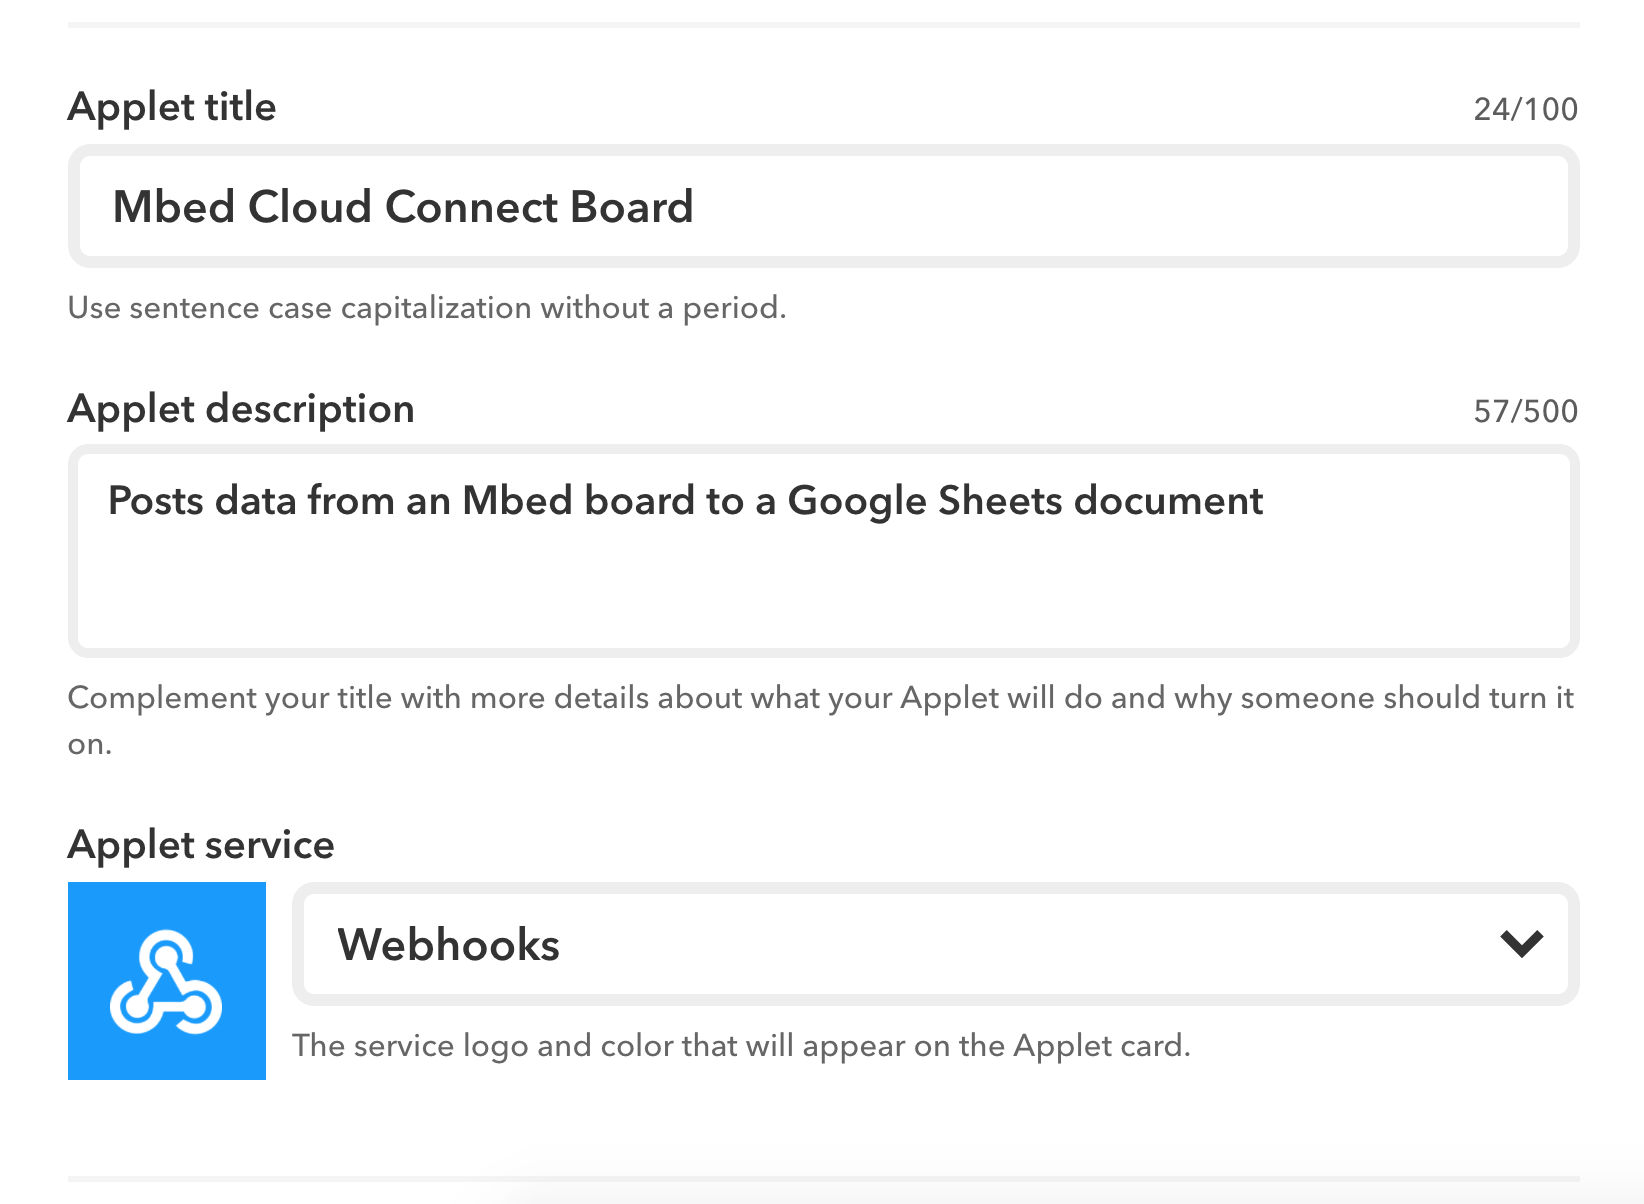
Under "Applet title" type in "Mbed Cloud Connect Board" or whatever name you would prefer your applet to be titled.
Type a description for your applet under "Applet description", I wrote: "Posts data from an Mbed board to a Google Sheets document".
Scroll to the bottom of the webpage and click on the blue "Save" button. We have now created our IFTTT applet. On the next webpage, click on the blue link that says "Enable it on IFTTT". Then click on the "Turn on" button and click "Save". We are now ready to send data from our Mbed board to IFTTT.
HTTP POST to your IFTTT applet
We will now add code to our Mbed application's while loop to create an HTTP POST request and send our button click information to our previously created applet.
Open main.cpp
Whenever the button is clicked, the boolean variable clicked state gets changed from false to true. When clicked is true, we will send an HTTP POST request to our IFTTT applet. Under 'WHILE LOOP CODE HERE' add the following code:
if (clicked) {
    clicked = false;
    char body[140];
    char event_name[] = "Button Clicked";
    NetworkInterface* net = &wifi;
    HttpRequest* request = new HttpRequest(net, HTTP_POST, "http://maker.ifttt.com/trigger/mbed_connect/with/key/SECRET_KEY_HERE");
    request->set_header("Content-Type", "application/json");
    sprintf(body, "{\"value1\":\"%s\", \"value2\":\"%d\"}", event_name, count);
    HttpResponse* response = request->send(body, strlen(body));
    delete request;
}
In order for this code to run with your specific applet, you need to have your personal IFTTT secret key. Go to https://ifttt.com/services/maker_webhooks/settings . At this page, copy the string of letters and numbers following the text "https://maker.ifttt.com/use/" (do not copy the slashes). This is your IFTTT secret key.
Replace the "SECRET_KEY_HERE" string in the URL of the HttpRequest* request variable above with your secret key.
Compile and run
- Select the u-blox EVK-ODIN-W2 target board in the upper right hand corner
- Press "Compile"
- Wait for a binary to be downloaded
- Drag the binary to the DAPLINK disk
- Press the board's reset button
- The WiFi connection status should now be displaying on the board, once you see "Successfully connected!" you can press the button and see the number of button clicks on the LCD screen.
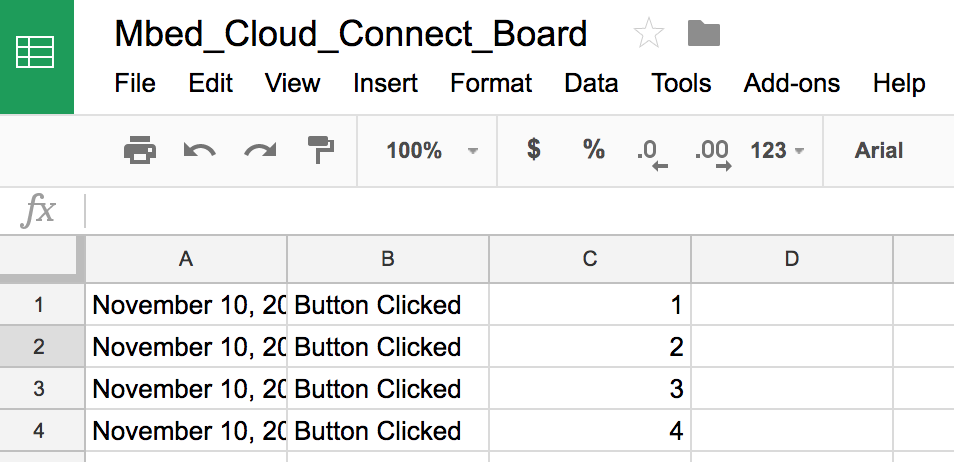
- You should also be able to see the number of button clicks in your Google Sheets document that was created by your IFTTT applet. It should look similar to the screenshot below.
Publishing changes
- Right click the project folder
- Select "Publish"
- Write a commit message in the "Revision Commit" menu
- Press OK
- Select "Fork..." in the "Publish Repository" menu
- Write a Description
- Press OK
You have now successfully created an Mbed application with IFTTT integration!