You are viewing an older revision! See the latest version
Homepage
Development Status
The main design goal of this stack is something that's easy to understand and doesn't require end users to spend too much time in the core Bluetooth 4.0 specs themselves. Some familiarity with BLE is necessary, particularly the way data is structured and transmitted, but ideally you'll be able to cover common use cases with a few lines of code and without too much additional reading.
In order to improve things early in the design and development process we're opening up the initial code to the larger mbed community for review and feedback.
This allows us to know at an early stage if we're moving things in the right direction, but it also means that the code as it exists today is inherently unstable, and there may be major breaking changes to the API moving forward, and inevitably bugs and holes in the overall code.
Status Update: 7 January 2014
- An initial GAP API is available that covers the most common use cases for advertising, along with a simple demo program that simulates an iBeacon node.
- The original GATT classes are being revised and an update to the core GattService and GattCharacteristic classes will be available this week, along with a demo for a few simple services.
Hardware Requirements
In order to use this early release BLE API, you will need the following setup:
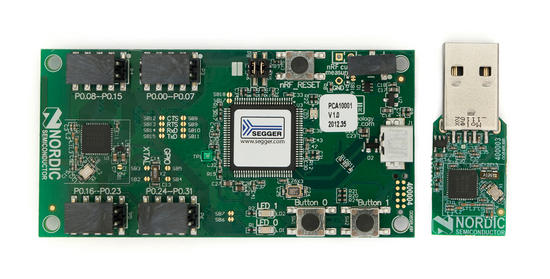
- Nordic's PCA10001 board, available in the nRF51822 Evaluation Kit
- An LPC1768 mbed module
- A means to connect header pins on the nRF51822-EK to the mbed module, such as jumper wires or a breadboard.
Software Requirements
Once you have access to your nRF51822-EK from Nordic, you will need to take the serial number on the evaluation kit, and go to Nordic's website to create a MyPages account: https://www.nordicsemi.com/eng/user/register
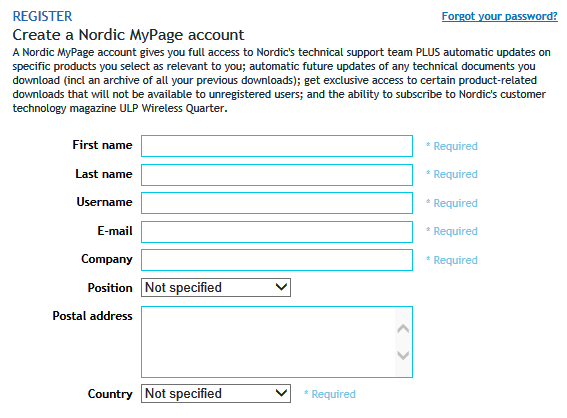
Once you've create your account, you need to login and register your nRF51822-EK Serial Number (printed on the anti-static bag the boards were shipped in).
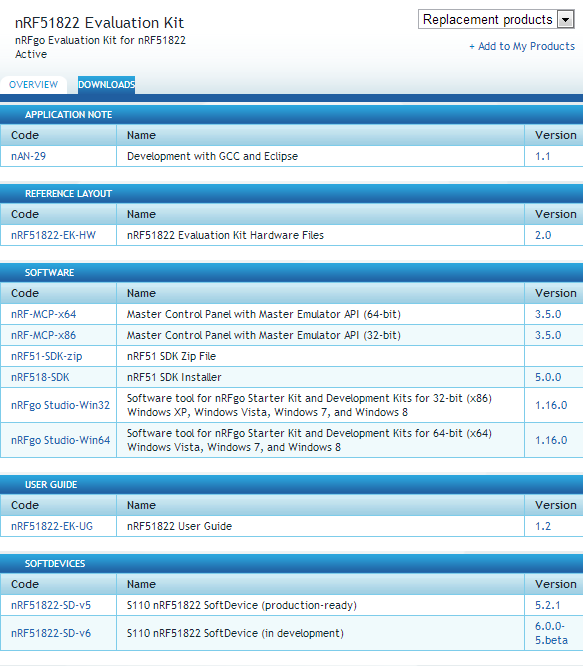
This will add the nRF51822-EK to 'MY PRODUCTS' in your account, and you can select 'Downloads' for the relevant board:

From the downloads list, we will need the following items as a minimum:
- nRF51822-SD-v5 - The low level BLE stack that must be burned onto every nRF51822 chip before we can run any user code
- nRFGo Studio - The utility we use to burn the stack onto the nRF51822 on the PCA10001 board, as well as any custom user code
You may also want to download the following package:
- nRF-MCP-x64 (or x32) - This is a tool that allows you to emulate a Master device use the PCA10000 (USB Stick) board included in your Evaluation Kit, and is useful for debugging
Burning the SoftDevice onto your nRF51822 Evaluation Board
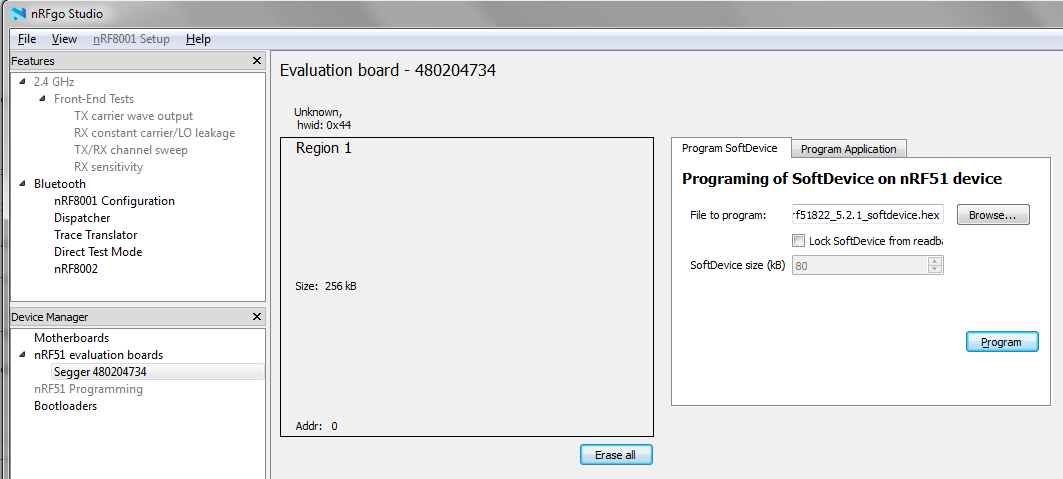
To burn Nordic's SoftDevice onto your chip you will need to install and open the 'nRFGo Studio' tool downloaded above.
Plug in your nRF51822 board (PCA10001), open nRFGo Studio, and click on the 'Segger xxxxxxxx' entry in the left-hand menu.
In the 'Program SoftDevice' tab on the right-hand side, find the 5.2.1 softdevice .hex file you downloaded above (s110_nrf51822_5.2.1_softdevice.hex), and then click the 'Program' button, which will flash the lower part of the chip with this firmware image.
Burning the mbed Serialization Firmware onto your nRF51822 Evaluation Board
Next you need to install the user code onto your chip, which is a custom firmware designed by us to handle the UART data being send from the mbed, and re-transmitting these commands to the lower level BLE stack from Nordic.
Download the latest .hex file here: /media/uploads/ktownsend/mbedser_191213.hex
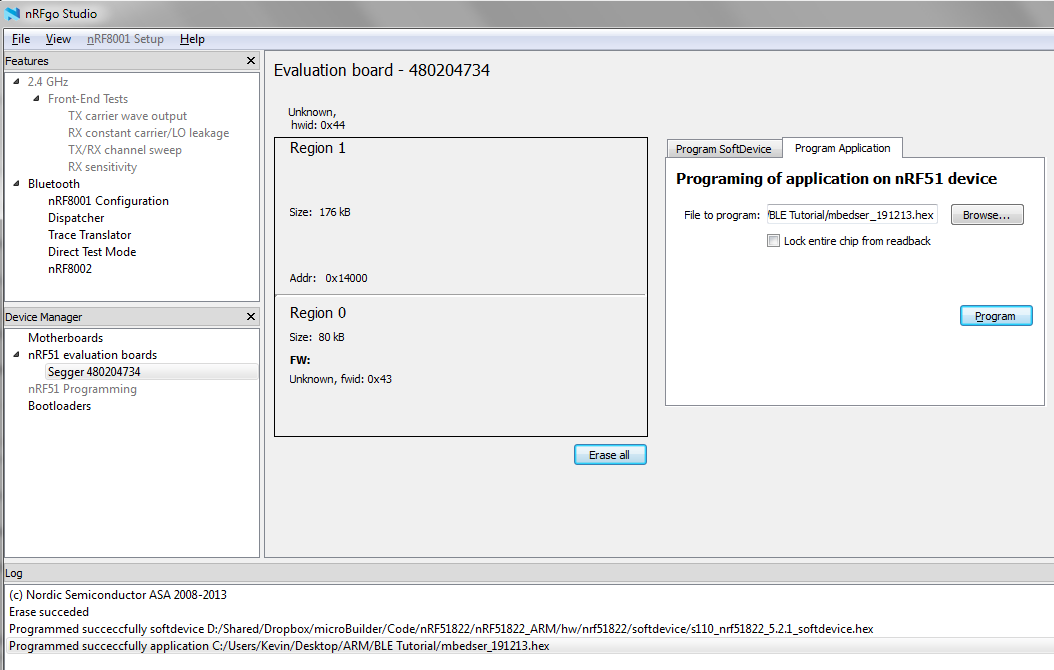
In nRFGo Studio, select the 'Program Application' tab, select the .hex file above (mbedser_191213.hex), and then click the 'Program' button again:
Pin Setup
At this point, our nRF51822 chip is ready to use, and we can connect our mbed to the PCA10001 board.
The current API is based on a two-chip solution where the mbed generates serialized commands and transmits them to the nRF51822 over UART.
The ideal solution is of course fully native code running exclusively on the nRF51822, but using the two-chip 'connectivity' mode at first allows us to make progress on the generic BLE API while the low level development on the nRF51822 continues in parallel.
The following pin setup is required between the nRF51822-EK and the LPC1768 mbed modules:
All pins are shown nRF51822 to LPC1768 mbed module
- 0.22 -> p9 (TXD)
- 0.23 -> p10 (RXD)
- 0.21 -> p30 (RTS)
- 0.20 -> p29 (CTS)
- VCC -> VOUT (3.3V)
- GND -> GND
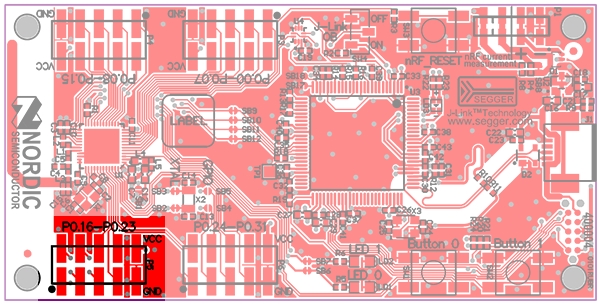
If you look at the following image of the PCA10001 board, pins 0.20..23 can be found in the lower left-hand corner, and you need to connect the 6 pins on the right-hand side of the connector.
At this point, we should be setup to start working with the API on the mbed side.
API Examples
While the entire API is a work in progress, the current API has a reasonably flexible GAP and GATT API. GAP controls advertising and connections, while GATT allows services and characteristics to be defined once a connection is established with another device.
Two basic examples are shown below of how you can make use of the GAP and GATT classes in the real world:
iBeacon/Advertising Example
Apple's iBeacon is an advertising-only solution that makes uses a special field in the main advertising packet called Manufacturer Specific Data. It works by inserting a custom payload in the Manufactuter Specific Data field identifying our primary location (a store, office building, etc.) via a 128-bit UUID, and individual nodes in that location via two 16-bit values. Explaining the iBeacon payload is beyond the scope of this tutorial, but a sample payload is provided below.
To simulate an iBeacon device with the mbed, we simply need to take a GapAdvertisingData instance and insert our custom payload into the MSD field via the generic .addData() function.
We also set the Flags field to BREDR_NOT_SUPPORTED via the dedicated .addFlag() helper function, which tells other listening devices that this node doesn't support older Bluetooth standards and is a BLE only device.
The mandatory GapAdvertisingParams instance is also configured to advertise in ADV_NON_CONNECTABLE_UNDIRECTED mode, which means any device can see the node, but connections can not be established with it (making this a broadcast only device, since no GATT services are present). The default advertising timing values are used, but they can optionally be adjusted in the constructor if you want a slower advertising interval for lower power.
Then we simple need to pass the advertising data and advertising parameters into the radio and start advertising, as follows, and the device should be visible on any supported iOS device using an appropriate application as an iBeacon node (you may need to tweek the payload contents depending on the app you are using):
GAP/iBeacon Example
#include "mbed.h"
#include "uuid.h"
#include "hw/nrf51822.h"

/* Radio HW */
nRF51822 radio;

int main(void)
{
    GapAdvertisingParams advParams ( GapAdvertisingParams::ADV_NON_CONNECTABLE_UNDIRECTED );
    GapAdvertisingData   advData;
    GapAdvertisingData   scanResponse;

    /* Define an iBeacon payload
       --------------------------------------------------------------
       128-Bit UUID = E2 0A 39 F4 73 F5 4B C4 A1 2F 17 D1 AD 07 A9 61
       Major/Minor  = 0000 / 0000
       Tx Power     = C8
    */
    uint8_t iBeaconPayload[25] = { 0x4C, 0x00, 0x02, 0x15, 0xE2, 0x0A, 0x39, 0xF4, 0x73, 0xF5, 0x4B, 0xC4, 0xA1, 0x2F, 0x17, 0xD1, 0xAD, 0x07, 0xA9, 0x61, 0x00, 0x00, 0x00, 0x00, 0xC8 };

    /* iBeacon includes the FLAG and MSD fields */
    advData.addFlags(GapAdvertisingData::BREDR_NOT_SUPPORTED);
    advData.addData(GapAdvertisingData::MANUFACTURER_SPECIFIC_DATA, iBeaconPayload, sizeof(iBeaconPayload));

    radio.reset();
    radio.setAdvertising(advParams, advData, scanResponse);
    radio.start();

    while(1);
}
Battery Level Service Example
This example shows how to create a simple GATT service and update the value of a GATT characteristic in that service. No advertising data is set, meaning that default values will be used, but you can use the example above to also set specific advertising data if desired.
GATT Services are encapsulated in the GattService class, and GATT Characteristics in the GattCharacteristic class.
In the example below, we define the standard Battery Level Service, which has a pre-defined UUID of 0x180F.
We also define a single characteristic for this service, Battery Level which has a UUID of 0x2A19. This field has a min and max length of 1 byte, and we set it to have both the NOTIFY and READ properties.
The GattCharacteristic is added to the GattService, and then the service is passed into the radio. Once the radio is started, we can update the value of the characteristic via the .writeCharacteristic() helper function:
Note: For information on officially adopted Bluetooth Low Energy Services and Characteristics, consult the Bluetooth Definition Browser
Battery Level Service Example
#include "mbed.h"
#include "UUID.h"
#include "hw/nRF51822.h"

/* Radio HW */
nRF51822 radio;

int main(void)
{
    GattService        battService ( 0x180F );
    GattCharacteristic battLevel   ( 0x2A19, 1, 1, BLE_GATT_CHAR_PROPERTIES_NOTIFY | BLE_GATT_CHAR_PROPERTIES_READ);

    /* Make sure we get a clean start */
    radio.reset();

    /* Add the characteristic to our service */
    battService.addCharacteristic(battLevel);

    /* Pass the service into the radio */
    radio.addService(battService);

    /* Configure the radio and start advertising with default values */
    /* Make sure you've added all of your services before calling this function! */
    radio.start();

    /* Now that we're live, update the battery level characteristic */
    uint8_t batt = 72;
    radio.writeCharacteristic(battLevel.handle, (uint8_t*)&batt, sizeof(batt));

    while(1);
}