Hello folks
I am working with USBMidi, and I saw some doubts about that topic. I'm in the beginning of my projects, but I would like to share what worked for me so far, and how I made it.
First, what my prototype does:
- I plug it via USB and Windows XP recognizes it as a MIDI instrument
- I open a drum sampler and I configure it to receive commands from Midi
- I press a tact switch in my breadboard, and mbed sends a note via Midi
- The sampler plays a drum sound
So far, just that, but it was a big step to me.
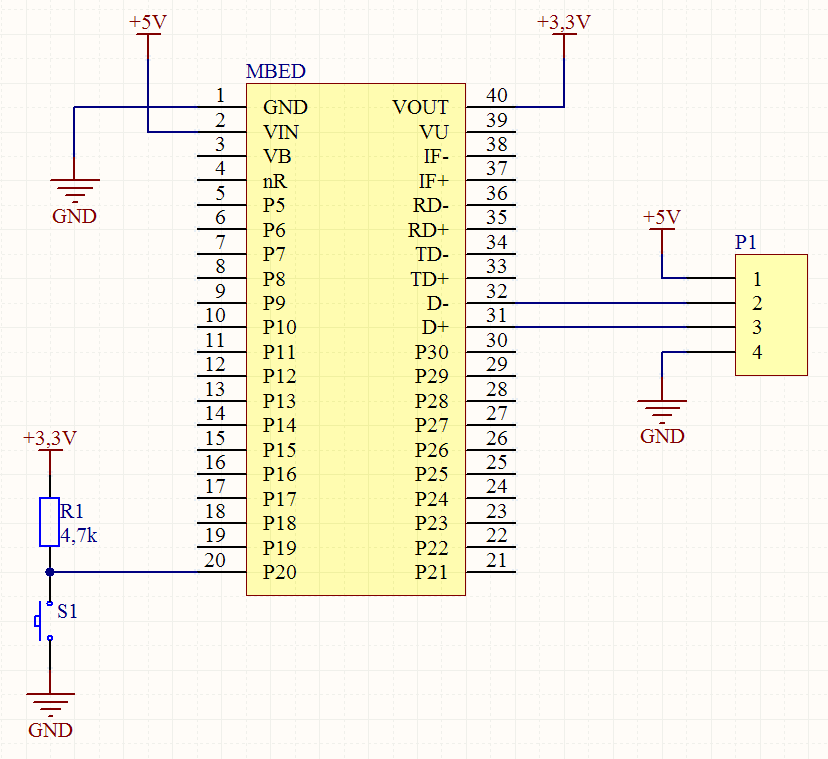
First: the schematic; (I'm a hardware guy, and every conversation must start with a picture, instead of a code...)

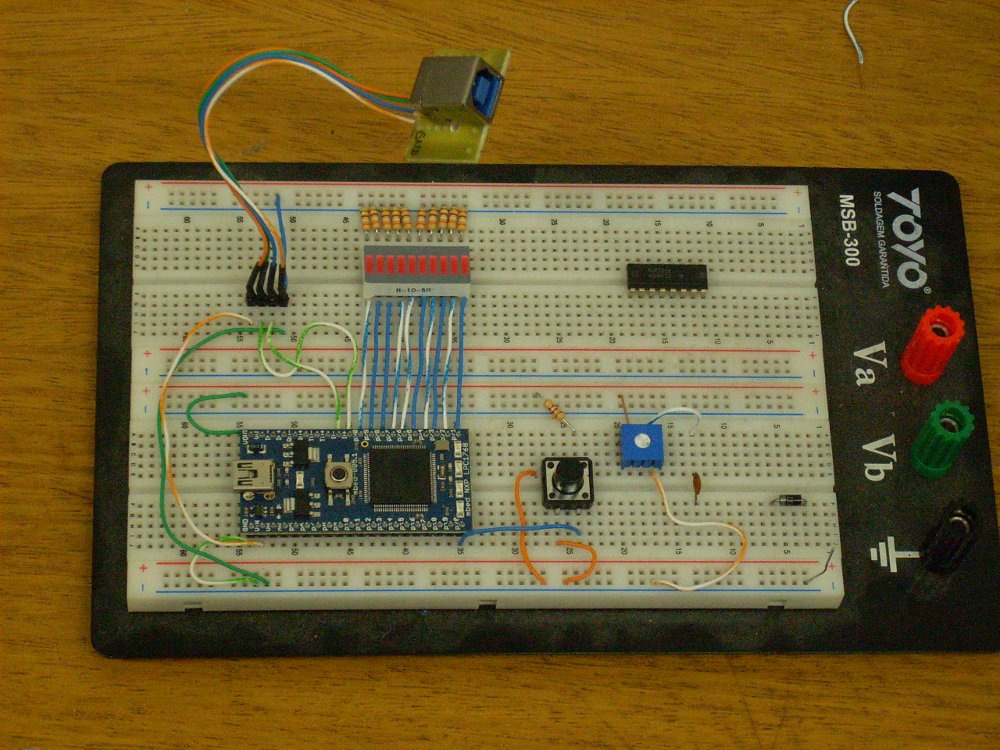
The first thing to note is about the USB connection. The mbed has a USB port, but it is used only for programming. It has nothing in common with the LPC1768 USB port. To use this port, a USB connector must be connected to the D+ and D- pins on the mbed board. To do it, I made an adaptor for a USB type B connector and 4 wires to my breadboard, as seen here:

If you look closely, the USB B connector has 4 wires connecting to the breadboard, the GND of the USB connects to the GND of mbed, D- and D+ connects to D- and D+ of mbed, and the VCC to the mbed VCC. This connection is not really necessary, I made it because I wanna make a MID instrument and I will power the mbed from the USB port. In that case, I need to unplug that USB port from the computer (I will call it usbmidi port hereafter), plug the mini USB to program the mbed, unplug and plug the usbmidi again and test it.
It's pretty easy to find the pinout of the USB connector, like here:
http://pinouts.ru/SerialPortsCables/usb_cable_pinout.shtml
Note that I have a switch in P20 with a 4k7 resistor as a pull up. I use the Vout from mbed to power the pull up resistor, which is a 3,3V output from mbed. When the switch is not pressed, P20 has a high logic level, and by pressing it, it gets a low logic level.
Let´s go to the code (IMHO, the boring part):
#include "mbed.h"
#include "USBMIDI.h"

DigitalIn botao(p20);
DigitalOut led1(LED1);
DigitalOut led2(LED2);


void show_message(MIDIMessage msg) {
     switch (msg.type()) {
         case MIDIMessage::NoteOnType:
             printf("NoteOn key:%d, velocity: %d, channel: %d\n", msg.key(), msg.velocity(), msg.channel());
             break;
         case MIDIMessage::NoteOffType:
             printf("NoteOff key:%d, velocity: %d, channel: %d\n", msg.key(), msg.velocity(), msg.channel());
             break;
         case MIDIMessage::ControlChangeType:
             printf("ControlChange controller: %d, data: %d\n", msg.controller(), msg.value());
             break;
         case MIDIMessage::PitchWheelType:
             printf("PitchWheel channel: %d, pitch: %d\n", msg.channel(), msg.pitch());
             break;
         default:
             printf("Another message\n");
     }
 }


USBMIDI midi;

int main()
{
    led2 = 1;
    midi.attach(show_message);         // call back for messages received
    led1 = 1;

    for(;;)
    {
        while(botao == 1);
        midi.write(MIDIMessage::NoteOn(38));
        wait(.5);
    }
}
Most of the code is copied from the hello world example of the usbmidi library. Thank you so much, Simon Ford, for such a nice library!
The show_message(MIDIMessage msg) is not necessary here because this circuit do nothing with MIDI commands it receives from the PC, but I pasted it anyway... It it's working, keep on working...
The main() does the following: when the board is powered by the usbmidi plug, it lights the first blue led of the board (aka, the led which will make me blind someday). Next it tries to connect with the SO (in my case, Windows XP) via USB. If it's ok, he will light the second led on the board (aka, the led I can't see because the first one made me blind. I really don't like blue leds...). I put this diagnostic leds because I had some trouble making all this to work, and is nice to hear Windows sounding for a new device attached and see the leds on, with my sunglasses.
Then, it stays in a forever loop waiting for the button to be pressed, when it is pressed, it sends a MIDI message to the PC, stays for half a second doing nothing (in order to debounce the switch; it's not the best way to debounce a switch, but for a simple test, maybe people will forgive me) and waits for the switch be pressed again, and so on.
Ok, but I did with the note message I sent to the PC? To test it, I installed a sampler called Battery, from Native Instruments. But it will work with any sampler, instrument, or program that deals with Midi. Here are the steps: after installing Battery, I load a drum kit (usually, I click the "Empty Instrument" drop down, select Acoustic > Basic, and wait till it loads all the samples). If I press in any block with the mouse cursor, it plays the sound of a drum part. If it plays, so far, so good. It's safe to close Battery for a while.
The I plug the usbmidi in the PC. If both leds are on, the PC connected the usbmidi port and I still can see. Then, I open Battery again.
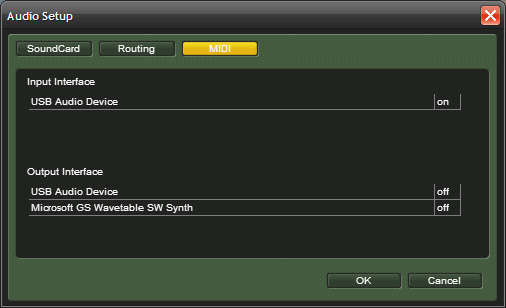
Then I go to File > Audio and Midi Settings. A little window opens, and I click on the MIDI button. Here, below "Input Interface" I can select "USB Audio Interface". I don't know why, but that's the usbmidi interface name from mbed. Click OK. Here is a screenshot:

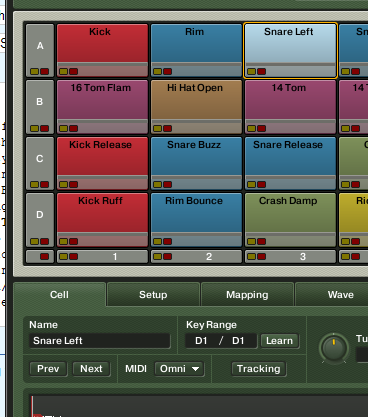
Next, I select any block (in the example below, I selected the Snare Left), click on Cell below, and clicked on the Learn button. When I press the switch two times in the breadboard, it learns the note I am sending (in the case, I send a 38, which means D1), and from now on, everytime I press the button, the PC sounds a snare on the speakers. Tada!!!!

My real objective is to create a complete electronic drum instrument. I'm working right now in the circuit to read a piezo sensor, read his intensity (which is proportional to the hitting force in the pad), and send a note with the velocity of the hit, and the sampler will sound a nice sound of the drum part. In my opinion, that's the funny part of the project. I'm one of those old guys that have fun with analog circuits, instead of fighting with code. My problem is that I have only a oscilloscope with only one channel, analog, completelly disaligned and full of bad contacts, my power supply is not working good, I don't have access to nice components (like rail to rail opamps, the local sellers have at the best TL072 and LM324, it's too expensive to buy such parts from Digikey here from Brazil, by paying shipment, taxes, and taxes over the shipment (yes, we pay taxes over shipment expenses). It's not easy to play with electronic in Brazil. To make the things worst, a rabbit ate the probe cord (don't try to understad how, it was a "gift" from my ex-wife brother while I was married. I send the rabbit back to him, it was only one of the reasons to my divorce), and I'm in college (the good news is that the professors at the college are in a strike, it's not easy to study in a public college in Brazil), but I have a good feeling I will make it work. The next part, is make a full drum set, connect all of the parts to analog muxes, read all of them with mbed A/D converter, learn to play the drums, become the best drummer of the universe, get a rock band, and finally be extremely rich selling trilions of records. I'm not sure if I can reach all of the objectives this year.
After that, I have another project to create a USB Midi controller for DJ, and become the best Dj of the universe, too.
Well, I hope it helps more people to start playing with USB Midi and mbed and create midi instruments.
So far, I would like to know if it is possible to configure in the code the name of the usbmidi interface, to make it easier to find in the setup window. I saw in the usb midi specification and it has a way to do it, but it was impossible to me to understand it. If someone has a tip, please share it.
Best regards
Xtian Xultz
Curitiba - Brazil
 little llumpu.
1 reply
Hello folks
I am working with USBMidi, and I saw some doubts about that topic. I'm in the beginning of my projects, but I would like to share what worked for me so far, and how I made it. First, what my prototype does:
- I plug it via USB and Windows XP recognizes it as a MIDI instrument
- I open a drum sampler and I configure it to receive commands from Midi
- I press a tact switch in my breadboard, and mbed sends a note via Midi
- The sampler plays a drum sound
So far, just that, but it was a big step to me.
First: the schematic; (I'm a hardware guy, and every conversation must start with a picture, instead of a code...)
The first thing to note is about the USB connection. The mbed has a USB port, but it is used only for programming. It has nothing in common with the LPC1768 USB port. To use this port, a USB connector must be connected to the D+ and D- pins on the mbed board. To do it, I made an adaptor for a USB type B connector and 4 wires to my breadboard, as seen here:
If you look closely, the USB B connector has 4 wires connecting to the breadboard, the GND of the USB connects to the GND of mbed, D- and D+ connects to D- and D+ of mbed, and the VCC to the mbed VCC. This connection is not really necessary, I made it because I wanna make a MID instrument and I will power the mbed from the USB port. In that case, I need to unplug that USB port from the computer (I will call it usbmidi port hereafter), plug the mini USB to program the mbed, unplug and plug the usbmidi again and test it. It's pretty easy to find the pinout of the USB connector, like here: http://pinouts.ru/SerialPortsCables/usb_cable_pinout.shtml
Note that I have a switch in P20 with a 4k7 resistor as a pull up. I use the Vout from mbed to power the pull up resistor, which is a 3,3V output from mbed. When the switch is not pressed, P20 has a high logic level, and by pressing it, it gets a low logic level.
Let´s go to the code (IMHO, the boring part):
#include "mbed.h" #include "USBMIDI.h" DigitalIn botao(p20); DigitalOut led1(LED1); DigitalOut led2(LED2); void show_message(MIDIMessage msg) { switch (msg.type()) { case MIDIMessage::NoteOnType: printf("NoteOn key:%d, velocity: %d, channel: %d\n", msg.key(), msg.velocity(), msg.channel()); break; case MIDIMessage::NoteOffType: printf("NoteOff key:%d, velocity: %d, channel: %d\n", msg.key(), msg.velocity(), msg.channel()); break; case MIDIMessage::ControlChangeType: printf("ControlChange controller: %d, data: %d\n", msg.controller(), msg.value()); break; case MIDIMessage::PitchWheelType: printf("PitchWheel channel: %d, pitch: %d\n", msg.channel(), msg.pitch()); break; default: printf("Another message\n"); } } USBMIDI midi; int main() { led2 = 1; midi.attach(show_message); // call back for messages received led1 = 1; for(;;) { while(botao == 1); midi.write(MIDIMessage::NoteOn(38)); wait(.5); } }Most of the code is copied from the hello world example of the usbmidi library. Thank you so much, Simon Ford, for such a nice library! The show_message(MIDIMessage msg) is not necessary here because this circuit do nothing with MIDI commands it receives from the PC, but I pasted it anyway... It it's working, keep on working... The main() does the following: when the board is powered by the usbmidi plug, it lights the first blue led of the board (aka, the led which will make me blind someday). Next it tries to connect with the SO (in my case, Windows XP) via USB. If it's ok, he will light the second led on the board (aka, the led I can't see because the first one made me blind. I really don't like blue leds...). I put this diagnostic leds because I had some trouble making all this to work, and is nice to hear Windows sounding for a new device attached and see the leds on, with my sunglasses. Then, it stays in a forever loop waiting for the button to be pressed, when it is pressed, it sends a MIDI message to the PC, stays for half a second doing nothing (in order to debounce the switch; it's not the best way to debounce a switch, but for a simple test, maybe people will forgive me) and waits for the switch be pressed again, and so on.
Ok, but I did with the note message I sent to the PC? To test it, I installed a sampler called Battery, from Native Instruments. But it will work with any sampler, instrument, or program that deals with Midi. Here are the steps: after installing Battery, I load a drum kit (usually, I click the "Empty Instrument" drop down, select Acoustic > Basic, and wait till it loads all the samples). If I press in any block with the mouse cursor, it plays the sound of a drum part. If it plays, so far, so good. It's safe to close Battery for a while. The I plug the usbmidi in the PC. If both leds are on, the PC connected the usbmidi port and I still can see. Then, I open Battery again. Then I go to File > Audio and Midi Settings. A little window opens, and I click on the MIDI button. Here, below "Input Interface" I can select "USB Audio Interface". I don't know why, but that's the usbmidi interface name from mbed. Click OK. Here is a screenshot:
Next, I select any block (in the example below, I selected the Snare Left), click on Cell below, and clicked on the Learn button. When I press the switch two times in the breadboard, it learns the note I am sending (in the case, I send a 38, which means D1), and from now on, everytime I press the button, the PC sounds a snare on the speakers. Tada!!!!
My real objective is to create a complete electronic drum instrument. I'm working right now in the circuit to read a piezo sensor, read his intensity (which is proportional to the hitting force in the pad), and send a note with the velocity of the hit, and the sampler will sound a nice sound of the drum part. In my opinion, that's the funny part of the project. I'm one of those old guys that have fun with analog circuits, instead of fighting with code. My problem is that I have only a oscilloscope with only one channel, analog, completelly disaligned and full of bad contacts, my power supply is not working good, I don't have access to nice components (like rail to rail opamps, the local sellers have at the best TL072 and LM324, it's too expensive to buy such parts from Digikey here from Brazil, by paying shipment, taxes, and taxes over the shipment (yes, we pay taxes over shipment expenses). It's not easy to play with electronic in Brazil. To make the things worst, a rabbit ate the probe cord (don't try to understad how, it was a "gift" from my ex-wife brother while I was married. I send the rabbit back to him, it was only one of the reasons to my divorce), and I'm in college (the good news is that the professors at the college are in a strike, it's not easy to study in a public college in Brazil), but I have a good feeling I will make it work. The next part, is make a full drum set, connect all of the parts to analog muxes, read all of them with mbed A/D converter, learn to play the drums, become the best drummer of the universe, get a rock band, and finally be extremely rich selling trilions of records. I'm not sure if I can reach all of the objectives this year. After that, I have another project to create a USB Midi controller for DJ, and become the best Dj of the universe, too.
Well, I hope it helps more people to start playing with USB Midi and mbed and create midi instruments.
So far, I would like to know if it is possible to configure in the code the name of the usbmidi interface, to make it easier to find in the setup window. I saw in the usb midi specification and it has a way to do it, but it was impossible to me to understand it. If someone has a tip, please share it.
Best regards
Xtian Xultz
Curitiba - Brazil