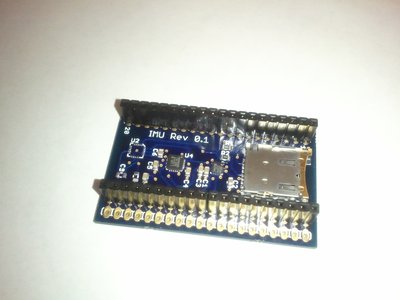
IMU Daughterboard
I've designed and built a small IMU add-on for the mbed. It adds a triple axis gryo (ITG3200), triple axis accel (ST LIS331DLH), a microSD card slot, triple axis magnetometer, a li-po power jack on the back side (probably requires a minimum of 2 cell battery), and pin headers that let it snap right onto an mBed.
So far I've gotten raw counts out of the gyro (thanks to Aaron's library here: http://mbed.org/cookbook/ITG-3200-Gyroscope ), and raw counts from the Accel. I'll publish my accel lib shortly. All it can do is just the accels, and I'd like to add some additional commands to better setup the chip. (But if anyone wants it as it is now, let me know and I'll publish it now)
11/16/10 - Got IMUfilter up and running. Linked the mbed/imu to matlab over the serial port and got three orthogonal rods to sort of track the mbed's position.
Video here:/media/uploads/atommota/video90.mpg
1/11/11 - - Got SDCard interface working. Many thanks to Klaus Bu's SDHC MicroSD card library. It worked great on my 16GB card. You can get it here: http://mbed.org/users/xxll/programs/SDHCFileSystem/5zdtq - Populated the magnetometer, and it also works correctly. I recorded two data sets from RC helicopters. They are available for download /media/uploads/atommota/mikeb_-_flight_1.txt and /media/uploads/atommota/johans_-_flight_1.txt here if anyone would like to play with some 9axis inertial sensor data. The data is formatted as follows: Time (sec), Accel (raw counts - divide by 4096 to get Gs) X, Y, Z, Gyro (rad/sec) X, Y, Z, Mag (raw counts) X, Y, Z
Here is a Matlab script to import, convert accels to G's and plot. /media/uploads/atommota/postprocessimu.m
ToDo:
- DONE (1/11/11): Get SDcard interface working. Only have a 16gb card to test with now, and its proving difficult.
- DONE (1/11/11): Order and populate the magnetometer. UPDATE: Ordered. Will be here and populated by Thursday.
- Swap out the current IMUFilter http://mbed.org/users/aberk/libraries/IMUfilter/lebv20 and build up a Kalman filter implementation
- Here are PDFs of the designs:
Schematic: /media/uploads/atommota/imu_board_-_v1_schematic.pdf
PDB: /media/uploads/atommota/imu_board_-_v1_pcb.pdf
ZIP of Eagle PCB/SCH Files: /media/uploads/atommota/mbed_imu_daughterboard_files.zip
Additionally, I'll probably be putting in another order for the pcb's so if anyone wants to build their own copy, let me know and I can get some extras for whoever is interested.

Quick Start Guide and Basic Documentation
Since a few people have built their own or purchased completed copies of this board it was time to put together a brief documentation and reference area for it.
Pin Outs
p9 = Accel, Gyro, Magnetometer - i2c Data Line
p10 = Accel, Gyro, Magnetometer - i2c Clock Line
p28 = Accel INT Line
p29 = Accel INT Line
p30 = Gyro INT Line
All of the INT lines (digital I/O, i2c, serial, and CAN) may be used for other purposes by default. They need to be explicitly enabled inside the sensors via i2c commands if you would like to make use of the sensor's interrupt functionality.
p5 = microSD Card - SPI MOSI
p6 = microSD Card - SPI MISO
p7 = microSD Card - SPI Clock
p8 = microSD Card - Card Select
GND and VIN are connected to the two pads on the backside for soldering a lipo battery socket on. I've never actually used these, choosing to just solder a 9V battery clip to the outside row of holes for power
I2C 7-Bit Device Addresses
LIS331(DLH/HH) - 0x19 (DLH is the standard option, HH is the high g version for rockets)
ITG3200 - 0x68
HMC5843 - 0x1E
Acceptance Test Program
This will demo the basic functionality
http://mbed.org/users/atommota/programs/AcceptanceTest/ln0maj
Many thanks to Scott O. for catching some of my errors and general feedback on my board. Check out his project over here: http://mbed.org/users/scotto/notebook/scottrov1/
7 comments on IMU Daughterboard:
Please log in to post comments.

Hey Tim,
Nice project. How does what you are doing compare with using a separate IMU board such as one of the sparkfun Razors? I have been mucking around with one of these for a while now and I'm just interested as to why you chose this route instead. At a guess I would have thought this would be a cheaper solution than buying an off the shelf IMU and as such is enough to spark my further interest. I'll be interested to follow your progress on this one mate. Keep up the good work!
Sam