Pushbuttons and Switches
Here are some ways to correctly use pushbuttons with mbed and several demos. It sounds simple, but there are several problems you can encounter and fortunately there are already solutions to them in the cookbook.
Pushbutton and Switch Pullups
A low cost SPST (Single Pole Single Throw) NO (normally open) switch or pushbutton with two pins is typically used for digital inputs. An external pullup resistor is typically used to pull the input high, and when the switch is closed it pulls the input to ground as seen in the schematic below. Vcc in the schematic is the higher voltage on the logic supply (i.e., not Vin or Vu on mbed, it would be 3.3V(Vout) on mbed). Wikipedia has more information on the use of pullup and pulldown resistors.
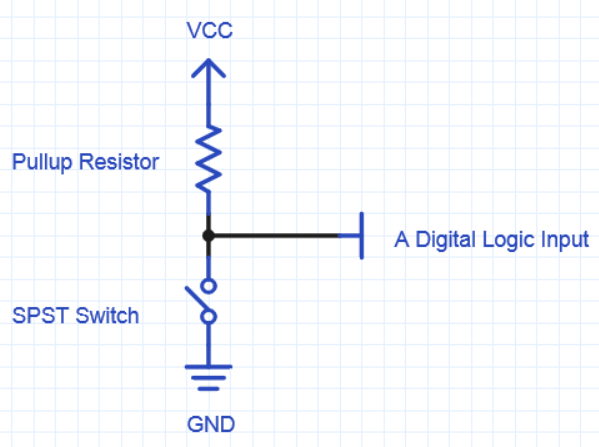
A Typical Digital Logic Input Switch Circuit
When the switch is open the voltage of the gate input is pulled up to the level of Vcc. When the switch is closed, the input voltage at the gate goes to ground. For mbed, Vcc would be 3.3 volts and pullups are typically in the range of 1K-10K ohms for TTL and even larger for CMOS logic. There is a way on mbed to eliminate the need to add the external resistor that will be explained after examining the options for pushbuttons and switches on breadboards.
Pushbuttons and Switches for Breadboards
Small low cost pushbuttons are available which can plug directly into a breadboard. Most are designed to mount in a PCB, so some will work better than others as far as the pins having the correct .1 inch spacing, fitting correctly, and holding firm into a breadboard. Sparkfun's small pushbuttons require that you straighten out the pins and rotate them ninety degrees and then the pins tend to be a bit short on some breadboards. Sparkfun also has a large 12mm pushbutton that fits on a breadboard. Here are a couple of other small pushbuttons that work well in most breadboards.
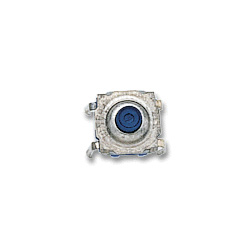
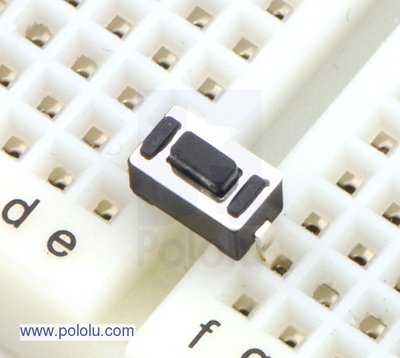
Parallax Pushbutton Pololu Pushbutton
The Parallax pushbutton has four pins and holds well in a breadboard. This style of pushbutton is called a "tactile switch". The one in the photo is made by C&K components. There are two pairs of connected pins. It is similar to the reset pushbutton on the mbed. It fits in the chip area of the breadboard. The larger flat surface of each pin is vertical in the breadboard image below (just like a DIP IC). If it is mounted rotated by ninety degrees, the connected pairs of pins will short out on the breadboard. Note the wiring in the photo below, the top pair of pins connects to the bottom pair when the pushbutton is hit.
Note that the red ground jumper wire is actually connected the top left pin on the mbed module in the photo. The module’s pin labels all stick up a bit higher than the breadboard and with the resulting parallax distortion it is very easy to be off by one pin when hooking up jumper wires. Look straight down on the module from the top or double check pins on by looking at the side to avoid this common wiring error.
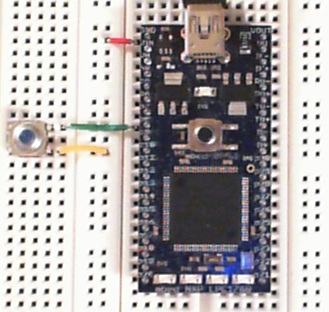
Using the Parallax pushbutton with mbed
The Pololu pushbuttons require a bit less area on the breadboard. They mount a bit differently and work best when one pin is in a power bus connector and the other pin in the chip area of a breadboard. G. M. E. Van Bekkum suggested the setup as seen in the image below that eliminates the need for any jumper wires (assuming a power bus is already hooked up) and uses very little breadboard area.
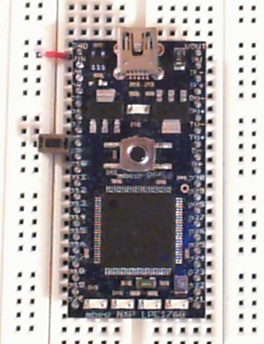
Using the small Pololu pushbutton with mbed without jumper wires.
A similar idea can also be used to connect DIP switches with five or less switches (assuming the power bus pins lineup with several mbed Px pins) as seen in the image below. Digikey has DIP switches with 1-25 switches. Keep in mind that all of these small pushbuttons and switches can only handle low voltages (<12V?) and low current (<50MA?). They work reliably for logic signals, but should not be used to switch higher voltage or current devices. Many DIP switches have short tiny pins that may not work well on some breadboards. There are some that work better than others and the best option may be one of the styles that has pins just like most DIP ICs like the one seen below.
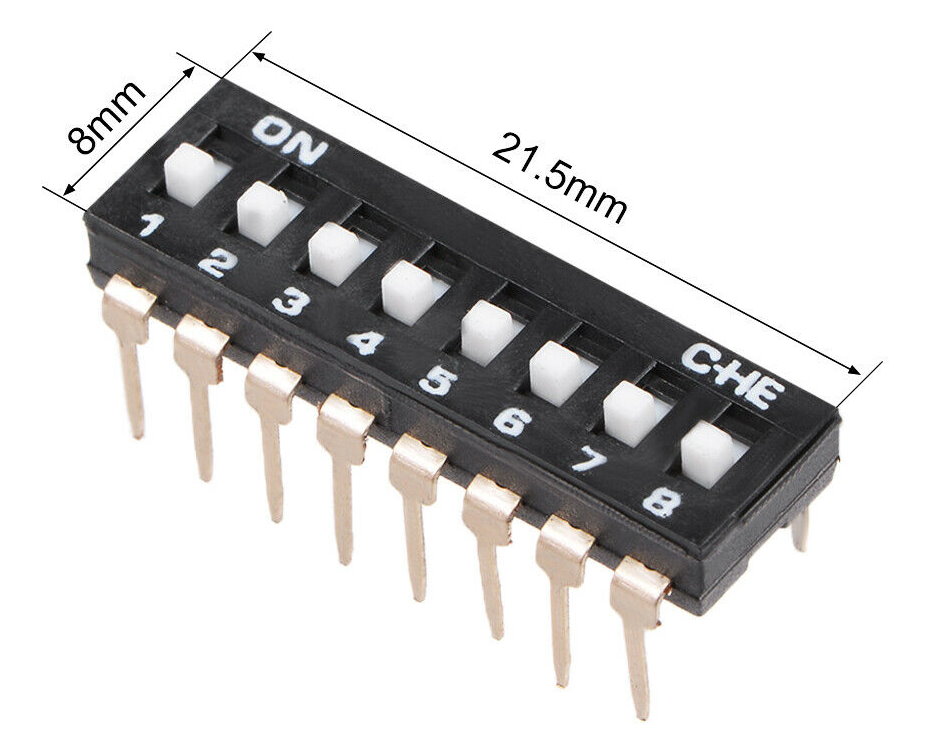
DIP Switches with larger and longer pins will hold better in breadboards
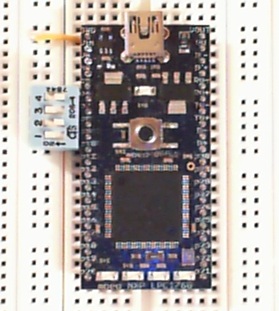
Easy no jumper wire hookup of a DIP switch with 4 switches
Keep in mind that all switches are mechanical devices that will eventually wear out with constant use. Pushbuttons are typically rated for 1,000,000 to 100,000 operations, and some DIP switches can be as low as 1,000 switch cycles.
Configuring Internal Pullups
Mbed has special inputs that can be programmed to provide an internal pullup resistor and eliminate the need to add an external resistor when hooking up pushbuttons and switches. To use it, on a DigitalIn pin set the mode to pullup with pin.mode(PullUp);, and leave out the external resistor. The switch is then connected to the input pin and the other switch connection is tied to ground. While the focus here is on pushbuttons, the same techniques will apply to the use of other switches such as the individual switches found in a DIP switch.
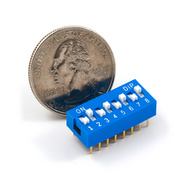
DIP Switch with 8 switches
A DIP switch contains several independent SPST switches in a small DIP (Dual Inline Package) in the same size format as early .1 inch spacing digital logic ICs that fit directly in breadboards. Each SPST switch has two pins located directly across the DIP package (long way). Each DIP switch still needs pullups and the same connections as a pushbutton. Read the switch with DigitalIn just like the first pushbutton example. Typically, the data from DIP switches is used in a more static way for things like configuration setup options and they do not require debouncing. BusIn can be used to read multiple input bits at a time from a DIP switch instead of multiple DigitalIns.
Wiring for Pushbutton Demos
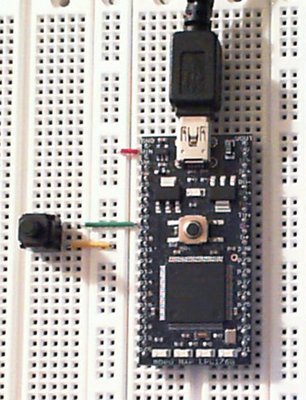
Wiring Setup for Pushbutton code examples. Connect pushbutton from p8 to gnd.
Basic Pushbutton Demo
The first example program reads a pushbutton input from p8 and sends the value to LED1. As you press the button or flip the switch the LED will turn on and off when the program is running.
#include "mbed.h"

DigitalOut myled(LED1);
DigitalIn pb(p8);
// SPST Pushbutton demo using internal PullUp function
// no external PullUp resistor needed
// Pushbutton from P8 to GND.
int main() {
    pb.mode(PullUp);
    while(1) {
        myled = pb;
    }
}
Pushbutton demo using internal pull-up
In the video, the LED goes off each time the pushbutton is hit.
Import programPushbutton_Demo
Pushbutton demo using internal pullup feature
There is also an alternative form of the mbed DigitalIn C++ constructor with two arguments, "DigitalIn(pb, PullUp); " that can be used to configure the pullup resistor when the pb object is initialized and .mode() would not be needed.
Debouncing a Pushbutton Input
When the number of times a pushbutton or switch is hit is used to control an application, care must be exercised as another common problem will occur. Here is an example program that counts the number of times the pushbutton is hit and it displays the count in binary on mbed's four LEDs. If you run the program, you will notice that it will occasionally count up by more than one when the button is hit. This problem is called contact bounce.
#include "mbed.h"

DigitalOut myled(LED1);
DigitalOut myled2(LED2);
DigitalOut myled3(LED3);
DigitalOut myled4(LED4);

DigitalIn pb(p8);
// SPST Pushbutton count demo using internal PullUp function
// no external PullUp resistor needed
// Pushbutton from P8 to GND.
// Demonstrates need for debounce - will sometimes count more than once per button hit
// This occurs on all switches due to mechanical contact bounce
int main()
{
int count=0;
int old_pb=1;
int new_pb;
    // Use internal pullup for pushbutton
    pb.mode(PullUp);
    // Delay for initial pullup to take effect
    wait(.001);
    while(1) {
        new_pb = pb;
        if ((new_pb==0) && (old_pb==1)) count++;
        myled4 = count & 0x01;
        myled3 = (count & 0x02)>>1;
        myled2 = (count & 0x04)>>2;
        myled = (count & 0x08)>>3;
        old_pb = new_pb;
    }
}
Pushbutton counter demo without switch debouncing
In the video above, listen for the button clicks and note that on the fourth and fifth hit of the pushbutton the counter in the LEDs actually counts up twice. This is a result of switch contact bounce.
Import programPushbutton_BadBounce_Demo
Pushbutton counter demo showing switch contact bounce
Switch Contact Bounce
All switches are mechanical devices that slam two small metal contacts together to connect a circuit. When the metal contacts first hit they will always bounce for a few milliseconds. This is just the fundamental physics of what occurs when two objects collide. A spring effect is also involved since the switch must snap open when released. What happens can be seen in the image below of a single switch closure captured using a storage oscilloscope. It is not the nice picture you typically see of a digital input in a textbook. On hardware and fast processors, this will occasionally cause one pushbutton hit to randomly appear as several. Switch contact bounce can be fixed by sampling the switch at several different times to filter out the bounce.
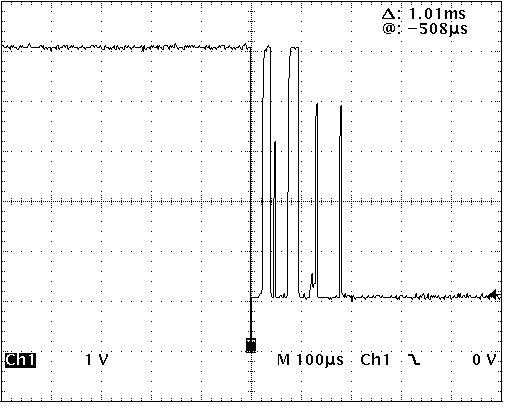
Pushbutton Switch Contact Bounce captured on an Oscilloscope
Using DebounceIn for switch debouncing
The cookbook library DebounceIn has software that automatically samples the input several times and filters out the switch contact bounce. The debounce algorithm samples the input 10 times at 1ms intervals. When the samples do not change for 10 times, it passes through a state change in the pin. Fortunately, the time duration of the contact bounce is significantly less than the fastest rate at which a human can hit a switch. Here is an example using the DebounceIn library function.
#include "mbed.h"
#include "DebounceIn.h"
// must import Cookbook Debounce library into project
// URL: http://mbed.org/users/AjK/libraries/DebounceIn/lky9pc

DigitalOut myled(LED1);
DigitalOut myled2(LED2);
DigitalOut myled3(LED3);
DigitalOut myled4(LED4);

DebounceIn pb(p8);
// SPST Pushbutton count demo using internal PullUp function
// no external PullUp resistor needed
// Pushbutton from P8 to GND.
// Demonstrates need for debounce - will not count more than once per button hit
// This occurs on all switches due to mechanical contact bounce
int main()
{
int count=0;
int old_pb=0;
int new_pb;
    // Use internal pullup for pushbutton
    pb.mode(PullUp);
    // Delay for initial pullup to take effect
    wait(.001);
    while(1) {
        new_pb = pb;
        if ((new_pb==0) && (old_pb==1)) count++;
        myled4 = count & 0x01;
        myled3 = (count & 0x02)>>1;
        myled2 = (count & 0x04)>>2;
        myled = (count & 0x08)>>3;
        old_pb = new_pb;
    }
}
Import programPushbutton_NoBounce_Demo
Pushbutton counter demo with debounce
Pushbutton counter demo with switch debouncing
As seen in the video above, when this improved code is run with the software debounce algorithm in the DebounceIn library, it will reliably count up by one every time the switch is hit.
Using Interrupts and a Callback Function
Often times you will want to respond quickly to a switch input without continuously checking it in a loop in the main program. It is possible to setup external pins on mbed so that they generate a hardware interrupt. The main program is running in an infinite loop slowly blinking LED1 and it never needs to check the switch input. Count is displayed in the three right LEDs. The code below generates an interrupt each time the pb input goes low. The interrupt routine, pb_hit_interrupt(), is called on each falling edge of pb.
#include "mbed.h"

DigitalOut myled(LED1);
DigitalOut myled2(LED2);
DigitalOut myled3(LED3);
DigitalOut myled4(LED4);

InterruptIn pb(p8);
// SPST Pushbutton count demo using interrupts
// no external PullUp resistor needed
// Pushbutton from P8 to GND.
// A pb falling edge (hit) generates an interrupt and activates the interrupt routine

// Global count variable
int volatile count=0;

// pb Interrupt routine - is interrupt activated by a falling edge of pb input
void pb_hit_interrupt (void) {
    count++;
    myled4 = count & 0x01;
    myled3 = (count & 0x02)>>1;
    myled2 = (count & 0x04)>>2;
}

int main() {
    // Use internal pullup for pushbutton
    pb.mode(PullUp);
    // Delay for initial pullup to take effect
    wait(.01);
    // Attach the address of the interrupt handler routine for pushbutton
    pb.fall(&pb_hit_interrupt);
    // Blink myled in main routine forever while responding to pb changes
    // via interrupts that activate pb_hit_interrupt routine
    while (1) {
        myled = !myled;
        wait(.5);
    }
}
Import programPushbutton_BadBounce_Interrupt
Pushbutton demo using interrupts with switch contact bounce
Pushbutton counter demo using interrupts
This program has even more problems with switch contact bounce than the earlier example since interrupts respond faster. When hitting the pushbutton, count almost appears to be a random number in the three right LEDs. If the number of times the button is pressed is critical, it also needs to be debounced when using interrupts with PinDetect.
Using PinDetect and a Callback Function
It is possible to setup timers on mbed's hardware so that they periodically generate an interrupt. The interrupt routine can then check for a change in pin state. The cookbook PinDetect library uses this feature to activate a callback function when a pin changes state. It also debounces the switch at the same time so that the callback function is only called once per switch hit. In the final example, the callback function, pb_hit_callback(); counts the number of pushbutton hits and outputs the count to the LEDs. The main program is running in an infinite loop slowly blinking LED1 and it never needs to check the switch input. When the switch is hit, the main program loop is interrupted and the callback function runs once. It then returns to the main program. The variable count can also be used in the main program, but such shared variables should always be setup using volatile when declared.
Pushbutton counter demo using a callback function
In the video above, the main routine just blinks LED1 in an infinite loop and the callback function increments and displays the count in LED2, LED3, and LED4 whenever the pushbutton is hit and detected by the interrupt routine.
#include "mbed.h"
#include "PinDetect.h"
// must import Cookbook PinDetct library into project
// URL: http://mbed.org/users/AjK/libraries/PinDetect/lkyxpw

DigitalOut myled(LED1);
DigitalOut myled2(LED2);
DigitalOut myled3(LED3);
DigitalOut myled4(LED4);

PinDetect pb(p8);
// SPST Pushbutton debounced count demo using interrupts and callback
// no external PullUp resistor needed
// Pushbutton from P8 to GND.
// A pb hit generates an interrupt and activates the callback function
// after the switch is debounced

// Global count variable
int volatile count=0;

// Callback routine is interrupt activated by a debounced pb hit
void pb_hit_callback (void) {
    count++;
    myled4 = count & 0x01;
    myled3 = (count & 0x02)>>1;
    myled2 = (count & 0x04)>>2;
}
int main() {

    // Use internal pullup for pushbutton
    pb.mode(PullUp);
    // Delay for initial pullup to take effect
    wait(.001);
    // Setup Interrupt callback function for a pb hit
    pb.attach_deasserted(&pb_hit_callback);
    // Start sampling pb input using interrupts
    pb.setSampleFrequency();

    //Blink myled in main routine forever while responding to pb changes
    // via interrupts that activate the callback counter function
    while (1) {
        myled = !myled;
        wait(.5);
    }

}
Import programPushbutton_Debounce_Interrupt
Pushbutton counter demo with debounce and a callback using interrupts
Pull Down Resistors
With TTL logic, inputs float high so a smaller resistor is required to pull down an input and also a bit more power used so pull up resistor circuits are more common. With CMOS logic, the current required is about the same. The schematic below shows the alternative circuit using a pull down resistor with the pushbutton tied from the input to Vcc (instead of gnd). Vcc in the schematic is the higher voltage on the logic supply (i.e., not Vin or Vu on mbed, it would be 3.3V(Vout) on mbed). The input signal from the pushbutton pin will be inverted in this case. In the earlier examples, using pb.mode(PullDown) puts a pulldown resistor on the input and with this setup the pushbutton input, pb, will be inverted vs. using a pullup resistor. The default mode value for the DigitalIn API appears to be PullDown.
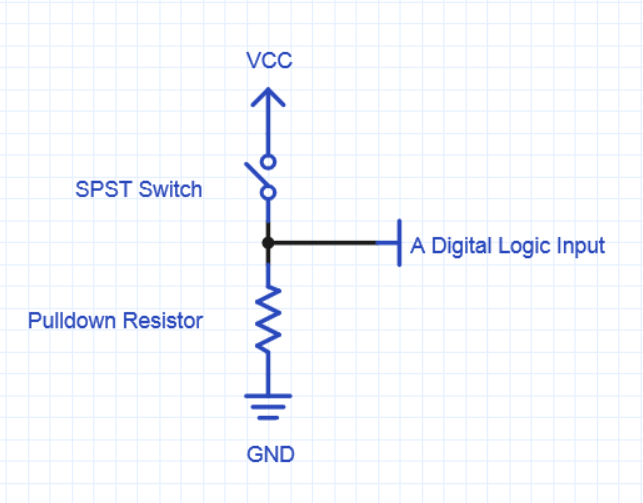
The Pull down resistor alternative circuit for a pushbutton
Multiple Pushbutton Callbacks
Often time multiple pushbuttons are needed and it is even possible to setup multiple callbacks with one for each pushbutton. In this example there are now two pushbuttons and two callback functions. One pushbutton counts up (count=count+1) and one pushbutton counts down (count=count-1) in the example code below.
#include "mbed.h"
#include "PinDetect.h"
// must import Cookbook PinDetct library into project
// URL: http://mbed.org/users/AjK/libraries/PinDetect/lkyxpw

DigitalOut myled(LED1);
DigitalOut myled2(LED2);
DigitalOut myled3(LED3);
DigitalOut myled4(LED4);

PinDetect pb1(p8);
PinDetect pb2(p7);
// SPST Pushbutton debounced count demo using interrupts and callback
// no external PullUp resistor needed
// Pushbutton from P8 to GND.
// Second Pushbutton from P7 to GND.
// A pb hit generates an interrupt and activates the callback function
// after the switch is debounced

// Global count variable
int volatile count=0;

// Callback routine is interrupt activated by a debounced pb1 hit
void pb1_hit_callback (void) {
    count++;
    myled4 = count & 0x01;
    myled3 = (count & 0x02)>>1;
    myled2 = (count & 0x04)>>2;
}
// Callback routine is interrupt activated by a debounced pb2 hit
void pb2_hit_callback (void) {
    count--;
    myled4 = count & 0x01;
    myled3 = (count & 0x02)>>1;
    myled2 = (count & 0x04)>>2;
}
int main() {

    // Use internal pullups for pushbutton
    pb1.mode(PullUp);
    pb2.mode(PullUp);
    // Delay for initial pullup to take effect
    wait(.01);
    // Setup Interrupt callback functions for a pb hit
    pb1.attach_deasserted(&pb1_hit_callback);
    pb2.attach_deasserted(&pb2_hit_callback);
    // Start sampling pb inputs using interrupts
    pb1.setSampleFrequency();
    pb2.setSampleFrequency();
    //Blink myled in main routine forever while responding to pb changes
    // via interrupts that activate the callback counter function
    while (1) {
        myled = !myled;
        wait(.5);
    }

}
Import programTwo_Pushbutton_Debounce_Interrupt
Two pushbuttons with two callbacks
Other User Input Options
Once a user interface has several pushbuttons, you might also consider some other interesting low-cost options such as a Rotary Pulse Generator (RPG), 5-way tactile navigation switch, Joystick, or a Touch Keypad. Several other human input device options with mbed examples can be found in User Input Options. Several bits at a time can be read faster than multiple DigitalIns on mbed using BusIn. The code for the 5-way tactile navigation switch has an example using BusIn to read five switches at a time.
12 comments on Pushbuttons and Switches:
Please log in to post comments.

Thank.