Digital Output
Example 1
- The program blinks the onboard LED 1 at 1/0.2 = 5 Hz.
DigitalOutis a C++ class.myledis declared as an object ofDigitalOutusing pinLED.wait(0.2)cause the microcontroller busy-waiting for next statement to be executed.while ( )means "while the statement within the bracket istrue'". In C/C++, anything but0istrue. So the statementwhile (1)is always evaluated to be true and hence it runs non-stop. You may like to substitute-1,100,0,'0',"0","Hi"to test out.
#include "mbed.h"

DigitalOut myled(LED1);

int main() {
    while (1) {
        myled = 1;
        wait(0.2);
        myled = 0;
        wait(0.2);
    }
}
Note
- Another way to code the program above.
!means logical not.
#include "mbed.h"

DigitalOut myled(LED1);

int main() {
    myled = 1;
    while (1) {
        myled = !myled;
        wait(0.2);
    }
}
Example 2
- The program blinks the onboard LED 1 and LED 2 at 1/0.2 = 5 Hz, alternatively.
- As we need to distinguish the LEDs from each other, we have to name them differently. In C/C++, no two variables share the same name. Name is case sensitive and may consist of letters, digits, and underscores, but they must not begin with a digit.
#include "mbed.h"

DigitalOut myled1(LED1);
DigitalOut myled2(LED2);

int main() {
    myled1 = 1;
    myled2 = 0;
    while (1) {
        myled1 = !myled1;
        myled2 = !myled2;
        wait(0.2);
    }
}
Note
- The program can be written using member functions of
DigitalOut.
#include "mbed.h"

DigitalOut myled1(LED1);
DigitalOut myled2(LED2);

int main() {
    myled1.write(1);
    myled2.write(0);
    while (1) {
        myled1.write( !myled1.read());
        myled2.write( !myled2.read());
        wait(0.2);
    }
}
Example 3
- The program passes a light from LED 1 to LED4, cyclically.
- An array of
DigitalOutobjects was declared and initialized at same time. The definition ofDigitalOutrequires us to define the pin during its variable declaration. Look at the constructor forDigitalOut. - To access individual object in the array, we use a numerical index, starting from 0. The index is expressed with square brackets
[]. for (i = 0; i < 4; i++)setups a looping mechanism which initially setup the value ofito 0. Before the body of theforloop is executed, the statementi < 4is evaluated. If it is true, the loop body is executed. After each iteration,iis increment by 1.
#include "mbed.h"

DigitalOut myleds[] = {(LED1), (LED2), (LED3), (LED4)};

int main() {
    int i;
    int previous;

    while (1) {
        for (i = 0; i < 4; i++) {
            if (i == 0)
                previous = 3;
            else
                previous = i - 1;

            myleds[i] = 1;
            myleds[previous] = 0;

            wait(0.2);
        }
    }
}
Note
- The program above can be written as follows.
%means "get the remainder after divided by".++imeans "increment i by 1 first before doing anything else".- The code is shorter but is more cryptic.
#include "mbed.h"

DigitalOut myleds[] = {(LED1), (LED2), (LED3), (LED4)};

int main() {
    int i = 0;
    int previous = 3;

    while (1) {
        myleds[i] = 1;
        myleds[previous] = 0;
        previous = i;
        i = ++i % 4;
        wait(0.2);
    }
}
Example 4
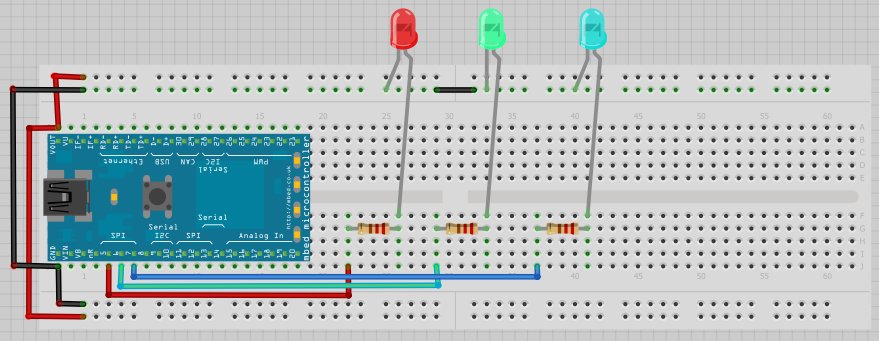
- The program below blinks 3 external LEDs which are red, green and blue.
Note
A LED has positive (anode) and negative (cathode) ends. A new LED has its positive end on the longer lead. You can also use digital multimeter to determine its polarity.


Note
To prevent a high current passes through the LED and hence damaging it, it is usually connected with a resistor in series. For this example, we will use a 220 Ω resistor.
| LED | Positive End | Negative End |
|---|---|---|
| Red | p5 | GND |
| Green | p6 | GND |
| Blue | p7 | GND |
#include "mbed.h"

DigitalOut red  (p5);
DigitalOut green(p6);
DigitalOut blue (p7);

int main() {
    red = 1;
    green = blue = 0;
    wait(0.2);

    green = 1;
    red = blue = 0;
    wait(0.2);

    blue = 1;
    red = green = 0;
    wait(0.2);
}
Discovery
- Use digital multimeter to measure the voltage
- between each DigitalOut pin (p5 or p6 or p7) and the ground.
- between the 220 Ω resistor.
- between each LED.
- Compare your results with the information from http://www.oksolar.com/led/led_color_chart.htm
Questions
- Determine the voltage across each of the LED.
- Determine the current passes through each of the LED.
Example 5
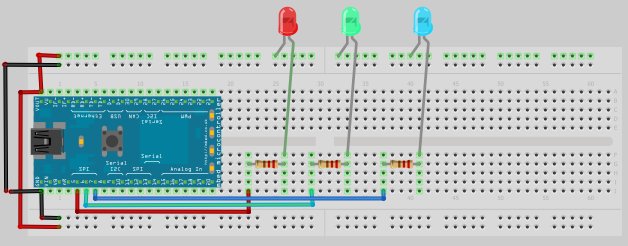
- The program below blinks 3 external LEDs which are red, green and blue. The connection is different from Example 4.

| LED | Positive End | Negative End |
|---|---|---|
| Red | VOUT | p5 |
| Green | VOUT | p6 |
| Blue | VOUT | p7 |
#include "mbed.h"

DigitalOut red  (p5);
DigitalOut green(p6);
DigitalOut blue (p7);

int main() {
    red = 0;
    green = blue = 1;
    wait(0.2);

    green = 0;
    red = blue = 1;
    wait(0.2);

    blue = 0;
    red = green = 1;
    wait(0.2);
}
Please log in to post comments.
