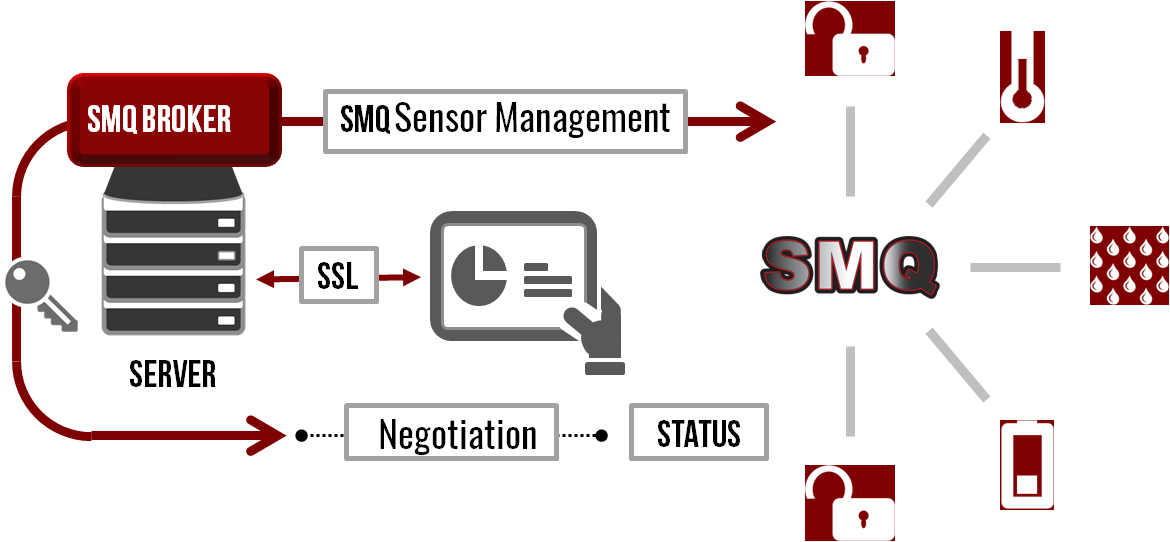
Example program that shows how to use the Secure (TLS) SharkMQ library included in SharkSSL-Lite
Dependencies: EthernetInterface SharkSSL-Lite mbed-rtos mbed
Introduction
The SMQ Architecture is an Internet of Things (IoT) publish subscribe end-to-end solution that is optimized for embedded systems to provide instantaneous Device Edge Node connectivity, 1 to 1 Communications, and Ease of Transcending Firewalls. The solution is ideal for resource constrained devices that require real-time dynamic control, analytic information, and firmware updates in both LAN and WAN environments.
Architecture Component List
- SMQ C Client (Non-secure)
- SharkMQ Secure C Client (this mbed example)
- SMQjs (Javascript)
- SMQ JAVA
- SMQ Broker

SharkMQ-LED-Demo
An example of (Secure) device control via a Browser interface. It includes the LED demonstration example code, SharkMQ, and SharkSSL SSL|TLS stack for authentication and encryption.
- Code Size: 21kB ROM | 4kB RAM.
- Requires: SharkSSL-Lite
Video Tutorials
How to setup your own secure SMQ IoT cloud server
Most IoT cloud server solutions, whether they provide ready-to-use hosted services or not, are based on a standard Virtual Private Server (VPS). Most developers probably think of Amazon or Microsoft Azure's services when considering the server side of their IoT solution. These high-end services are great if you need to scale up to millions of connected devices. However, for most small-scale operations and DIY projects, a low-cost VPS is more than adequate.
SMQ LED Demo
See Also
- SMQ Client-Example (NonSecure) SMQ Client LED Demonstration.
- SMQ LED Demonstration Tutorial
- SMQ Documentation
- Real Time Logic LLC public SMQ Broker access.
- How to set up your own low cost SMQ Broker cloud server solution Tutorial.
README.txt@5:6526b95442e7, 2016-04-08 (annotated)
- Committer:
- wini
- Date:
- Fri Apr 08 16:44:27 2016 +0000
- Revision:
- 5:6526b95442e7
- Parent:
- 4:7a75c57901e6
Readme file fix
Who changed what in which revision?
| User | Revision | Line number | New contents of line |
|---|---|---|---|
| wini | 4:7a75c57901e6 | 1 | The demo is configured for Arch Pro. If you use a different board, |
| wini | 4:7a75c57901e6 | 2 | open main.cpp and modify the LED values. For example, to modify the |
| wini | 4:7a75c57901e6 | 3 | example for the FRDM-K64F, change the LED structure to: |
| wini | 4:7a75c57901e6 | 4 | |
| wini | 4:7a75c57901e6 | 5 | static const LedInfo ledInfo[] = { |
| wini | 4:7a75c57901e6 | 6 | { |
| wini | 4:7a75c57901e6 | 7 | "LED 1", |
| wini | 4:7a75c57901e6 | 8 | LedColor_red, |
| wini | 4:7a75c57901e6 | 9 | 1 |
| wini | 4:7a75c57901e6 | 10 | }, |
| wini | 4:7a75c57901e6 | 11 | { |
| wini | 4:7a75c57901e6 | 12 | "LED 2", |
| wini | 4:7a75c57901e6 | 13 | LedColor_green, |
| wini | 4:7a75c57901e6 | 14 | 2 |
| wini | 4:7a75c57901e6 | 15 | }, |
| wini | 4:7a75c57901e6 | 16 | { |
| wini | 4:7a75c57901e6 | 17 | "LED 3", |
| wini | 4:7a75c57901e6 | 18 | LedColor_blue, |
| wini | 4:7a75c57901e6 | 19 | 3 |
| wini | 4:7a75c57901e6 | 20 | } |
| wini | 4:7a75c57901e6 | 21 | }; |
| wini | 4:7a75c57901e6 | 22 | |
| wini | 5:6526b95442e7 | 23 | You should also delete: DigitalOut led4(LED4); |