Important changes to repositories hosted on mbed.com
Mbed hosted mercurial repositories are deprecated and are due to be permanently deleted in July 2026.
To keep a copy of this software download the repository Zip archive or clone locally using Mercurial.
It is also possible to export all your personal repositories from the account settings page.
Dependencies: amakusa mbed-dsp mbed shimabara ukifune unzen_nucleo_f746
Fork of Signal_nucleo_f746 by
Homepage
このプログラムは『雲仙』オーディオ・フレームワークを使する、オーディオ信号処理プログラムのスケルトンです。
雲仙はオーディオ信号処理を割り込みコンテキストで実行します。割り込みコンテキストではmbedの便利な機能を使いにくいため、それらはmain()関数で実行します。管理プログラムはシリアルIO、GPIO、ファイルIOなどといったmbedの機能をそのまま使うことが出来ます。
雲仙は各種のサンプル周波数や各種のハードウェアに対応できる柔軟な設計になっています。一方で、この柔軟さは信号処理と無関係のAPIを複数呼ぶことを必要とします。結果として雲仙の柔軟性はオーディオ信号処理をする上で余計な作業を増やします。
スケルトンを使うことで、これらの問題は概ね解決します。本プロジェクトは雲仙の管理APIを可能な限りサブルーチンに押し込み、一方でサンプル周波数やブロックサイズといったコンフィギュレーション用のマクロをプログラマが変更できるようにしています。このスケルトンでは、プログラマは大きく分けて「信号処理の初期化」「信号処理アルゴリズム」「管理プログラム」の3つのコードを穴埋めしていきます。
利用方法
このページ右上の"Import to compiler"をクリックしてください。自分のmbed compilerにスケルトンがインポートされます。あとはプロジェクト名を変えて、自由に変更してください。
利用しているライブラリ
ライブラリの詳細はそれぞれのライブラリを参照してください。
- unzen_nucleo_f746 : Nucleo F746ZG用のオーディオ・フレームワーク本体です。詳細は『雲仙』オーディオ・フレームワークを参照してください。
- shimabara : 雲仙とペアで使う、オーディオCODECコントローラ。
- ukifune : Nucleo F476ZG用のUI基板コントロール・ライブラリ。回路設計情報もあります。
- amakusa : mbed-dsp 用のラッパー・クラス・ライブラリ + α
- mbed-dsp : mbed用の公式DSPライブラリ。
利用するハードウェア
- Nucleo F746ZG
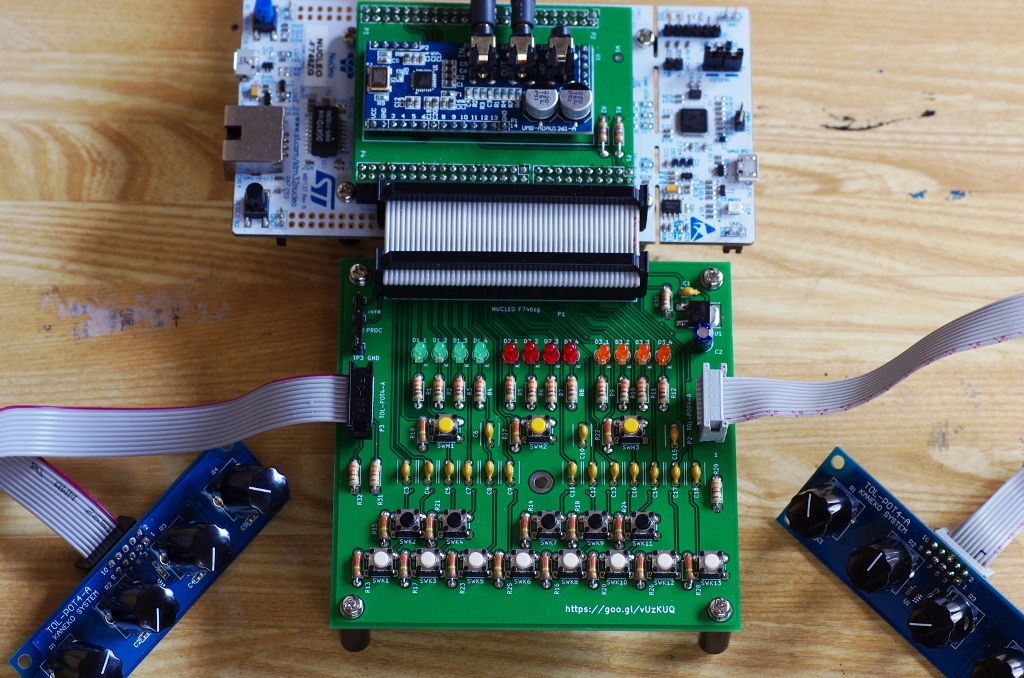
- 「桐壺」基板 : Nucleo F746ZGと UMB-ADAU1361-A の接続基板。設計情報は『雲仙』オーディオ・フレームワークにあります。
- 「浮舟」基板 : Nucleo F476ZG用のUI基板。基板設計情報はukifuneにあります。
- UMB-ADAU1361-A : オーディオCODEC基板。
- TOL-POT4-A : ボリューム基板。

コンフィギュレーション
このスケルトンは、マクロを使ってサンプル周波数とブロックサイズを変更できます。
BLOCKSIZEマクロは main.cpp の冒頭で宣言されています。この値がNのとき、Nサンプル毎に信号処理がおこなわれます。FSマクロはmain.cppの冒頭で宣言されています。この値はサンプル周波数を変更します。
main.cpp
/*========================= Project Dependent Constants ======================*/
#define BLOCKSIZE 16        // number of the sample to be processed at once.
#define FS shimabara::Fs_48 // Fs can be Fs_32, Fs_441, Fs_48, Fs_96
信号処理アルゴリズムの初期化と実装
このスケルトンは、信号処理アルゴリズムとその初期化をひとつのClassとして実装しています。ユーザーはアルゴリズムの内部変数を含め、クラスの実装を変更することで独自のアルゴリズムを実装します。
ヘッダー・ファイルである signal_processing.h にはクラスの宣言があります。このクラス宣言にはユーザーが変更してよい部分と変更してはならない部分があります。
次のメソッド・プロトタイプは変更してはいけません。
- SignalProcessing::SignalProcessing()
- SignalProcessing::run()
- SignalProcessing::set_volume()
- SignalProcessing::enter_critical_section()
- SignalProcessing::leave_critical_section()
次のメソッド・プロトタイプは、管理プログラムと信号処理アルゴリズムの通信用のサンプルとして実装しているものです。ユーザーが自由に変更、削除、追加してかまいません。
- SignalProcessing::set_volume()
メンバー変数は自由に変更してください。
signal_processing.h
    // User Signal processing Class
class SignalProcessing {
public:
        // essential members. Do not touch
    SignalProcessing( unsigned int  block_size );
    void run(
        float rx_left_buffer[],     // array of the left input samples
        float rx_right_buffer[],    // array of the right input samples
        float tx_left_buffer[],     // place to write the left output samples
        float tx_right_buffer[],    // place to write the right output samples
        unsigned int block_size     // block size [sample]
        );

        // project depenedent members.
    void set_volume( float vol );
private:
        // essential members. Do not touch.
    void enter_critical_section(void);
    void leave_critical_section(void);

        // project dependent members.
    float volume_level;
};
実際のコードは signal_processing.cpp に実装します。
SignalProcessing::SignalProcessing() はコンストラクタです。信号処理の初期化が必要な場合にはここに実装します。たとえば、フィルタへの係数の設定、内部変数の初期化などがそれです。
signal_processing.cpp
        // Modify this constructor to initialize your audio algorithm.
SignalProcessing::SignalProcessing( unsigned int  block_size )
{
        // place the signal processing initializing code here.
    this->volume_level = 0.0;   // sample initializaiton
}   // End of constructor()
SignalProcessing::run() は信号処理本体です。このメソッドはスケルトンの冒頭で宣言したBLOCKSIZEサンプル周期で呼び出されます。デフォルトでは、入力オーディオ信号を出力にコピーしながら、ボリューム値で音量を変えるサンプルになっています。
signal_processing.cpp
        // Modify this method to implement your audio algorithm.
void SignalProcessing::run(
            float rx_left_buffer[],     // array of the left input samples
            float rx_right_buffer[],    // array of the right input samples
            float tx_left_buffer[],     // place to write the left output samples
            float tx_right_buffer[],    // place to write the right output samples
            unsigned int block_size     // block size [sample]
           )
{
        // place the signal processing coce here
    for ( int i= 0; i< block_size; i++ )
    {
            tx_left_buffer[i]  = rx_left_buffer[i]  * this->volume_level;
            tx_right_buffer[i] = rx_right_buffer[i] * this->volume_level;
    }
}   // End of run()
管理プログラムとの間で通信を行うメソッドを実装する場合には、必要に応じて SignalProcessing::enter_critical_section() と SignalProcessing::leave_critical_section() によってメンバー変数アクセスを保護してください。
管理プログラムの実装
main.cpp の main() 関数には信号処理アルゴリズムの外側で実行すべき管理プログラムを書きます。一般にはUIの処理、外部との通信、ファイル・アクセスなどをここに書きます。ここではmbed SDKが提供するAPIを使うことが出来ます。
管理プログラムが信号処理アルゴリズムと通信する場合には、SignalProcessing * 型変数 process を介して通信を行ってください。
main.cpp
int main()
{
    uint32_t pushing, releasing, holding;

        // start audio. Do not touch
    initialize_system();

       // main loop. Signal processing is done in background.
    while(1)
    {       // place your foreground program here.

            // get volume from UI panel, then apply it to signal processing.
        process->set_volume( ukifune::get_volume(0) );

            // sample usage of button switch detection
        ukifune::get_button_state( pushing, releasing, holding);

            // pushing detection demo
        if ( pushing & (1 << ukifune::swm1 ) )      // is SWM1 switch pusshing down?
            ukifune::toggle_led( ukifune::led1_1 ); // then, toggle LED1_1

            // releasing detection demo
        if ( releasing & (1 << ukifune::swm2 ) )    // is SWM2 switch releasing?
            ukifune::toggle_led( ukifune::led2_1 ); // then toggle LED2_1

            // holding detection demo
        if ( holding & (1 << ukifune::swm3 ) )    // is SWM3 switch holding?
            ukifune::turn_led_on( ukifune::led3_1 );    // then turn LED3_1 on
        else
            ukifune::turn_led_off( ukifune::led3_1 );   // else off


            // you have to call tick() every 20mS-50mS if you need get_volume()
        wait(0.05);
        ukifune::tick();
    }
}   // End of main
