ESP8266 V2 Firmware update
Intro
The ESP8266 is a 5$ wifi module (in low quantities) that can communicate over UART by AT Commands to the host microcontroller. This page talks about the firmware update process for the ESP8266 module.
The Process
To update the firmware on your ESP8266 device please follow these steps:
- Download ESP8266 Firmware . This zip contains only the necessary binaries taken from here.
- Download the flash download tool
- Compile / Load Serial Passthrough example to the mbed board
- Put ESP8266 into firmware update mode (GPIO0 ->GND) (either push button or jumper)
- Launch the flash download tool
mbed board as serial passthrough
Import, compile, and load the serial passthrough code onto your mbed board. The serial passthrough code will allow the computer to talk directly to the ESP8266 chip and vice versa. This will be necessary for the esptool python script to load the firmware update into the ESP8266 chips memory.
Import programSerialPassthrough
Serial Passthrough program
ESP8266 Firmare Update Wiring
Seeed Grove UART Wifi
Push the reset button untill the light goes red.
Standalone module
Wire up the ESP8266 chip to be in firmware update mode. On the ESP01 chip this involves setting GPIO0 to GND and resetting the chip. See the wiring diagram below.
| ESP | MBED |
| VCC | 3.3V |
| GND | GND |
| TX | RX |
| RX | TX |
| CH_PD | 3.3V |
| GPIO0 | GND |
For a more detailed diagram see the getting started guide in the resources section.
load firmware with Flash Download tool
Download the Download the flash download tool.
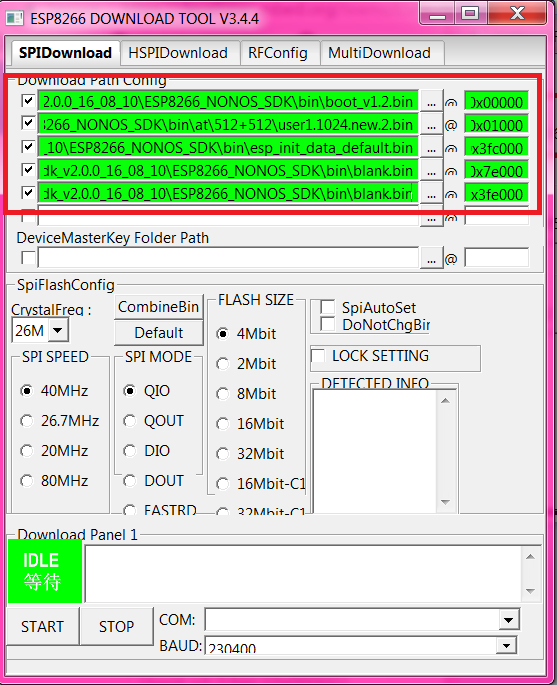
From the espressif firmware you just downloaded you will need to load 4 seperate files to the ESP8266 chip. You will need to write the blank binary twice.
| Bin | Address |
| boot_v1.2.bin | 0x00000 |
| user1.1024.new.2.bin | 0x01000 |
| esp_init_data_default.bin | 0x3FC000 |
| blank.bin | 0xFE000 |
| blank.bin | 0x3FE000 |
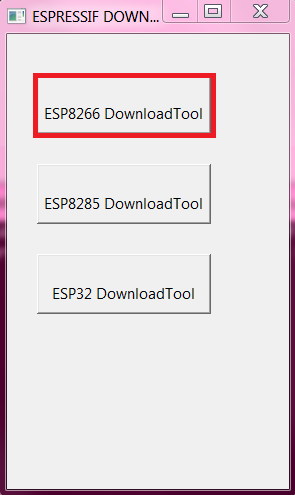
When you've launched the tool, select the ESP8266 downloader.

Select the files you want to download to ehs ESP8266, and specify their memory locations according to the table above.

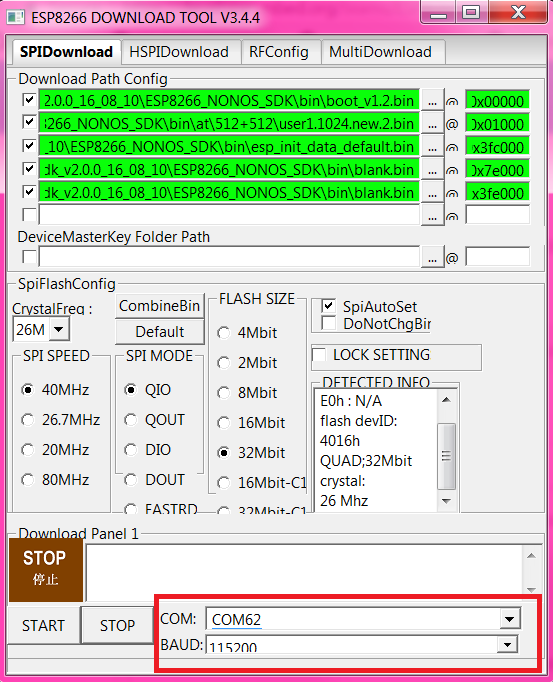
Specify the Flash size as 32 Mbit.

Specify the COM port of your mbed board and 115200 baud.

Press START!
Success
Now that you have completed updating the fimware remove the GPIO0 pin (or press the RESET button on the Seeed Grove module), the ESP will now be running communicating with the board at 115200 baud.
Example
For example, if I have a FRDM-K64F board and a ESP8266 module and I want to update the firmware for the ESP8266, I would compile and load the Serial Passthrough program onto the K64F. Then I would connect the following pins together
| ESP | FRDM-K64F |
| VCC | 3.3V |
| GND | GND |
| TX | D0 |
| RX | D1 |
| CH_PD | 3.3V |
| GPIO0 | GND |
Then I would use the flash download tool to download the binaries. Once they were all downloaded I would unconnect GPIO0 from GND and restart the board. Now the board should be running in operational mode, usually this is 115200 baud. To test this I would load the program below onto the board. It has the AT+RST command already programmed, so just compile and run it and you should get valid output from the ESP Chip. If you do not get valid output, but instead a bunch of junk try changing the baud speed of the device.
Import programSerialDeviceTerminal
This program is designed to act as a serial terminal for interfacing with serial peripherals, such as the ESP8266, that support AT Commands.
That's it! Go build awesome!
Resources
Here are some other very useful resources for ESP8266 schenanigans.
- ESP8266 Getting Started, TRM, etc
- ESP8266 V2.0 AT command set
- Minimal ESP Breakout Board to Seeed Grove Headers (some assembly required)
- Full Featured ESP Breakout Board to Seeed Grove Headers (some assembly required)
- Seeed Grove UART WiFi module
TLDR;
- load serial passthrough onto mbed board
- hookup ESP8266 to serial port on mbed board and put into firmware update mode
- Flash all firmware files according to package instructions (may need to reset ESP8266 between each file and put into FW Update mode again)
- Go build awesome
Please log in to post comments.
