Smart Remote
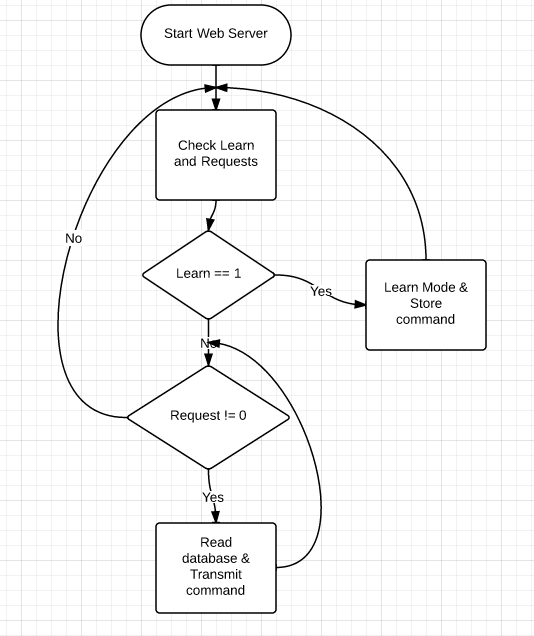
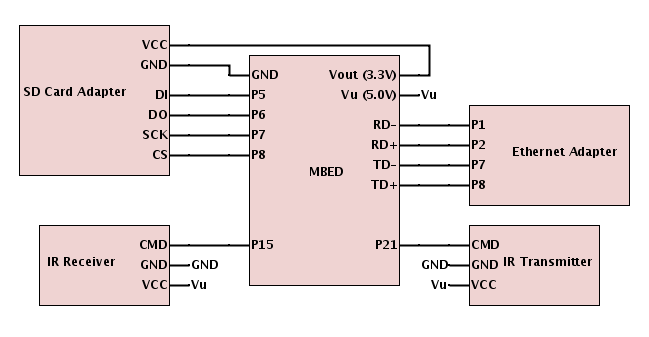
Smart Remote is an mbed program that uses Sparkfun's IR transmitter and receiver. The program runs the learning capability using the receiver and stores the command in a database file using the microsd kit while also running a HTTP server. The server allows a mobile device to connect to the mbed and control the learned IR commands. Below is a basic flowchart showing the looping of the program.

Parts
To properly run this program, you will need the following parts:
- Max Power IR LED Kit
- IR Receiver Breakout
- Ethernet jack of choice - we used https://www.sparkfun.com/products/8790
- microSD Transflash for database storage

Program Info
This program uses RPC to talk between the web server and the IR code. To accomplish this, we implemented RPCVariables using this example here on RPCVariables using the new Ethernet library. Below you will find the main.cpp file for the program. It shows the HTTPServer being started, and the IR code in the while loop.
main.cpp
#include "mbed.h"
#include "EthernetInterface.h"
#include "HTTPServer.h"
#include "FsHandler.h"
#include "RpcHandler.h"
#include "rtos.h"
#include <string>
DigitalOut led1(LED1);
DigitalOut led2(LED2);
//Start IR
#include "ReceiverIR.h"
#include "TransmitterIR.h"
#include "IR.h"
//END IR
// Start DB
#include <stdio.h>
#include <stdlib.h>
#include "SDFileSystem.h"
#include "db.h"
// End DB
// Start RPC
#include "RPCVariable.h"
int Request = 0;
int Learn = 0;
char Learn_name0;
char Learn_name1;
char Learn_name2;
char Learn_name3;
char Learn_name4;
char Learn_name5;
char Learn_name6;
char Learn_name7;
char Learn_name8;
char Learn_name9;
//Make these variables accessible over RPC by attaching them to an RPCVariable
RPCVariable<int> RPCRequest(&Request, "Request");
RPCVariable<int> RPCLearn(&Learn, "Learn");
RPCVariable<char> RPCLearner0(&Learn_name0, "Learn_name0");
RPCVariable<char> RPCLearner1(&Learn_name1, "Learn_name1");
RPCVariable<char> RPCLearner2(&Learn_name2, "Learn_name2");
RPCVariable<char> RPCLearner3(&Learn_name3, "Learn_name3");
RPCVariable<char> RPCLearner4(&Learn_name4, "Learn_name4");
RPCVariable<char> RPCLearner5(&Learn_name5, "Learn_name5");
RPCVariable<char> RPCLearner6(&Learn_name6, "Learn_name6");
RPCVariable<char> RPCLearner7(&Learn_name7, "Learn_name7");
RPCVariable<char> RPCLearner8(&Learn_name8, "Learn_name8");
RPCVariable<char> RPCLearner9(&Learn_name9, "Learn_name9");
// End RPC
Serial pc(USBTX, USBRX, "pc");
// Instantiate a HTTPServer to handle incoming requests
HTTPServer svr;
// Instantiate a local file system handler named 'local' which will be used later to access files on the mbed.
LocalFileSystem local("local");
SDFileSystem sd(p5, p6, p7, p8, "sd"); // the pinout on the mbed
int main()
{
printf("Setting up Apache...\n \r");
HTTPFsRequestHandler::mount("/local/", "/");
HTTPFsRequestHandler::mount("/sd/", "/sd/");
svr.addHandler<HTTPFsRequestHandler>("/");
svr.addHandler<HTTPRpcRequestHandler>("/rpc");
EthernetInterface eth;
eth.init(); //Use DHCP
eth.connect();
// Now start the server on port 80.
if (!svr.start(80, ð)) {
error("Server not starting !");
exit(0);
}
printf("IP: %s\n \r", eth.getIPAddress());
printf("Setup OK\n \r");
// DB Init
mkdir("/sd/SmartRemote", 0777);
char tuple_code[128];
char tuple_name[128];
char tuple_bitlength[128];
char tuple_format[128];
char temp[20];
int n;
//End DB init
//IR Init
uint8_t buf1[32];
uint8_t buf2[32];
int bitlength1;
int bitlength2;
char tempstr[3];
RemoteIR::Format format;
memset(buf1, 0x00, sizeof(buf1));
memset(buf2, 0x00, sizeof(buf2));
//END IR Init
printf("Listening...\n \r");
Timer tm;
tm.start();
//Listen indefinitely
while(true) {
svr.poll();
if(tm.read()>.5) {
tm.start();
}
if (Learn) {
// Debug LED
led1 = 1;
// Receive the code
{
bitlength1 = receive(&format, buf1, sizeof(buf1));
if (bitlength1 < 0) {
continue;
}
display_status("RECV", bitlength1);
display_data(buf1, bitlength1);
//display_format(format);
}
// Reset
led1 = 0;
Learn = 0;
// Set up the variables
sprintf(tuple_name, "%c%c%c%c%c%c%c%c%c%c", Learn_name0,Learn_name1,Learn_name2,Learn_name3,Learn_name4,Learn_name5,Learn_name6,Learn_name7,Learn_name8,Learn_name9);
//sprintf(tuple_code, "%X", buf1);
sprintf(tuple_bitlength, "%d", bitlength1);
sprintf(tuple_format, "%d", format);
for (int i = 0; i < 10; i++) {
if (tuple_name[i] == '~') tuple_name[i] = ' ';
}
const int n = bitlength1 / 8 + (((bitlength1 % 8) != 0) ? 1 : 0);
strcpy(tuple_code, "");
for (int i = 0; i < n; i++) {
sprintf(temp, "%02X", buf1[i]);
strcat(tuple_code, temp);
}
// Insert into DB
db_insert_tuple(tuple_name, tuple_code, tuple_bitlength, tuple_format);
}
if ( Request != 0) {
led2 = 1;
db_find_tuple(Request, tuple_name, tuple_code, tuple_bitlength, tuple_format);
n = atoi(tuple_bitlength) / 8 + (((atoi(tuple_bitlength) % 8) != 0) ? 1 : 0);
memset(buf1, 0x00, sizeof(buf1));
int j = 0 ;
for (int i = 0; i < 2*n; i+=2) {
// printf("%02X", buf[i]);
// buf1[i] = (uint8_t)(atoi( tuple_code.substr(i, 2) ));
sprintf(tempstr,"%c%c", tuple_code[i],tuple_code[i+1] );
printf("%s - ", tempstr);
printf("%02X\n", (uint8_t)strtol(tempstr,NULL,16) );
buf1[j] = (uint8_t)strtol(tempstr,NULL,16);
j++;
}
display_data(buf1,atoi(tuple_bitlength));
{
RemoteIR::Format f = static_cast<RemoteIR::Format>(atoi(tuple_format));
bitlength1 = transmit(f, buf1, atoi(tuple_bitlength));
if (bitlength1 < 0) {
continue;
}
display_status("TRAN", bitlength1);
//display_data(buf1, bitlength1);
//display_format(format);
}
led2 = 0;
Request = 0;
}
}
return 0;
}
Web Server Remote HTML
Here is the HTML file we used. It uses a javascript library referenced in the RPC example from above. The convenience of this library gives you much more freedom to customize your HTML file. Here are the two files you need, the HTML and js files, in a nice zipped format: /media/uploads/sammacjunkie/remote.zip
remote.htm
<html>
    <head>
    	<title>Smart Remote</title>
        <script src="mbedRPC.js" type="text/javascript" language="javascript"></script>
        <script src="//ajax.googleapis.com/ajax/libs/jquery/1.10.2/jquery.min.js"></script>
        <script type="text/javascript">
            mbed = new HTTPRPC();

            RPCRequest = new RPCVariable(mbed, "Request");
            RPCLearn = new RPCVariable(mbed, "Learn");
            RPCName0 = new RPCVariable(mbed, "Learn_name0");
            RPCName1 = new RPCVariable(mbed, "Learn_name1");
            RPCName2 = new RPCVariable(mbed, "Learn_name2");
            RPCName3 = new RPCVariable(mbed, "Learn_name3");
            RPCName4 = new RPCVariable(mbed, "Learn_name4");
            RPCName5 = new RPCVariable(mbed, "Learn_name5");
            RPCName6 = new RPCVariable(mbed, "Learn_name6");
            RPCName7 = new RPCVariable(mbed, "Learn_name7");
            RPCName8 = new RPCVariable(mbed, "Learn_name8");
            RPCName9 = new RPCVariable(mbed, "Learn_name9");

            function send_id(clicked_id)
            {
            	RPCRequest.write(clicked_id);
            }

            function learner()
            {

            	a = document.getElementById("button_name").value;
            	if( a.length > 10) { alert("Button name cannot exceed 10 characters!"); document.getElementById("button_name").value = "";}
            	else if( a.length == 0) { alert("Button name needed!"); document.getElementById("button_name").value = "";}
            	else {
            	RPCLearn.write(1);
       		     	a = a.split('');
       	    	 	for (i = 0; i < 10; i++) {
						if (a[i] == undefined)
						a[i] = '~';
					}
					for (i = 0; i < 10; i++) {
						var x = eval("RPCName" + i);
						x.write(a[i]);
					}
				}
            }
        </script>
        <script>
			$.get('/sd/SmartRemote/db.txt', function(data) {
        	//$('#text').append(data);
        	data = data.split("\n");
        	for (d in data) {
        		if(d%5 == 1) // Grab all the button names (every third entry)
        			$('#buttons').append("<button id="+data[d-1]+" style=\"width: 100%; font-size: 60px; padding: 10px; margin: 10px;\" onClick=\"send_id(this.id)\">" + data[d] + "</button></ br></ br>"); //set id's
        	}
  			});
		</script>
    </head>
    <body>
    	<h1 style="text-align: center; font-size: 80px">SmartRemote</h1>
    	<button id="learn" onClick="learner()" style="width: 100%; font-size: 60px; padding: 10px; margin: 10px;">Learn</button>
    	<br />
    	<input type="text" id="button_name" style="width: 100%; font-size: 100px;" />

    	<br /><hr /><br />
    	<div id="buttons"></div>

    </body>
</html>
Import programSmartRemote
A smart remote using the sparkfun IR transmitter and receiver. The program also uses a web server to show the buttons on a mobile platform.
4 comments on Smart Remote:
Please log in to post comments.

How did u create server ?