Important changes to repositories hosted on mbed.com
Mbed hosted mercurial repositories are deprecated and are due to be permanently deleted in July 2026.
To keep a copy of this software download the repository Zip archive or clone locally using Mercurial.
It is also possible to export all your personal repositories from the account settings page.
You are viewing an older revision! See the latest version
Example Application Esmacat master
Example Application, “Arduino_shield”
- Download the "Esmacat Master Software from https://www.esmacat.com/software
- The example project under the folder esmacat_applications\project_examples\arduino_shield constructs a specific application using the Arduino shield slave driver to demonstrate the features of the EASE. You may build this example directly from this folder.
- Files to be modified incase you want to build your own Esmacat Master Application my_app.h, my_app.cpp

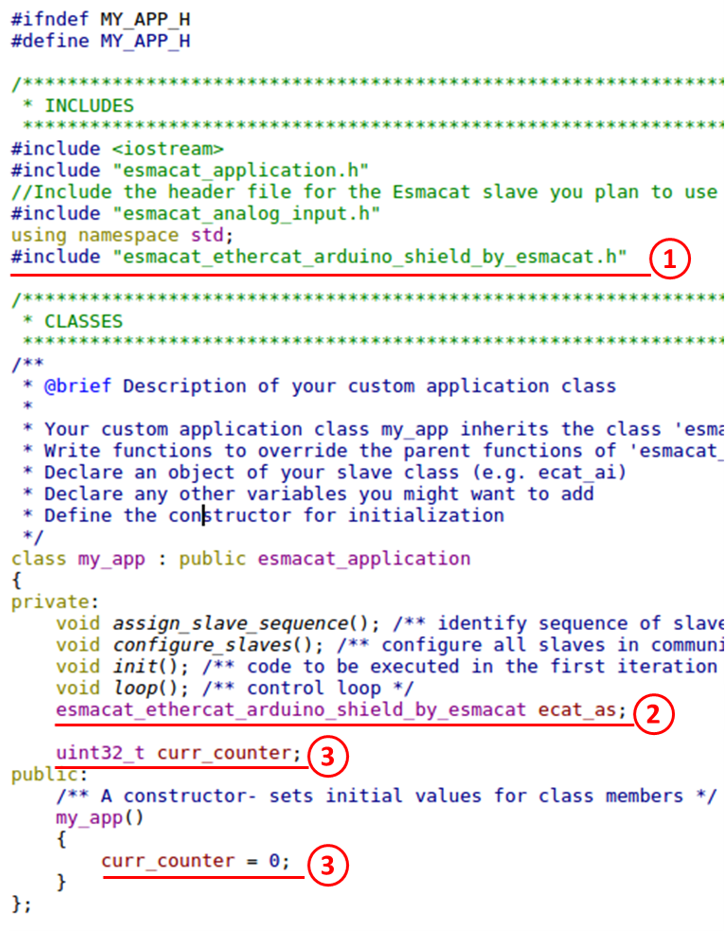
- In the header file, my_app.h, you have to include the corresponding header files for your slave in here. Since we want to use EASE, include esmacat_ethercat_arduino_shield_by_esmacat.h
- Instantiate your slave esmacat_ethercat_arduino_shield_by_esmacat as ecat_as
- If you’re introducing additional variables under the esmacat_application class, include those and initialize them within the constructor. In this example, we will use an integer variable curr_counter.

This part of the code is in my_app.cpp
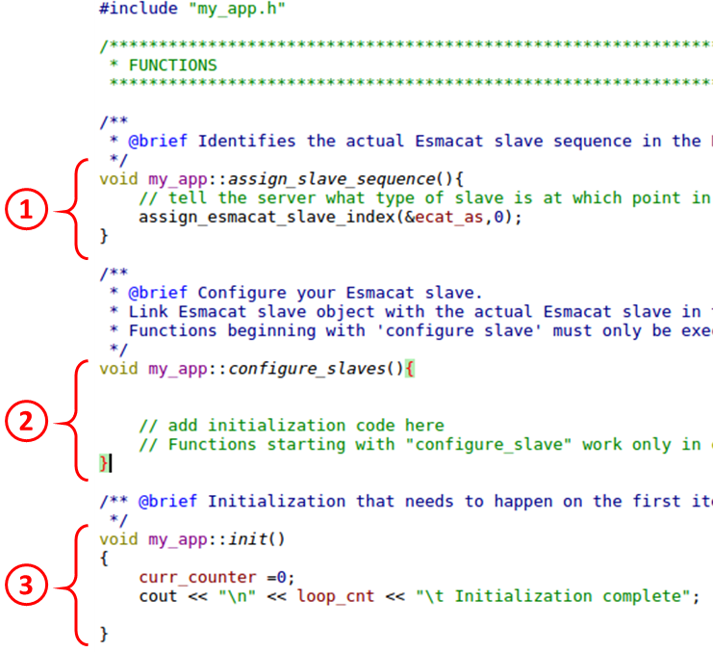
- Assign the slave sequence in the communication chain and link your object instance ecat_as (created in step 2 in the Header file subsection) in the function assign_slave_sequence with assign_esmacat_slave_index(&ecat_as,0); The index starts from 0. In this example, only one device has been connected. Thus, the index is 0.
- Do not change the function configure_slaves since we do not need to change any configuration of the EASE slave. If you need to change any configuration of other Esmacat slaves later, use this function.
- The init function can be used for any initialization that has to be done prior to the loop being executed. We will initialize the counter here and print out a completion message on the terminal. You may expand this code to include other initialization activities as needed.
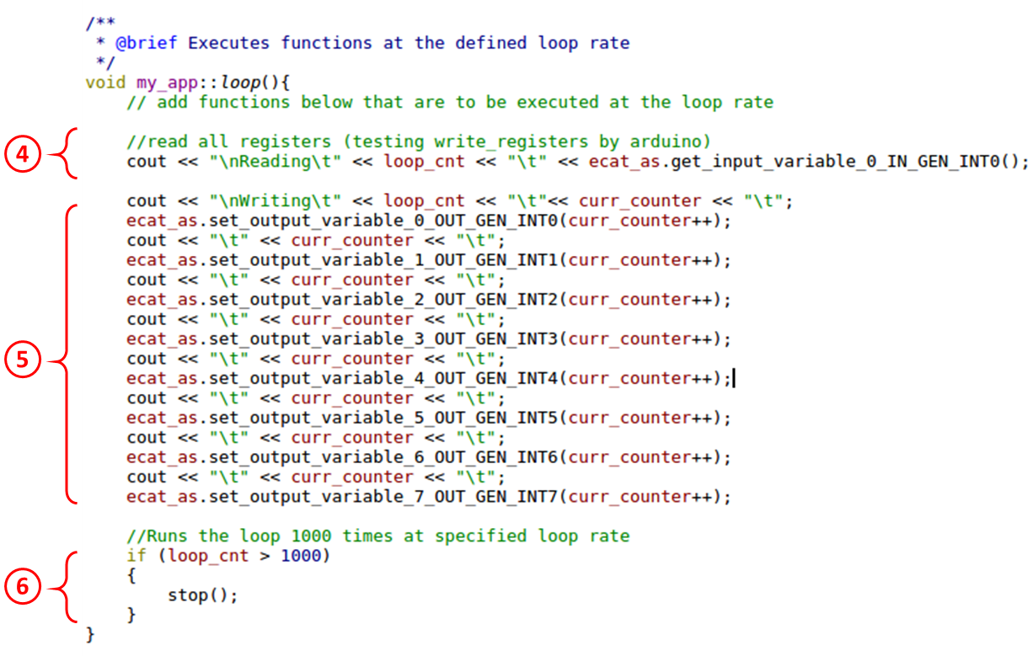
- This part of the code prints the loop counter and the 0th integer that is being set by the EASE_Example application.
- This part of the loop writes the value of curr_counter (which is being incremented) to the Mbed Base Board.
- The loop exits after 1000 iterations.
- You do not have to change anything in the main.cpp file

- The loop rate can be adjusted by changing the value of ESMACAT_TIME_PERIOD_US in esmacat_library\master.h. The loop rate accuracy varies significantly with the OS being used.
Building and Executing the Master Software
- Build the project the project as per Getting Started with Esmacat Master Software in Windows or Getting Started with Esmacat Master Software in Linux provided at https://www.esmacat.com/tutorials
- Use a terminal window to navigate to the build folder. In our example, it is located at MyRepositories\Esmacat\esmacat-master-software\out\build\x64-Debug.
- Navigate to the example folder where the Arduino shield example is located (esmacat_applications\project_examples\arduino_shield) using and Run the output file with the following command arduino_shield.exe
- NOTE: The folder path might also be determined by the location in the JSON file at Project -> CMake Settings for Esmacat -> CmakeSettings.json
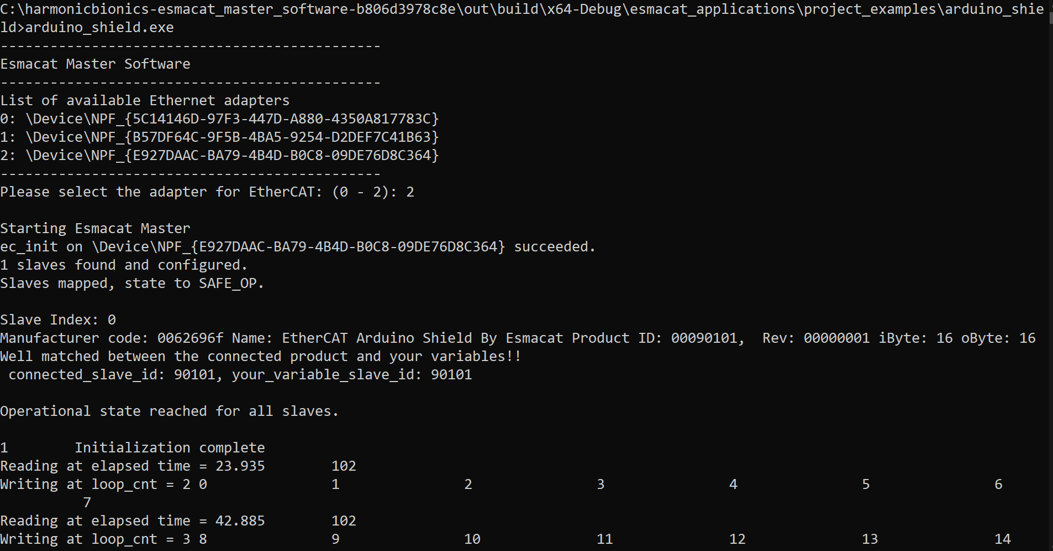
- You should be able to see a result similar to Figure below

- When prompted to select the adapter, select the number corresponding to the adapter on the list.
- In our example setup, it is adapter no. 2. If the adapter is entered correctly and recognized by the Master, it will list the Slaves on the EtherCAT communication chain, and then proceed to execute my_app.
- You should be able to see a result similar to Figure below.
