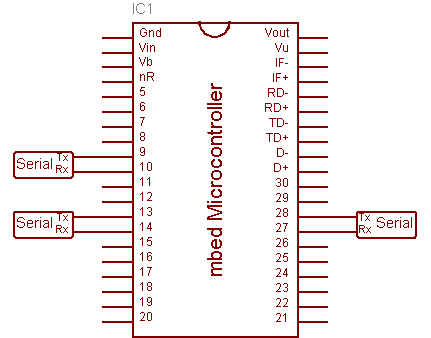
Serial - シリアル通信
Serial - シリアル通信
Information
本ページは私家版のため、誤り等あればご指摘ください。
最新の情報は公式のドキュメントをご参照ください。
http://mbed.org/handbook/Serial
ピンをシリアル(UART)に設定し、外部と通信します。
受信割込みや、送信完了割込みの機能もあります。
プログラム書込み用のUSBも、PCとのシリアル通信に利用できます。
mbedのUSBシリアルを使うには、あらかじめドライバをインストールしておきましょう。
RawSerial
RTOS中でも使える、排他制御が考慮されていない RawSerial というのもあります。

初期化
Serial name(tx, rx);
name: 名前(自由に決めて良い)
tx: TX(送信)ピン名(p9, p13, p28, USBTX)
rx: RX(受信)ピン名(p10, p14, p27, USBRX)
PCシリアルのピン名は USBTX, USBRX です。
クロックレート
name.baud(baudrate);
baudrate: クロックレート(省略時 9600)
通信方式
name.format(bits, parity, stop_bits)
bits: ビット数(5~8)
| parity | 備考 |
|---|---|
| Serial::None | パリティなし(省略時) |
| Serial::Odd | 奇数パリティ |
| Serial::Even | 偶数パリティ |
| Serial::Forced1 | 1強制 |
| Serial::Forced0 | 0強制 |
stop_bits: ストップビット(1~2)
受信
val = name.getc();
valに受信したデータが代入されます。
受信チェック
val = name.readable();
valには受信データがあれば1が、なければ0が代入されます。
送信
name.putc('A');
"A"の文字を送信します。
name.printf("Hello");
"Hello"の文字列を送信します。
割り込み
name.attach(fptr, type);
fptr: 割り込み処理ルーチンのアドレス
| type | 備考 |
|---|---|
| Serial::RxIrq | 受信割り込み |
| Serial::TxIrq | 送信バッファ空き割り込み |
Class中での利用
name.attach(&this, T::mptr, type);
ブレーク
ブレークを生成するにはレジスタを直接操作する。
break enable
LPC_UART3->LCR |= (1 << 6);
break disable
LPC_UART3->LCR &= (1 << 6);
ブレークを検出するにはレジスタのフラグをチェックする。
break or framing error
val = LPC_UART3->LSR & ( (1 << 4) | (1 << 3) );
p9,p10:LPC_UART3 / p13,p14:LPC_UART1 / p28,p27:LPC_UART2
フロー制御
ハードウェアフローコントロールを有効化できます。
set_flow_control(Serial::RTSCTS, rts, cts);
set_flow_control(Serial::RTS, rts);
set_flow_control(Serial::CTS, cts);
DMA
最近、DMA関連のオプションが追加されている。 未検証のためまた後日。。。
set_dma_usage_tx (DMAUsage usage)
set_dma_usage_rx (DMAUsage usage)
例
受信したシリアルデータをそのまま送信(エコー)します
#include "mbed.h"

Serial pc(USBTX, USBRX); // tx, rx

int main() {
    pc.printf("Hello World!");
    while(1) {
        pc.putc(pc.getc() + 1);
    }
}
割り込みにより、PCシリアルとp9,p10間で送受信する
#include "mbed.h"

Serial pc(USBTX, USBRX); // tx, rx
Serial device(p9, p10);  // tx, rx
char buf[] = "Hello World!";
int i = 0;

void pc_rx () {
    device.putc(pc.getc());
}

void dev_rx () {
    pc.putc(device.getc());
}

void pc_tx () {
    pc.putc(buf[i]);
    i ++;
    if (i >= strlen(buf)) {
       pc.attach(NULL, Serial::TxIrq);
    }
}

int main() {
    pc.attach(pc_rx, Serial::RxIrq);
    device.attach(dev_rx, Serial::RxIrq);
    pc.attach(pc_tx, Serial::TxIrq);

    while(1);
}
参考
LPCXpresso LPC1768 コード
UART送受信、割込み
RXD0で受信したデータをTXD0へ送信
#include "LPC17xx.h"

#ifdef __cplusplus
extern "C" {
  void UART0_IRQHandler ();
}
#endif

void UART0_IRQHandler (void) {
    int c;
    switch(LPC_UART0->IIR & 0x0e) {
    case 0x04: // RDA
    case 0x0c: // CTI
        // Loopback to send
    	c = LPC_UART0->RBR;
        LPC_UART0->THR = c;
        break;
    }
}

int main(void) {

    LPC_PINCON->PINSEL0 &= ~((3 << 6)|(3 << 4));
    LPC_PINCON->PINSEL0 |= (1 << 6)|(1 << 4); // RXD0 (01), TXD0 (01)

    LPC_SC->PCLKSEL0 &= ~(3 << 6); // PCLK_UART0 ck/4 (00)
    LPC_SC->PCONP |= (1 << 3); // PCUART0

    uint32_t Fdiv = SystemCoreClock / (4 * 16 * 9600); // 9600bps
    LPC_UART0->LCR |= (1 << 7); // enable access DLAB
    LPC_UART0->DLL = Fdiv & 0xff;
    LPC_UART0->DLM = (Fdiv >> 8) & 0xff;
    LPC_UART0->LCR &= ~(1 << 7); // disable access DLAB

    LPC_UART0->LCR |= (3 << 0); // 8bit
    LPC_UART0->FCR = (7 << 0); // RX1char(00), FIFO reset
    LPC_UART0->IER = (1 << 0); // RBR
    NVIC_EnableIRQ(UART0_IRQn);
    __enable_irq();

    while(1);
}
12 comments on Serial - シリアル通信:
Please log in to post comments.

『割り込みにより、PCシリアルとp9,p10間で送受信する』の20行目 pc.attach(NULL, TxIrq);
ここのTxIrqはSerial::TxIrqではないでしょうか。