TCP/IP to Serial Converter (remote serial port). For more details see [https://developer.mbed.org/users/hudakz/code/Serial_over_Ethernet/wiki/Homepage]
Dependencies: UIPEthernet mbed mbed-STM32F103C8T6
TCP/IP to Serial Converter
- Enables communication with TTL serial device over Ethernet LAN connection.
- You can considerably extend an existing serial connection without modifying the legacy serial communication software.
How it Works
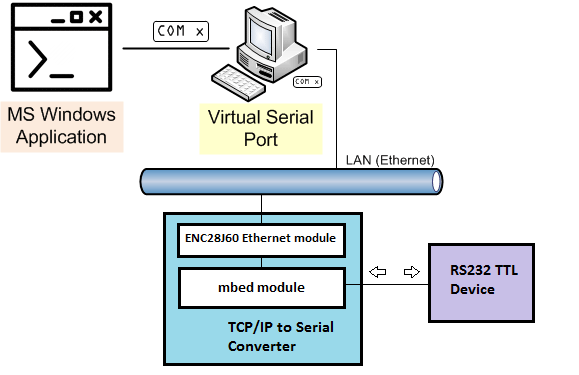
Serial data sent by an application running on your PC to your PC's virtual serial port (see below how to create one) is automatically transmitted through Ethernet LAN connection to a "TCP/IP to Serial Converter". The converter then sends the data received over Ethernet to the connected TTL serial device through serial connection. In turn, the response from the serial device is sent back to your PC by the "TCP/IP to Serial Converter" over Ethernet connection and the application can read through the virtual serial port without knowing that it actually arrived over Ethernet .

How to build one
To create a "TCP/IP to Serial Converter" an inexpensive ENC28J60 Ethernet module is connected to the mbed board and set-up as TCP/IP server. The server is listening for data coming from clients for example at IP Address 192.168.1.181, Port Number 10001 (adapt to your needs). Binary data received from a client over the Ethernet is transmitted to the connected TTL serial device and in turn, data received from the serial device is sent back to the TCP/IP client via Ethernet.
- Compile the program and save the binary to your mbed board.
- Connect an ENC28J60 Ethernet module to the mbed board according to the pin assignment defined in main.cpp.
- Connect the ENC28J60 module to your Ethernet network.
- Connect a serial device to the mbed's serial port. Please notice that in case your serial device is using a regular RS-232 connection an additional "Serial TTL to regular RS-232 converter" is needed!
How to test and use the Converter
- Create a virtual serial port on your PC as follows:
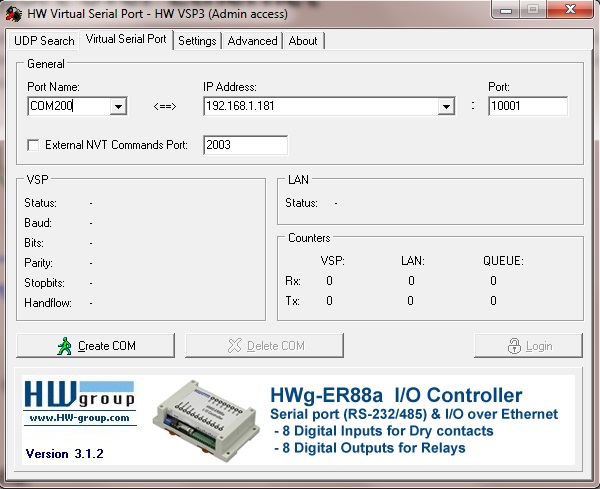
See Using HW VSP powered by HW group and download their HW VSP3 Virtual Serial Port for free. - Install and run the HW VSP. Proceed to the Virtual Serial Port tab and create a new virtual serial port (for example COM200). Assign it the same IP address and port number as you specified in main.cpp (IP address 192.168.1.181 and port number 10001).

- You can now close the HW VSP application and verify, through the Windows Device Manager, that a new COM200 port is available on the system. From now on, all serial data sent by any application running on your PC to your PC's serial port COM200 will be redirected trough the Ethernet LAN to the "TCP/IP to Serial Converter". Then mbed's serial port will act on behalf of COM200 and transmit the data to the connected serial device. In turn, the response from the serial device will be sent back trough the Ethernet LAN to your PC and the application can read through the (virtual) serial port COM200.
- Simple test:. Connect the serial Tx pin on the mbed board to the Rx pin. On your PC, run your favorite terminal application (HyperTerminal, TeraTerm, PuTTY etc.) and open serial port COM200. Set the same bit rate as you did in main.cpp. Then type in some message and send it to serial port COM200. In turn, you should receive the same data echoed by the "TCP/IP to Serial Converter".
Diff: main.cpp
- Revision:
- 2:e38442f3cb74
- Parent:
- 1:d39ee3c772e8
--- a/main.cpp	Sat Apr 11 07:23:02 2015 +0000
+++ b/main.cpp	Thu Aug 25 10:37:39 2016 +0000
@@ -6,10 +6,10 @@
  *
  *  ENC28J60 modul is connected to the mbed board to create a TCP/IP server.
  *  The server is listening for clients at IP address 192.168.1.181, port 10001 (you can adapt it to your needs).
- *  Binary data received from a client is transmitted to a serial device and
+ *  Binary data received from a client is transmitted over serial device and
  *  in turn data received from the serial device is sent back to the TCP/IP client.
  *
- *  How to use:
+ *  How to use the converter:
  *  Compile and save it to your mbed board.
  *  Connect a ENC28J60 module to the mber board according to the pin assignment below.
  *  Connect a serial device to the mbed serial port. Please notice that in case your serial device
@@ -29,8 +29,8 @@
 #include "UIPEthernet.h"

 const int           BAUD = 115200;  // serial bit rate (change to match the speed of the connected serial device)
-uint8_t             rxBuf[1024];    // serial Rx buffer (reduce the size if you don't use so much data in bulk)
-uint8_t             txBuf[1024];    // serial Tx buffer (reduce the size if you don't use so much data in bulk)
+uint8_t             rxBuf[512];     // serial Rx buffer (adjust the size to your needs)
+uint8_t             txBuf[512];     // serial Tx buffer (adjust the size to your needs)
 // MAC number must be unique within the connected network. Modify as appropriate.
 const uint8_t       MY_MAC[6] = { 0x00, 0x01, 0x02, 0x03, 0x04, 0x06 };
 // IP address must be also unique and compatible with your network. Change as appropriate.
@@ -44,10 +44,17 @@
 #if defined(TARGET_LPC1768)
 Serial              serial(p9, p10);                        // serial: tx, rx
 UIPEthernetClass    UIPEthernet(p11, p12, p13, p8);         // spi: mosi, miso, sck, cs
-#elif defined(TARGET_NUCLEO_F103RB)
+#elif defined(TARGET_NUCLEO_F103RB) || defined(TARGET_NUCLEO_L152RE) || defined(TARGET_NUCLEO_F030R8)  \
+   || defined(TARGET_NUCLEO_F401RE) || defined(TARGET_NUCLEO_F302R8) || defined(TARGET_NUCLEO_L053R8)  \
+   || defined(TARGET_NUCLEO_F411RE) || defined(TARGET_NUCLEO_F334R8) || defined(TARGET_NUCLEO_F072RB)  \
+   || defined(TARGET_NUCLEO_F091RC) || defined(TARGET_NUCLEO_F303RE) || defined(TARGET_NUCLEO_F070RB)  \
+   || defined(TARGET_KL25Z ) || defined(TARGET_KL46Z) || defined(TARGET_K64F) || defined(TARGET_KL05Z) \
+   || defined(TARGET_K20D50M) || defined(TARGET_K22F) \
+   || defined(TARGET_NRF51822) \
+   || defined(TARGET_RZ_A1H)
 Serial              serial(PA_2, PA_3);                     // serial: tx, rx
-UIPEthernetClass    UIPEthernet(PB_5, PB_4, PB_3, PB_6);    // spi: mosi, miso, sck, cs
-
+UIPEthernetClass    UIPEthernet(D11, D12, D13, D10);        // spi: mosi, miso, sck, cs
+#else
 // If your board/plaform is not present yet then uncomment
 // the following three lines and replace TARGET_YOUR_BOARD and other pins as appropriate.

@@ -66,7 +73,8 @@
  * @retval
  */
 void onSerial(void) {
-    rxBuf[rxLength++] = serial.getc();   // read serial data
+    while(serial.readable())
+        rxBuf[rxLength++] = serial.getc();   // read serial data
 }

 /**
@@ -76,9 +84,6 @@
  * @retval
  */
 int main(void) {
-    UIPEthernet.begin(MY_MAC, MY_IP);
-    myServer.begin();
-    serial.baud(BAUD);
     serial.attach(&onSerial);

     while(1) {
@@ -90,8 +95,8 @@
                 txLength = client.read(txBuf, txLength);    // read data received from the TCP/IP client
                 for(int i = 0; i < txLength; i++)           // send through serial
                     serial.putc(txBuf[i]);
-                wait_ms(50);                                // tune (increase) this if you are loosing some data
-                client.write(rxBuf, rxLength);              // send back to client
+                wait_ms(50);                                // receive serial data from device
+                client.write(rxBuf, rxLength);              // send data to client over ethernet
             }
         }
     }