Mbed support for QtCreator IDE. Visit https://os.mbed.com/users/hudakz/notebook/building-offline-with-qt-creator/ for more info.
Building and debugging offline on Linux with QtCreator IDE
This page provides step by step instructions how to create, build and debug MBED applications offline using
- the QtCreator IDE (usually part of a Linux distribution) and
- the GNU Arm Embedded Toolchain.
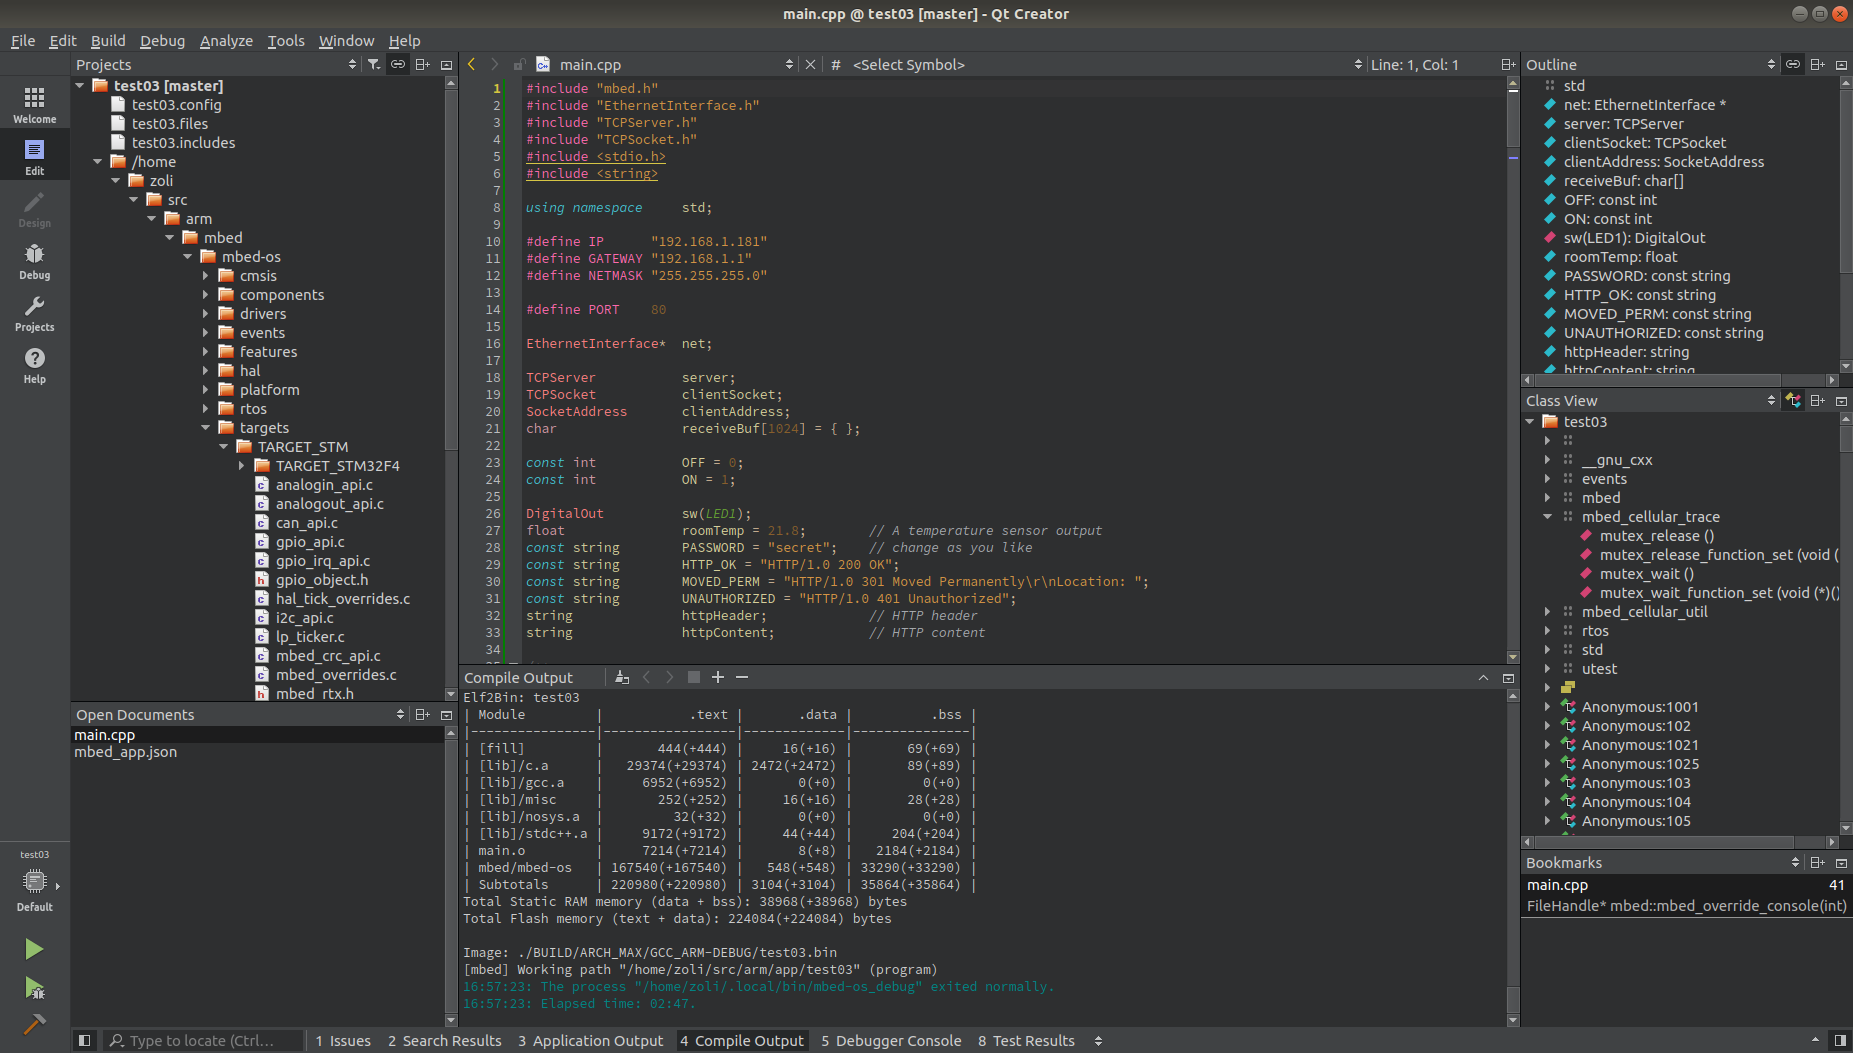
Main features
- Mbed CLI is used as the backend engine and QtCreator IDE is the GUI making life easier.
- No makefiles shall be edited.
- Enables to build Mbed OS 2 (aka Mbed Classic) or Mbed OS 6 (aka Mbed OS) applications.
- Supports custom targets.
- Works on Linux. (MS Windows is not supported anymore.)
- A common repository is shared rather than having a separate instance of Mbed OS and user libraries for each project.
How does it work
A bash script is run to parse and execute commands typed into the QtCreator's Make arguments edit box (located in the Build Steps Details).
The commands are stored along with the project file. The bash script is stored in the ~/.local/bin/mbed.bat file of your linux machine and you are free to adapt it to your needs.
In comparison to mbed-cli compile it accepts a few additional options :
- The
-osoption can be used to build for Mbed OS 2. For example:
-m LPC1768 -os 2
- Libraries can be added with the
-loption. For example:
-m LPC1768 -l TextLCD -l DS1820
See below the User libraries section for more details.
- The
-ror--releaseoption can be used to build with release profile.
-m NUCLEO_F446RE -r
- The
-Dor--macrooption can be used to define macros. For example:
-m NUCLEO_F103RB -macro MY_MACRO -l DS1820
Once the compilation is complete it can also flash the selected target MCU/board. At the present it is using pyOCD, OpenOCD and lpc21isp for flashing. You can use any programmer supported by these tools (e.g. a serial port, DAP link or ST-link programmer/debugger).
Usage
Once installed and configured, creating a new Mbed project becomes as easy as
- Launch the
QtCreatorand then click on the+ New Projectbutton.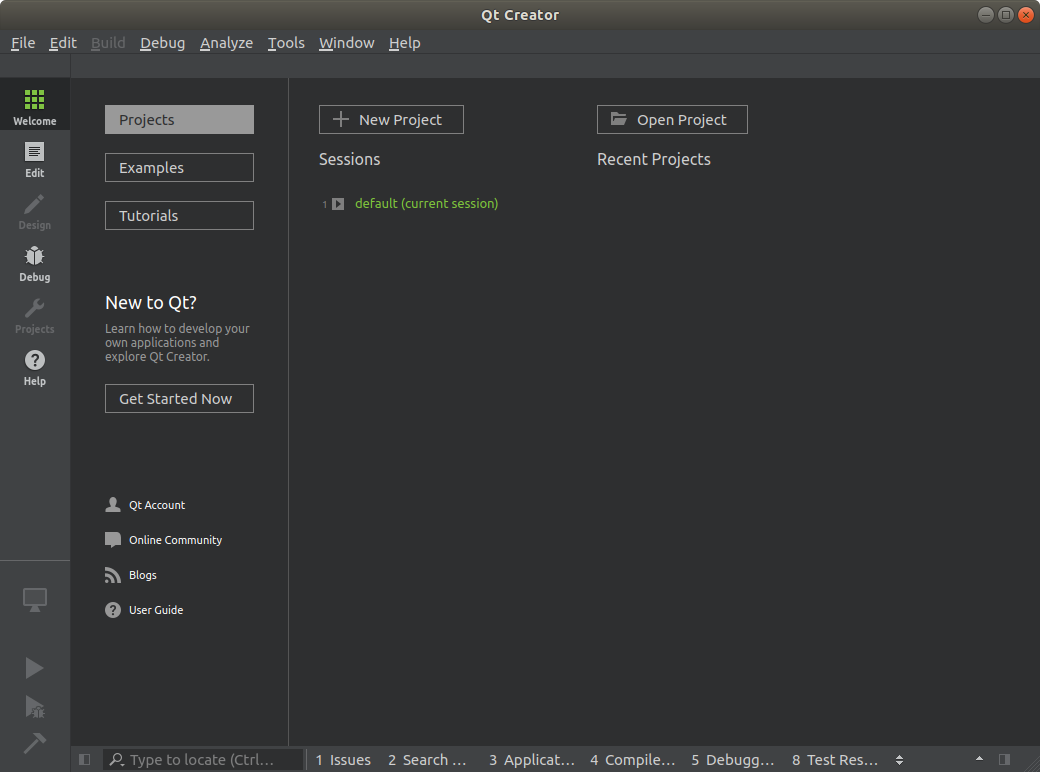
- Choose the
Mbedproject template.
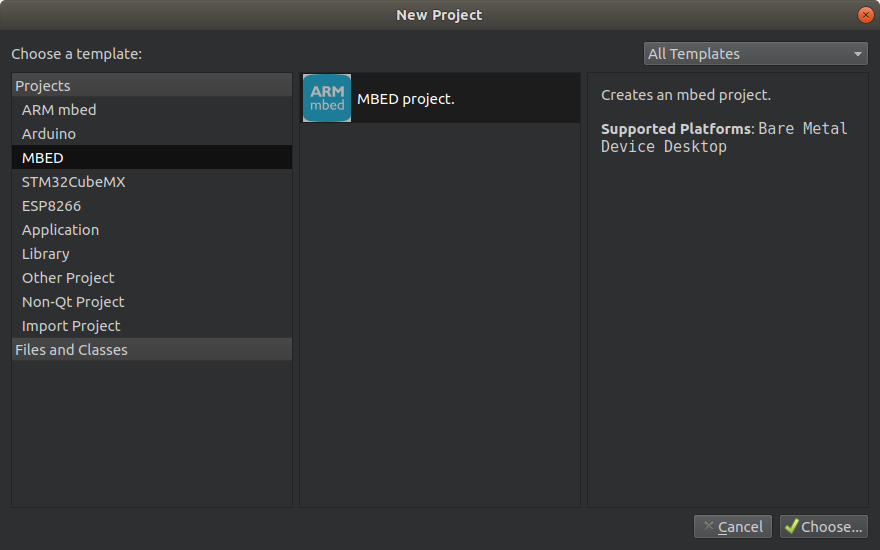
- Give it a name (for example
Blinky-os) and select a repository to create in.
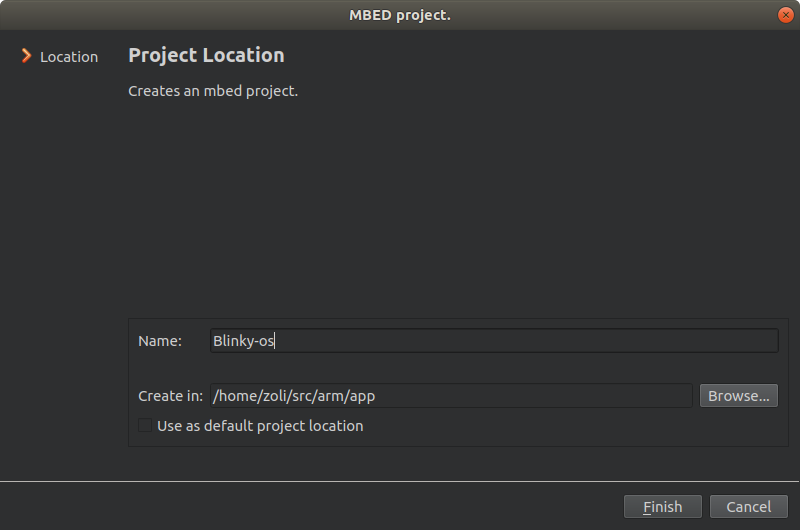
- Select the mbed kit
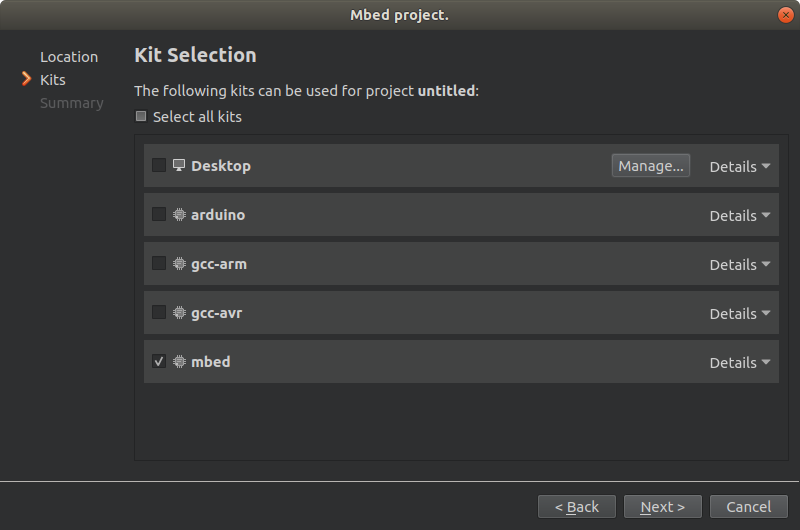
- Finish the new project
- The
main.cppwill be opened for editing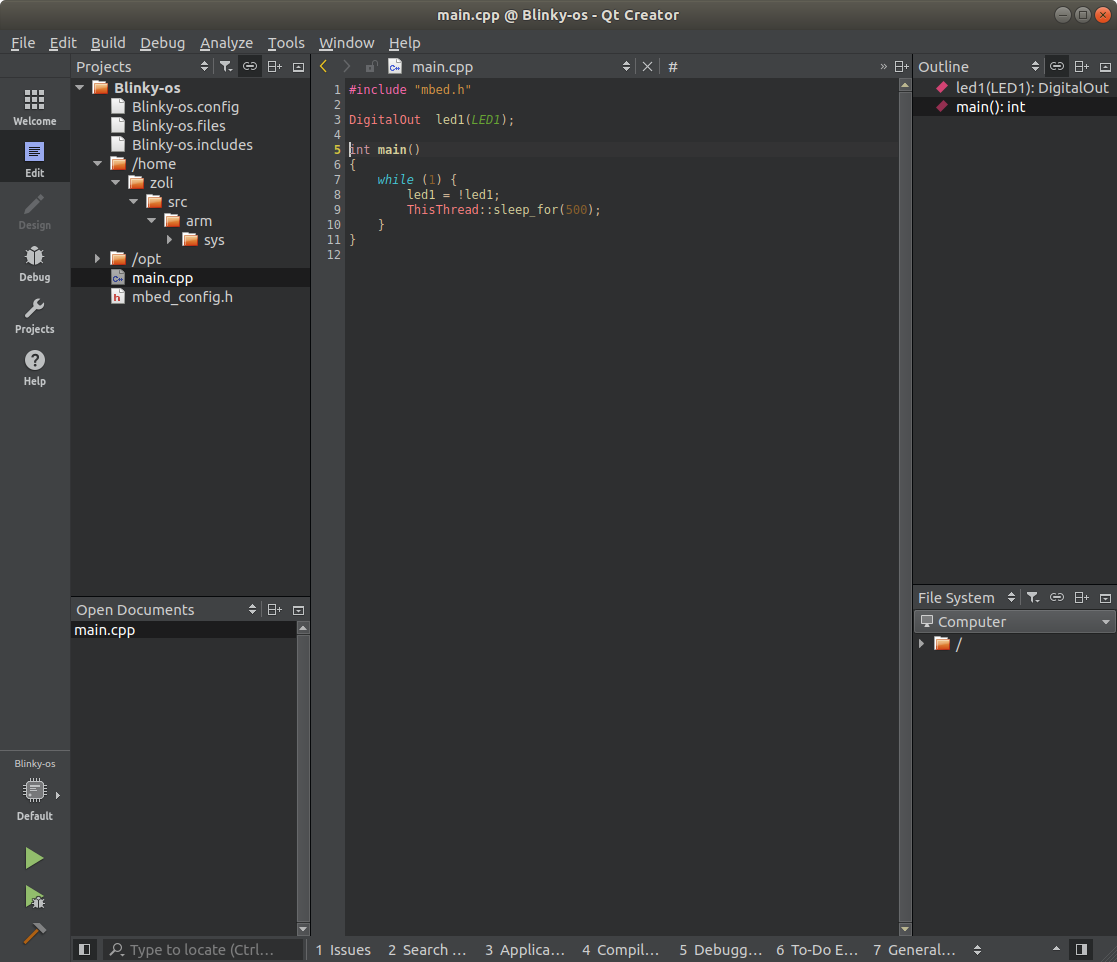
- In the left-hand toolbar select
Projectsand forBuild & Runselect mbed
- In
Build StepsopenDetailsand type-mfollowed by a space and the name of your target board into theMake argumentsedit box. For example:
-m LPC1768
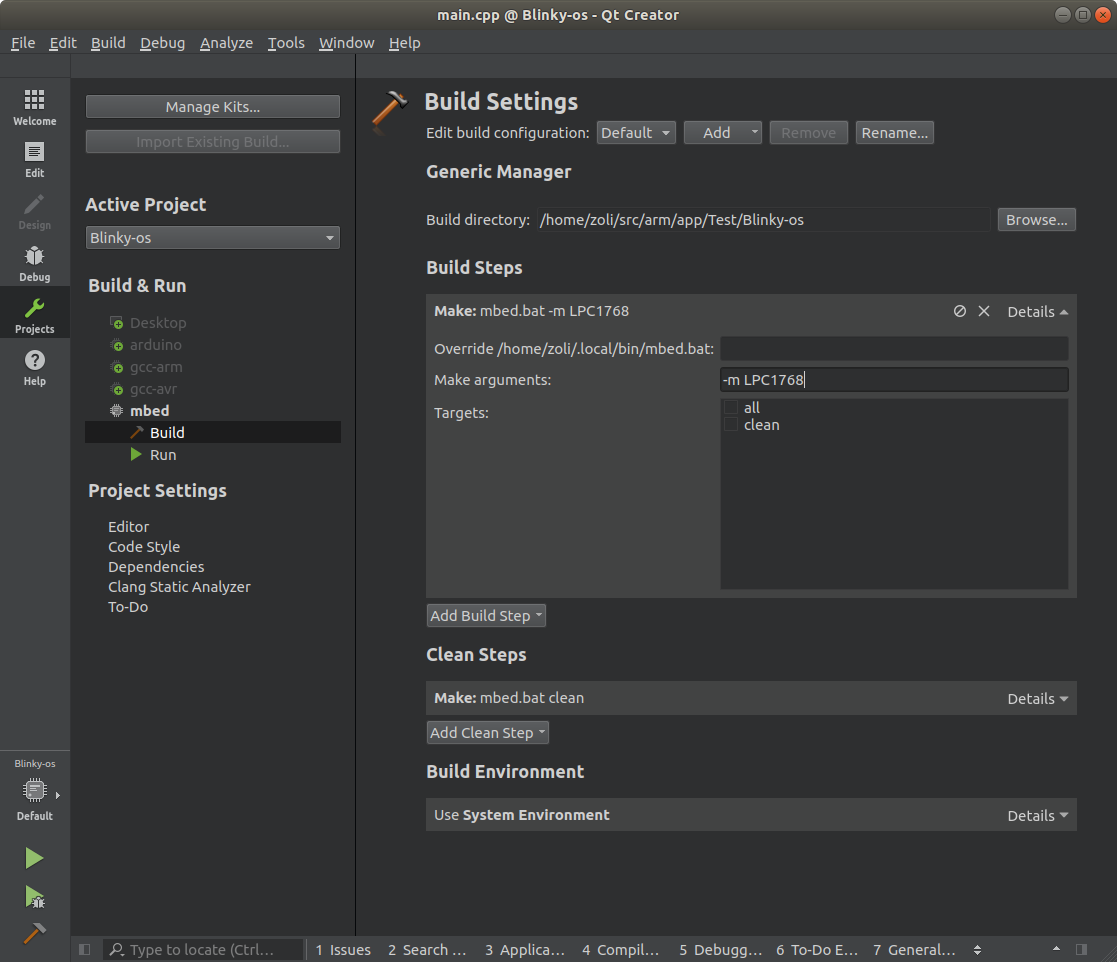
- If you don't want your program to be automatically downloaded to the connected board's flash then deselect the
allcheckbox.
- If you want a clean compilation (delete existing object files) then select the
cleancheckbox.
- To launch compilation, in the left-hand toolbar select
Editand click on theBuild Projectbutton (Hammer) or press Ctrl+B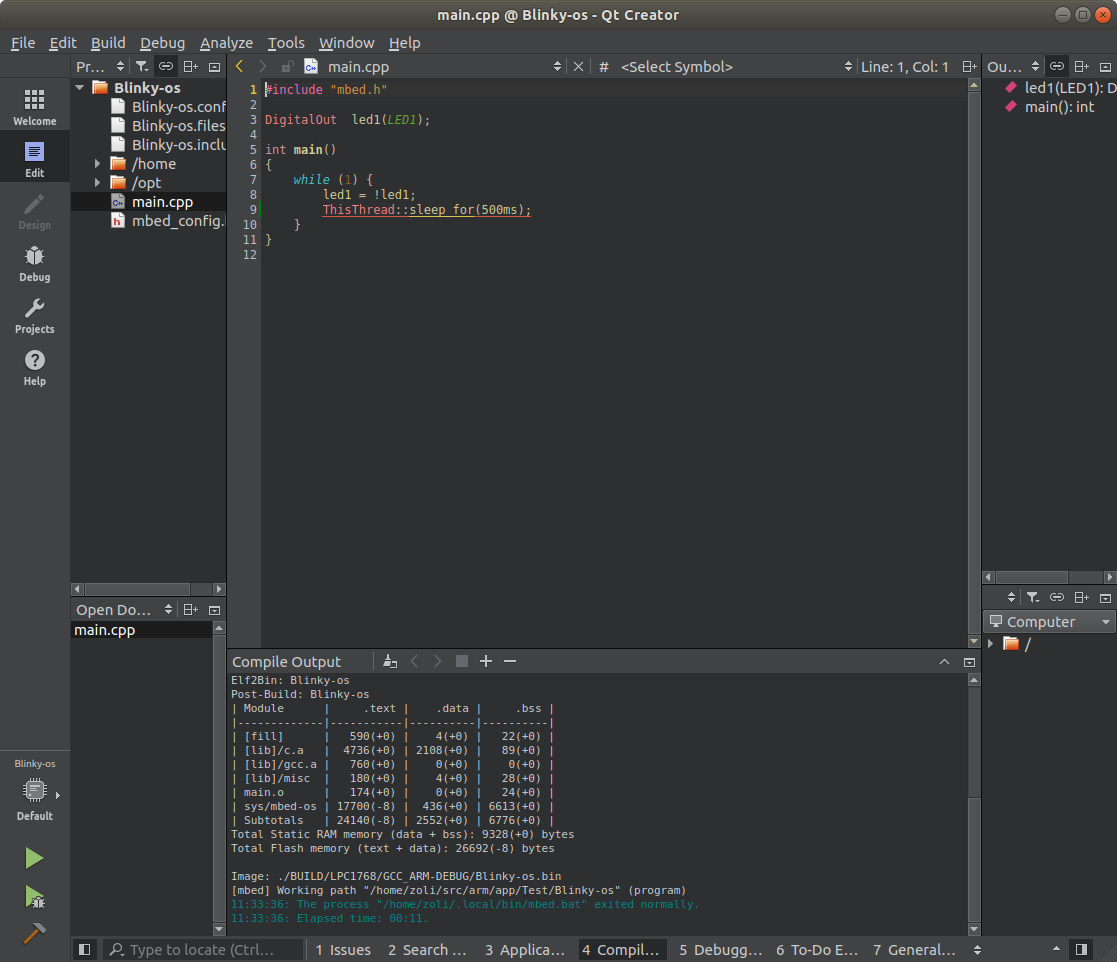
Happy coding :)
Installation
Install the following software to your PC
- Version
9-2019-q4-majorfor Mbed OS 6 - If you'd like to build Mbed OS 2 programs install also version
6-2017-q2-update(see below Juan Pedro's comments for more details).
Mbed CLI
pyOCD
OpenOCD
QtCreator IDE (usually part of a Linux distribution)
Mbed OS
- In your home directory, create a new
src/arm/sysfolder and open it in terminal - Issue the following commands
~/src/arm/sys >
mbed import mbed-os
cd mbed-os
mbed update master
mbed config -G toochain GCC_ARM
Mbed support for QtCreator
- Import the Mbed support for QtCreator project into the online compiler. Type
QtCreator_Supportinto theImport Nameedit box and save the project. - Right-click on the
mbed.batfile and selectExport File ... - Save the file to the
~/.local/binfolder. (NOTE: In Linux~is a shortcut (alias name) for your home directory.)
~/.local/bin/mbed.bat
- To make the script (text file) executable open a terminal in the
~/.local/bindirectory and execute:chmod +x mbed.bat
ubuntu:~/.local/bin$ chmod +x mbed.bat
- Click on the
mbed_wizard_linux_zipfolder - Right-click on the
mbed_wizard_linux.zipfile and selectExport File... - Save the file to the
~/.config/QtProject/qtcreator/templates/wizardsfolder and unzip. The result should be as below:
~/.config/QtProject
          └── qtcreator
		      └── templates
		          └── wizards
		              └── mbed
		                  ├── ARMmbedLogo.png
		                  ├── main.cpp
		                  ├── mbed_app.json
		                  ├── project.config
		                  ├── project.creator
		                  ├── project.files
		                  ├── project.includes
		                  └── wizard.json
- Right-click on the
custom_targetsfolder and selectExport Folder ... - Save the file to the
~/src/arm/sysfolder and unzip:
~/src/arm/sys
          ├── custom_targets
          └── mbed-os
- In your home directory create a new
~/src/arm/appfolder:
~/src/arm
      ├── app
      └── sys
- In your home directory create a new
~/src/arm/libfolder andcopy & paste(collect) the folders with your library sources there:
~/src/arm
      ├── app
      ├── lib
      └── sys
Optional: For building Mbed OS 2 programs
- Because at the present it's impossible to import the Mbed 2 library using Mbed CLI
- Download the
ZIPrepository from mbed-dev to your local drive and unpack it to the~/src/arm/sysfolder.
- Download the
- Rename the unpacked
mbed-dev-masterfolder tombed. After that it should be three sub-folders in the~/src/arm/sysfolder:
~/src/arm/sys
          ├── custom_targets
          ├── mbed
          └── mbed-os
Copy & pastethetoolsfolder from thembed-osto thembedfolder.
Configuration
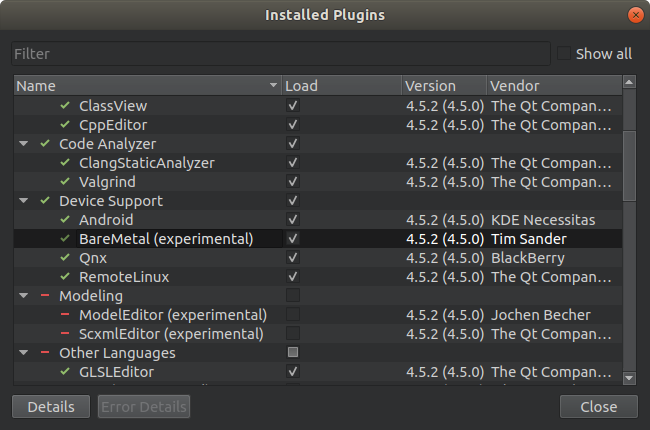
When the installation is complete launch the Qt Creator and in the Help menu select About Plugins ...
Make sure that the BareMetal (experimental) plugin is checked.
- Close the dialog box and restart the
QtCreator. - In
Toolsmenu selectOptions ... - Proceed to
Build & Runand add new mbedCustom Cand mbedCustom C++compilers. Provide the actual paths according to your system.
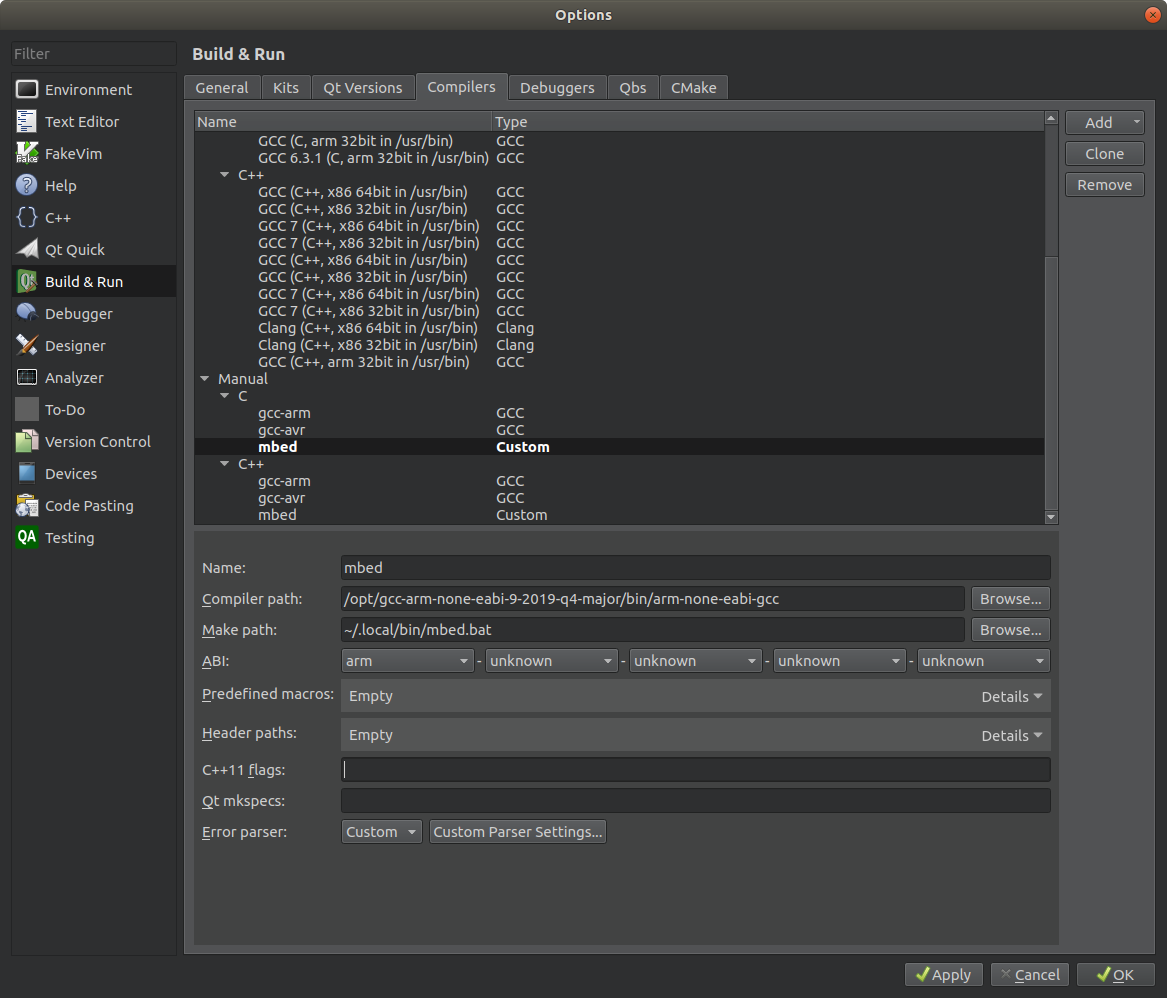
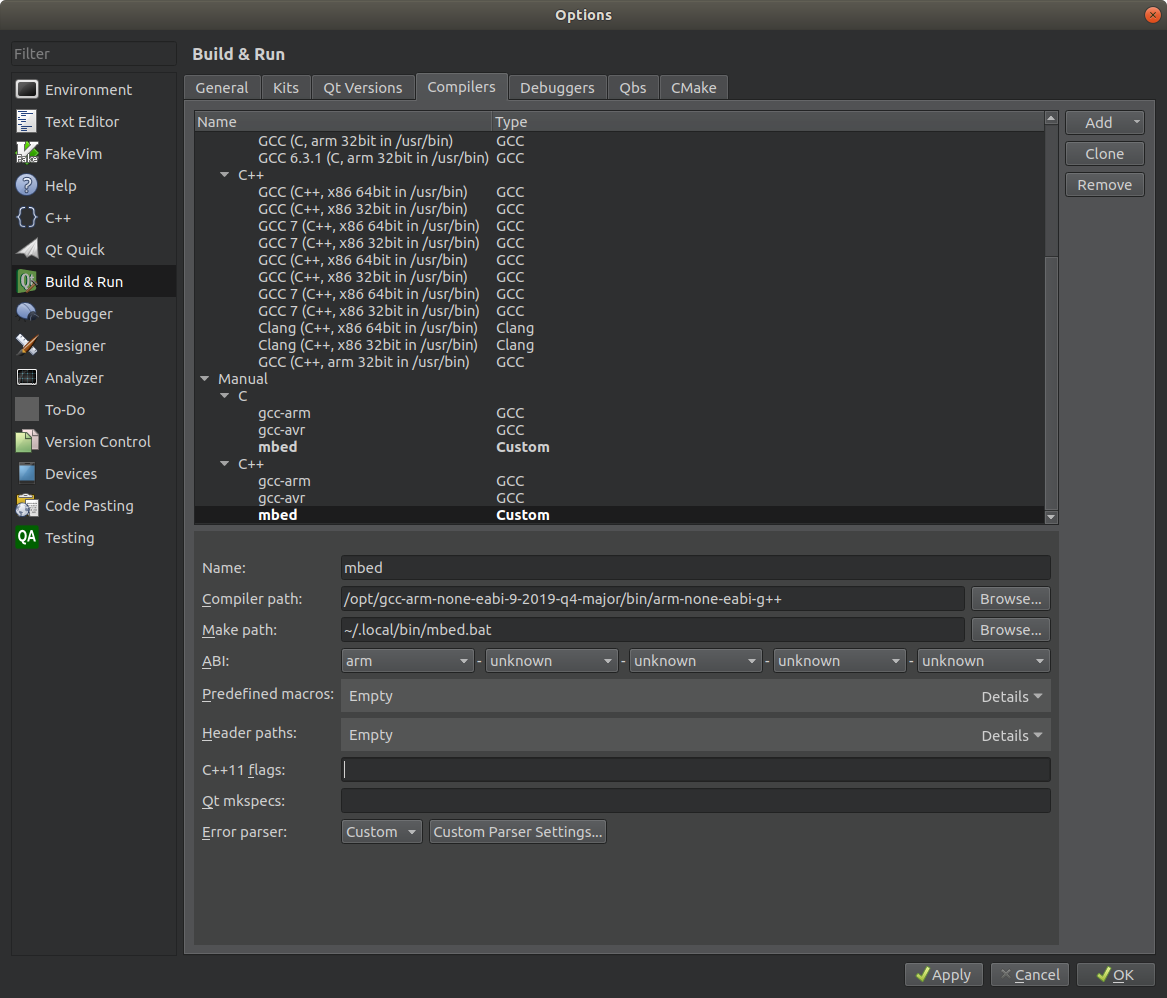
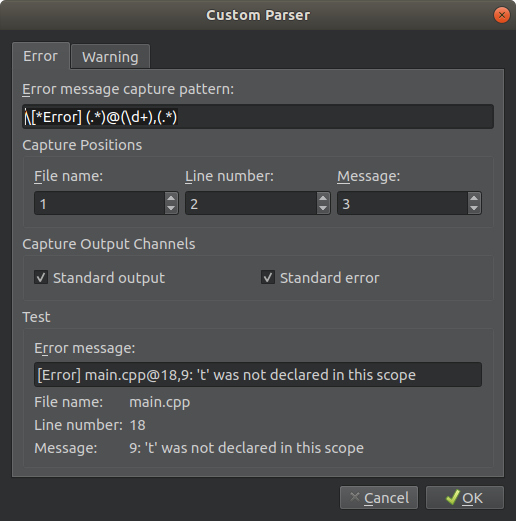
For the new mbed Custom C and Custom C++ compilers change the Custom Parser Settings ...:
Copy & pastethe following text into theError message capture patternedit box:
^.*[Ee][Rr][Rr][Oo][Rr][^.c][ \]]*([^@:,]*)[@:,]([0-9]*)(.*)
Copy & pastethe following text into theWarning message capture patternedit box:
^.*[Ww][Aa][Rr][Nn][Ii][Nn][Gg][ \]]*([^@:,]*)[@:,]([0-9]*)(.*)
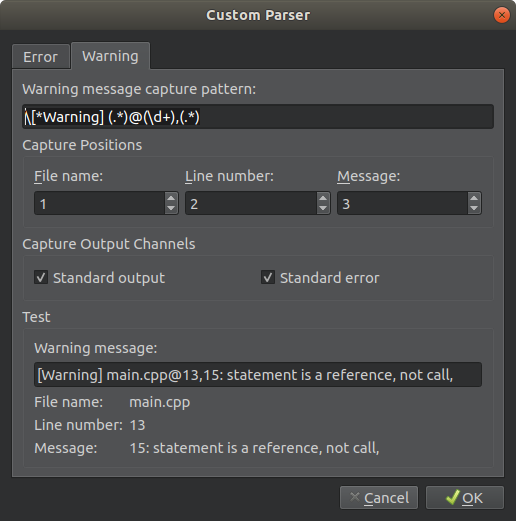
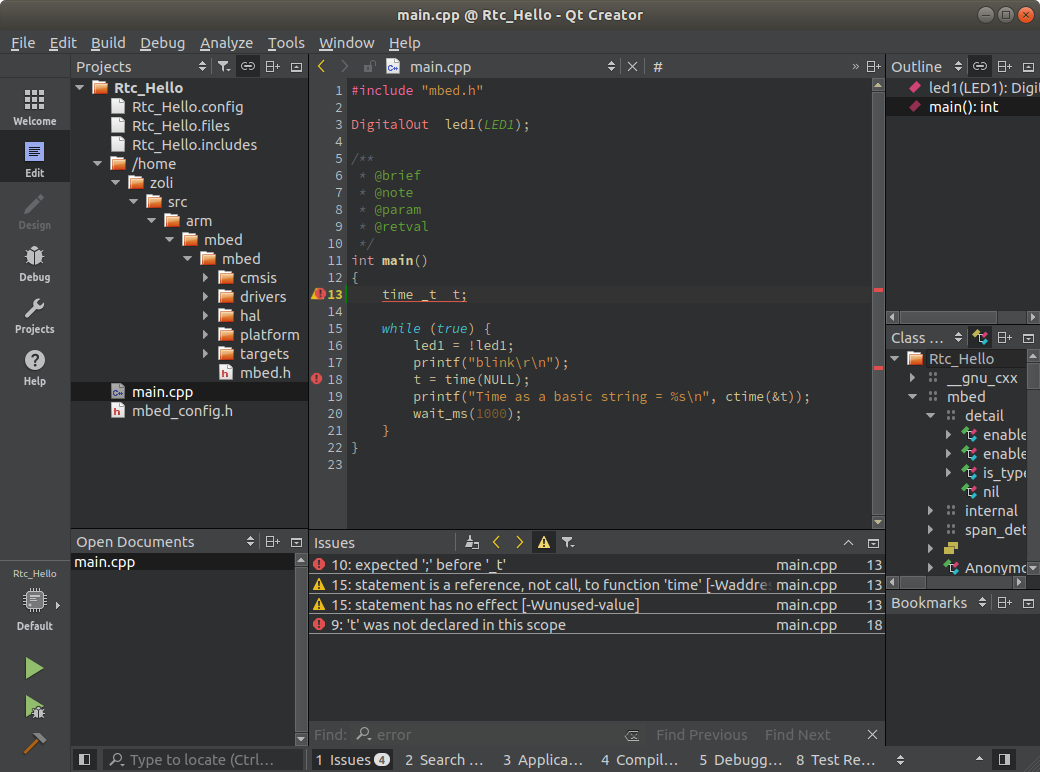
This will assure capturing error and warning messages during compilation and quick navigation to the related line.
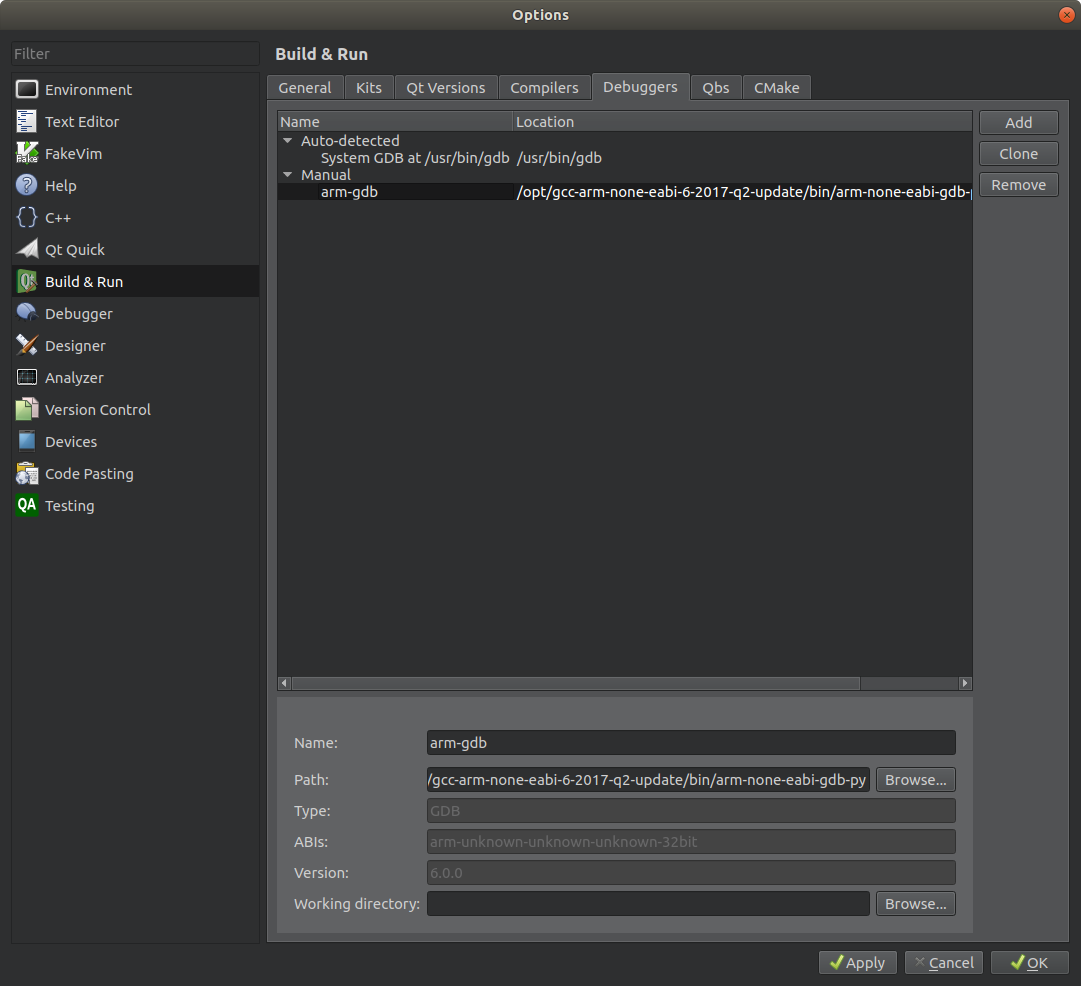
- Add a new
arm-gdbdebugger. Make sure you select thearm-none-eabi-gdb-py(arm-none-eabi-gdbwon't work)
- Proceed to the
Devicesand click on theAdd ...button.
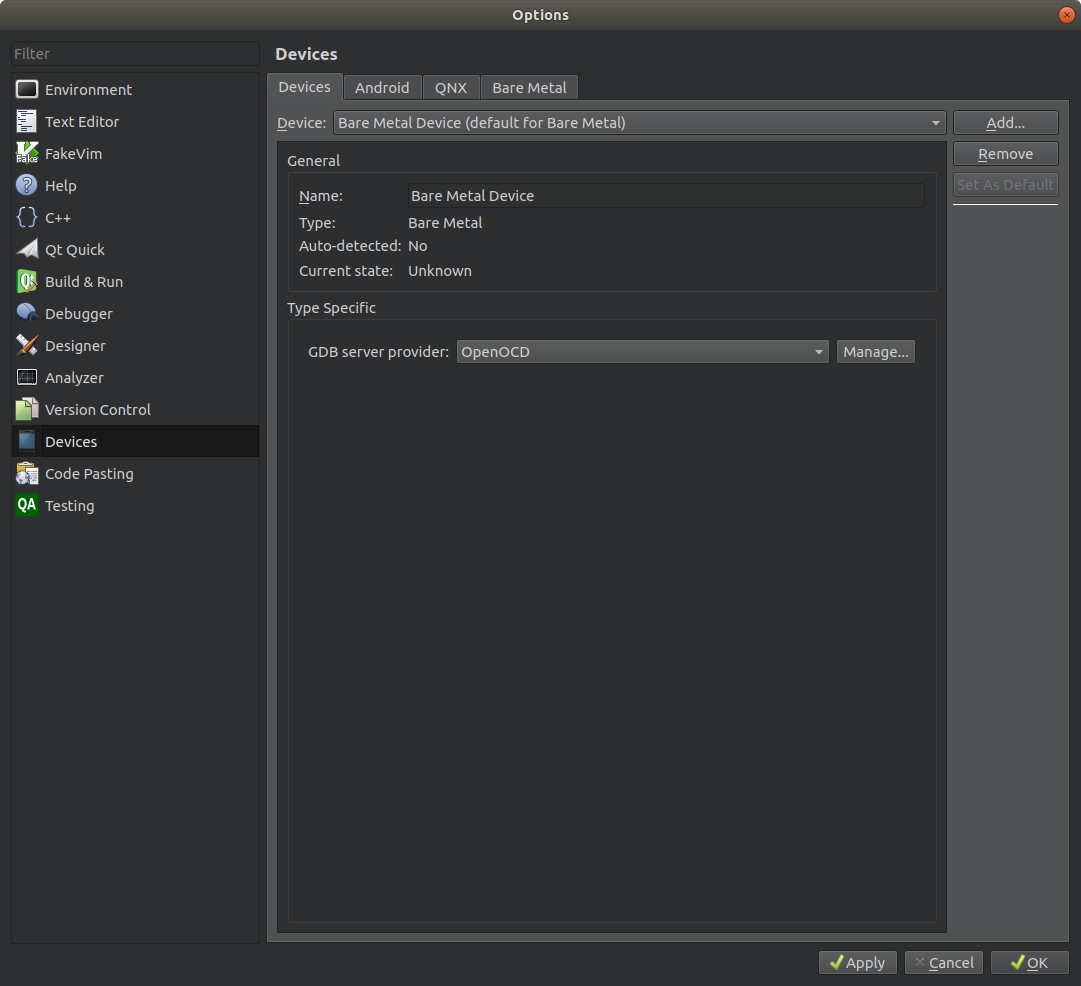
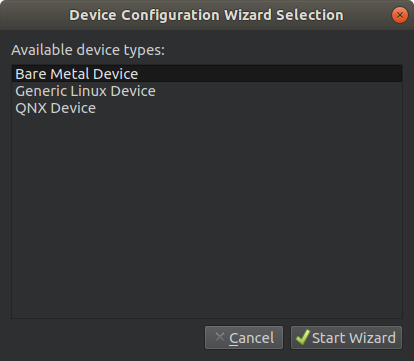
- Select the
Bare Metal Deviceand click on theStart Wizardbutton.
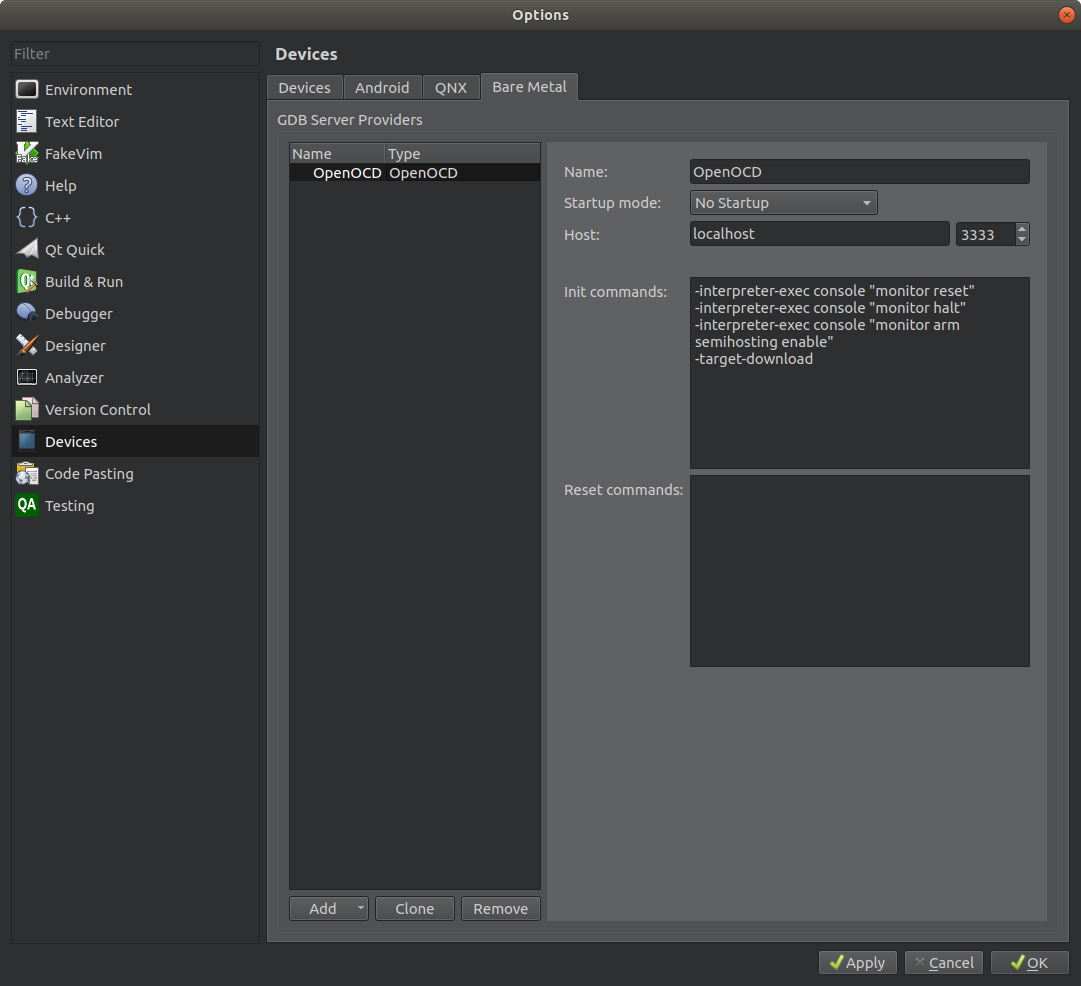
- In
Devicesproceed to theBare Metaltab. Click on theAddbutton and selectOpenOCD.
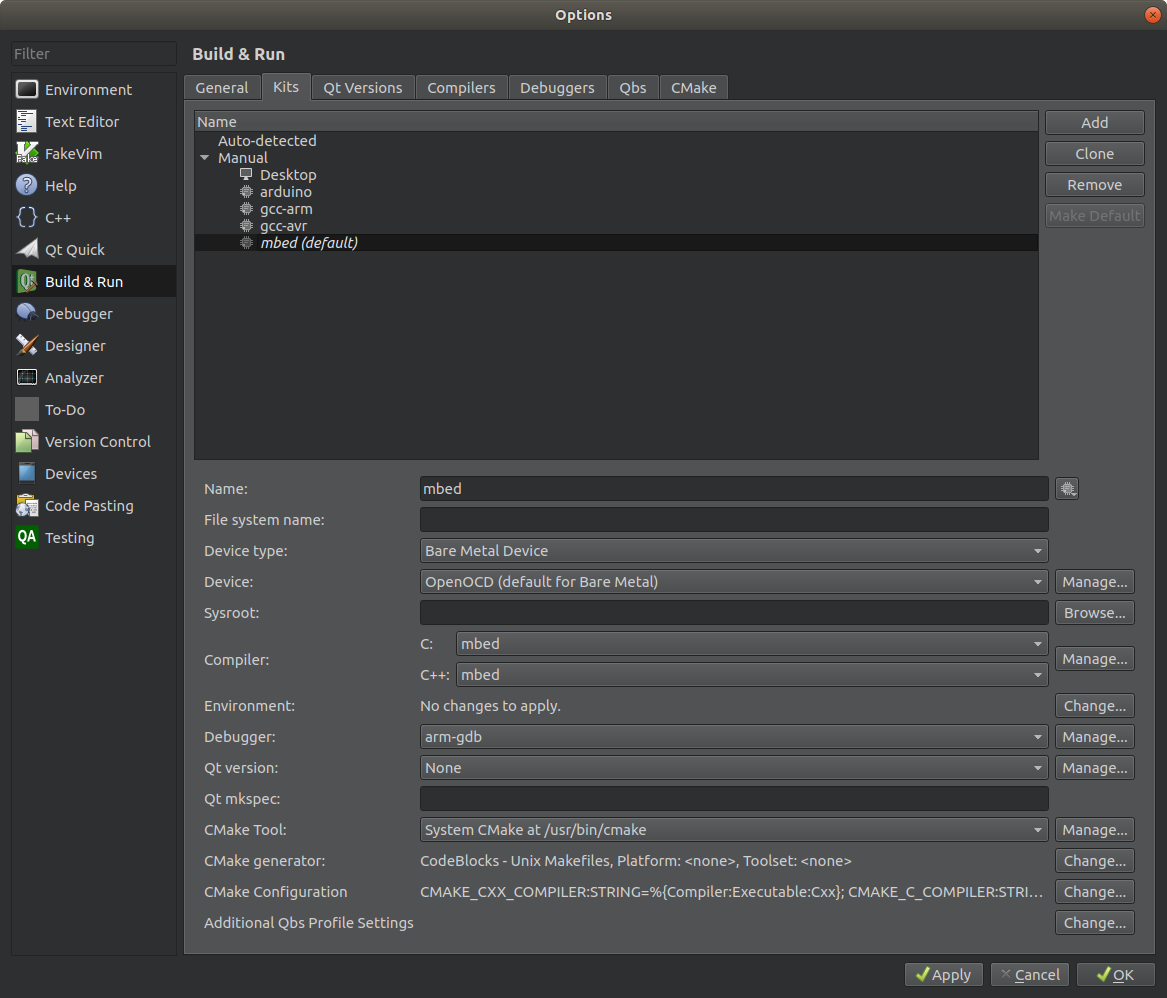
- Go back to the
Devicestab and selectOpenOCDas theGDB server provider.

- Select
Build & Runand proceed to theKitstab. Click on theAddbutton and add the following new kit.
User libraries
User libraries can be shared among all the projects. Such approach requres less disk space and makes sure all programs use the same version of a library. If you keep your libraries in the recommended repository ( ~/src/arm/lib) then just add the directory name of your library (the relative path inside the library repository) into the Make arguments edit box prepended with -l .
For example if you have a TextLCD and DS1820 library stored in the ~/src/arm/lib repository as below:
~/src/arm/lib
          └── Display
		      └── TextLCD
          └── TempSensor
		      └── DS1820
Then you can add them to your project as:
-m LPC1768 -l Display/TextLCD -l TempSensor/DS1820
Another option is to copy & paste a folder containing library files to the project folder using your favorite file manager utility. However, in this case the library is not shared with other projects. Any modification to the library will affect only the given project.
Notice that when you then open the project in QtCreator you won't see the library folder yet.
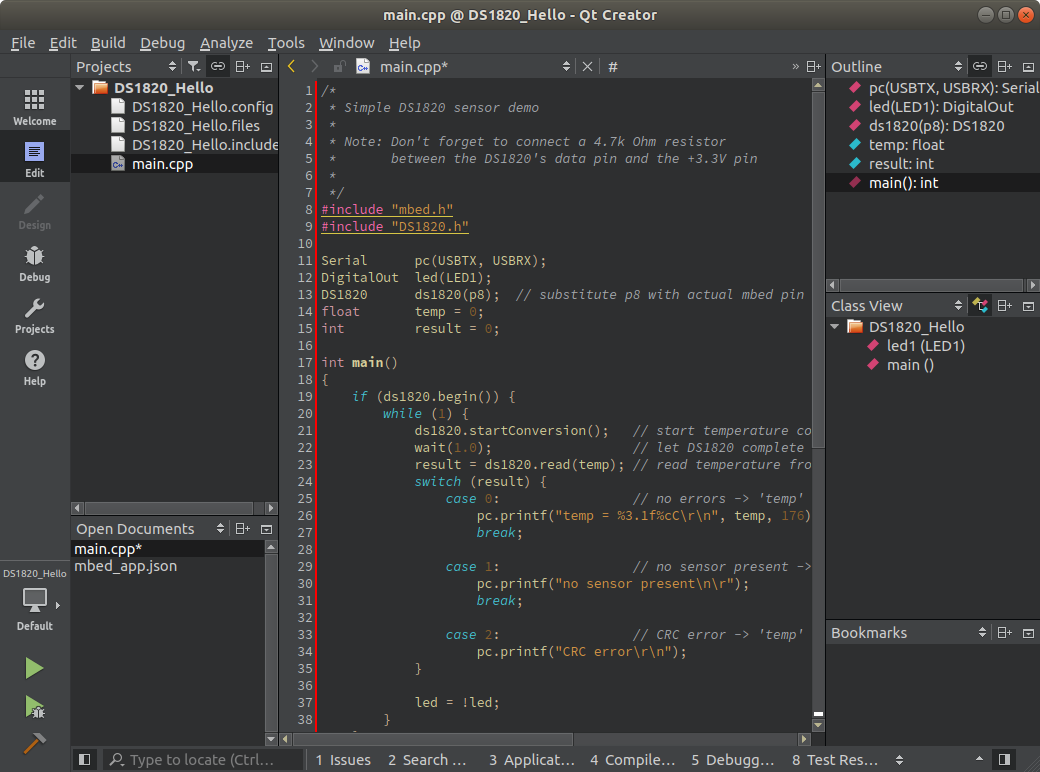
You have to launch the compilation to get the folder added to the Projects pane.
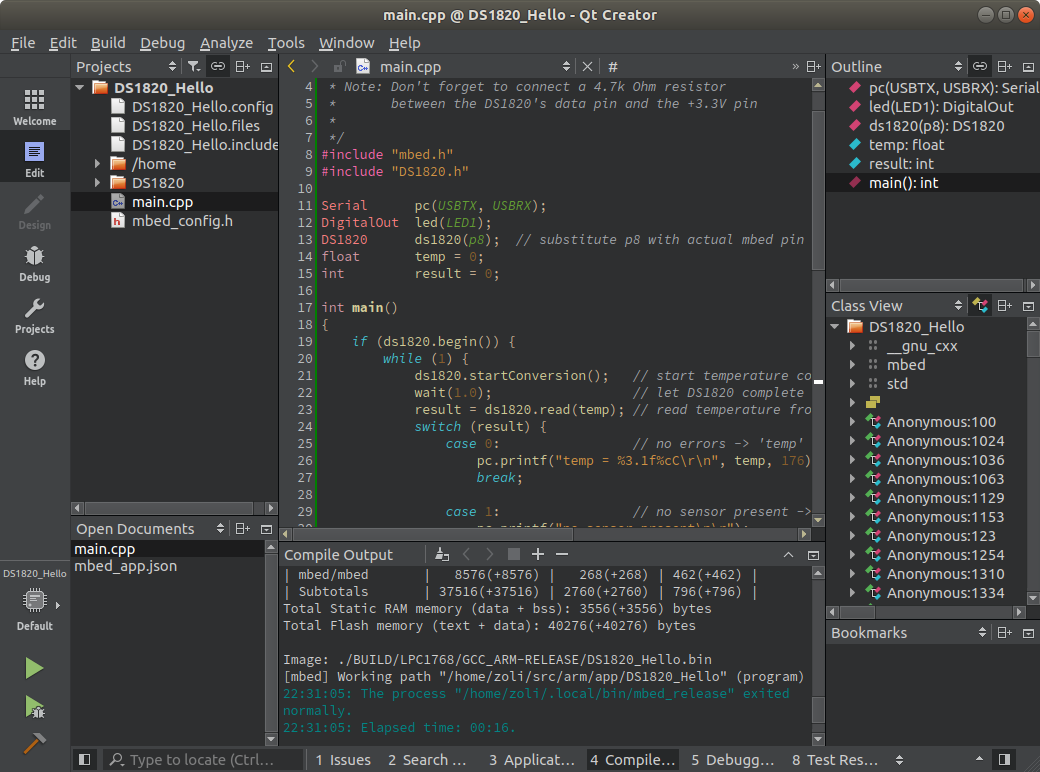
As an alternative you can import a library into your local project from its URL repository
- In the
Projectspane right-click on themain.cppfile and selectOpen terminal here(on Linux) orOpen command prompt here(on Windows) - Use the
mbed addcommand followed by the library's URL repository to import the library. For example:
- Close the terminal (command prompt) window and return to the QtCreator.
- Launch compilation and the new library will appear in the
Projectspane.
Creating a new library
- Launch the
Qt Creatorand open your project (or create a new one). - In the
Projectspane right click on your project name and selectAdd new .... - Choose the
C++template andC++ Classthen click on theChoose...button. - In the
Class Nameedit box provide a name for your new class (for exampleMyLcdDriver). - Click on the
Browsebutton and create a new folder (e.g.MyLcdDriver) in your Project folder and then click on theNextbutton.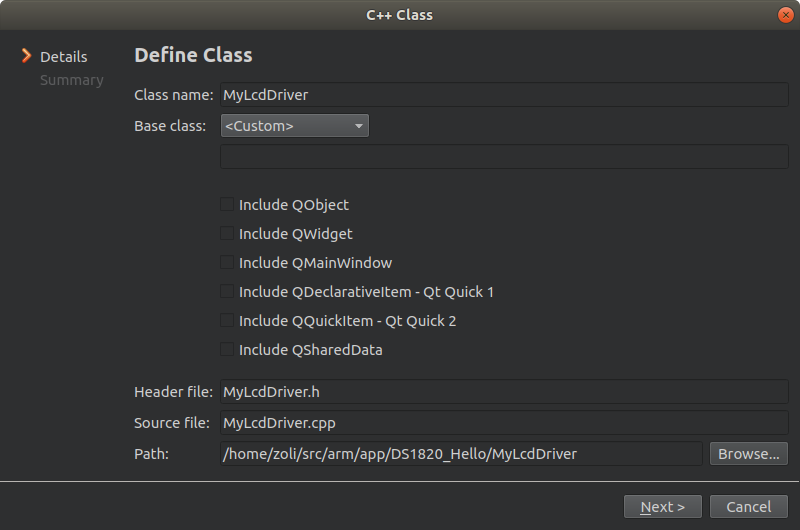
- Choose
<None>forAdd to version controland click on theFinishbutton.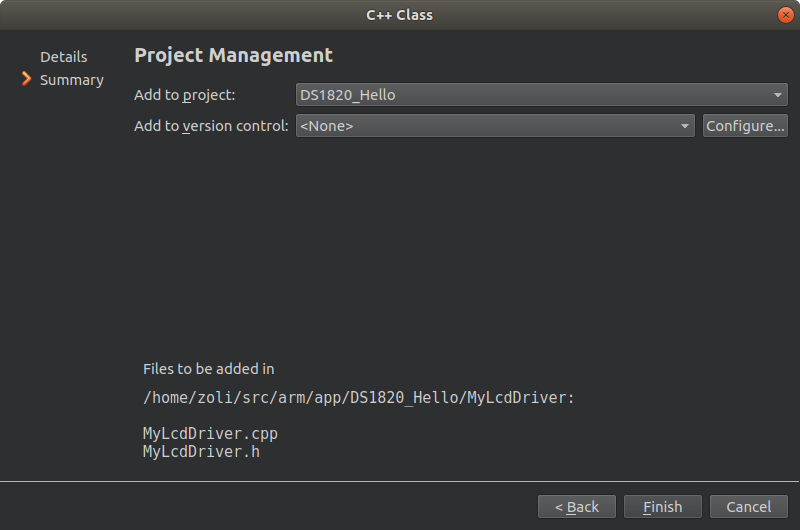
- Edit your library files as needed and then compile the project.
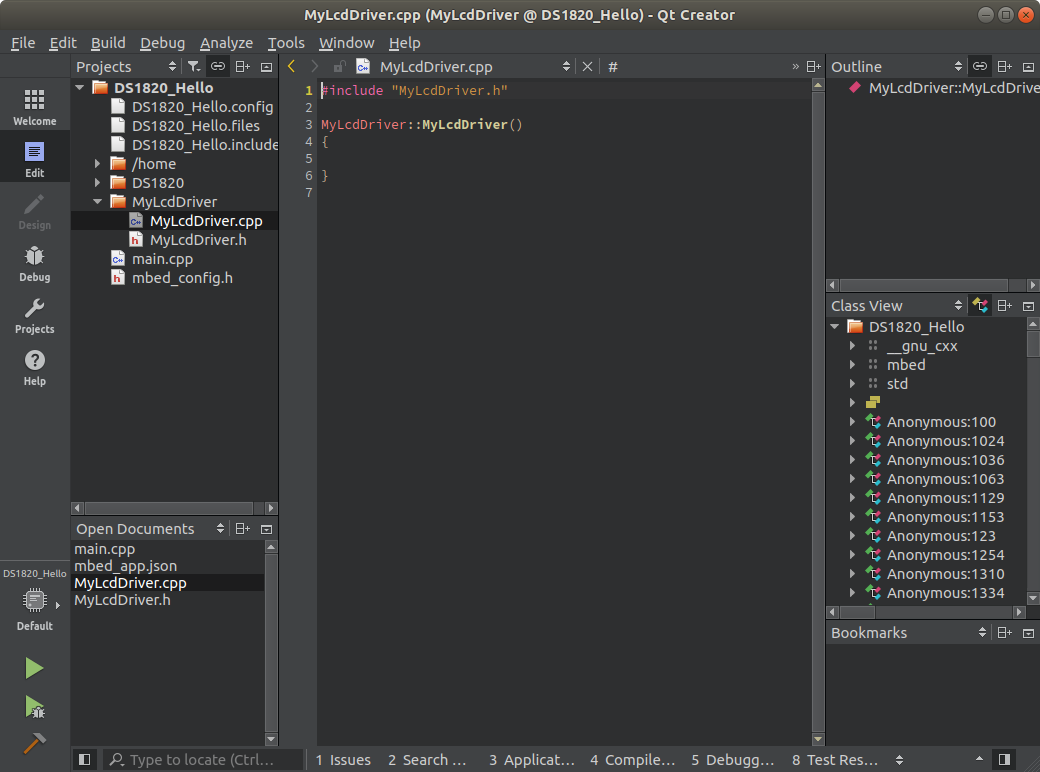
- Once you are happy with it move the library folder to your library repository so you can easily share it with other projects.
Importing projects from online repository
One way is to export the program from the online compiler for the QtCreator toolchain
- Right-click on the project in the online compiler and export for the
QtCreatortoolchain. - Once saved to the local drive, unzip the file and open the project's folder in a file manager.
- Delete all files and folders (
mbedandmbed-osincluded) except user library folders, the.creatorproject file, source and header files (likemain.cpp) and.jsonfiles. - Open the
.creatorproject file in QtCreator. - Select the target system and board and compile.
Another method is to use Mbed CLI for import
- Open a terminal (on Linux) or command prompt (on Windows) in your mbed projects repository.
- Use the
mbed importcommand followed by the programs's URL repository to import the program.
For example:
mbed import https://github.com/ARMmbed/mbed-os-example-blinky
- When finished, open the folder and delete all files and folders (
mbedandmbed-osincluded) except user library folders, source and header files (likemain.cpp) and.jsonfiles. - In the project's folder create an empty
PROJECT_NAME.creatorfile (substitute PROJECT_NAME with your project name). - Open the
.creatorproject file in QtCreator. - Select the target system and board and compile.
Custom targets
It is possible to build projects also for custom targets. Read Adding and configuring targets and have a look at the provided custom targets. I'm sure you'll be able to extend them by your favorite ones.
Once a custom target is added you compile for it by simply using its name. For example, to build for the BLUEPILL target type
-m BLUEPILL
into the Make arguments edit box in the Build Steps Details.
Debugging
Setting up debug tools
- In the
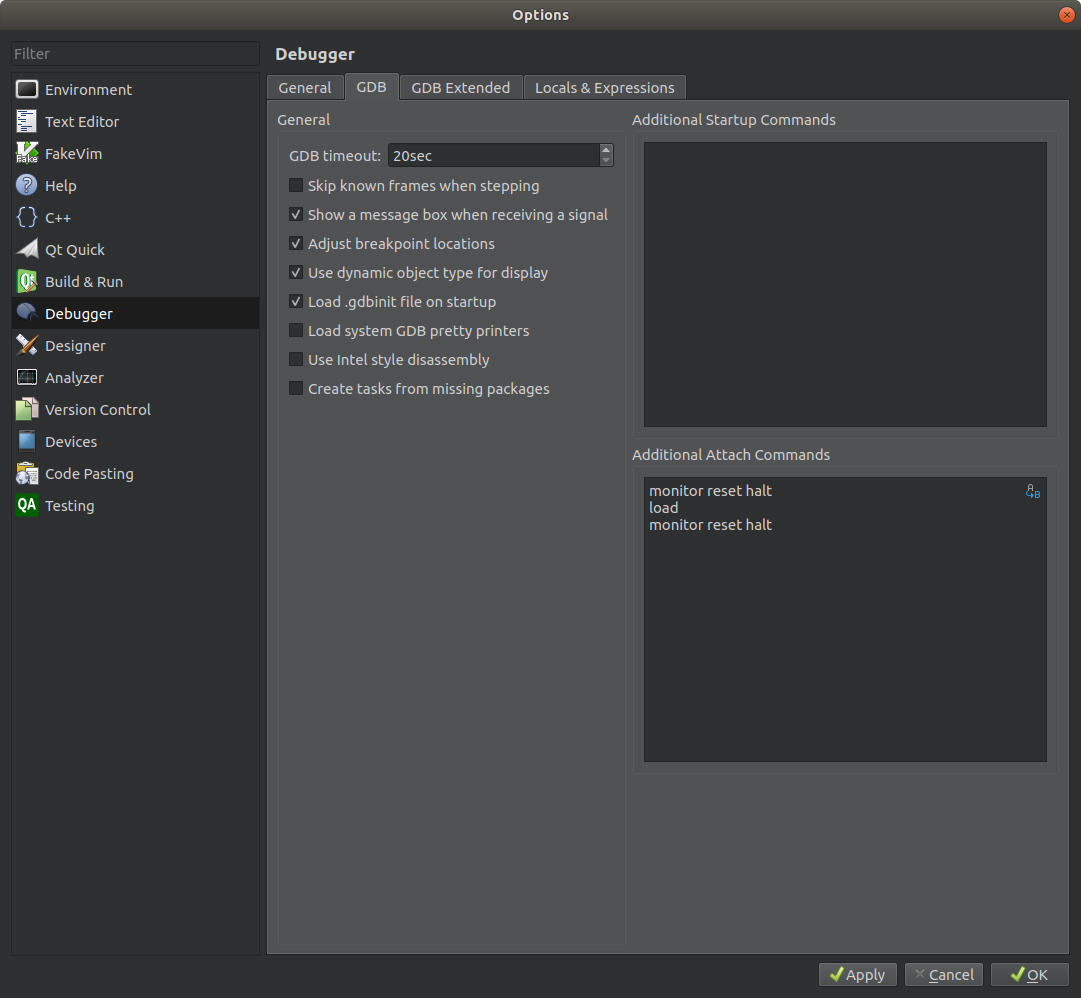
MenuselectTools>Options ...>Debuggerand proceed to theGDBtab.
Copy & Pastethe following text into theAdditional Attach Commandsedit pane:
monitor reset halt
load
monitor reset halt
- Click on the
OKbutton to save the changes.
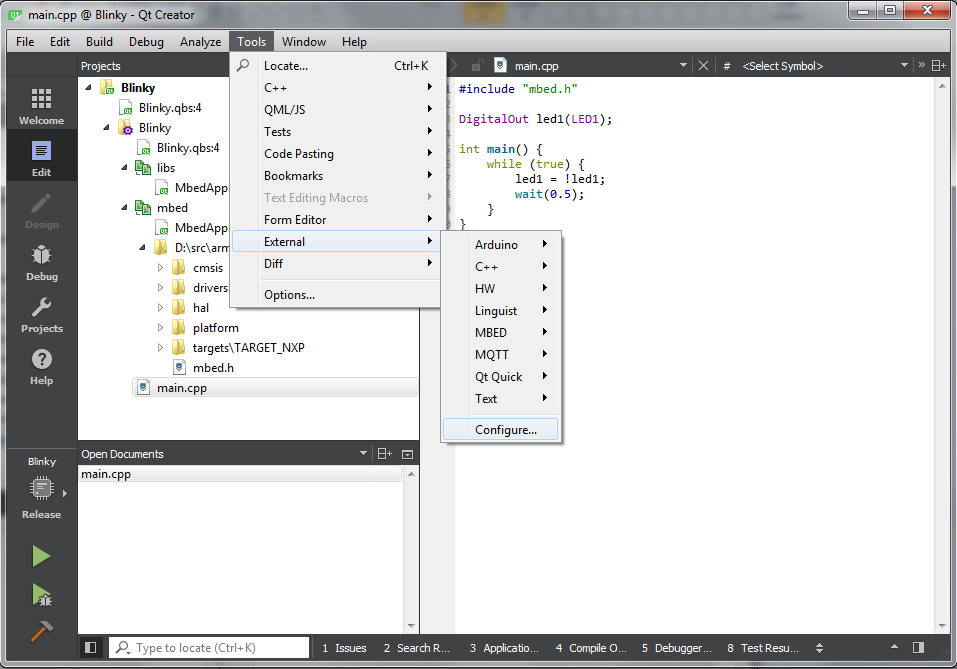
- In the
Toolsmenu selectExternal > Configure ...
- Click on the
Addbutton and selectAdd Category.
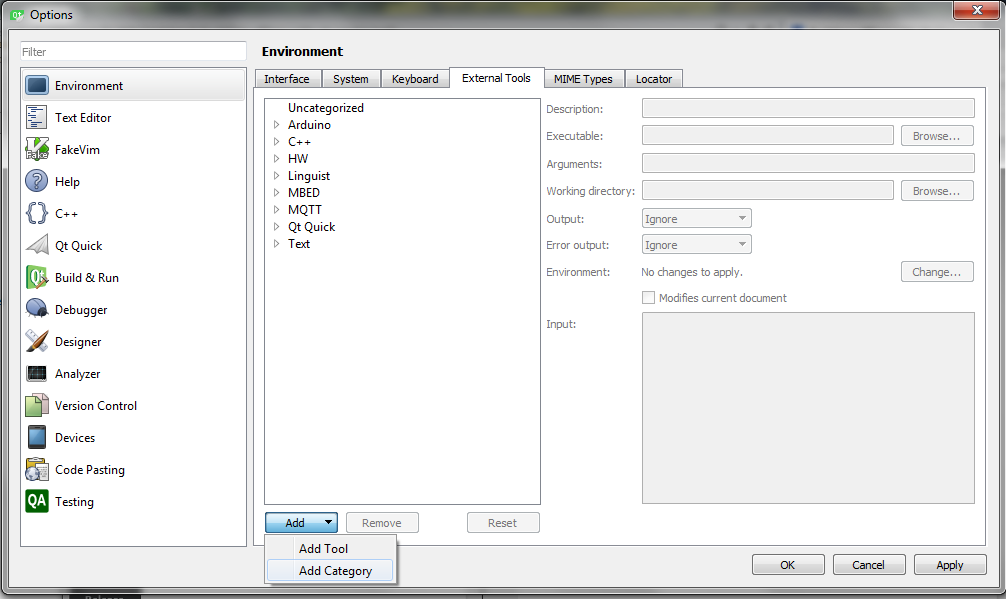
- Name it
MBED. - Select
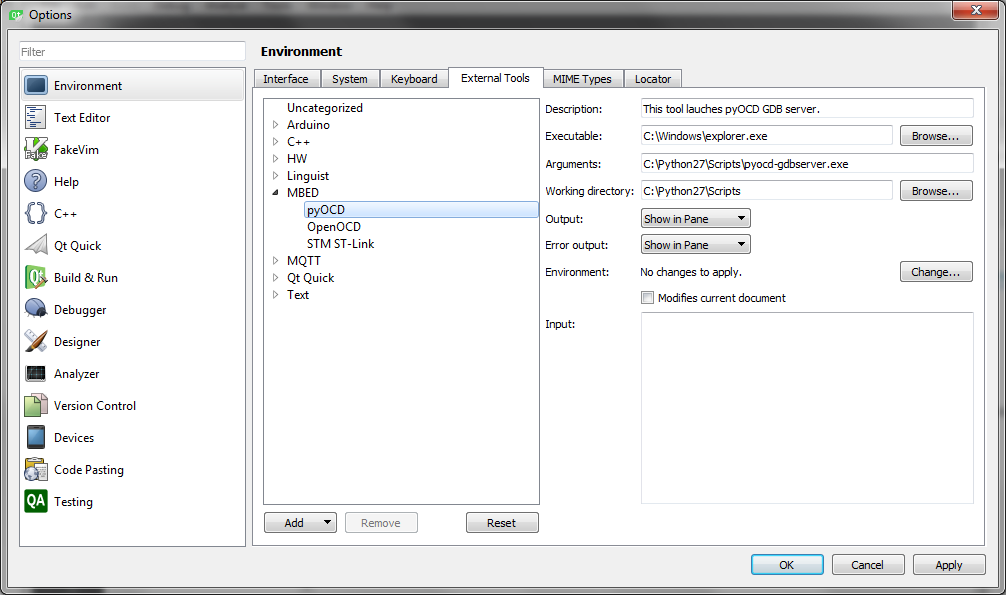
MBED, click on theAddbutton and selectAdd Tool.
- Change its name to
pyOCDand provideDescription,Executable,ArgumentsandWorking directoryaccording to the path selected when you installedpyOCDto your system.
- In
~/.local/bincreate a new text file for each group of boards you'd like to debug. For examplePyOCD,NUCLEO-F103,NUCLEO-F4XX,NUCLEO-F7XX
- Type or paste the following text into the
PyOCDfile:
#!/bin/bash
~/.local/bin/pyocd-gdbserver
- Type or paste the following text into the
NUCLEO-F103file:
!/bin/bash
openocd -s /usr/local/share/openocd/scripts -f /usr/local/share/openocd/scripts/board/st_nucleo_f103rb.cfg
- Type or paste the following text into the
NUCLEO-F4XX.batfile:
#/bin/bash
openocd -s /usr/local/share/openocd/scripts -f /usr/local/share/openocd/scripts/board/st_nucleo_f4.cfg
- Type or paste the following text into the
NUCLEO-F7XX.batfile:
#!/bin/bash
openocd -s /usr/local/share/openocd/scripts -f /usr/local/share/openocd/scripts/board/st_nucleo_f7.cfg
- NOTE: Modify the path to the
OpenOCDfolder in the scripts above according to the actual path on your system.
- Finally save and close all files and make them executable with the following commnad:
chmod +x file_name
Enter gnome-terminal as Executable and the path to the associated batch file prepended with -- as Arguments.
For example:
-- ~/.local/bin/OpenOCD_F103
Debugging on boards equipped with CMSIS-DAP interface
We'll use pyOCD GDB server to debug on boards equqipped with CMSIS-DAP interface (e.g. mbed LPC1768).
- Launch the
Qt Creator.
- Open for example the
Blinky-osproject for the LPC1768 target (or create a new one) and openmain.cppfor editing.
- Connect your mbed LPC1768 board over a USB cable to the PC.
- In the
Toolsmenu selectExternal > MBED > pyOCD.
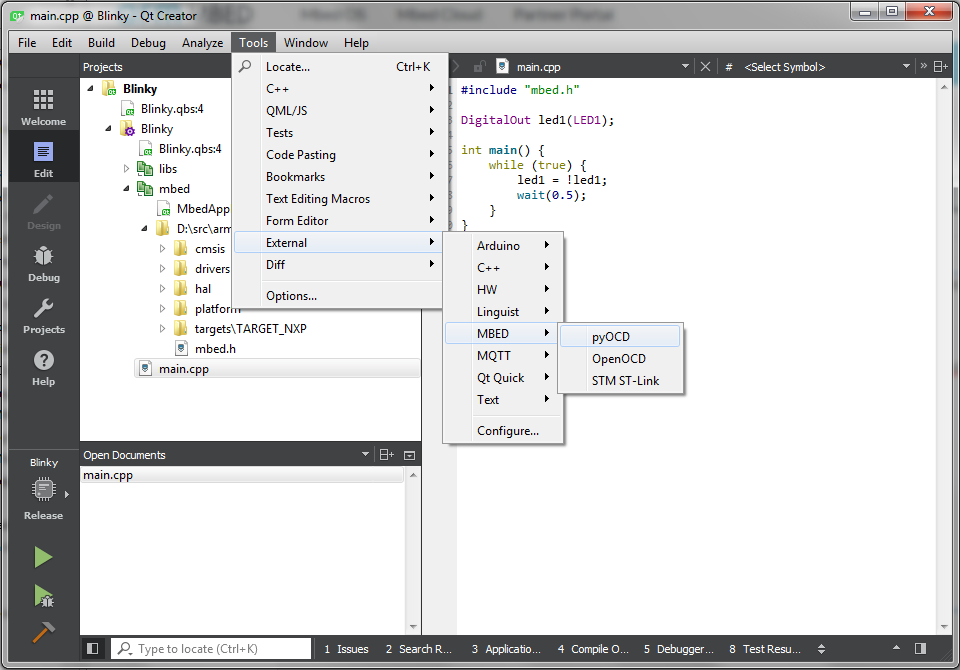
- That will launch a pyOCD GDB server.
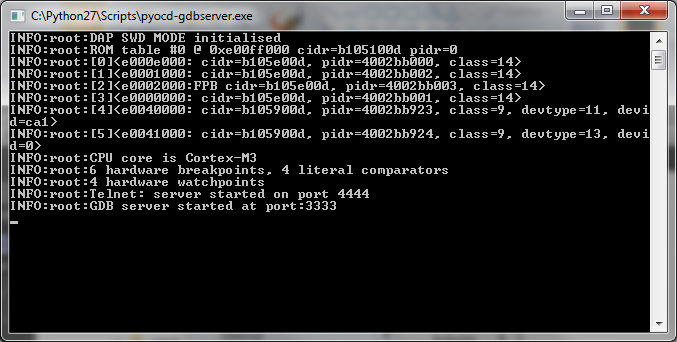
- Return to the
Qt Creatorand in the left-hand toolbar selectProjectsand forBuild & RunselectMbed > Build.
For some unknown reason when local file system and semihosting is enabled debugging for LPC1768 boards fails. A workaround is to compile for a custom (dummy) LPC1768 target board with local file system and semihosting disabled. That's why a custom target LPC1768DBG is provided. Have a look at the ~/src/arm/sys/custom_targets/mbed-os/custom_targets.json configuration file.
- Build the project for the dummy
LPC1768DBGcustom target board:- Type
-m LPC1768DBGto theMake agumentsedit box and click on the 'Hammer' button.
- Type
- Setup a break point by clicking in front of a source line.
- In
MenuselectDebug>Start Debugging>Attach to Running Debug Server.
- For
Local executableclick on theBrowse ...button and select theBlinky-os/BUILD/LPC1768DBG/GCC_ARM-DEBUG/Blinky-os.elffile.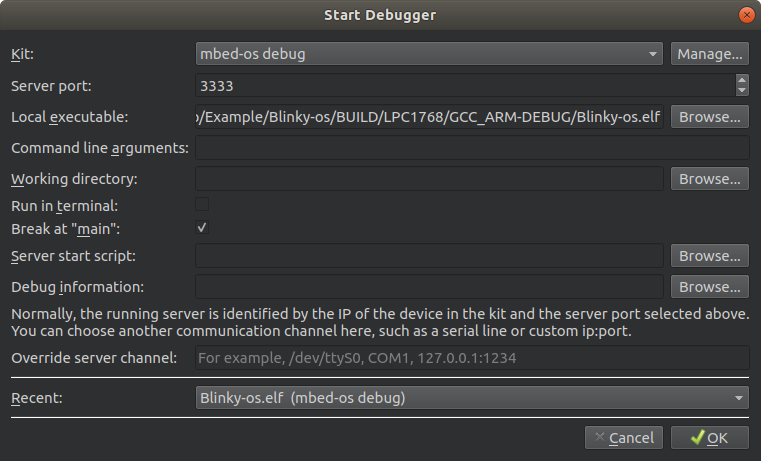
Debugging on boards equipped with ST-Link or J-Link interface
We'll use OpenOCD GDB server to debug on boards equqipped with ST-Link or J-Link interface (e.g. STM NUCLEO boards).
- Launch the
Qt Creator.
- Open for example the
Blinky-osproject for a target board e.g.NUCLEO-F446REor create a new one and openmain.cppfor editing and build the project
- Connect your MBED board
NUCLEO-F446REover a USB cable to the PC.
- In the
Toolsmenu selectExternal > MBED > OpenOCD NUCLEO-F4XX.
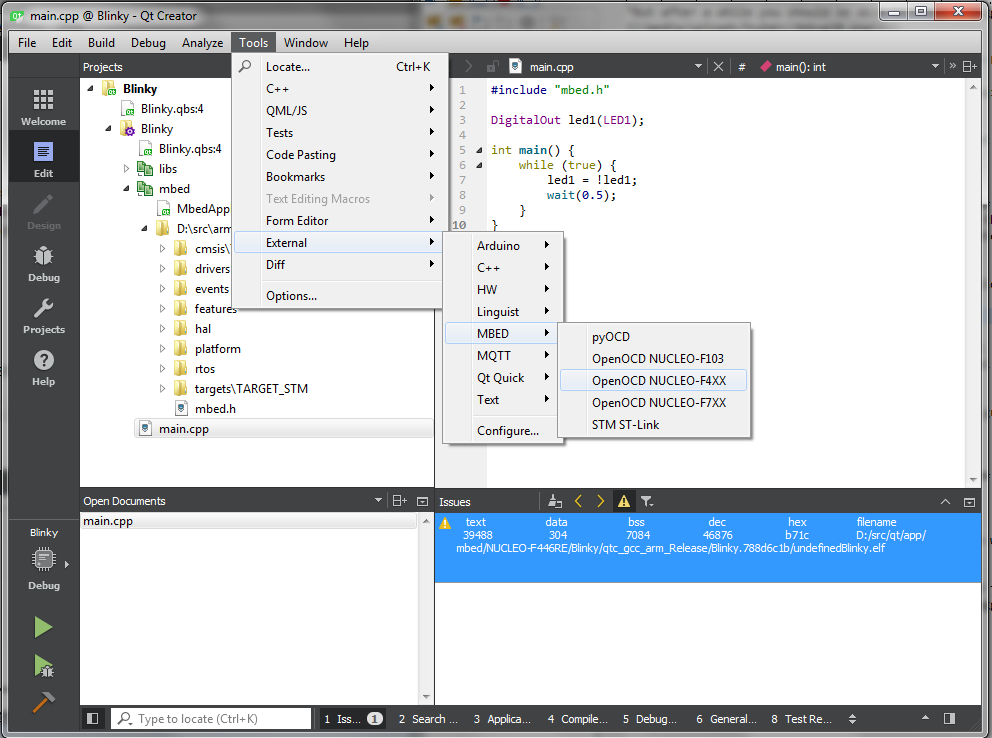
- That will launch an OpenOCD GDB server for the selected group of boards.
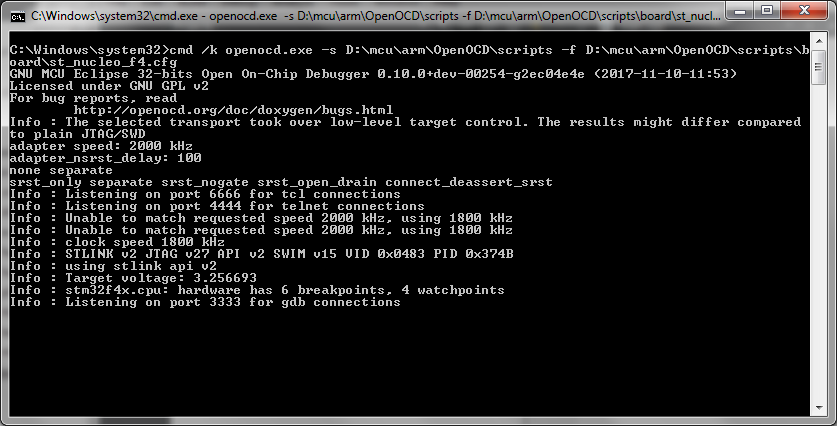
- Return to the
Qt Creatorand in the left-hand toolbar selectProjectsand forBuild & RunselectMbed > Build
- Build the project for the NUCLEO-F446RE target:
- Type
-m NUCLEO_FF446REto theMake agumentsedit box and click on the 'Hammer' button.
- Type
- Setup a break point by clicking in front of a source line.
- In the
MenuselectDebug>Start Debugging>Attach to Running Debug Server.
- For
Local executableclick on theBrowse ...button and select theBlinky-os/BUILD/NUCLEO_F446RE/GCC_ARM-DEBUG/Blinky-os.elffile.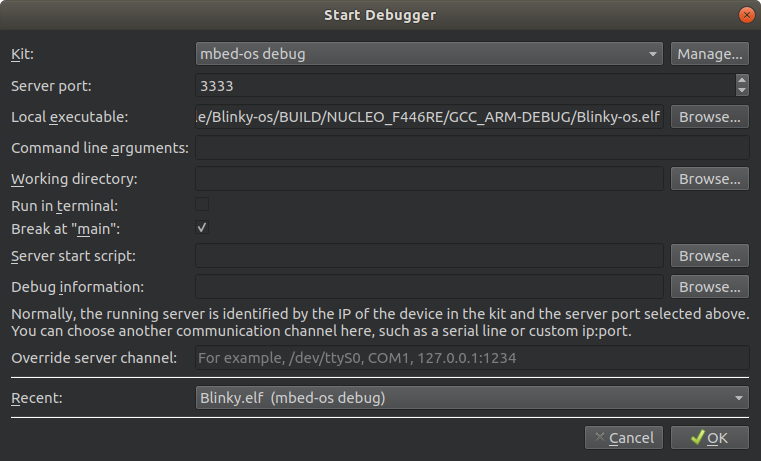
Files at revision 9:480495caa078
| Name | Size | Actions |
|---|---|---|
| [up] | ||
| custom_targets | ||
| mbed_wizard_linux_zip | ||
| mbed.bat | 6374 | Revisions Annotate |