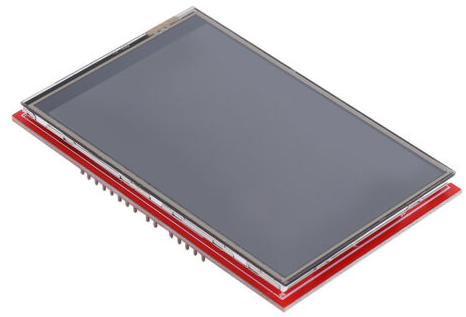
3.5" inch TFT LCD Display Module 480X320 driven with FSMC.
TFT LCD Display Module 480X320 driven with FSMC
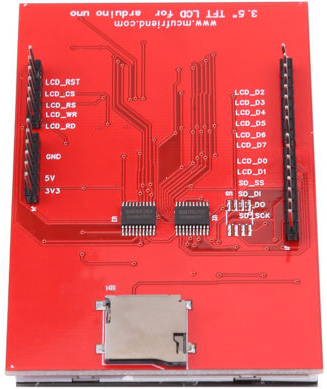
I have recently bought a 3.5" inch TFT LCD Touch Screen Display Module 480X320 with a www.mcufriend.com label on the back side. The display was equipped with an 8bit parallel interface. First I decided to test it with the UniGraphic library using the BUS_8 protocol. The display was very slow but improved when I switched to the PAR_8 protocol. Because I heard about the possibility to use a Flexible Static Memory Controller (FSMC), built into some STM MCU's, to drive LCD's (read/write to LCD's memory rather than to an external SRAM) I thought it would be a fun to try it out.

Below is the brief story of what I did:
- Created a project for my STM32F407VE board in the STM32CubeIDE
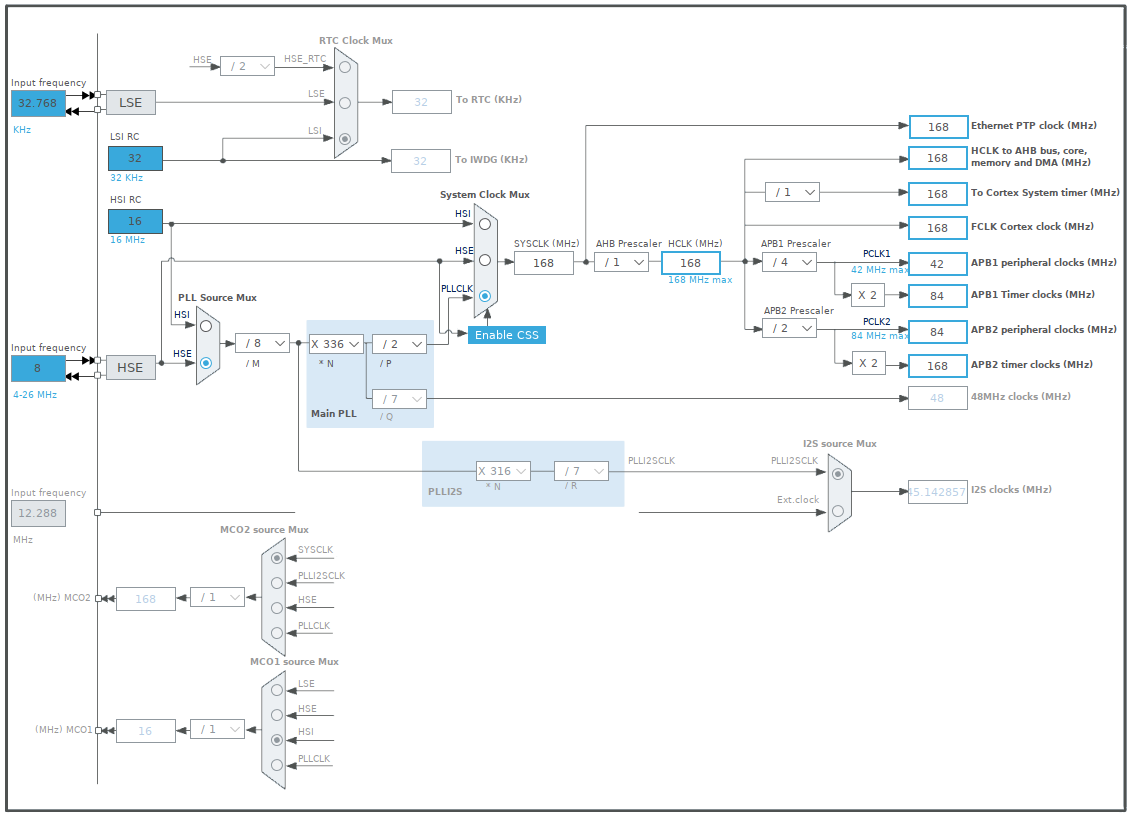
- Set the
Clock Configurationto match the one used by Mbed for the Seeed Arch Max board:
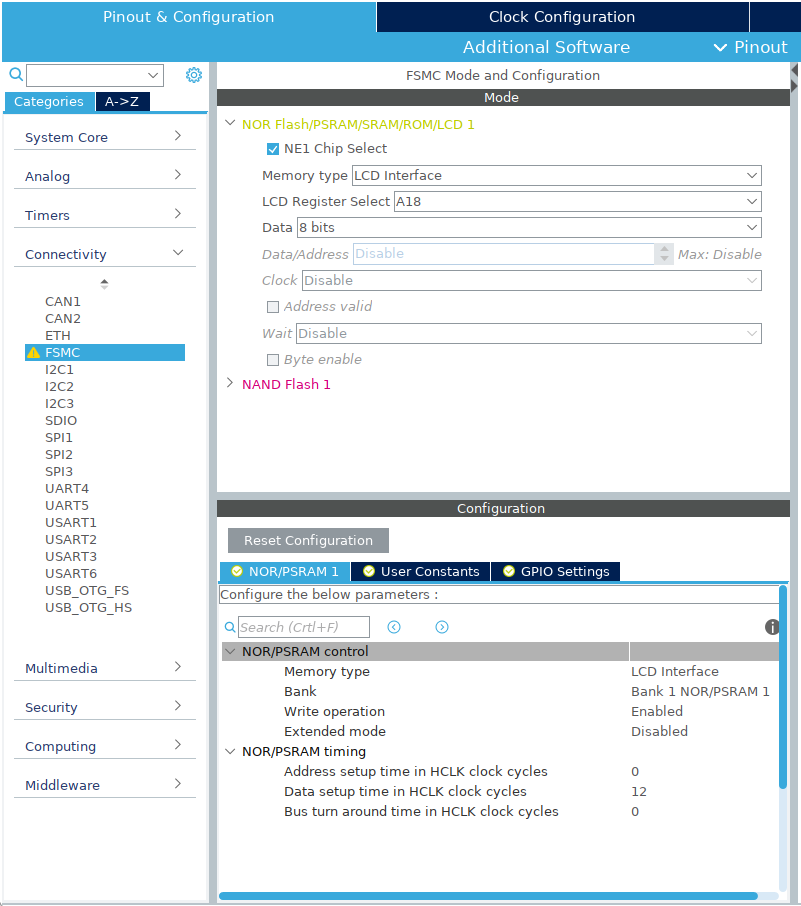
- Selected
FSMCin theConnectivitycategory and configured it as below:
- Let the
STM32CubeIDEgenerate the code (files). - Created a new program for the Seeed Arch Max target in the Mbed Online Compiler by selecting a
mbed os blinkytemplate. - Replaced the
main.cppwith themain.ccontent of theSTM32CubeIDEproject. Copy & Pastedthe other files with codes from theSTM32CubeIDEproject to the online compiler project.- Renamed and modified:
"stm32f4xx_it.h" to "stm32f4xx_it_msp.h"
"stm32f4xx_it.c" to "stm32f4xx_it_msp.c" - Added the UniGraphic library to the online compiler project.
- Extended the
UniGraphiclibrary with aFSMC_8protocol and replaced theTFT::set_orientation(int orient)function with the one used bymcufriendfor arduino. - Modified the
main.cppas needed.
 |  |
Wiring
| STM32F407VE | TFT LCD module |
|---|---|
| +3.3V | 3V3 |
| GND | GND |
| PB_12 | LCD_RST |
| GND | LCD_CS |
| PD_13 (RS) | LCD_RS |
| PD_5 (WR) | LCD_WR |
| PD_4 (RD) | LCD_RD |
| PD_14 (DB00) | LCD_D0 |
| PD_15 (DB01) | LCD_D1 |
| PD_0 (DB02) | LCD_D2 |
| PD_1 (DB03) | LCD_D3 |
| PE_7 (DB04) | LCD_D4 |
| PE_8 (DB05) | LCD_D5 |
| PE_9 (DB06) | LCD_D6 |
| PE_10 (DB07) | LCD_D7 |
Results
| Execution times | ||
|---|---|---|
| Used protocol | BUS_8 | FSMC_8 |
| Operation \ Time | ms | ms |
| Clear | 2283.980 | 38.454 |
| Plot | 192.066 | 11.365 |
| 8bit BMP | 63.805 | 41.338 |
| Large Font | 163.872 | 7.895 |
| Sparce pixels | 2072.265/1458.051 | 74.107/52.168 |
| 16bit BMP | 2288.589 | 59.904 |
Diff: README.md
- Revision:
- 0:fa952828e34c
--- /dev/null Thu Jan 01 00:00:00 1970 +0000 +++ b/README.md Sun May 10 10:44:31 2020 +0000 @@ -0,0 +1,64 @@ + +# Blinky Mbed OS example + +The example project is part of the [Arm Mbed OS Official Examples](https://os.mbed.com/code/) and is the [getting started example for Mbed OS](https://os.mbed.com/docs/mbed-os/v5.14/quick-start/index.html). It contains an application that repeatedly blinks an LED on supported [Mbed boards](https://os.mbed.com/platforms/). + +You can build the project with all supported [Mbed OS build tools](https://os.mbed.com/docs/mbed-os/latest/tools/index.html). However, this example project specifically refers to the command-line interface tool [Arm Mbed CLI](https://github.com/ARMmbed/mbed-cli#installing-mbed-cli). +(Note: To see a rendered example you can import into the Arm Online Compiler, please see our [import quick start](https://os.mbed.com/docs/mbed-os/latest/quick-start/online-with-the-online-compiler.html#importing-the-code).) + +1. [Install Mbed CLI](https://os.mbed.com/docs/mbed-os/latest/quick-start/offline-with-mbed-cli.html). + +1. Clone this repository on your system, and change the current directory to where the project was cloned: + + ```bash + $ git clone git@github.com:armmbed/mbed-os-example-blinky && cd mbed-os-example-blinky + ``` + + Alternatively, you can download the example project with Arm Mbed CLI using the `import` subcommand: + + ```bash + $ mbed import mbed-os-example-blinky && cd mbed-os-example-blinky + ``` + + +## Application functionality + +The `main()` function is the single thread in the application. It toggles the state of a digital output connected to an LED on the board. + +## Building and running + +1. Connect a USB cable between the USB port on the board and the host computer. +2. <a name="build_cmd"></a> Run the following command to build the example project and program the microcontroller flash memory: + ```bash + $ mbed compile -m <TARGET> -t <TOOLCHAIN> --flash + ``` +The binary is located at `./BUILD/<TARGET>/<TOOLCHAIN>/mbed-os-example-blinky.bin`. + +Alternatively, you can manually copy the binary to the board, which you mount on the host computer over USB. + +Depending on the target, you can build the example project with the `GCC_ARM`, `ARM` or `IAR` toolchain. After installing Arm Mbed CLI, run the command below to determine which toolchain supports your target: + +```bash +$ mbed compile -S +``` + +## Expected output +The LED on your target turns on and off every 500 milliseconds. + + +## Troubleshooting +If you have problems, you can review the [documentation](https://os.mbed.com/docs/latest/tutorials/debugging.html) for suggestions on what could be wrong and how to fix it. + +## Related Links + +* [Mbed OS Stats API](https://os.mbed.com/docs/latest/apis/mbed-statistics.html). +* [Mbed OS Configuration](https://os.mbed.com/docs/latest/reference/configuration.html). +* [Mbed OS Serial Communication](https://os.mbed.com/docs/latest/tutorials/serial-communication.html). +* [Mbed OS bare metal](https://os.mbed.com/docs/mbed-os/latest/reference/mbed-os-bare-metal.html). +* [Mbed boards](https://os.mbed.com/platforms/). + +### License and contributions + +The software is provided under Apache-2.0 license. Contributions to this project are accepted under the same license. Please see contributing.md for more info. + +This project contains code from other projects. The original license text is included in those source files. They must comply with our license guide.