Important changes to repositories hosted on mbed.com
Mbed hosted mercurial repositories are deprecated and are due to be permanently deleted in July 2026.
To keep a copy of this software download the repository Zip archive or clone locally using Mercurial.
It is also possible to export all your personal repositories from the account settings page.
You are viewing an older revision! See the latest version
Homepage
BLACKPILL custom target
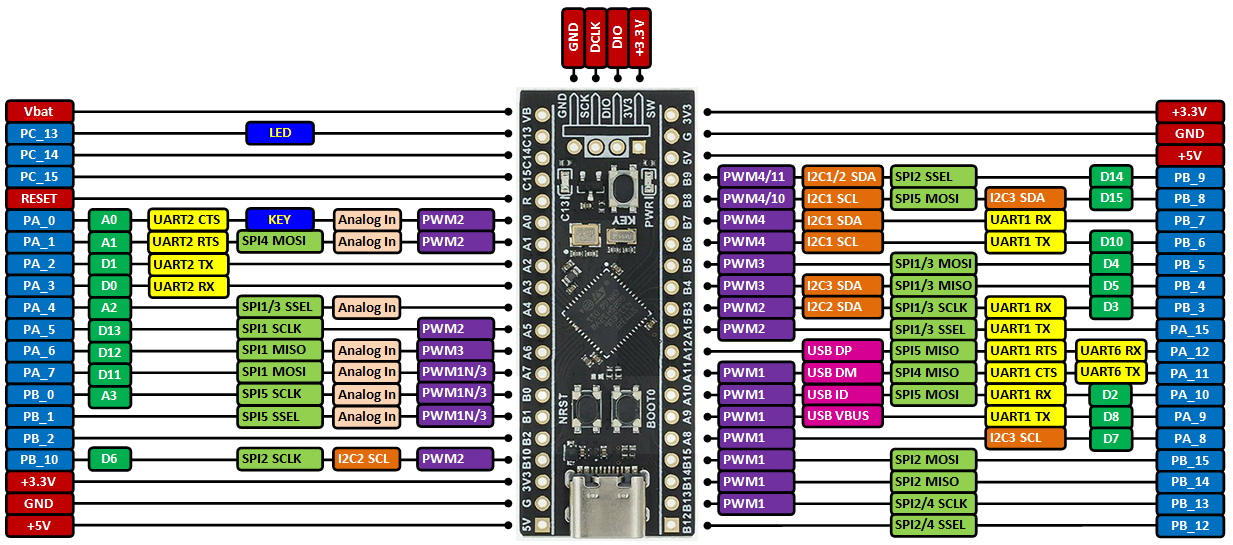
Advantages of the BLACKPILL custom target over the NUCLEO_F411RE
- The onboard external 25 MHz crystal is used as system clock source rather than the less precise internal 16 MHz RC oscillator.
- The onboard LED works as LED1 in programs.
- The onboard KEY works as USER_BUTTON pin in programs.
- You can use the USB peripheral in your programs and connect the board to the PC over the onboard USB connector. An example of using the USB peripheral as USBSerial (12 Mbit/s) is available here.
Building programs for the BLACKPILL custom target in Mbed Studio
- Connect an STM32 ST-Link programmer to your BLACKPILL board and PC (see below for more details).
- Create a new program in the Mbed Studio IDE.
- Right-click on the program's root folder and in the popup window select
Add library...
- Copy&paste the text https://os.mbed.com/users/hudakz/code/BLACKPILL_Custom_Target/ into the
Git or os.mbed.com URLedit box and click on theNextbutton.
- Open the drop-list and select
defaultasBranch or tagand click on theFinishbutton.
- Open the
BLACKPILL_Custom_Targetfolder and drag&drop theTARGET_BLACKPILLfolder and thecustom_targets.jsonfile one by one to the root folder of your program.
- You can now delete the
BLACKPILL_Custom_Targetfolder from your project, if you like. (Right-click and select delete).
- Open the
Targetdrop-list and click on the button with a "chip" icon on it (Manage custom targets) .
- Open the
USB devicedrop-list and select your STM32 ST-Link programmer.
- Open the
Build targetdrop-list and selectBLACKPILL.
- Click on the
Save Allbutton.
- Build your program (click on hammer button).
For more info visit
Import programBlackpill_Hello
Using low cost Blackpill (STM32F411CEU6) boards with mbed.

