OV7670 Camera + mbed LPC1768 over Ethernet
 Edoardo De Marchi.
13
replies
android,
ethernet,
Grab,
OV7670,
VGA
Edoardo De Marchi.
13
replies
android,
ethernet,
Grab,
OV7670,
VGA
Introduction
This project is an upgrade of THIS work and it works by taking a image from the ov7670 camera and send it over an ethernet connection to a pc.
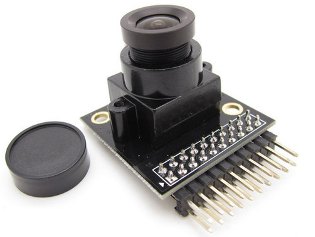
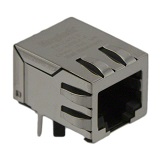
You need a camera OV7670 with FIFO buffer and a ethernet connector (I used a SI-60002-F Jack Connector).
Table of Contents
- Product Specifications
- OV7670 + AL422
- RJ45 SI-60002-F
- Pin Description
- Test Code for mbed
- Example
- View the images on Android phone
- View the images on PC
- Commands for OV7670 Grabber
- INIT
- SNAP
- Some important informations
- Image Format
- Oscilloscope Screens
1. Product Specifications
1.1 OV7670 + AL422
- Array Size: 640x480
- 8bit Output Format (YUV/ YCbCr 4:2:2/RGB565-555-444/RAW RGB Data)
- Serial Camera Control Bus (SCCB)
- Rolling shutter
- 3Mbit of DRAM
- Read/write cycle time: 20ns
Warning!
There are two versions of this camera.
The difference is that in the model V2 the VSYNC from the OV7670 is connected directly to the AL422’s write reset (WRST).
The schematic is here: /media/uploads/edodm85/ov7670_fifo_sch_v2.pdf
In the back of my camera there is this code: CF7670C-V2.
1.2 RJ45 SI-60002-F
Datasheet: SI-60002-F
This is a RJ45 connector without leds.
2. Pin Description
| Name | OV7670 pin | MBED pin |
|---|---|---|
| VCC | 1 | Vout |
| GND | 2 | GND |
| SCL_SCCB | 3 | P27 |
| SDA_SCCB | 4 | P28 |
| VSYNC | 5 | P23 |
| HREF | 6 | NC |
| WEN | 7 | P25 |
| XCLK | 8 | NC |
| RRST | 9 | P26 |
| OE | 10 | P29 |
| RCLK | 11 | P30 |
| GND | 12 | GND |
Note: you need a pull-up resistor on sda and scl.
| Name | OV7670 pin | MBED MASK: 0x7878000 | MBED MASK: 0x78600C0 |
|---|---|---|---|
| D0 | 13 | P13 (p0.15) | P8 (p0.6) |
| D1 | 14 | P14 (p0.16) | P7 (p0.7) |
| D2 | 15 | P12 (p0.17) | P12 (p0.17) |
| D3 | 16 | P11 (p0.18) | P11 (p0.18) |
| D4 | 17 | P15 (p0.23) | P15 (p0.23) |
| D5 | 18 | P16 (p0.24) | P16 (p0.24) |
| D6 | 19 | P17 (p0.25) | P17 (p0.25) |
| D7 | 20 | P18 (p0.26) | P18 (p0.26) |
3. Test Code for mbed
Import programOV7670_Test_Code_with_ethernet
Test Code for OV7670 Camera module. The images are sent over ethernet link.
Last commit 05 Apr 2014 by Edoardo De Marchi
Now the program is using a "Static IP" but if you want to use a DHCP is necessary change this code in main.cpp
Static IP
eth.init(ip, mask, gateway);
with this
DHCP
eth.init();
4. Example
4.1 View the images on Android phone (Apk OV7670 Grabber)
You can download it by google play here: OV7670 Grabber for Android
- First you have to connect the phone Android and the mbed to the same local network through a router.

- Then you have to set the IP and PORT of the mbed board in TCP CONSOLE Settings:


- In "Grabber" Settings you can select the image resolution and format.
For the FREE version:
- Image resolution
- QQVGA: 160x120
- QVGA: 320x240
- Image format
- BAW: Black and White
For the PRO version:
- Image resolution
- QQVGA: 160x120
- QVGA: 320x240
- Image format
- BAW: Black and White
- RGB: RGB565
- YUV: YUV to ARGB8888


- Then you can start the connection with mbed. The black ball will turn green color when the connection is established.

- In the second tab "Grabber" first you have to initialize the board with the "INIT" button.
If the initialization is OK you can acquire images with "SNAP" button.

- Ok now you can acquire images by android.
4.2 View the images on PC (Software OV7670 Grabber v2.0)
You can download the program here: OV7670 Grabber v2.0
Info!
Is required Microsoft .NET Framework 4.5 or above.
- First you have to press the button "INIT" and set the IP address and Port in a right property box.
In the end you can press the button "Connect" (if the connection is established with success a green ball appear).

- In the right box you can select the Image format and some properties and then press the button "INIT" for initialize the camera.
Now if you press the button "SNAP" the program acquires a image while if you press "GRAB" the program acquires continuously.

- The grab function is limited for the format 160x120. The maximum frame rate is 10FPS.

- If you press the button "Refresh" you can monitor all registers.

5. Commands for OV7670 Grabber
5.1 INIT
The initialization sets the correct registers of the OV7670 sensor.
INIT CMD: "init " + Image_Format + " " + (width * height);
Image_Format = BAW or RGB or YUV or RAW
If the initialization finished with success the mbed return: "OV Init OK".
5.2 SNAP
The snap button send this string: "snap".
The mbed board respond with a Start Condition string: "sRt" followed by the image data.
6. Some important informations
6.1 Image Format
This camera supports various formats, but I will comment only the three that I used:
- YUV 4:2:2
The YUV model defines a color space. The Y component determines the brightness of the color, while the U and V components determine the color itself (the chroma). Y ranges from 0 to 255 in digital formats, while U and V range from -128 to 127.
One neat aspect of YUV is that you can throw out the U and V components and get a grey-scale image.
In the YUV 4:2:2 format the U and V channels are shared between two consecutive pixels. Therefore two pixels are composed from 4 bytes, this means that in average each pixel is stored as 2 bytes.

- RGB 565
RGB Colorspace is one of the most common colorspaces used today. It is used for many uncompressed image formats and computer displays. In RGB, there are 3 channels, each one indicating how much of a given color the final color has. These channels indicate Redness (R channel), Blueness (B channel), and Greeness (G Channel). Combining these components allows us to make almost any color humans can see.
The RGB565 color format is composed by 5 bits for the red and blue value and 6 bits for the green value.

- RAW Bayer
This type of format doesn't have any image processing.
6.2 Oscilloscope Screens
The camera needs 33ms to acquire a 160x120 image and the double time for read and send the frame from FIFO memory to pc over ethernet (screens below).


So the Frame rate is FPS_TCP = 1000 / (3 * 33) = 10FPS
In this screen is shown the pin OE.

13 comments on OV7670 Camera + mbed LPC1768 over Ethernet:
Please log in to post comments.
Hello,
Your project is very impressive especially the grabber utility. I am using a DSP processor to capture the image data from Omnivision sensor, and I am transferring the image data using MAC address, I do not know how to implement TCP or UDP protocol and I believe it might make the code at the processor end a little complicated, so I would like to develop a Camera Image Grabber similar to OV7670 Grabber, which recieves the image data based on MAC address, but I am not well versed in VB, so can you please help me out with the development process? or Can you please provide the VB source code for OV7670 Grabber?
Thank you.