5x5 LED Display Snake Game
By Daniel Hamilton and Eleni Spring
Introduction
This 5x5 LED Display Snake Game is the first stepping stone to a fully functional 3-D snake game on a 5x5x5 LED Cube which will be built in a future project. This introductory project serves to provide experience for soldering the LEDs and creating a framework for the more involved LED cube. For this more simple first step project, the following hardware is required:
Hardware
- Protoboard or PCB
- mbed microcontroller
- 25 LEDs
- 25 100 Ohm Resistors
- MCP23S17 I/O Expander
- Analog Controller
- Plenty of wires

Figure 1: Completed PCB with LEDs soldered in place
Design Process
Theory
Because this design will eventually become a fully functional LED cube, a desire for multiplexing is kept in mind when designing the LED matrix. Every LED anode has its own pin, while all LEDs share a common ground. This means that 25 digital output pins are needed just for the LEDs, not to mention two analog inputs for the controller. In order to accommodate these requirements, an I/O expander like the MCP23S17 is required, which can be controlled using SPI.
The goal of the game of snake is to eat pellets to make your snake as large as possible without running into walls or yourself. This becomes more difficult as the snake gets larger and your speed increases.
Building the LED Matrix
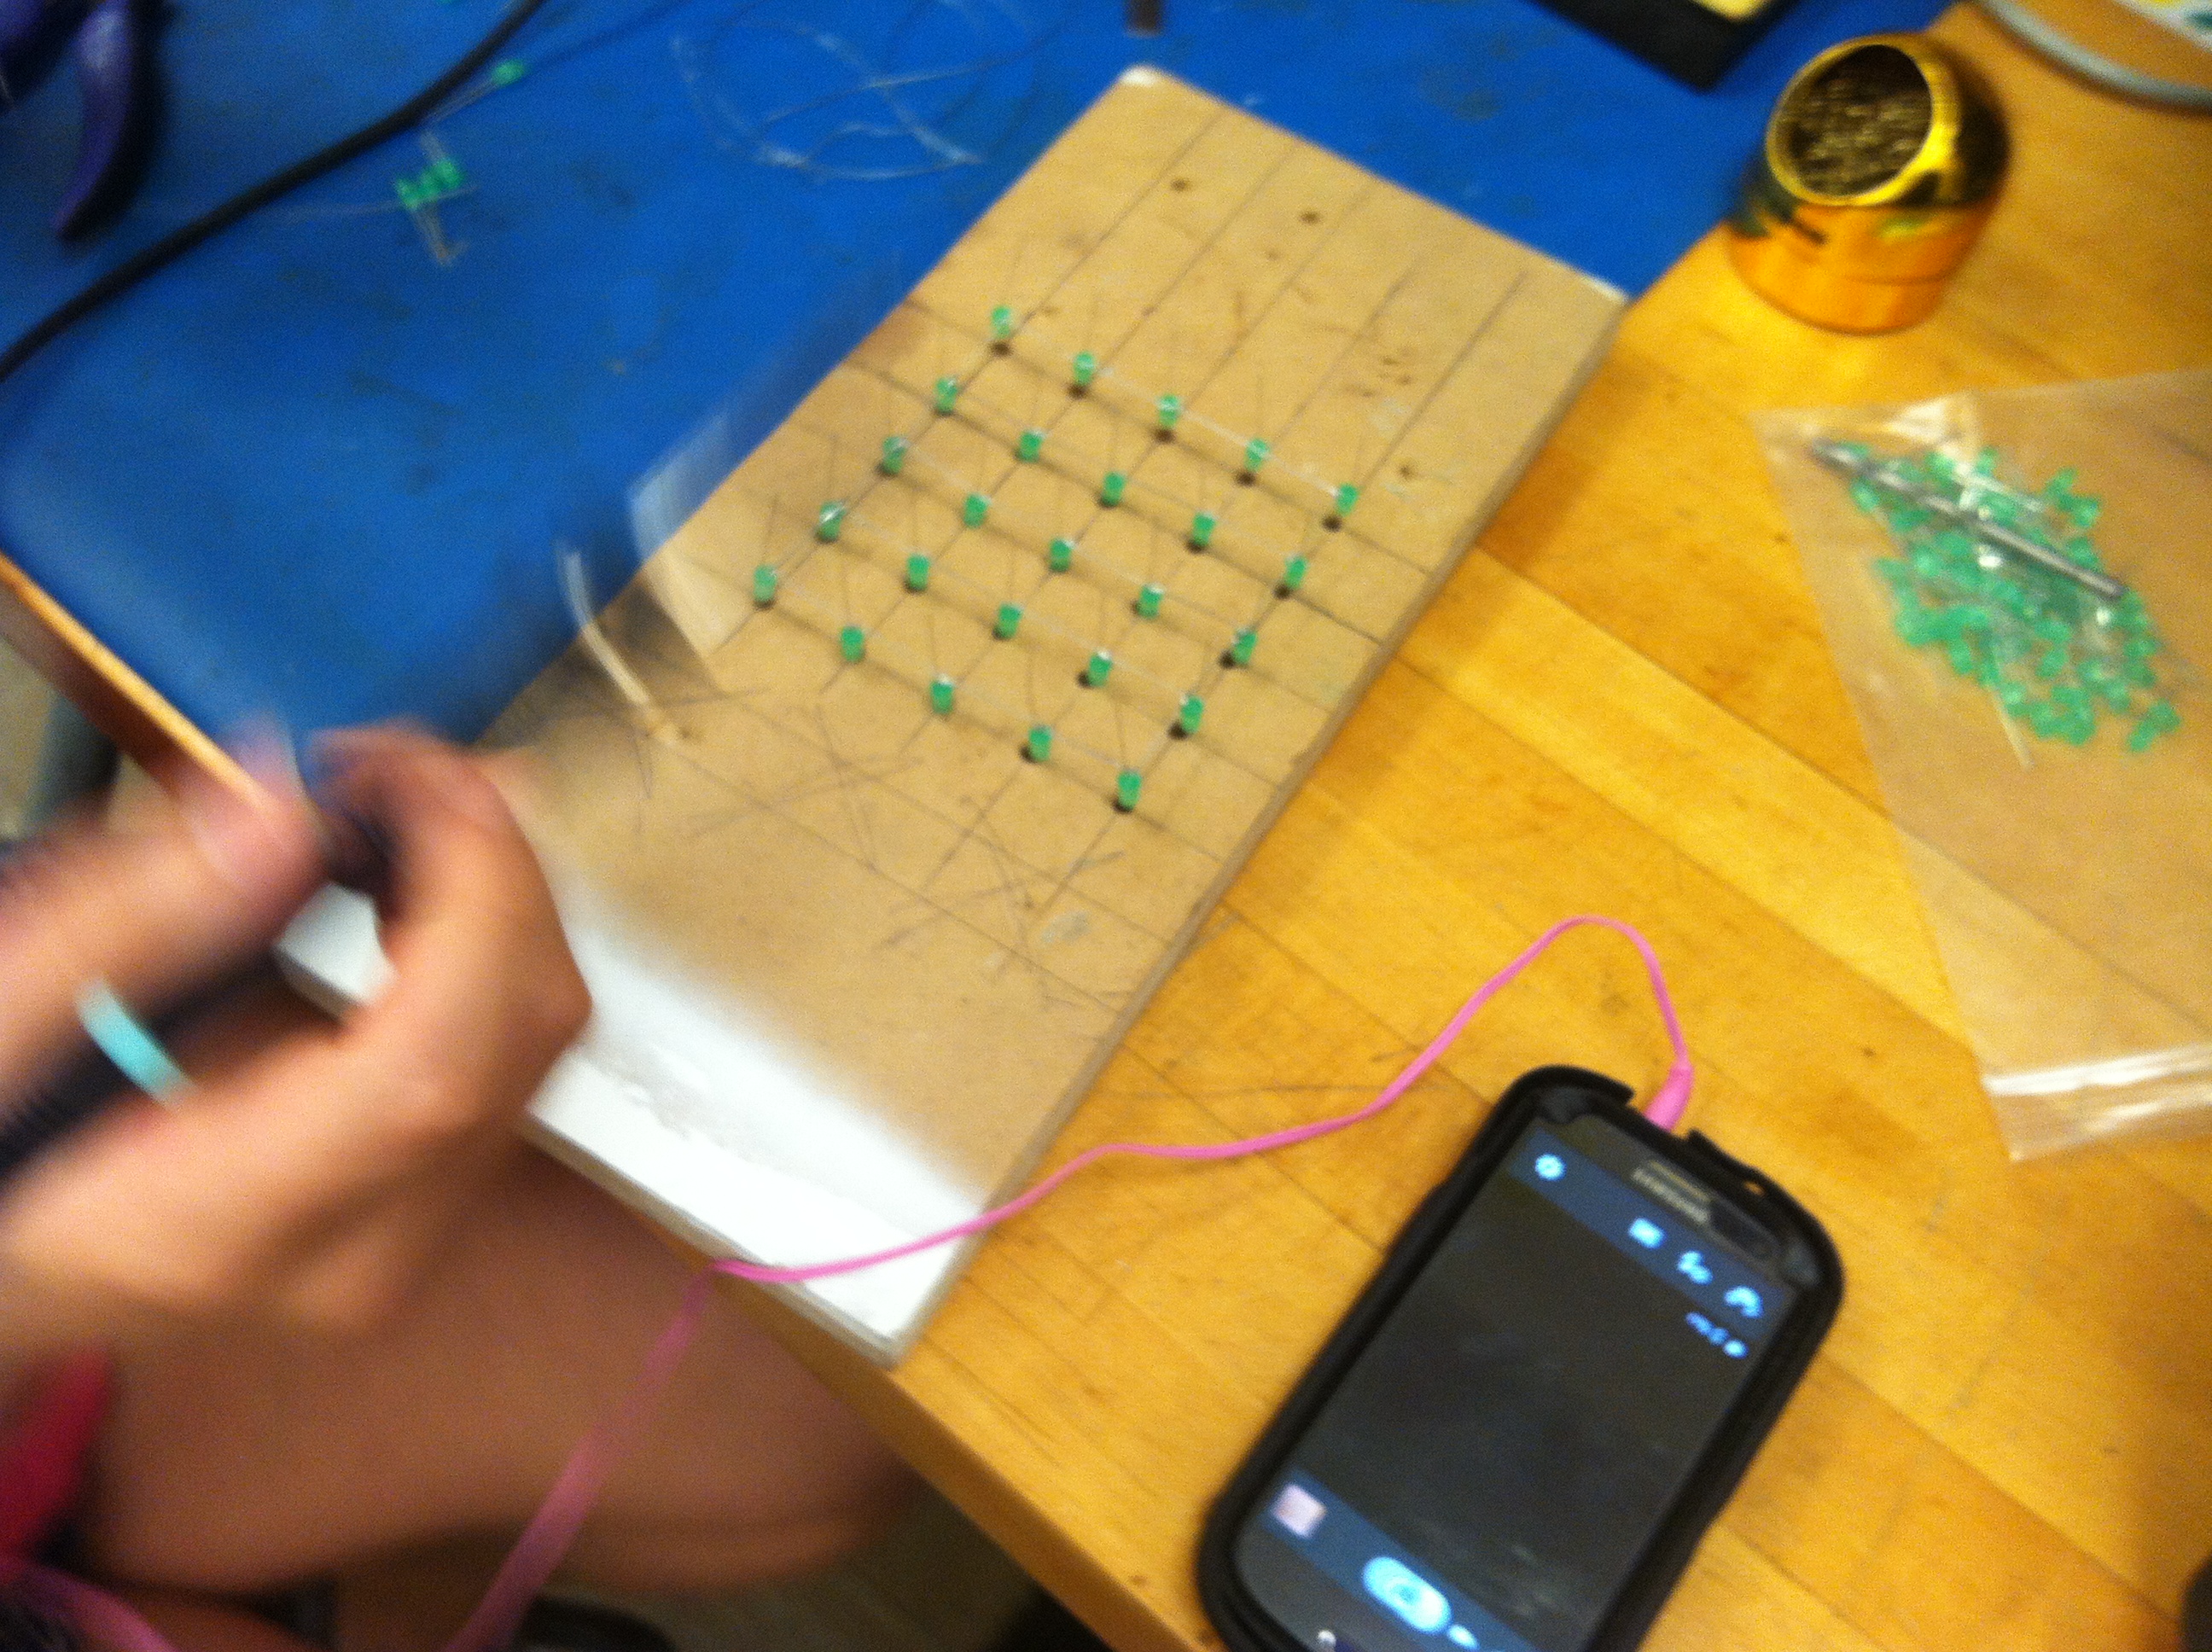
In order to build the 2D LED Matrix, we took a piece of wood and drilled holes to place the LEDs in as we soldered them together as seen in Figure 2.
 Figure 2: Soldering LEDs together using wood block as a base
This template ensures equal spaces between the LEDs, the end result is much more ordered than a free-hand attempt would be. The same template must be used for future layers of the cube as well.
PCB Design
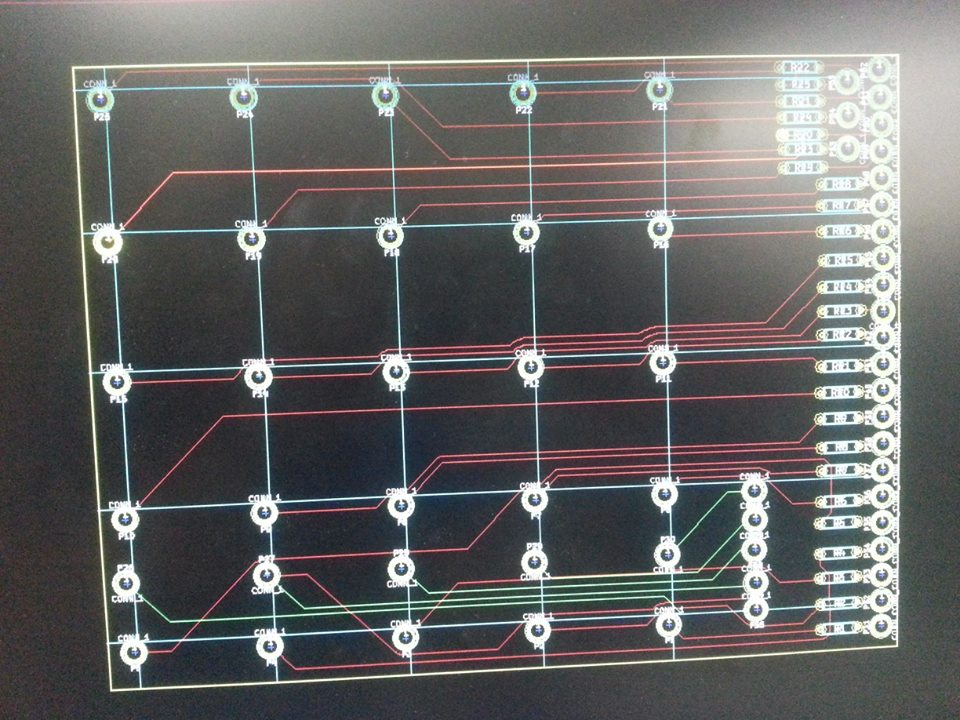
We decided to go ahead and design a PCB to hold the LEDs and resistors, as well as be the base for the later LED cube. A protoboard should work just as well though. Figure 3 shows the PCB design layout, and the files can be downloaded below.
 Figure 3: PCB layout for 25 LEDs, 5 leads for ground (one for each layer of the cube to come later) and 25 resistor mounts.
/media/uploads/dhamilton31/leds.zip PCB schematic and design files
Connecting to the mbed
Using the PCB design above and the syntax LED[row][column]
Mbed pin function:
- Pin 5 LED[0][0]
- Pin 6 LED[0][1]
- Pin 7 LED[0][2]
- Pin 8 LED[0][3]
- Pin 9 LED[0][4]
- Pin 10 LED[1][0]
- Pin 11 MCP23S17 -> SI
- Pin 12 MCP23S17 -> SO
- Pin 13 MCP23S17 -> SCK
- Pin 14 LED[1][1]
- Pin 15 LED[1][2]
- Pin 17 Controller analog horizontal input
- Pin 18 Controller analog vertical input
- Pin 19 Controller digital pushbutton input
- Pin 20 Controller MCP23S17 -> CS
- Pin 21 LED[3][1]
- Pin 22 LED[3][2]
- Pin 23 LED[3][3]
- Pin 24 LED[3][4]
- Pin 25 LED[4][0]
- Pin 26 LED[4][1]
- Pin 27 LED[4][2]
- Pin 28 LED[4][3]
- Pin 29 LED[4][4]
Do note that LED[1][3] - LED[3][0] are on PORT_A of the MCP23S17.
Code
The code consists of a few major classes which work to make up the entirety of the display driver, the game mechanic, and input/output control. Below is a breakdown of the major classes and subfiles:
- ledCube.cpp/.h - This class does all of the behind the scenes work for lighting the LED matrix. It knows all of the Pins using a helper file called ledValues.h. It also controls the I/O expansion DIP.
- snake.cpp/.h - This class takes care of all the inner workings of the game itself. A linked list was made of each of the body parts of the snake (bodyParts.h), and when the head moves, all of the following parts are simply adjusted to the spot the previous one was just at. The game is currently set to start with only one body part and hitting a wall will cause all the LEDs to blink as shown in Video 1 below.
- main.cpp/.h - Main holds the ledCube and snake object and checks for updates from the analog controller and tells the snake to change direction when necessary. it also determines the snake's movement speed. The code for main.cpp is shown below.
/media/uploads/dhamilton31/2013-10-17_00.51.13.mov Video 1: The LEDs will blink when the Snake hits a wall.
Video 2: Notice the speed increase as I play the snake game.
Snake Game: main.cpp
/*
*   5x5 LED Snake Game
*   Author: Daniel Hamilton
*   ECE 4180 Lab 3
*
*/

#include "mbed.h"
#include "ledCube.h"
#include "snake.h"
#include "main.h"

snake mySnake(snakeStartRow,snakeStartCol); // Snake represents the coordinates making up the snake
food myFood(foodStartRow, foodStartCol); // food pellet the snake is trying to eat
ledCube cube;                           // Currently a square, but represents and controls the physical LEDs
AnalogIn joyVer(p19);                   // vertical analog joystick input pin
AnalogIn joyHor(p18);                   // Horizontal analog joystick input pin
DigitalIn select(p17);                  // Pushbutton on the joystick (currently unused)

int main()
{
    printf("Start\n");
    int snakeUpdateCounter = 0; // keeps track of when we should move Snake
    cube.turnOnLed(snakeStartRow, snakeStartCol, 0); // Starts the snake at Row 0 Col 0
    updateFoodLed();                                 // Lights up the food LED
    printf("Setup Complete\n");
    bool gameover = false;                           // Is set to true when the game is over and keeps the LEDs blinking

    while(1) {
        // Update snake position if we are greater than the set movement speed
        if(snakeUpdateCounter++ >= mySnake.movementSpeed) {
            snakeUpdateCounter = 0;
            if(mySnake.moveSnake(&cube) || gameover) {
                gameover = true;
                cube.blink();
            }
            // See if the snake is on the Food's LED
            if(checkForSnakeEating()) {
                myFood.moveFood(rand() % 5, rand() % 5);
                updateFoodLed();
            }
        }
        updateDirectionInput();
        wait(.1);
    }

}

// Return true if the snake is on a food, false otherwise
bool checkForSnakeEating()
{
    return mySnake.isEating(myFood.currRow, myFood.currCol);
}

// Update the food's loction
void updateFoodLed()
{
    cube.turnOnLed(myFood.currRow, myFood.currCol, 0);
    printf("FOOD: Row: %d Col: %d\n", myFood.currRow, myFood.currCol);
    if(mySnake.movementSpeed > 0){
        mySnake.movementSpeed--;
    }
}

// Updates the direction the snake is traveling based on the analog controller's input
void updateDirectionInput(){
   float verValue, horValue;
    int pushed;
    select.mode(PullUp);
        verValue = joyVer;
        horValue = joyHor;
        pushed = select;
        if(horValue < .4){
            mySnake.movementDirection = Left;
            //printf("Left\n");
        }
        else if(horValue > .6){
            mySnake.movementDirection = Right;
            //printf("Right\n");
        }
        if(verValue < .4){
            mySnake.movementDirection = Down;
            //printf("Down\n");
        }
        else if(verValue > .6){
            mySnake.movementDirection = Up;
            //printf("Up\n");
        }
}
Import programLab3-SnakeGame
Snake game for a 5x5 LED matrix
The snake itself is distinguished from the pellets because the snake is moving. There is a counter, called snakeUpdateCounter which counts up to a value, mySnake.movementSpeed, in order to determine how quickly the snake moves. The food is moved with the simple rand() function and does not currently use a seed, meaning the order of food location does not change. When the Snake runs into a wall or itself, the LEDs will all blink until the mbed is reset.
Current Problems
The PCB mounting holes were made a little too small, and the PCB material is rather cheap and difficult to solder. Thus, one of the LEDs isnot fully connected, which is our next step. The game itself could be further improved as well to keep track of score, allow for newgames without a mbed reset, and a better randomization of the food.
Next Steps
After the minor fixes mentioned above are completed, the objective will turn to adding 4 more layers on top of the current one using the same technique mentioned in Section 1. This will create a 5x5x5 cube, meaning PORT_B will very likely be needed for additional pins, as well as additional inputs to move the snake along the Z-axis as well as the X and Y.
Please log in to post comments.
